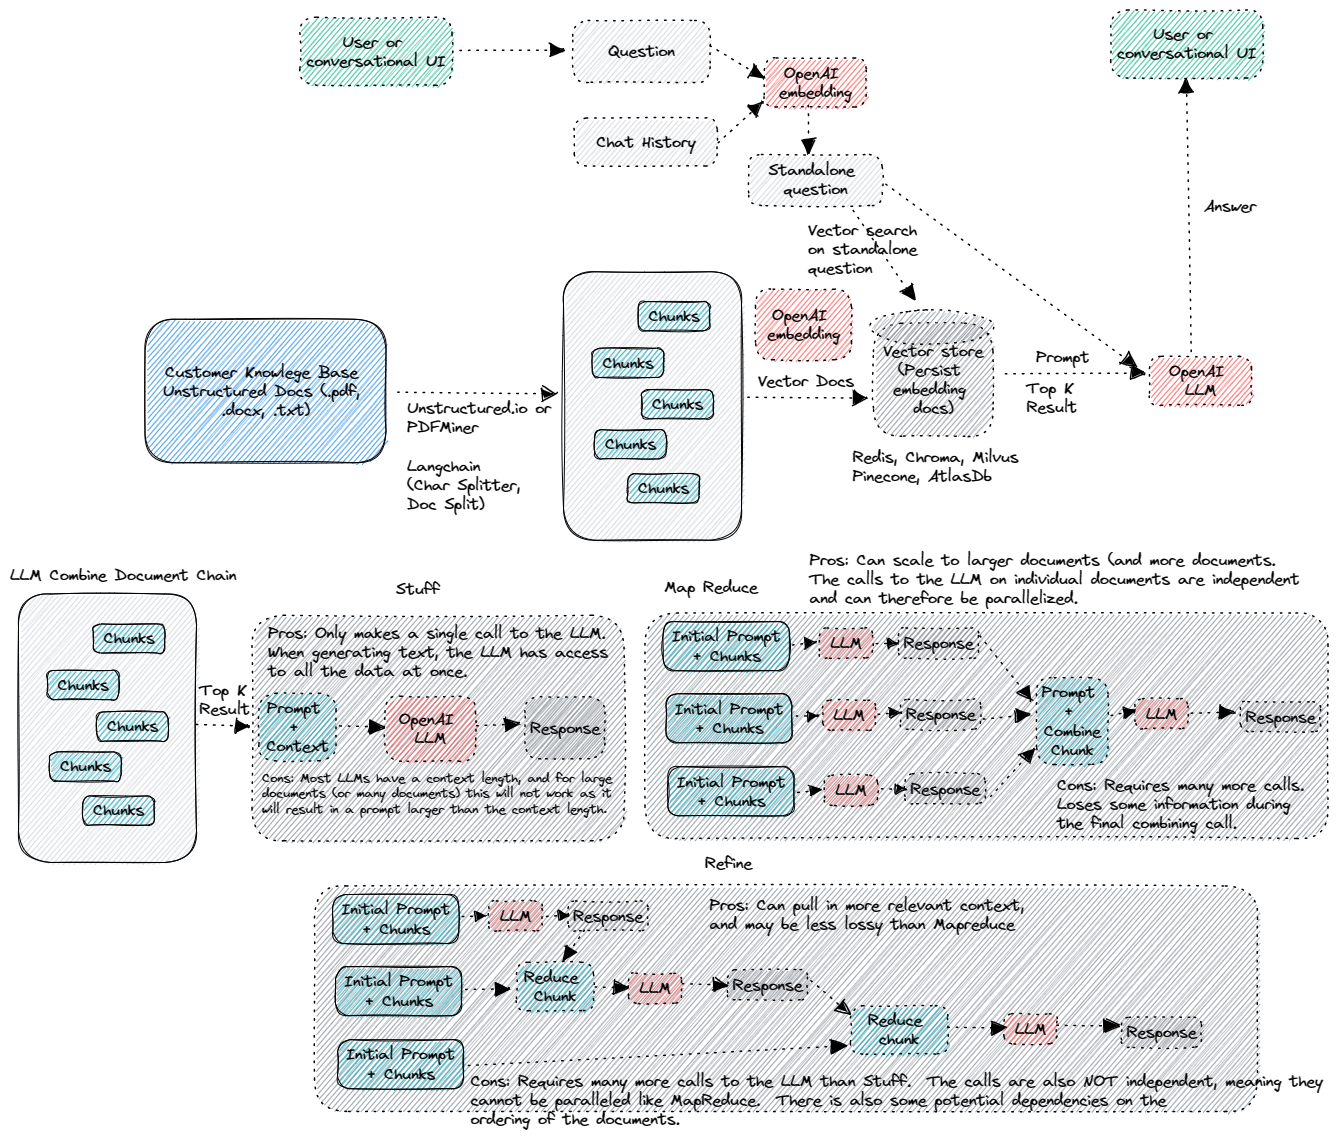
This sample demonstrates a few approaches for creating ChatGPT-like experiences over your own data. It uses Azure OpenAI Service to access the ChatGPT model (gpt-35-turbo and gpt3), and vector store (Pinecone, Redis and others) or Azure cognitive search for data indexing and retrieval.
The repo provides a way to upload your own data so it's ready to try end to end.
- Upload (PDF/Text Documents as well as Webpages)

- Chat

- Q&A interfaces

- Explores various options to help users evaluate the trustworthiness of responses with citations, tracking of source content, etc.
- Shows possible approaches for data preparation, prompt construction, and orchestration of interaction between model (ChatGPT) and retriever
- Integration with Cognitive Search and Vector stores (Redis, Pinecone)
NOTE In order to deploy and run this example, you'll need an Azure subscription with access enabled for the Azure OpenAI service. You can request access here.
- Azure Developer CLI
- Python 3+
- Node.js
- Git
- Azure Functions Extension for VSCode
- Azure Functions Core tools
- Powershell 7+ (pwsh) - For Windows users only. Important: Ensure you can run
pwsh.exefrom a PowerShell command. If this fails, you likely need to upgrade PowerShell.
- Deploy the required Azure Services - Using Automated Deployment or Manually following minimum required resources
- az deployment sub create --location eastus --template-file main.bicep --parameters prefix=astoai resourceGroupName=astoai location=eastus
- OpenAI service. Please be aware of the model & region availability documented [here] (https://learn.microsoft.com/en-us/azure/cognitive-services/openai/concepts/models#model-summary-table-and-region-availability)
- Storage Account and a container
- One of the Document Store
- Git clone the repo
- Open the cloned repo folder in VSCode
- Open new terminal and go to /app/frontend directory
- Run
npm installto install all the packages - Go to /api/Python directory
- Run
pip install -r requirements.txtto install all required python packages - Copy sample.settings.json to local.settings.json
- Update the configuration (Minimally you need OpenAi, one of the document store, storage account)
- Start the Python API by running
func host start - Open new terminal and go to /api/backend directory
- Copy env.example to .env file and edit the file to enter the Python localhost API and the storage configuration
- Run py(or python) app.py to start the server.
- Open new terminal and go to /api/frontend directory
- Run npm run dev to start the local server
Once in the web app:
- Try different topics in chat or Q&A context. For chat, try follow up questions, clarifications, ask to simplify or elaborate on answer, etc.
- Explore citations and sources
- Click on "settings" to try different options, tweak prompts, etc.
- Revolutionize your Enterprise Data with ChatGPT: Next-gen Apps w/ Azure OpenAI and Cognitive Search
- Azure Cognitive Search
- Azure OpenAI Service
Adapted from the Azure OpenAI Search repo at OpenAI-CogSearch
