Requirements (install using pip install <package>):
-
paddlepaddle>=2.0.1 (paddlepaddle-gpu>=2.0.1 if you have installed cuda)
-
visualdl
-
lmdb
If you haven't downloaded pretrained PaddlePaddle models with '.pdl' suffix to $XDG_CACHE_HOME, you need to install PyTorch 1.6 for downloading PyTorch pretrained models and converting them to PaddlePaddle models.
Now you can train or sample DDIM.
If you already have the converted PaddlePaddle pretrained models or you have installed PyTorch, you can try to sample the image using the pretrained model with the following command:
python main.py --config {DATASET}.yml --exp {PROJECT_PATH} --doc {MODEL_NAME} --sample --use_pretrained --sample --sequence --timesteps {STEPS} --eta {ETA} --ni
For example:
XDG_CACHE_HOME=<PLACE_TO_STORE_THE_PRETRAINED_MODEL> python main.py --config cifar10.yml --exp exp --doc log --use_pretrained --sample --sequence --timesteps 25 --eta 0 --ni
You should store the converted pretrained model under <PLACE_TO_STORE_THE_PRETRAINED_MODEL>/diffusion_models_converted/.
In this example, the folder ema_diffusion_cifar10_model/ under the directory <PLACE_TO_STORE_THE_PRETRAINED_MODEL>/diffusion_models_converted/ should contain this file model-790000.ckpt.pdl. Or if you have installed PyTorch, the command line will automatically download the PyTorch pretrained model model-790000.ckpt to ema_diffusion_cifar10_model/ and convert it to the file model-790000.ckpt.pdl.
If you don't set XDG_CACHE_HOME, then it will default to ~/.cache.
The following is the description of the original repo. Training and sampling are basically the same as those of the original repo.
Jiaming Song, Chenlin Meng and Stefano Ermon, Stanford
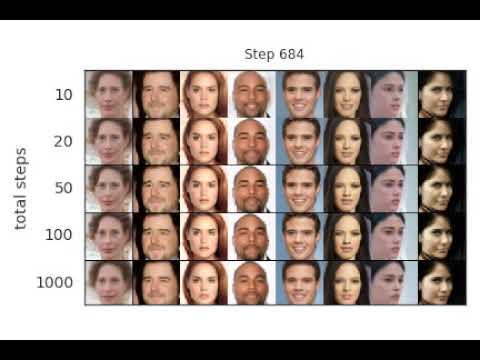
Implements sampling from an implicit model that is trained with the same procedure as Denoising Diffusion Probabilistic Model, but costs much less time and compute if you want to sample from it (click image below for a video demo):
The code has been tested on PyTorch 1.6.
Training is exactly the same as DDPM with the following:
python main.py --config {DATASET}.yml --exp {PROJECT_PATH} --doc {MODEL_NAME} --ni
python main.py --config {DATASET}.yml --exp {PROJECT_PATH} --doc {MODEL_NAME} --sample --fid --timesteps {STEPS} --eta {ETA} --ni
where
ETAcontrols the scale of the variance (0 is DDIM, and 1 is one type of DDPM).STEPScontrols how many timesteps used in the process.MODEL_NAMEfinds the pre-trained checkpoint according to its inferred path.
If you want to use the DDPM pretrained model:
python main.py --config {DATASET}.yml --exp {PROJECT_PATH} --use_pretrained --sample --fid --timesteps {STEPS} --eta {ETA} --ni
the --use_pretrained option will automatically load the model according to the dataset.
We provide a CelebA 64x64 model here, and use the DDPM version for CIFAR10 and LSUN.
If you want to use the version with the larger variance in DDPM: use the --sample_type ddpm_noisy option.
Use --interpolation option instead of --fid.
Use --sequence option instead.
The above two cases contain some hard-coded lines specific to producing the image, so modify them according to your needs.
@article{song2020denoising,
  title={Denoising Diffusion Implicit Models},
  author={Song, Jiaming and Meng, Chenlin and Ermon, Stefano},
  journal={arXiv:2010.02502},
  year={2020},
  month={October},
  abbr={Preprint},
  url={https://arxiv.org/abs/2010.02502}
}
This implementation is based on / inspired by:
- https://github.com/hojonathanho/diffusion (the DDPM TensorFlow repo),
- https://github.com/pesser/pytorch_diffusion (PyTorch helper that loads the DDPM model), and
- https://github.com/ermongroup/ncsnv2 (code structure).