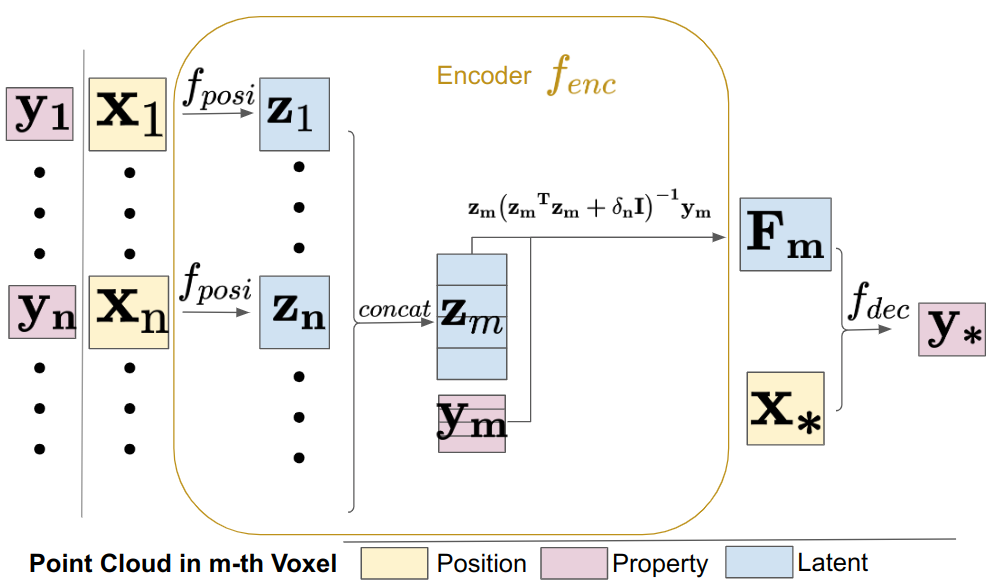
Universal encoder no need data train | Picture on the right is voxel grid for mapping
Therefore, it supports any mapping:
Table of Contents
Unfold this for installation
- Create env
conda create -n uni python=3.8
conda activate uni

conda install pytorch==1.12.1 torchvision==0.13.1 torchaudio==0.12.1 cudatoolkit=11.3 -c pytorch
pip install torch-scatter torch-sparse torch-geometric -f https://data.pyg.org/whl/torch-1.12.0+cu113.html
pip install ninja functorch==0.2.1 numba open3d opencv-python trimesh torchfile - install package
git clone https://github.com/Jarrome/Uni-Fusion.git && cd Uni-Fusion
# install uni package
python setup.py install
# install cuda function, this may take several minutes, please use `top` or `ps` to check
python uni/ext/__init__.py- train a uni encoder from nothing in 1 second
python uni/encoder/uni_encoder_v2.pyoptionally, you can install the [ORB-SLAM2](https://github.com/Jarrome/Uni-Fusion-use-ORB-SLAM2) that we use for tracking
cd external
git clone https://github.com/Jarrome/Uni-Fusion-use-ORB-SLAM2
cd [this_folder]
# this_folder is the absolute path for the orbslam2
# Add ORB_SLAM2/lib to PYTHONPATH and LD_LIBRARY_PATH environment variables
# I suggest putting this in ~/.bashrc
export PYTHONPATH=$PYTHONPATH:[this_folder]/lib
export LD_LIBRARY_PATH=$LD_LIBRARY_PATH:[this_folder]/lib

./build.sh && ./build_python.shWe provide a toy example to quick try our algorithm.
You can either python example/toy.py or code as following:
import torch
import numpy as np

from example.util import get_modules, get_example_data

device = torch.device("cuda", index=0)

# get mapper and tracker
sm, cm, tracker, config = get_modules(device)

# prepare data
colors, depths, customs, calib, poses = get_example_data(device)

for i in [0, 1]:
    # preprocess rgbd to point cloud
    frame_pose = tracker.track_camera(colors[i], depths[i], customs, calib, poses[i], scene = config.sequence_type)
    # transform data
    tracker_pc, tracker_normal, tracker_customs= tracker.last_processed_pc
    opt_depth = frame_pose @ tracker_pc
    opt_normal = frame_pose.rotation @ tracker_normal
    color_pc, color, color_normal = tracker.last_colored_pc
    color_pc = frame_pose @ color_pc
    color_normal = frame_pose.rotation @ color_normal if color_normal is not None else None

    # mapping pc
    sm.integrate_keyframe(opt_depth, opt_normal)
    cm.integrate_keyframe(color_pc, color, color_normal)

# mesh extraction
map_mesh = sm.extract_mesh(config.resolution, int(4e7), max_std=0.15, extract_async=False, interpolate=True)

import open3d as o3d
o3d.io.write_triangle_mesh('example/mesh.ply', map_mesh)
You will get a mesh looks like this:
Then
- All demo can be run with
python demo.py [config] - Mesh for color, style, infrad, semantic can be extracted with
python vis_LIM.py [config] - Rendering for RGB and Depth image can be extracted with
python example/render_w_LIM.py [config] [optionally traj with GT poses]
# download replica data
source scripts/download_replica.sh

# with gt pose
python demo.py configs/replica/office0.yaml

# with slam
python demo.py configs/replica/office0_w_slam.yaml
Then you can find results in output/replica/office0 where was specified in the [config] file:
$ ls output/replica/office0

surface.lim
color.lim
final_recons.ply
pred_traj.txt - in [scene_w_slam.yaml], we can choose 3 mode
| Usage | load_gt | slam |
|---|---|---|
| use SLAM track | False | True |
| use SLAM pred pose | True | True |
| use GT pose | True | False |
-
you can set
vis=Truefor online vis (Falseby default), which is more Di-Fusion. You can tap keyboard ',' for step and '.' for continue running with GUI -
LIM extraction for mesh
python vis_LIM.py configs/replica/office0.yaml
will generate a output/replica/office0/color_recons.ply
- LIM rendering given result LIMs
# with gt pose
python example/render_w_lim.py configs/replica/office0.yaml data/replica/office0/traj.txt

# otherwise
python example/render_w_lim.py configs/replica/office0_w_slam.yaml
This will creat a render folder under output/replica/office0 where was specified in the [config] file:
$ ls output/replica/office0

surface.lim
color.lim
final_recons.ply
pred_traj.txt
render/ # here contains rendered RGB and Depth imagesoffice0_custom.yaml contains all mapping you need
# if you need saliency
pip install transparent-background numba
# if you need style
cd external
git clone https://github.com/Jarrome/PyTorch-Multi-Style-Transfer.git
mv PyTorch-Multi-Style-Transfer style_transfer
cd style_transfer/experiments
bash models/download_model.sh
cd ../../../

# run demo
python demo.py configs/replica/office0_custom.yaml


# LIM extraction of custom property shown on mesh
python vis_LIM.py configs/replica/office0_custom.yamlThis Text-Visual CLIP is from OpenSeg
# install requirements
pip install tensorflow==2.5.0
pip install git+https://github.com/openai/CLIP.git

# download openseg ckpt
# can use `sudo snap install google-cloud-cli --classic` to install gsutil
gsutil cp -r gs://cloud-tpu-checkpoints/detection/projects/openseg/colab/exported_model ./external/openseg/

python demo.py configs/replica/office0_w_clip.yaml

# LIM extraction of semantic shown on mesh
python vis_LIM.py configs/replica/office0_w_clip.yamlWe provide the script to extract RGB, D and IR from azure.mp4: azure_process.
The captured apartment data stores here.
- Upload the uni-encoder src (Jan.3)
- Upload the env script (Jan.4)
- Upload the recon. application (By Jan.8)
- Upload the used ORB-SLAM2 support (Jan.8)
- Upload the azure process for RGB,D,IR (Jan.8)
- Upload the seman. application (Jan.14)
- Upload the Custom context demo (Jan.14)
- Toy example for fast essembling Uni-Fusion into custom project
- Extraction of Mesh w properties from Latent Implicit Maps (LIMs) (Jun.26) [Sry for the delay... Yijun just get some free time...]
- Rendering of RGB and Depth images from Latent Implicit Maps (LIMs) (Jun.26)
- Our current new project SceneFactory has a better option, I plan to replace this ORB-SLAM2 with that option after open-release that work.
If you find this work interesting, please cite us:
@article{yuan2024uni,
  title={Uni-Fusion: Universal Continuous Mapping},
  author={Yuan, Yijun and N{\"u}chter, Andreas},
  journal={IEEE Transactions on Robotics},
  year={2024},
  publisher={IEEE}
}


