📢
pyllamais a hacked version ofLLaMAbased on original Facebook's implementation but more convenient to run in a Single consumer grade GPU.
The Hugging Face's LLaMA implementation is available at
pyllama.hf.
In a conda env with pytorch / cuda available, run
pip install pyllama -U
🐏 If you have installed llama library from other sources, please uninstall the previous llama library and use
pip install pyllama -Uto install the latest version.
In order to download the checkpoints and tokenizer, fill this google form
Once your request is approved, you will receive links to download the tokenizer and model files.
Edit the download.sh script with the signed url provided in the email to download the model weights and tokenizer.
-
- pyllama
There is another high-speed way to download the checkpoints and tokenizers. There are four models(7B,13B,30B,65B) available. To download all of them, run:
python -m llama.downloadTo download only the 7B model files to your current directory, run:
python -m llama.download --model_size 7BTo download only the 7B and 30B model files to folder /tmp/pyllama_data, run:
python -m llama.download --model_size 7B,30B --folder /tmp/pyllama_dataThe help doc is:
$python -m llama.download --help
usage: download.py [-h] [--model_size MODEL_SIZE] [--folder FOLDER]

optional arguments:
  -h, --help            show this help message and exit
  --model_size MODEL_SIZE
                        The size of the models that you want to download. A comma separated
                        string of any of "7B", "13B", "30B", "65B". Totally 219G disk space
                        is needed to download them all. If you only want to download the 7B
                        model, just put "7B" here.
--folder FOLDER The target folder for the download files- Sample Screenshot
-
- Bittorrent
🔥 In order to download the checkpoints and tokenizer, use this BitTorrent link: "magnet:?xt=urn:btih:ZXXDAUWYLRUXXBHUYEMS6Q5CE5WA3LVA&dn=LLaMA".
pyllama support quantization of 2/3/4/8-bit so that you can run model in a 4G memory GPU.
You need to run
export HUGGING_FACE_HUB_TOKEN=XXXto be able to access Hugging Face's data. You also need to install gptq with commandpip install gptq.
python -m llama.llama_quant --help
usage: llama_quant.py [-h] [--ckpt_dir CKPT_DIR] [--tokenizer_path TOKENIZER_PATH]
                      [--seed SEED] [--nsamples NSAMPLES] [--percdamp PERCDAMP]
                      [--nearest] [--wbits {2,3,4,8,16}] [--groupsize GROUPSIZE]
                      [--save SAVE] [--load LOAD] [--benchmark BENCHMARK] [--check]
                      [--cuda CUDA] [--eval]
                      {wikitext2,ptb,c4}

positional arguments:
  {wikitext2,ptb,c4}    Where to extract calibration data from.

optional arguments:
  -h, --help            show this help message and exit
  --ckpt_dir CKPT_DIR
  --tokenizer_path TOKENIZER_PATH
  --seed SEED           Seed for sampling the calibration data.
  --nsamples NSAMPLES   Number of calibration data samples.
  --percdamp PERCDAMP   Percent of the average Hessian diagonal to use for dampening.
  --nearest             Whether to run the RTN baseline.
  --wbits {2,3,4,8}  bits for quauntization
  --groupsize GROUPSIZE
                        Groupsize to use for quantization; default uses full row.
  --save SAVE           Save quantized checkpoint under this name, eg pyllama-7B4b.pt.
  --load LOAD           Load quantized model.
  --benchmark BENCHMARK
                        Number of tokens to use for benchmarking.
  --check               Whether to compute perplexity during benchmarking for verification.
  --cuda CUDA           GPU device string, 'cuda:0' by default.
--eval Evaluate the model with dataset wikitext2, ptb and c4- Quantize 7B model to 8-bit
python -m llama.llama_quant decapoda-research/llama-7b-hf c4 --wbits 8 --save pyllama-7B8b.pt- Quantize 7B model to 4-bit with groupsize 128 (the recommended setup 🔥)
python -m llama.llama_quant decapoda-research/llama-7b-hf c4 --wbits 4 --groupsize 128 --save pyllama-7B4b.pt- Quantize 7B model to 2-bit
python -m llama.llama_quant decapoda-research/llama-7b-hf c4 --wbits 2 --save pyllama-7B2b.ptThe download links for quantized LLaMA files are below:
- 7B
| Quant Type | Size | Link | MD5 | Loss | Password |
|---|---|---|---|---|---|
| 2-bit | 2160484475 | 🔗 | 4c7215d28c1f650218c43fc46402cec5 | - | 8g9d |
| 3-bit | - | - | - | - | - |
| 4-bit | 3779485819 | - | cce9a3b522ddf5c011ee0174b2ff3dfb | - | - |
| 8-bit | 7017493231 | - | 2648b09597cf8f9e0d1a04cb70b71cab | - | - |
It took me 2 hours 40 mins to quantize the 65B model to 4bit. The file size is reduced from 122GB to 32GB.
The following suggestions are recommended for LLM qunatization:
- By default, use 4-bit quantization for LLM inference as it offers the total model bits and zero-shot accuracy trade-offs.
- Use a block size of 128 or lower to stabilize 4-bit quantization and improve zero-shot performance.
- Use a floating point or quantile quantization data type. In some cases, integer data types might be preferable to improve inference latency depending on the implementation and hardware support.
Set the environment variables CKPT_DIR as your llamm model folder, for example /llama_data/7B, and TOKENIZER_PATH as your tokenizer's path, such as /llama_data/tokenizer.model.
And then run the following command:
python inference.py --ckpt_dir $CKPT_DIR --tokenizer_path $TOKENIZER_PATHThe following is an example of LLaMA running in a 8GB single GPU.
With quantization, you can run LLaMA with a 4GB memory GPU.
- pyllama can run 7B model with 6GB GPU memory.
Example:
python quant_infer.py --wbits 4 --load pyllama-7B4b.pt -- text "..." --max_length 24 --cuda cuda:0
- pyllama can run 7B model with 3.2GB GPU memory.
Example:
python quant_infer.py --wbits 2 --load pyllama-7B4b.pt -- text "..." --max_length 32
-
To load KV cache in CPU, run
export KV_CAHCHE_IN_GPU=0in the shell. -
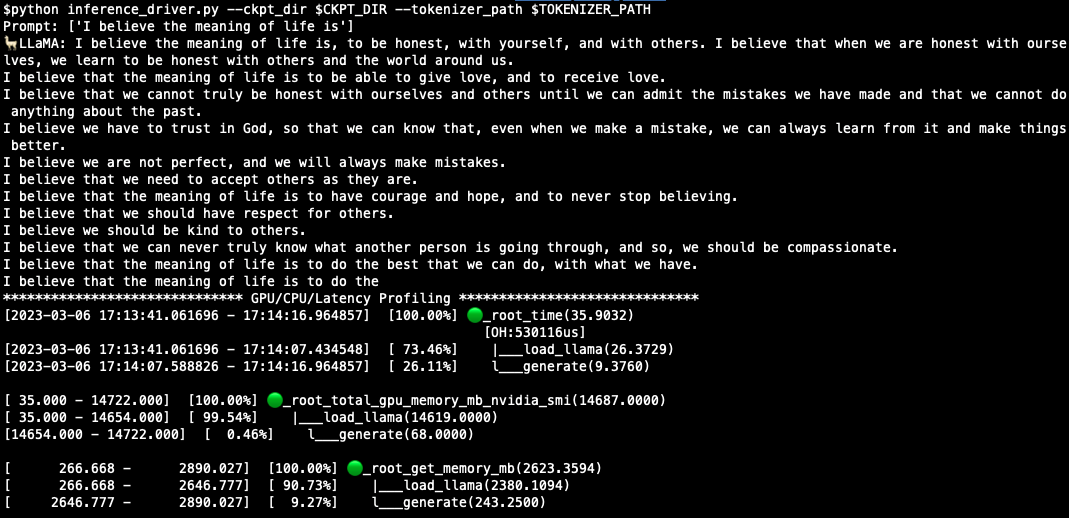
To profile CPU/GPU/Latency, run:
python inference_driver.py --ckpt_dir $CKPT_DIR --tokenizer_path $TOKENIZER_PATHA sample result is like:
- Tune
max_seq_lenandmax_batch_sizeto reduce memory consumption to be able to run in GPU. Refer to: this post!
$ cd apps/gradio
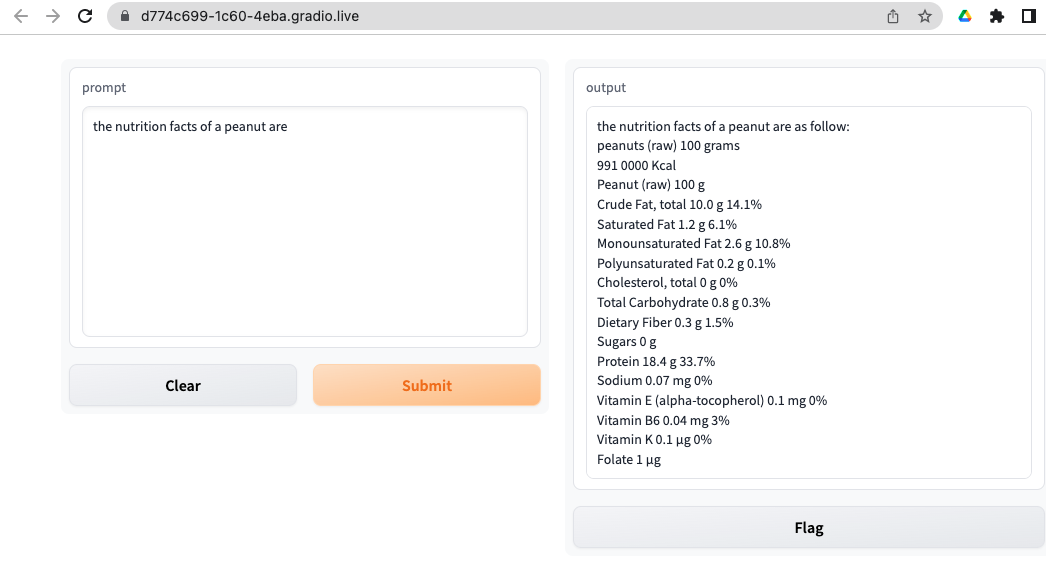
$ python webapp_single.py  --ckpt_dir $CKPT_DIR --tokenizer_path $TOKENIZER_PATH
You should see something like this in your browser:
The following command will start a flask web server:
$ cd apps/flask
$ python web_server_single.py --ckpt_dir $CKPT_DIR --tokenizer_path $TOKENIZER_PATHTo use the original META's model parallel, please set environment variable PYLLAMA_META_MP like:
export PYLLAMA_META_MP=1
With this environment variable set, you can import llama and the original META version's llama will be imported.
The provided example.py can be run on a single or multi-gpu node with torchrun and will output completions for two pre-defined prompts. Using TARGET_FOLDER as defined in download.sh:
torchrun --nproc_per_node MP example.py --ckpt_dir $TARGET_FOLDER/model_size \
  --tokenizer_path $TARGET_FOLDER/tokenizer.model
Different models require different MP values:
| Model | MP |
|---|---|
| 7B | 1 |
| 13B | 2 |
| 30B | 4 |
| 65B | 8 |
There are two steps to run LLaMA in multi-GPU environment.
- Convert original LLaMA model
$python -m llama.convert_llama --help
usage: convert_llama.py [-h] [--ckpt_dir CKPT_DIR] [--tokenizer_path TOKENIZER_PATH]
                        [--model_size {7B,13B,30B,65B}] [--output_dir OUTPUT_DIR]
                        [--max_batch_size MAX_BATCH_SIZE] [--to {hf,fb}]

optional arguments:
  -h, --help            show this help message and exit
  --ckpt_dir CKPT_DIR
  --tokenizer_path TOKENIZER_PATH
  --model_size {7B,13B,30B,65B}
  --output_dir OUTPUT_DIR
                        Location to write HF model and tokenizer
  --max_batch_size MAX_BATCH_SIZE
--to {hf,fb}- Run with HF's accelerate with multiple GPUs
$python -m llama.llama_multigpu --help
usage: llama_multigpu.py [-h] [--state_dict_dir STATE_DICT_DIR] [--model_size {7B,13B,30B,65B}]

optional arguments:
  -h, --help            show this help message and exit
  --state_dict_dir STATE_DICT_DIR
--model_size {7B,13B,30B,65B}With Standford Alpaca Instruction-Following Dataset
- Tokenization
- Finetuning
- Efficient FT
- Meta
- Hugging Face
https://github.com/facebookresearch/llama/blob/main/llama/model.py#LL127C27-L127C27
See MODEL_CARD.md
See the LICENSE file.


