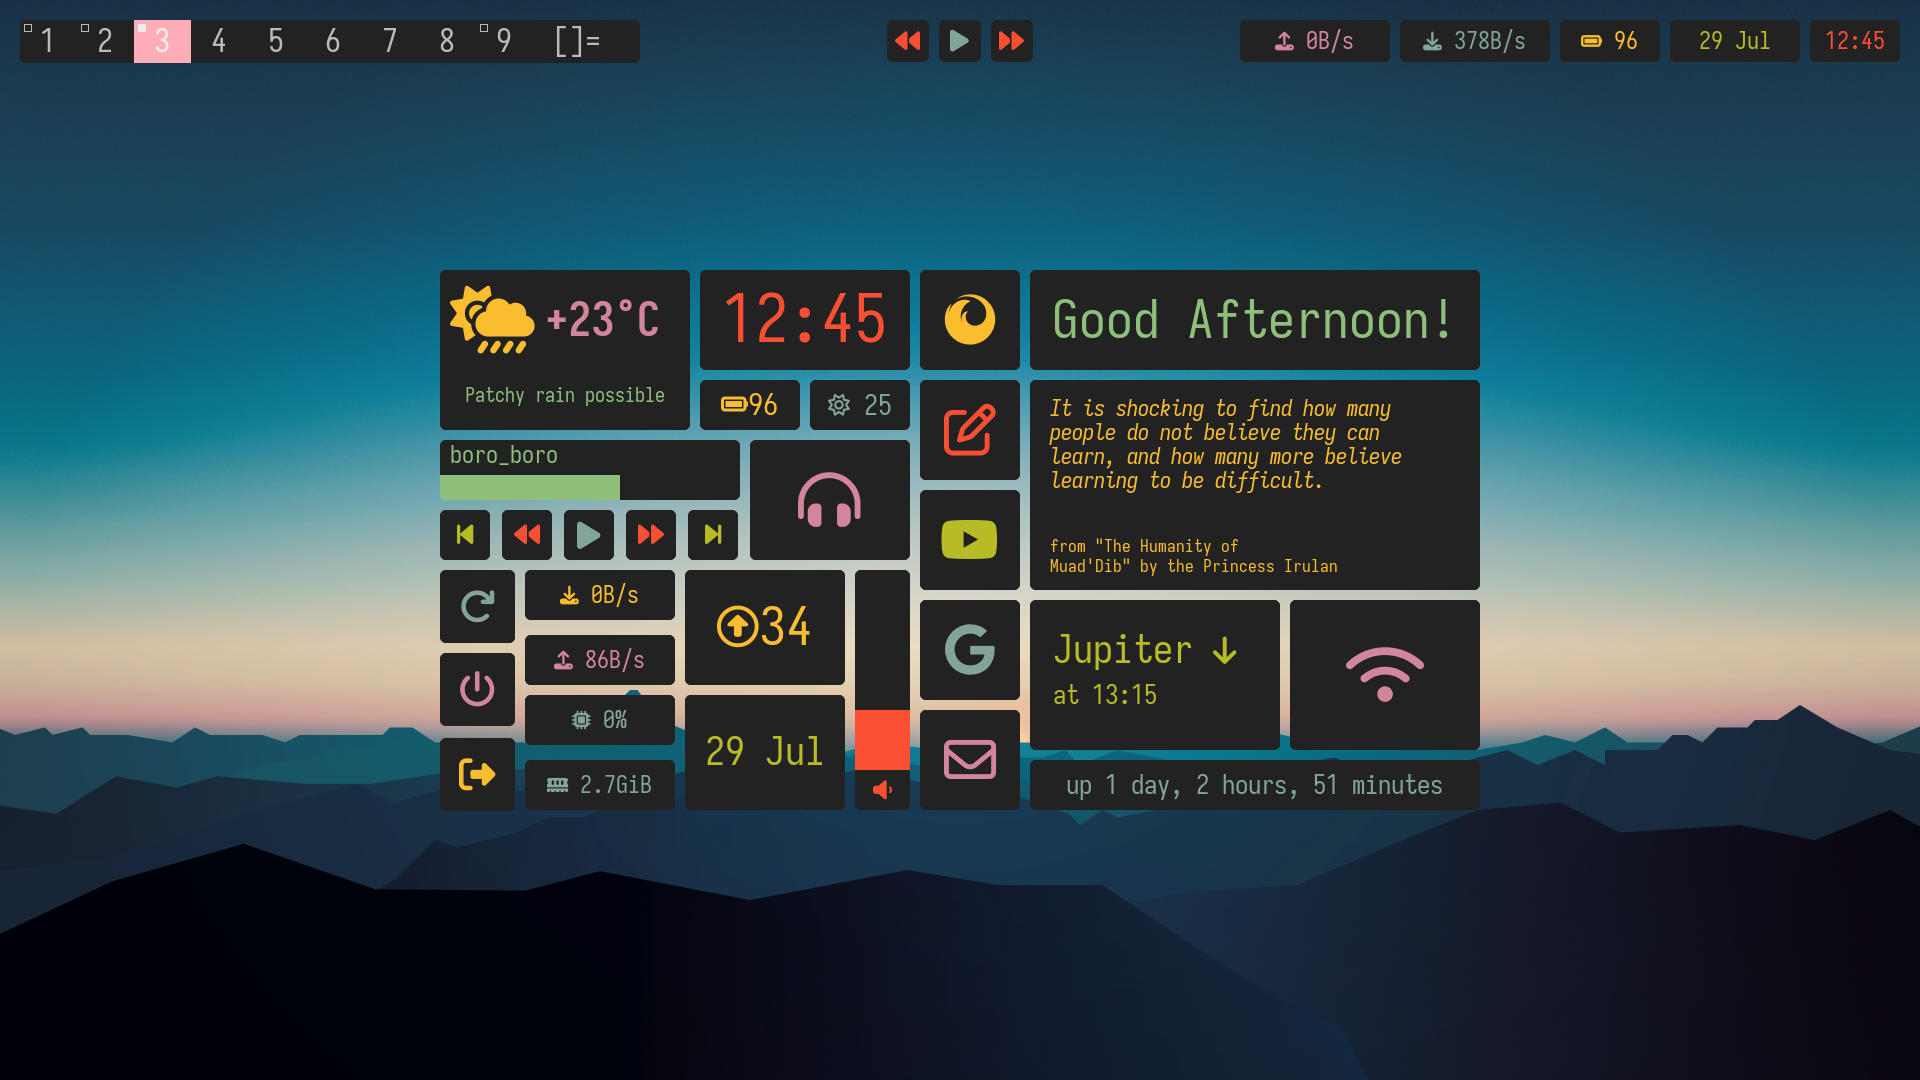
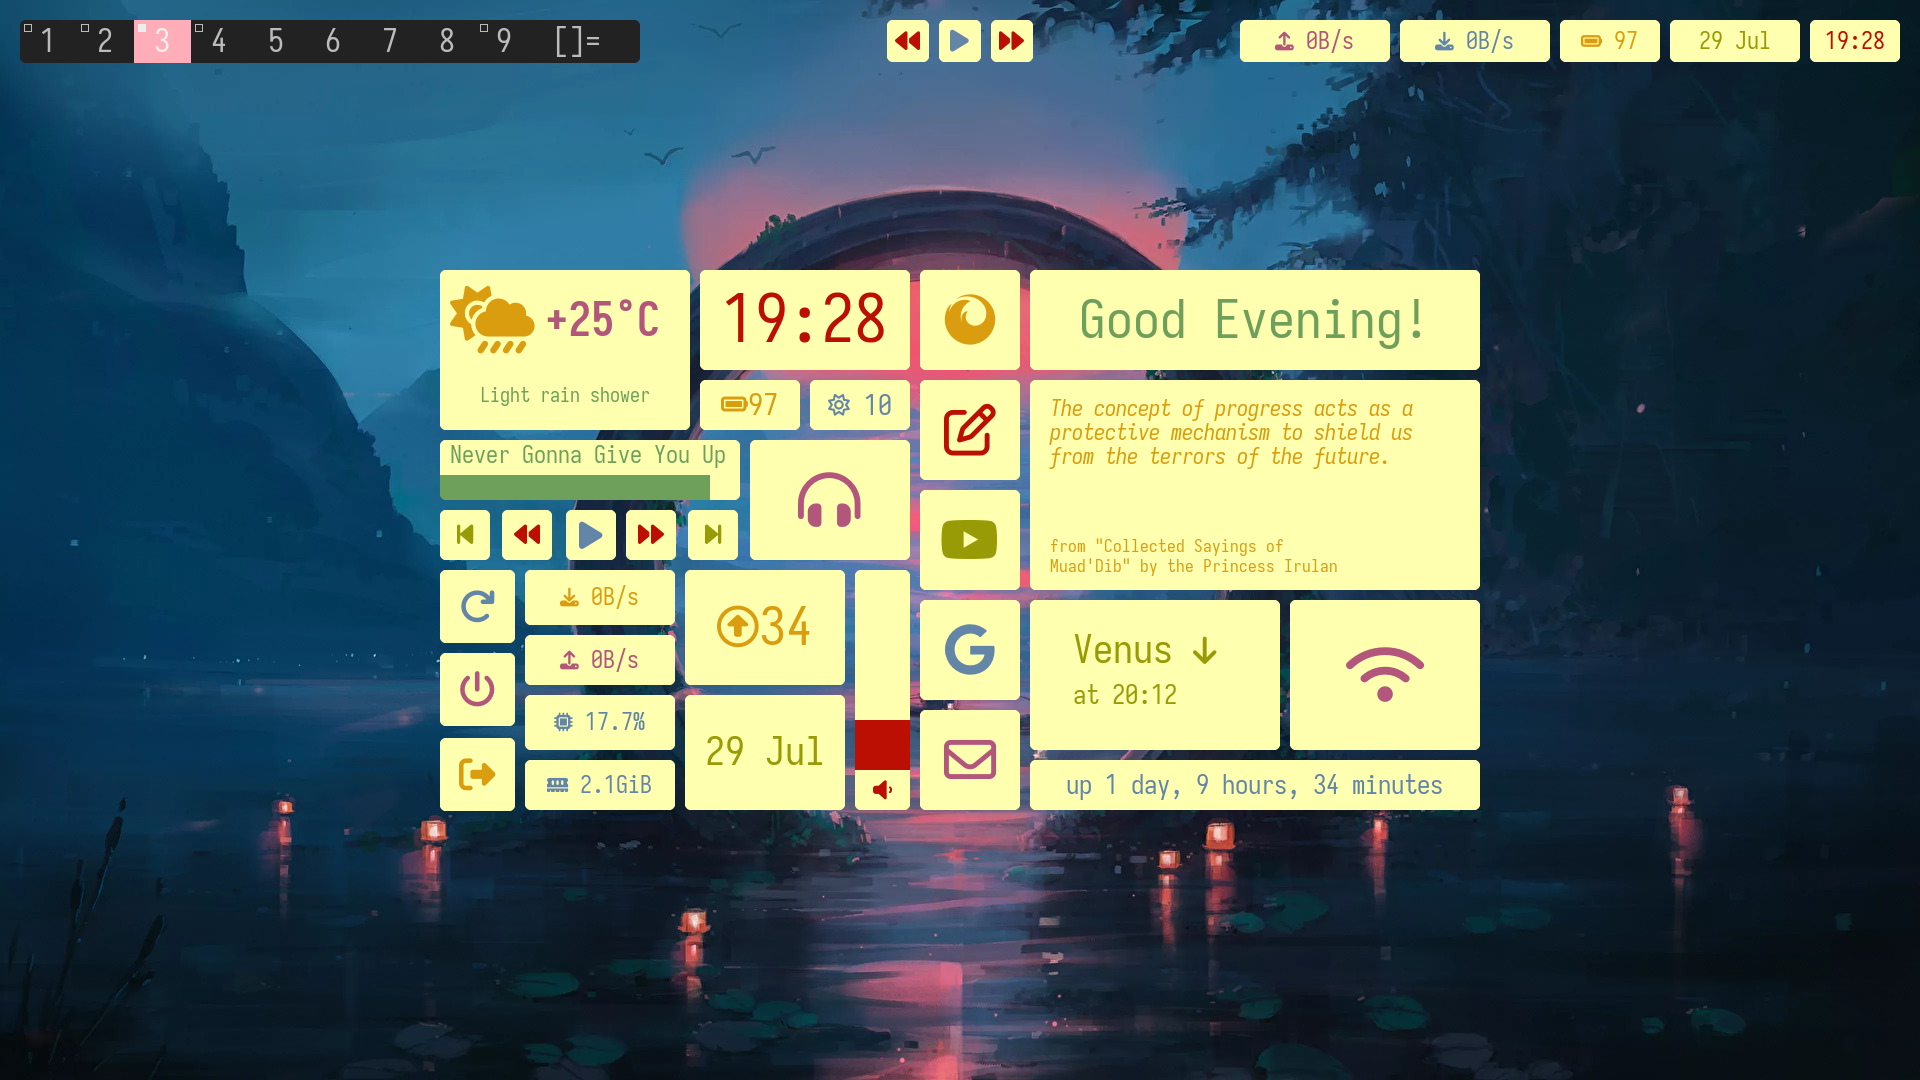
sxw is a collection of simple C programs that you can use to create pretty widget screens or status bars. Like this!  . Created mainly for
 dwm, sxw aims to be as light as possible (so as to run on my potato without lag). It also aims to have as few dependencies as possible. Only xorg and certain xorg developemnt files are required by sxw as dependencies. It is (clearly) very heavily inspired by suckless software. (I have actually taken all the text rendering code from dmenu).
Before installing it you will need some xorg development files. Install these packages according to your system.
- Arch
base-devel libx11 libxft libxinerama freetype2 fontconfig - Debian
build-essential libx11-dev libxft-dev libxinerama-dev libfreetype6-dev libfontconfig1-dev - Void
base-devel libX11-devel libXft-devel libXinerama-devel freetype-devel fontconfig-devel
Just clone this repo onto your machine and compile and install it.
git clone https://github.com/MrGizmo123/sxw
cd sxw
sudo make all
This will compile all the files into executables, it will not put them in /usr/bin so they wont be in the shells PATH. You can just copy all the executables in the bin folder info /usr/bin if that’s what you want.
This requires fonts iosevka and Font Awesome 6 to be installed on the system. iosevka should be available through your package manager, Font Awesome 6 may not be available on some distros <insert Debian stable meme>.
You will need to create the obj/ and bin/ directories in the main repo directory.
mkdir bin objThe script scripts/startw contains a layout (the one from the image). To start it simply run the startw script. There is also script/startbar which will start the status bar seen in the image.
Both scripts/startw and scripts/startbar contain a variable called PWD, that must be set to the absolute path of the repo on your machine. For example, I have it set to ~~/projects/simple_x_widgets~. This is so that these scripts can be called at startup (basically in your ~~/.xinitrc~).
scripts/startw 2>/dev/nullor
scripts/startbar 2>/dev/nullYour window manager must have a rule that
- Allows windows with class
widgetto float - Allows windows with class
widgetto be borderless
(Note that this is not required for the status bar, only the control panel)
To start the status bar, simply run scripts/startbar
Some widgets require some commands to be available, they are given here:
- weather -
curl - volume -
pactl(package name is usuallypulseaudio-utils) - updates - This requires that you change the code in
startwto work with your package manager, the default is forxbps(Void GNU/Linux) - brightness -
xbacklight - music widgets -
mpdandmpc - network -
ifstat(package name is usuallyiproute2) - battery - check the path for your device. It is something like
/sys/class/power_supply/BAT0/capacity
The rounded corners seen the screenshots are due to the compositor (picom in this case).
The default setup is made for a 1920x1080 screen. It will look off centered and weird on other sizes. A helper script: scripts/resizer is given. Resizer is used as follows
cd scripts
./resizer [original width] [original height] [new width] [new height] startw > startw_resized
chmod +x startw_resized
Here the original width and height will be 1920 and 1080, and the new width and new height will be the dimensions of your screen. This will create a script called startw_resized(name doesn’t really matter). startw_resized will then be adjusted to the size of your screen.
To resize the status bar, simply replace ‘startw’ with ‘startbar’ and ‘startw_resized’ to ‘startbar_resized’
sxw is all about customization! When creating you own layout, you will be using two types of widgets the most:
This is a widget that acts as a button. It will run a certain command when clicked. That is all. You can specify its position, width, height (all in pixels), font-size and display-string and command. The display-string can (and usually does) contain icons using fontawesome. command is obviously the shell command that runs when it is clicked. If the command ends up too complicated, then just create a shell script file and put that as the command. The contents of an iconbutton cannot change
The command is:
bin/iconbutton [xpos] [ypos] [width] [height] [override-redirect] [textsize] [text] [color] [command]The color is an integer from 0 to 6 (can be more but you will have to put more entries in config.h) which is an index into the colorscheme which is set in src/config.h
The override-redirect option is either 0 or 1, if it is 1, then the window completely disregards the window manager. This is used for all the widgets in the status bar which must stay on screen all the time. If its 0, then the WM will be able to control it.
This is a widget which displays the output of a given command. The contents are updated after a user specified amount of time. Again, you can specify its position, width, height (all in pixels). font-size and command. The command must output one line when called and exit. You also can (and indeed must) specify an update-time this is the time (in seconds) before the infowidget updates its contents
The command is:
bin/infowidget [xpos] [ypos] [width] [height] [override-redirect] [textsize] [color] [update-time] [command]These are custom widgets that do things that are more complicated than the generic iconbutton and infowidget. These include:
- brightness - controls the screen brightness using
xbacklight(controlled by scrolling on it) - volume - a volume slider (controlled by scrolling on it)
- weather - fetches weather from wttr.in
- quotes - displays random quote from
data/quotes.txt - planets - displays the next nearest rising or setting time of the Mercury, Venus, Mars, Jupiter, Saturn. Reads data from file
data/rts-data(Calculated using Stellarium, you will need to recalculate this to match your location) - mpdinfo - displays name of song playing and shows a(non interactive) progress bar
- mpdplay - just a playbutton
To start them, run the following, the position, width and height are in pixels, the origin is at the top left of the screen
bin/<widget> [xpos] [ypos] [width] [height] [override-redirect] [textsize]First before doing this, think if you can break what you are trying to acheive into smaller simpler parts. Most functionality can be acheived with just iconbutton and infowidget, this is preferrable as it is much faster and easier to do (Unix Philosophy!).
If you absolutely cannot do something with pre-existing widgets, you can use the crw script to create a new blank widget (from template.c.t) and add it to the Makefile. After running
./crw <your widget name>You can start editing src/<your widget name>. See the code for other widgets to get an idea of how to do things, there’s only (mainly) 3 new functions:
void sh(const char* cmd, char* output, int output_size);
void drw_rect(Drw *drw, int x, int y, unsigned int w, unsigned int h, int filled, int invert);
int drw_text(Drw *drw, int x, int y, unsigned int w, unsigned int h, unsigned int lpad, const char *text, int invert);
Look at the code for other widgets to see how these are used in practice.
To change the color scheme, simply go into src/config.h, change the color color values in the array to whatever you want (or comment out the old values), save and run make all to recompile and the scheme will be applied
static const char* colors[SchemeLast][2] = {
        [SchemeRed]        = { "#fb4f33", "#222222"},
        [SchemeGreen]      = { "#b8bb26", "#222222"},
        [SchemeYellow]     = { "#fabd2f", "#222222"},
        [SchemeBlue]       = { "#83a598", "#222222"},
        [SchemePurple]     = { "#d3869b", "#222222"},
        [SchemeAqua]       = { "#8ec07c", "#222222"},
        [SchemeLightGrey]  = { "#ffffff", "#444444"}
};
Here is a sample light theme (AKA the devil)

static const char* colors[SchemeLast][2] = {
        [SchemeRed]        = { "#bb0f03", "#ffffb0"},
        [SchemeGreen]      = { "#989b06", "#ffffb0"},
        [SchemeYellow]     = { "#da9d0f", "#ffffb0"},
        [SchemeBlue]       = { "#6385a8", "#ffffb0"},
        [SchemePurple]     = { "#b3567b", "#ffffb0"},
        [SchemeAqua]       = { "#6ea05c", "#ffffb0"},
        [SchemeLightGrey]  = { "#ffffff", "#ffffb0"}
};