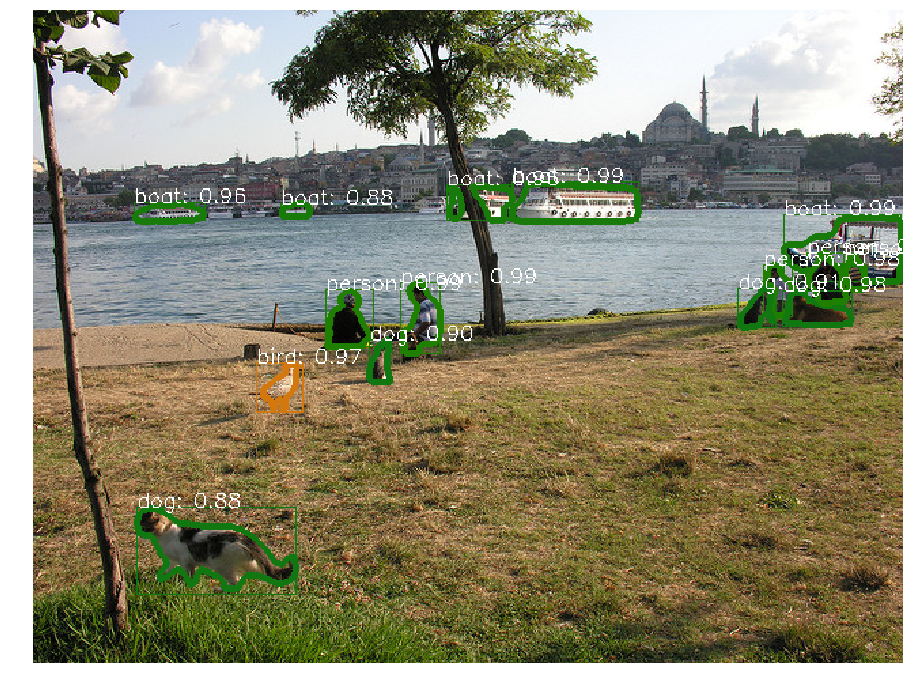
This project aims at providing the necessary building blocks for easily creating detection and segmentation models using PyTorch 1.0.
- PyTorch 1.0: RPN, Faster R-CNN and Mask R-CNN implementations that matches or exceeds Detectron accuracies
- Very fast: up to 2x faster than Detectron and 30% faster than mmdetection during training. See MODEL_ZOO.md for more details.
- Memory efficient: uses roughly 500MB less GPU memory than mmdetection during training
- Multi-GPU training and inference
- Batched inference: can perform inference using multiple images per batch per GPU
- CPU support for inference: runs on CPU in inference time. See our webcam demo for an example
- Provides pre-trained models for almost all reference Mask R-CNN and Faster R-CNN configurations with 1x schedule.
We provide a simple webcam demo that illustrates how you can use maskrcnn_benchmark for inference:
cd demo
# by default, it runs on the GPU
# for best results, use min-image-size 800
python webcam.py --min-image-size 800
# can also run it on the CPU
python webcam.py --min-image-size 300 MODEL.DEVICE cpu
# or change the model that you want to use
python webcam.py --config-file ../configs/caffe2/e2e_mask_rcnn_R_101_FPN_1x_caffe2.py --min-image-size 300 MODEL.DEVICE cpu
# in order to see the probability heatmaps, pass --show-mask-heatmaps
python webcam.py --min-image-size 300 --show-mask-heatmaps MODEL.DEVICE cpu
A notebook with the demo can be found in demo/Mask_R-CNN_demo.ipynb.
Check INSTALL.md for installation instructions.
Pre-trained models, baselines and comparison with Detectron and mmdetection can be found in MODEL_ZOO.md
We provide a helper class to simplify writing inference pipelines using pre-trained models.
Here is how we would do it. Run this from the demo folder:
from maskrcnn_benchmark.config import cfg
from predictor import COCODemo

config_file = "../configs/caffe2/e2e_mask_rcnn_R_50_FPN_1x_caffe2.yaml"

# update the config options with the config file
cfg.merge_from_file(config_file)
# manual override some options
cfg.merge_from_list(["MODEL.DEVICE", "cpu"])

coco_demo = COCODemo(
    cfg,
    min_image_size=800,
    confidence_threshold=0.7,
)
# load image and then run prediction
image = ...
predictions = coco_demo.run_on_opencv_image(image)For the following examples to work, you need to first install maskrcnn_benchmark.
You will also need to download the COCO dataset.
We recommend to symlink the path to the coco dataset to datasets/ as follows
We use minival and valminusminival sets from Detectron
# symlink the coco dataset
cd ~/github/maskrcnn-benchmark
mkdir -p datasets/coco
ln -s /path_to_coco_dataset/annotations datasets/coco/annotations
ln -s /path_to_coco_dataset/train2014 datasets/coco/train2014
ln -s /path_to_coco_dataset/test2014 datasets/coco/test2014
ln -s /path_to_coco_dataset/val2014 datasets/coco/val2014
You can also configure your own paths to the datasets.
For that, all you need to do is to modify maskrcnn_benchmark/config/paths_catalog.py to
point to the location where your dataset is stored.
You can also create a new paths_catalog.py file which implements the same two classes,
and pass it as a config argument PATHS_CATALOG during training.
python /path_to_maskrnn_benchmark/tools/train_net.py --config-file "/path/to/config/file.yaml"We use internally torch.distributed.launch in order to launch
multi-gpu training. This utility function from PyTorch spawns as many
Python processes as the number of GPUs we want to use, and each Python
process will only use a single GPU.
export NGPUS=8
python -m torch.distributed.launch --nproc_per_node=$NGPUS /path_to_maskrcnn_benchmark/tools/train_net.py --config-file "path/to/config/file.yaml"For more information on some of the main abstractions in our implementation, see ABSTRACTIONS.md.
This implementation adds support for COCO-style datasets. But adding support for training on a new dataset can be done as follows:
from maskrcnn_benchmark.structures.bounding_box import BoxList

class MyDataset(object):
    def __init__(self, ...):
        # as you would do normally

    def __getitem__(self, idx):
        # load the image as a PIL Image
        image = ...

        # load the bounding boxes as a list of list of boxes
        # in this case, for illustrative purposes, we use
        # x1, y1, x2, y2 order.
        boxes = [[0, 0, 10, 10], [10, 20, 50, 50]]
        # and labels
        labels = torch.tensor([10, 20])

        # create a BoxList from the boxes
        boxlist = BoxList(boxes, size=image.size, mode="xyxy")
        # add the labels to the boxlist
        boxlist.add_field("labels", labels)

        if self.transforms:
            image, boxlist = self.transforms(image, boxlist)

        # return the image, the boxlist and the idx in your dataset
        return image, boxlist, idx

    def get_img_info(self, idx):
        # get img_height and img_width. This is used if
        # we want to split the batches according to the aspect ratio
        # of the image, as it can be more efficient than loading the
        # image from disk
        return {"height": img_height, "width": img_width}
That's it. You can also add extra fields to the boxlist, such as segmentation masks
(using structures.segmentation_mask.SegmentationMask), or even your own instance type.
For a full example of how the COCODataset is implemented, check maskrcnn_benchmark/data/datasets/coco.py.
While the aforementioned example should work for training, we leverage the cocoApi for computing the accuracies during testing. Thus, test datasets should currently follow the cocoApi for now.
maskrcnn-benchmark is released under the MIT license. See LICENSE for additional details.
