本次实验中,你会搭建并训练一个用于图像分类的神经网络,并测试其表现效果。本实验共分为上下两个部分:
第一部分:搭建开发环境,学习pytorch的基础用法,并构建自己的神经网络
第二部分:训练神经网络,并使用tensorboard观察训练过程和测试结果
./checkpoint/:用于存储训练过程中在测试集上表现最好的那个模型
./data/:用于存储cifar10数据集
./installation_whls/:装着gpu版本的torch和torchvision的安装包(适配于python3.8)
./notebook_pics/:不用管
./notebook_tutorials/:装着用于演示pytorch基础用法的7个jupyter notebook
./runs/cifar10_result_1:存储着使tensorboard可以显示训练状态的支撑文件,届时启动tensorboard的命令也是在该目录下运行
MyNet.py:用于定义你自己的神经网络,同时也可以测试你刚刚定义的神经网络的运行结果(需要理解)
main.py:训练脚本,可手动指定学习率、batch size等参数(需了解大致逻辑,不需了解全部代码细节)
utils.py:一些针对本次实验项目代码的实用函数(不需了解)
-
打开anaconda prompt,使用conda创建一个新的环境,python版本指定为3.8(其他版本亦可,但不保证兼容性):
conda create -n convnet pip python=3.8,其中convnet为这个环境的名字,可以随意指定 -
激活环境:
conda activate convnet -
(3和4选一,如果电脑没有支持cuda的显卡,走3)安装pytorch的cpu版本:
pip install torch torchvision -
(3和4选一,如果电脑有能支持cuda的显卡,最好走4)安装CUDA10.2和CuDnn7.6.5,可以参考如下博客:
https://blog.csdn.net/bingo_liu/article/details/103224730
安装pytorch的gpu版本:
pip install torch==1.9.0+cu102 torchvision==0.10.0+cu102 -f https://download.pytorch.org/whl/torch_stable.html注:torch的安装命令来自于pytorch官网:https://pytorch.org/get-started/locally/
可以在这个网站上查询自己的显卡支不支持cuda:https://developer.nvidia.com/cuda-gpus#compute
如果下载太慢,可以直接安装.whl文件:
pip install 'torch-1.9.0+cu102-cp38-cp38-win_amd64.whl'pip install 'torchvision-0.10.0+cu102-cp38-cp38-win_amd64.whl' -
安装numpy和matplotlib:
pip install numpy matplotlib -
安装jypyter(用于学习pytorch基础用法):
conda install notebook ipykernelipython kernel install --user -
安装tensorboard(用于观测训练过程):
pip install tensorboard
详见存储于./notebook_tutorials/中的七个notebook
下面以目录路径为F:\experiment-convnet\为例,介绍一下打开方法:
- 打开anaconda prompt,激活在2.1中创建的convnet环境:
conda activate convnet - 输入命令
F:将prompt的工作目录转移到F盘 - 输入命令:
cd F:\experiment-convnet\notebook_tutorials,进入到存储着七个notebook的路径下 - 输入命令:
jupyter notebook打开notebook后,即可查阅所有的notebook
注意事项:
- 神经网络的输入尺寸为
[N, 3, 32, 32],其中,N为batchsize,可以指定为随意正整数;3为输入图片的通道数(RGB三通道);32x32为输入图片边长 - 神经网络的输出尺寸为
[10]或者[1,10] - 在脚本
MyNet.py中定义自己的神经网络结构,并运行MyNet.py,检查神经网络的输出尺寸是否合规
下面以构建一个两卷积层三全连接层的卷积神经网络为例,讲解一下如何使用MyNet.py脚本构建和验证神经网络:
方法一:
-
找到
class my_ConvNet(nn.Module):这个类,在初始化方法def __init__(self):中,编写如下代码:import torch.nn as nn import torch.nn.functional as F class Net(nn.Module): def __init__(self): super().__init__() self.conv1 = nn.Conv2d(in_channels=3, out_channels=6, kernel_size=(5,5), padding=0) self.pool = nn.MaxPool2d(2, 2) self.conv2 = nn.Conv2d(in_channels=6, out_channels=16, kernel_size=(5,5), padding=0) self.fc1 = nn.Linear(16 * 5 * 5, 120) self.fc2 = nn.Linear(120, 84) self.fc3 = nn.Linear(84, 10)
到了这一步,我们只是把我们需要用到的网络层“罗列”了出来,并给他们起了个名字,还没有真正地将它们拼接在一起。
-
编写
def forward(self):方法,真正地将输入→卷积网络网络中的每一层→输出串接在一起,形成一个真正的模型:import torch.nn as nn import torch.nn.functional as F class Net(nn.Module): def __init__(self): super().__init__() self.conv1 = nn.Conv2d(in_channels=3, out_channels=6, kernel_size=(5,5), padding=0) self.pool = nn.MaxPool2d(2, 2) self.conv2 = nn.Conv2d(in_channels=6, out_channels=16, kernel_size=(5,5), padding=0) self.fc1 = nn.Linear(16 * 5 * 5, 120) self.fc2 = nn.Linear(120, 84) self.fc3 = nn.Linear(84, 10) def forward(self, x): x = self.pool(F.relu(self.conv1(x))) # 这一层的输出尺寸是多少? x = self.pool(F.relu(self.conv2(x))) # 这一层的输出尺寸是多少? x = torch.flatten(x, 1) # flatten all dimensions except batch x = F.relu(self.fc1(x)) x = F.relu(self.fc2(x)) x = self.fc3(x) return x
-
通过函数
test()验证自己搭建好的模型:前向传播是否顺利无误、输出尺寸是否合规:def test(): net = my_ConvNet() print(net) x = torch.randn(1,3,32,32) y = net(x) print(y.size()) if __name__ == '__main__': test()
(注意该
test()不是class Net中的方法)
方法二:直接通过torch.nn.Sequential()将所有层拼接起来
-
找到
class my_ConvNet(nn.Module):这个类,在初始化方法def __init__(self):中,编写如下代码:class my_ConvNet(nn.Module): def __init__(self): super().__init__() self.network = nn.Sequential( nn.Conv2d(in_channels=3, out_channels=6, kernel_size=(5,5), padding=0), nn.ReLU(inplace=True), nn.MaxPool2d(2, 2), nn.Conv2d(in_channels=6, out_channels=16, kernel_size=(5, 5), padding=0), nn.ReLU(inplace=True), nn.MaxPool2d(2, 2), nn.Flatten(), nn.Linear(16 * 5 * 5, 120), nn.Linear(120, 84), nn.Linear(84, 10) ) def forward(self, x): x = self.network(x) return x
-
通过函数
test()验证自己搭建好的模型:前向传播是否顺利无误、输出尺寸是否合规:def test(): net = my_ConvNet() print(net) x = torch.randn(1,3,32,32) y = net(x) print(y.size()) if __name__ == '__main__': test()
在构建并验证了你的神经网络之后,即可着手开始训练你的神经网络了
打开main.py,设置学习率、训练batch size、测试batch size。方法有二:
**方法一:**直接修改代码,在main.py的114~120行
# Get arguments from command line
    parser = argparse.ArgumentParser(description='PyTorch CIFAR10 Training')
    parser.add_argument('--lr', default=0.1, type=float, help='learning rate')
    parser.add_argument('--training_bs', default=32, type=int, help='training batch size')
    parser.add_argument('--testing_bs', default=32, type=int, help='testing batch size')
    parser.add_argument('--resume', '-r', action='store_true', help='resume from checkpoint')
args = parser.parse_args()修改default=后面的值即可修改对应超参数(不修改也可以运行,会按default后的值运行训练脚本)
**方法二:**命令行启动
python main.py --lr 0.1 --training_bs 32 --testing_bs 32
main.py脚本会训练200个epoches,途中可以随时暂停,并且每遇到一个在训练集上表现优异的模型都会默认保存到./checkpoints/目录下,开始训练后,即可观察到下示输出:
Epoch: 0
Average loss over 100 batches: 2.0036681973934174; Images trained: 3200/50000;
Average loss over 100 batches: 1.864919171333313; Images trained: 6400/50000;
Average loss over 100 batches: 1.7121432852745055; Images trained: 9600/50000;
Average loss over 100 batches: 1.63226771235466; Images trained: 12800/50000;
Average loss over 100 batches: 1.602075765132904; Images trained: 16000/50000;
Average loss over 100 batches: 1.5232510197162628; Images trained: 19200/50000;
Average loss over 100 batches: 1.4914542436599731; Images trained: 22400/50000;
Average loss over 100 batches: 1.4452165484428405; Images trained: 25600/50000;
Average loss over 100 batches: 1.4290187615156174; Images trained: 28800/50000;
Average loss over 100 batches: 1.3877955460548401; Images trained: 32000/50000;
Average loss over 100 batches: 1.324196657538414; Images trained: 35200/50000;
Average loss over 100 batches: 1.310310099720955; Images trained: 38400/50000;
Average loss over 100 batches: 1.2967958825826644; Images trained: 41600/50000;
Average loss over 100 batches: 1.2280832821130752; Images trained: 44800/50000;
Average loss over 100 batches: 1.2552628827095031; Images trained: 48000/50000;
Average loss over 63 batches: 1.2051873008410137; Images trained: 50000/50000;
 [================================================================>]  Step: 0ms | Tot: 3s32ms | Loss: 1.825 | Acc: 44.320% (4432/10000) 313/313
-
打开tensorboard:
下面以目录路径为
F:\experiment-convnet\为例,介绍一下打开方法:F:cd F:\experiment-convnet\tensorboard --logdir=runs(每次在执行训练代码之前,请先把./runs/文件夹内的cifar10_result_1文件夹删掉,不然曲线会走歪)在浏览器中打开网址
http://localhost:6006/ -
tensorboard主页如下:
-
要上交的文件:
实验报告.pdfMyNet.pymain.py./runs/cifar10_result_1文件夹 -
实验报告要体现的元素:
① 你的同组成员姓名、学号(最多两人一组)
② 你的神经网络结构图(从tensorboard GRAPHS这一栏获取)
③ 你的训练超参数:learning rate, training batchsize, testing batchsize
④ 你的两条训练曲线:训练loss曲线,训练测试准确度曲线(从tensorboard SCALARS这一栏获取)
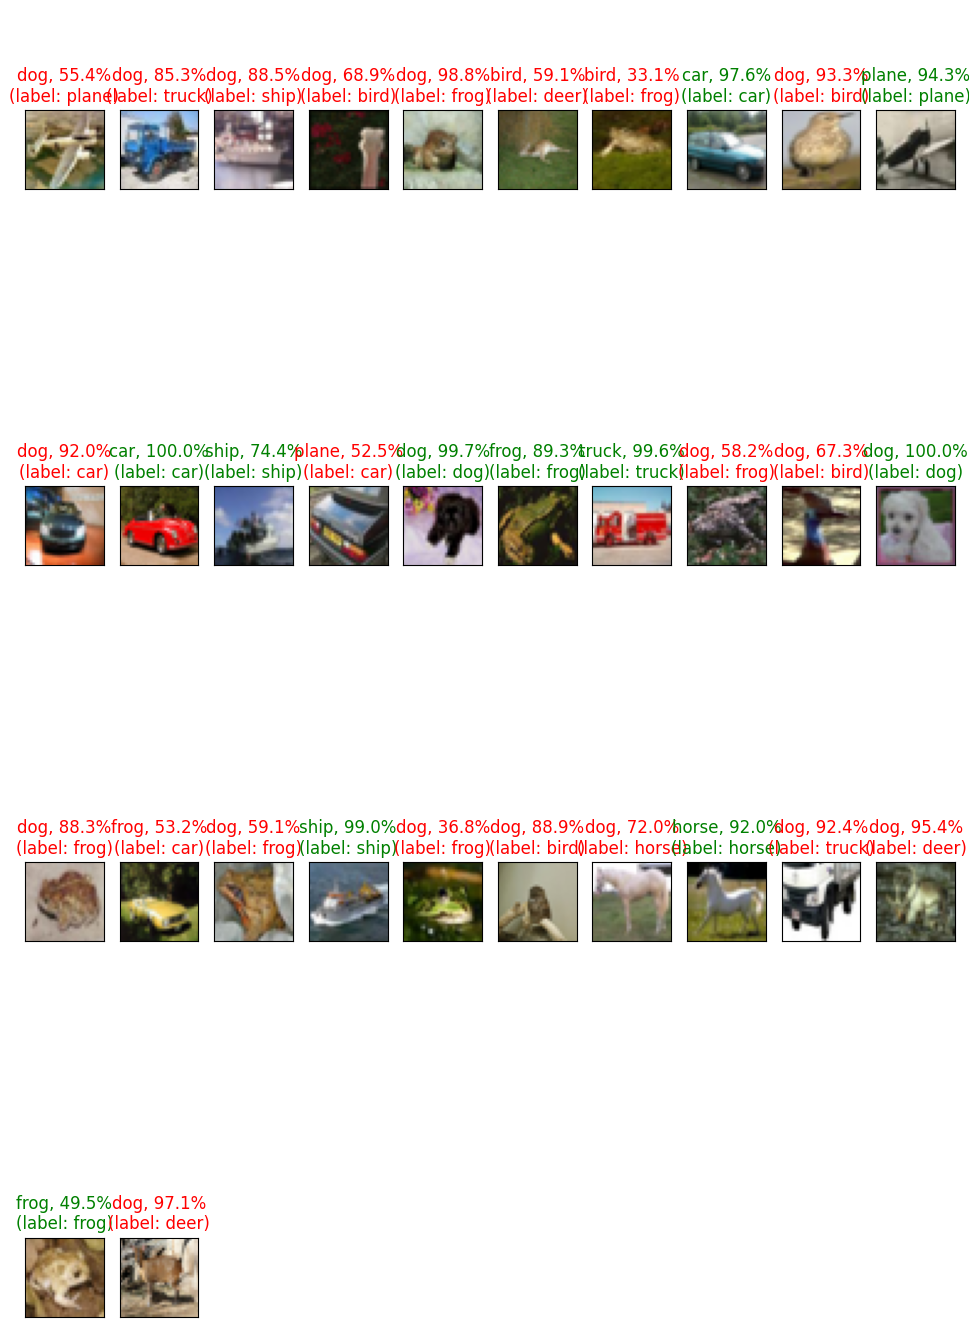
⑤ 你的test batch预测效果(从tensorboard IMAGES这一栏获取)
注意:以上文件、元素,缺一不可


