I've always thought that RGB LED panels would be perfect for displaying old-school pixel art. So I decided to work on a little project intended to highlight some of my favorite Nintendo Entertainment System gaming memories via a montage of short animations using actual NES sprites and background tiles. I hooked a Raspberry Pi to a 32 x 32 RGB LED display matrix, mounted it in a 'shadow box' frame, and wrote some code in Python to string together little vignettes:

Click here to see a YouTube video demoing what the final display looks like.
The code chooses a random character and background from each game (see below), and animates them on a repeating 10 second loop (the specific time can be set by the user). By continuing to add new games as well as sprites an backgrounds to existing games, the setup can cycle through games for several minutes before repeating the same routine.
Several folks have asked me to provide a description of how I built the project, so I've shared the animation code in this repo as well as a detailed guide below on how I set it all up. As I add more pixel art, I will continue to update this repo. I intend to provide better code documentation in the future as well, but what's here will allow people to reproduce the project.
This is a labor of love that I'm putting together on my spare time. I'm a data scientist, not a software engineer, so you'll have to forgive any amateurish coding. I appreciate feedback, though I may not be able to address feature requests in a timely manner. The best place to reach me regarding this project is via message or DM on Twitter: @DocBrownPhd
Note that all of the art included herein is intended as an homage to old-school gaming, and is freely shared with the community under the Creative Commons Attribution 4.0 International (CC BY 4.0) License (basically do whatever you want with it as long as you let people know where you got it). All characters, art, and other trademarks are the properties of their respective owners.
I'm regularly adding new games and sprites to the montage, so watch this repo if you're interested in updates!
- Games currently featured in the montage
- Required hardware components
- Putting the hardware together
- Setting up the software
- Updating the code
- Mounting the display
- Developing new sprites, scenes, etc.
- Credits, links, and resources
- Changelog
| Game | Developer | Release (NA) | Sprites | Backgrounds |
|---|---|---|---|---|
| Excitebike | Nintendo | 1985 | Bike (Standard), Bike (Wheelie) | Track 1, Track 3 |
| Ghosts 'n Goblins | Capcom | 1985 | Arthur (Armored), Red Arremer | Cave, City |
| LifeForce | Konami | 1987 | Vic Viper, Lord British | Area 1, Area 1 (alt) |
| Blaster Master | Sunsoft | 1988 | Sophia, Jake (Overworld) | Area 1, Area 3 |
| Metal Gear | Ultra (Konami) | 1988 | Snake (Unarmed, Armed) | Bldg 1 interior, roof |
| Zelda 2: The Adventure of Link | Nintendo | 1988 | Link, Blue IronKnuckle | Island Palace, Woods |
| Dragon Warrior | Enix | 1989 | Hero & Princess, King, Dragon Lord | Plains, Town |
| Ducktales | Capcom | 1989 | Scrooge McDuck, Native | Amazon, Moon |
| Mega Man 2 | Capcom | 1989 | Mega Man, Crash Man, Metal Man | Wood Man, Flash Man |
| Ninja Gaiden | Tecmo | 1989 | Ryu | Area 1, Area 4 |
| Batman | Sunsoft | 1990 | Batman, Shakedown | Stage 1, Stage 3 |
| Final Fantasy | Square | 1990 | Fighter, Monk, White Mage, Black Mage | Corneria, Flying Fortress |
| Castlevania 3: Dracula's Curse | Konami | 1990 | Trevor, Grant, Sylpha | Wallachia Village, Murky Marsh |
| Super Mario Bros. 3 | Nintendo | 1990 | Tanooki Mario, Frog Mario | Plains, Ice Plains, Palace |
| Kabuki Quantum Fighter | Human Entertainment | 1991 | Col. O'Connor | Stage 1, Stage 2 |
| AD&D DragonStrike | Westwood | 1992 | Red, Gold, Bronze Dragons | Forest |
| Kirby's Adventure | HAL Laboratory | 1993 | Kirby, Kirby (puffball) | Whispy Woods, Rainbow Resort |

I've listed the components used to build the display below. It may be possible to substitute some of the parts, such as using a Raspberry Pi 2 or a different display matrix, but I haven't tested this and can't offer any guidance on what changes may be required to the descriptions below. I've provided links to the Adafruit store or Amazon for components as that's where I purchased them, though they're likely available elsewhere.
Raspberry Pi
- Raspberry Pi 3 B
- Raspberry Pi Power Supply
- microSD card - You'll need ~2 GB, so a 4 GB card is plenty.
- microSD card reader - Some computers have these built in.
32 x 32 LED RGB display matrix
- 32 x 32 RGB LED Matrix Panel - Adafruit has a number of different available pixel sizes, I used the '4 mm pitch'.
- 5V 4A Switching Power Supply - Both the Pi and the display should be independently powered.
- Adafruit RGB Matrix HAT
- The RGB Matrix HAT makes wiring the RGB LED Matrix to the Raspberry Pi very straightforward; however, it does require some light soldering. I was able to do this by buying a cheap soldering iron, and this solder. I also found Getting Started with Soldering by Marc De Vinck very helpful.
- CR1220 coin cell battery (for the RGB Matrix HAT)
Adafruit has a step-by-step guide on how to assemble the The RGB Matrix HAT. This is followed by another step-by-step guide on how to connect the Raspberry Pi to the display. However, the following guide assumes the we stop at the end of 'Step 3. Connect RGB Matrix Data cable to IDC' in the second guide. Setting up the Raspberry Pi and installing required software is handled below.
Note: The software that Adafruit provides enables additional functions and custom settings for the RGB Matrix HAT that I'm not using in this project. If this is of interest, you may want to read the details in Steps 4 and beyond.
Next, we need to install the OS onto the microSD card and download all of the drivers and libraries required to run the animations. I've assumed zero familiarity with the Raspberry Pi ecosystem, so I've tried to be explicit below.
-
Download Raspbian, the Raspberry Pi operating system
A direct link to the latest stable 'lite' build can be found here. For development purposes, the build that I used was
2018-06-27-raspbian-stretch-lite.img. -
Put the image on a microSD card
This involves creating a bootable microSD card from the Raspbian image downloaded above. As an OS X user, my preferred method for doing this is using ApplePi-Baker. Follow the link to see instructions on its use (you'll select the microSD card from the menu, choose the IMG file in the 'Pi-Ingredients: IMG Recipe' box, and click on 'Restore Backup').
I used version 1.9.4 of ApplePi-Baker, which can be downloaded directly here.
If Windows users have a similar easy-to-use bootable SD card creator, please send me a message (@DocBrownPhd) and I'll put it here.
-
Set up the Raspberry Pi
Make sure that neither the Raspberry Pi nor the RGB HAT is plugged in. Pop in the microSD card, then make sure that the unit is connected via HDMI to a monitor and to a keyboard via USB. Plug the power cable into the 5V plug on the HAT as well as the smaller power cable into the Raspberry Pi and allow the unit to boot to the login. The default username is
piand the password israspberry. This should get you to the linux command line.The first step is to run the following command, which will bring up the Raspberry Pi configuration menu:
sudo raspi-config-
Unless you are in Great Britain at which point you can skip this step, via the arrow keys and enter, navigate to
4 Localisation Options(as you change each option you'll be dropped back into the top-level menu, so navigate back to the sub-menu).Select
I1 Change Locale, and choose your local via the spacebar, confirming with enter (for the US that would been_US.UTF-8 UTF-8. Confirm that you want this as the default for the system environment.Select
I2 Change Timezoneand select your region then timezone.Select
I3. If you're in the US, you'll most likely want to pickGeneric 104-key PC>other>English (US)>English (US)>The default for the keyboard layout>No compose key -
Navigate to
7 Advanced Optionsand selectA2 Overscan>No>Ok. (This makes the display fill the entire screen). -
Set up wi-fi by selecting
2 Network Options>N2 Wi-fiand following the instructions. You'll also want to set up the Pi's SSH server so that you'll be able to log into the Raspberry Pi from another PC (such that the Pi doesn't have to be connected to a display or keyboard) by navigating to5 Interfacing Optionsand selectingP2 SSH>Yes>Ok. -
Navigate to
Finishand the system should automatically reboot. Login as before.
-
-
Install required software
Download all of the software required to run the animation montage by running the following commands, one at a time (note that some of these will take a while):
sudo apt-get install -y vim tmux git sudo git clone https://github.com/carloartieri/8bit_raspi_pixel_art_display.git sudo 8bit_raspi_pixel_art_display/install.sh -
Run the animation script
If you'd like to run the animation script manually by logging into the Pi, you can do so by typing:
sudo python3 8bit_raspi_pixel_art_display/run_montage.pyBy appending
-hto the end of the above command, you can get a summary of the command line options available. In particular, if you'd like the individual animations to run longer, add--cycletime 30(where30here is the runtime of each scene in seconds). Also, adding--shuffleshuffles the order of animation routines at startup.If you'd like the montage to run in the background, such that you could ssh into the Raspberry Pi, turn it on and then log out, use the following command (adding desired options before the
&):sudo nohup python3 8bit_raspi_pixel_art_display/run_montage.py &However, both of the options above will have to be rerun if the Pi is turned off. Alternatively, if you'd like the Pi to launch the animation code immediately upon boot-up, you'll have to edit the
/etc/rc.localfile (using a command such assudo vim /etc/rc.local) to add the following command before theexit 0line:sudo /usr/bin/python3 /home/pi/8bit_raspi_pixel_art_display/run_montage.py --cycletime 30 --shuffle &Note that mistyping the above command can prevent the Raspberry Pi from booting, so type it in carefully! In this case, you can simply unplug the Pi to stop the display and plug it back in to restart.
When I get around to adding new animation routines, I'll update the Changelog below. In order to get these changes without having to redo a fresh install, you'll simply need to 'pull' the updates from github and relaunch the animation script. Upon logging into the Pi, run the following commands:
cd 8bit_raspi_pixel_art_display
sudo git pull origin
cd ..
Then run the animation routine as above.
To make the display presentable, I mounted the RGB LED matrix in a 6" x 6" (5" X 5" internal), 1 3/4" deep 'shadow box' frame (this one specifically). By cutting black foamboard with an X-acto knife and gluing everything with super-glue, I was able to center the matrix in the frame while leaving just enough space to place the Raspberry Pi behind it (it's a bit tight, but it works). All that was left to do was cut a small hole out of the back of the frame so that the power cable could pass through:


All code in the repo was written in Python 3.5.3.
For those who are interested in digging into how the sprites are coded, I've placed a Jupyter notebook in the repo with descriptions and examples that you can play around with. The notebook is called example_sprite_animation_code.ipynb.
If you followed the steps above to install the code for the pixel art display, then Jupyter is already installed on the Raspberry Pi. Follow these steps in order to run the notebook:
-
You'll want to copy the
development_examples.ipynbnotebook and work on the copy (the original is version controlled by git and modifying it will prevent pulling down new updates from this repo unless you know what you're doing!). From within the8bit_raspi_pixel_art_display/directory type:sudo cp development_examples.ipynb carlo_test.ipynbrenaming
carlo_test.ipynbwith whatever you'd like. -
You'll need the IP address of the Raspberry Pi on your network. If you're already ssh-ing into the Pi, then you should know this, but if not, you can type
hostname -Ion the command line and the firstXXX.XXX.XXX.XXXnumber is your IP. -
Launch Jupyter from either the home directory (
cd ~) or the8bit_raspi_pixel_art_display/directory as follows:sudo jupyter notebook --ip 0.0.0.0 --port 5000 --no-browser --allow-rootYou'll get a message that looks like the following:
 Copy/paste this URL into your browser when you connect for the first time,
	to login with a token:
	 	http://(raspberrypi or 127.0.0.1):5000/?token=3bd414122cc01b920e6dcae18eea22729d5790dd0b60820d
You'll need to copy the
http://line into a web browser on a PC, replacing the section in parentheses with the IP address from your Raspberry Pi. So if your IP was10.3.0.2then, based on the example above, you would copy the following into your web browser:http://10.3.0.2:5000/?token=3bd414122cc01b920e6dcae18eea22729d5790dd0b60820dYou should get a screen that looks like this:
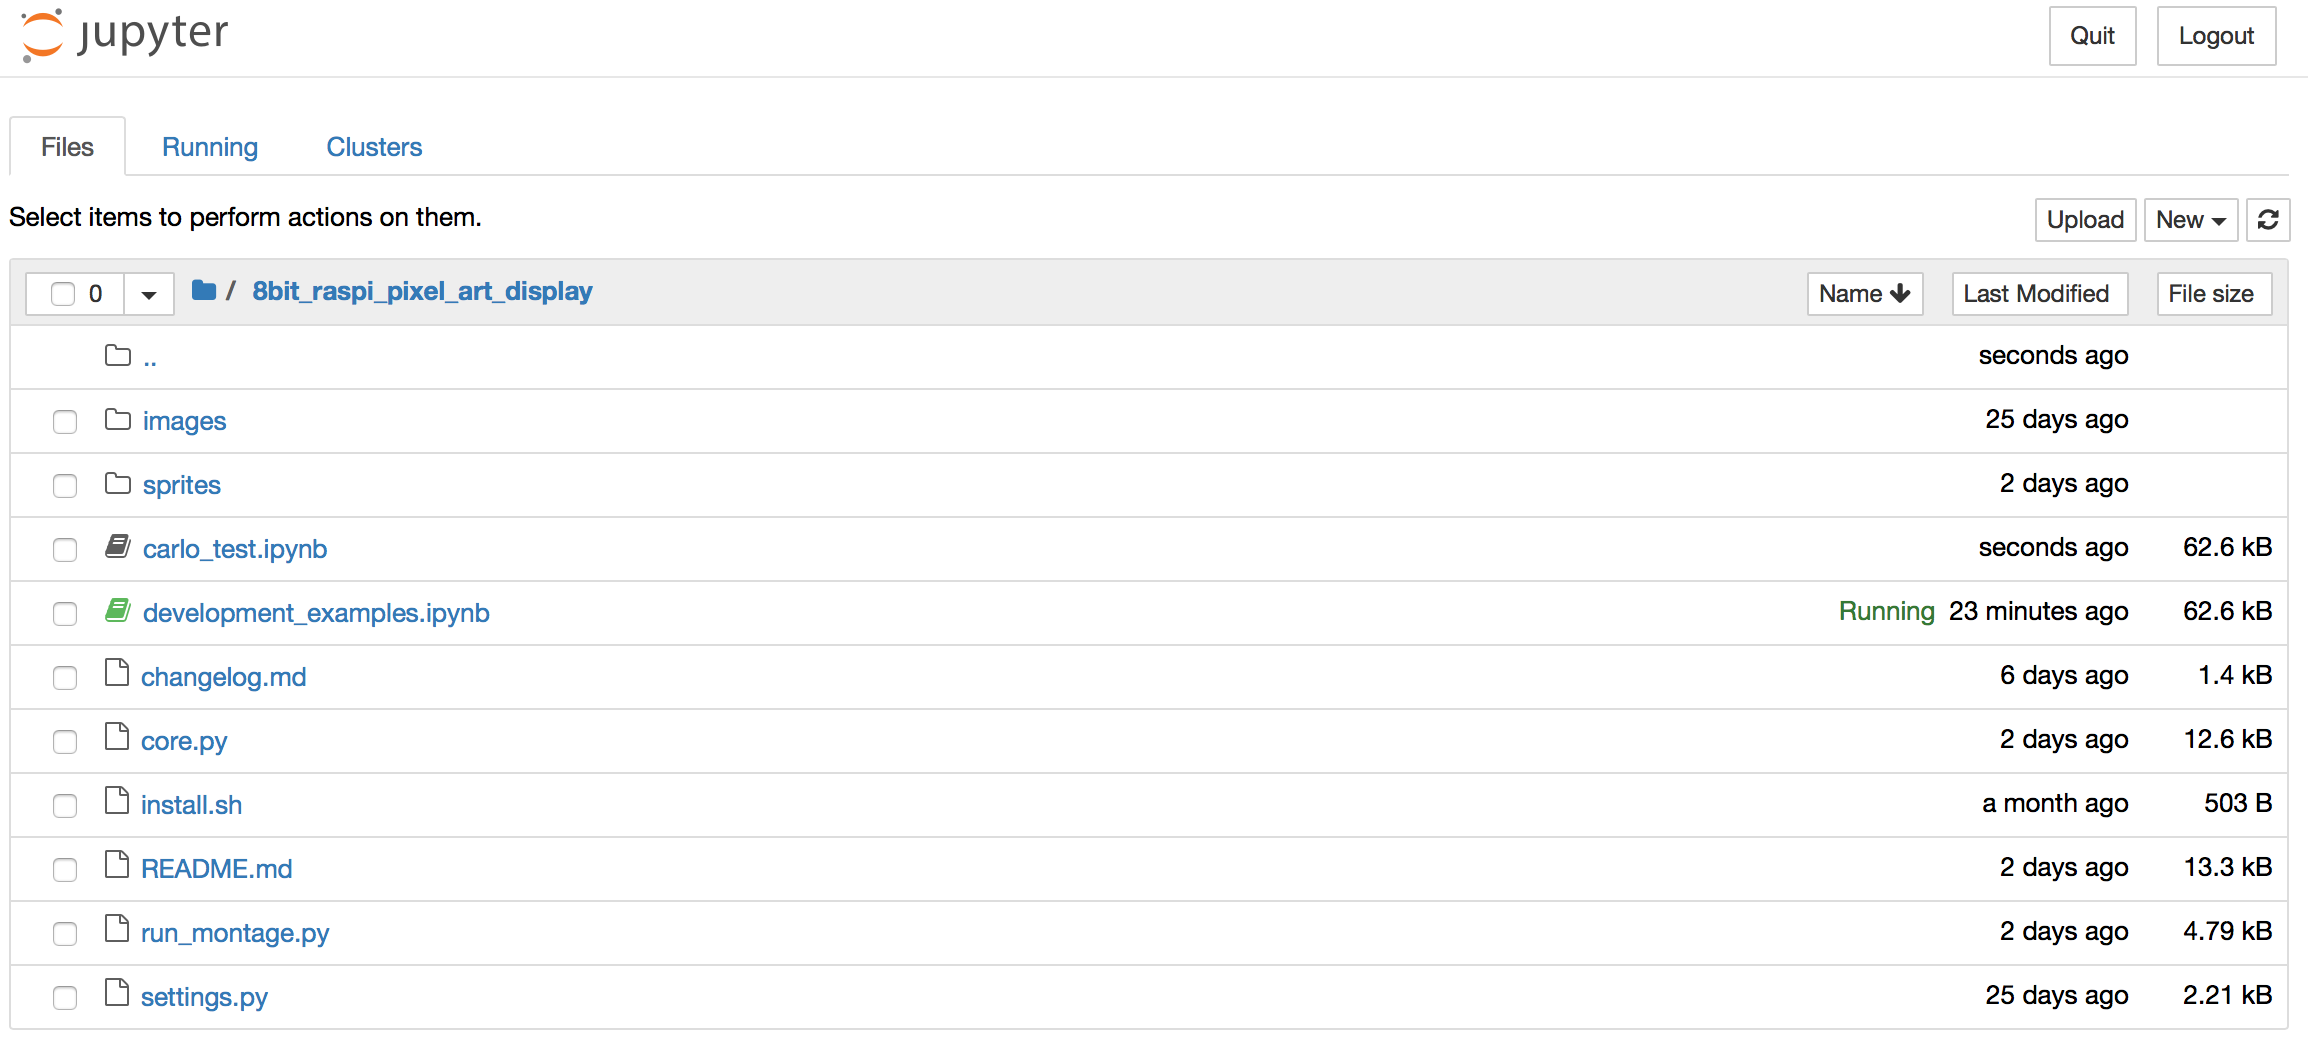
Click on the copied notebook (in this case
carlo_test.ipynb) and follow the instructions within.

P.S. As described above, while changes made to the notebook will be saved if the Raspberry Pi is shutdown or if you log out of a ssh session, Jupyter will close and you'll have to repeat 3 to relaunch it. Alternatively, if you're accessing the Raspberry Pi via ssh, you can launch Juptyer wrapped in a nohup command or within a tmux or screen session and Jupyter will remain running persistently and you'll be able to log in anytime by bookmarking the address.
-
Information about the default NES palette RGB values was obtained from:
http://www.thealmightyguru.com/Games/Hacking/Wiki/index.php/NES_Palette
-
Sprite and animation information was obtained from:
- https://www.spriters-resource.com
- http://www.nesmaps.com
- FF DOT. The Pixel Art of FINAL FANTASY (2018). Amazon link.
-
The actual code that drives the display matrix is hzeller's rpi-rgb-led-matrix library, available at: https://github.com/hzeller/rpi-rgb-led-matrix
-
Finally, thanks to all of the NES developers and publishers featured herein for the memories!
2018.09.27
- Added Metal Gear animation routine with Unarmed and Armed Solid Snake sprites and building 1 interior and roof backgrounds.
- Added Kabuki Quantum Fighter animation routine with Col. Scott O'Connor sprite and stage 1 and 2 backgrounds.
- Reordered the default order of animation routines in rough chronological order (by year).
2018.09.08
- Added Batman animation routine with Batman and Shakedown sprites and Stage 1 and 3 backgrounds.
- Added a
palette_swap()method to the sprite class and used it to create Gold and Bronze dragon sprites in the AD&D Dragon Strike routine. - Added description on how I mounted the display. Minor documentation fixes.
2018.09.01
- Added Ghosts n' Goblins animation routine with Armored Arthur and the Red Arremer sprites and two stage backgrounds.
- Added standard bike sprite to the Excitebike animation routine and adjusted sprite animation speed.
- Added additional background to the Kirby's Adventure animation routine and adjusted sprite animation speed.