| title | description | keywords | services | documentationcenter | author | manager | editor | ms.assetid | ms.service | ms.workload | ms.tgt_pltfrm | ms.devlang | ms.topic | ms.date | ms.author |
|---|---|---|---|---|---|---|---|---|---|---|---|---|---|---|---|
Build a Node.js web app for Azure Cosmos DB | Microsoft Docs |
This Node.js tutorial explores how to use Microsoft Azure Cosmos DB to store and access data from a Node.js Express web application hosted on Azure Websites. |
Application development, database tutorial, learn node.js, node.js tutorial |
cosmos-db |
nodejs |
mimig1 |
jhubbard |
cgronlun |
9da9e63b-e76a-434e-96dd-195ce2699ef3 |
cosmos-db |
data-services |
na |
nodejs |
article |
08/14/2017 |
mimig |
[!div class="op_single_selector"]
This Node.js tutorial shows you how to use Azure Cosmos DB and the DocumentDB API to store and access data from a Node.js Express application hosted on Azure Websites. You build a simple web-based task-management application, a ToDo app, that allows creating, retrieving, and completing tasks. The tasks are stored as JSON documents in Azure Cosmos DB. This tutorial walks you through the creation and deployment of the app and explains what's happening in each snippet.

Don't have time to complete the tutorial and just want to get the complete solution? Not a problem, you can get the complete sample solution from GitHub. Just read the Readme file for instructions on how to run the app.
Tip
This Node.js tutorial assumes that you have some prior experience using Node.js and Azure Websites.
Before following the instructions in this article, you should ensure that you have the following:
-
If you don't have an Azure subscription, create a free account before you begin.
[!INCLUDE cosmos-db-emulator-docdb-api]
-
Node.js version v0.10.29 or higher.
-
Express generator (you can install this via
npm install express-generator -g) -
Git.
Let's start by creating an Azure Cosmos DB account. If you already have an account or if you are using the Azure Cosmos DB Emulator for this tutorial, you can skip to Step 2: Create a new Node.js application.
[!INCLUDE cosmos-db-create-dbaccount]
[!INCLUDE cosmos-db-keys]
Now let's learn to create a basic Hello World Node.js project using the Express framework.
-
Open your favorite terminal, such as the Node.js command prompt.
-
Navigate to the directory in which you'd like to store the new application.
-
Use the express generator to generate a new application called todo.
express todo -
Open your new todo directory and install dependencies.
cd todo npm install -
Run your new application.
npm start -
You can view your new application by navigating your browser to http://localhost:3000.

Then, to stop the application, press CTRL+C in the terminal window and then click y to terminate the batch job.

The package.json file is one of the files created in the root of the project. This file contains a list of additional modules that are required for your Node.js application. Later, when you deploy this application to Azure Websites, this file is used to determine which modules need to be installed on Azure to support your application. We still need to install two more packages for this tutorial.
-
Back in the terminal, install the async module via npm.
npm install async --save -
Install the documentdb module via npm. This is the module where all the Azure Cosmos DB magic happens.
npm install documentdb --save -
A quick check of the package.json file of the application should show the additional modules. This file will tell Azure which packages to download and install when running your application. It should resemble the example below.
 {
   "name": "todo",
   "version": "0.0.0",
   "private": true,
   "scripts": {
     "start": "node ./bin/www"
   },
   "dependencies": {
     "async": "^2.1.4",
     "body-parser": "~1.15.2",
     "cookie-parser": "~1.4.3",
     "debug": "~2.2.0",
     "documentdb": "^1.10.0",
     "express": "~4.14.0",
     "jade": "~1.11.0",
     "morgan": "~1.7.0",
     "serve-favicon": "~2.3.0"
   }
 }
This tells Node (and Azure later) that your application depends on these additional modules.
That takes care of all the initial setup and configuration, now let’s get down to why we’re here, and that’s to write some code using Azure Cosmos DB.
-
In the project directory, create a new directory named models in the same directory as the package.json file.
-
In the models directory, create a new file named taskDao.js. This file will contain the model for the tasks created by our application.
-
In the same models directory, create another new file named docdbUtils.js. This file will contain some useful, reusable, code that we will use throughout our application.
-
Copy the following code in to docdbUtils.js
var DocumentDBClient = require('documentdb').DocumentClient; var DocDBUtils = { getOrCreateDatabase: function (client, databaseId, callback) { var querySpec = { query: 'SELECT * FROM root r WHERE r.id= @id', parameters: [{ name: '@id', value: databaseId }] }; client.queryDatabases(querySpec).toArray(function (err, results) { if (err) { callback(err); } else { if (results.length === 0) { var databaseSpec = { id: databaseId }; client.createDatabase(databaseSpec, function (err, created) { callback(null, created); }); } else { callback(null, results[0]); } } }); }, getOrCreateCollection: function (client, databaseLink, collectionId, callback) { var querySpec = { query: 'SELECT * FROM root r WHERE r.id=@id', parameters: [{ name: '@id', value: collectionId }] }; client.queryCollections(databaseLink, querySpec).toArray(function (err, results) { if (err) { callback(err); } else { if (results.length === 0) { var collectionSpec = { id: collectionId }; client.createCollection(databaseLink, collectionSpec, function (err, created) { callback(null, created); }); } else { callback(null, results[0]); } } }); } }; module.exports = DocDBUtils; -
Save and close the docdbUtils.js file.
-
At the beginning of the taskDao.js file, add the following code to reference the DocumentDBClient and the docdbUtils.js we created above:
var DocumentDBClient = require('documentdb').DocumentClient; var docdbUtils = require('./docdbUtils'); -
Next, you will add code to define and export the Task object. This is responsible for initializing our Task object and setting up the Database and Document Collection we will use.
function TaskDao(documentDBClient, databaseId, collectionId) { this.client = documentDBClient; this.databaseId = databaseId; this.collectionId = collectionId; this.database = null; this.collection = null; } module.exports = TaskDao; -
Next, add the following code to define additional methods on the Task object, which allow interactions with data stored in Azure Cosmos DB.
TaskDao.prototype = { init: function (callback) { var self = this; docdbUtils.getOrCreateDatabase(self.client, self.databaseId, function (err, db) { if (err) { callback(err); } else { self.database = db; docdbUtils.getOrCreateCollection(self.client, self.database._self, self.collectionId, function (err, coll) { if (err) { callback(err); } else { self.collection = coll; } }); } }); }, find: function (querySpec, callback) { var self = this; self.client.queryDocuments(self.collection._self, querySpec).toArray(function (err, results) { if (err) { callback(err); } else { callback(null, results); } }); }, addItem: function (item, callback) { var self = this; item.date = Date.now(); item.completed = false; self.client.createDocument(self.collection._self, item, function (err, doc) { if (err) { callback(err); } else { callback(null, doc); } }); }, updateItem: function (itemId, callback) { var self = this; self.getItem(itemId, function (err, doc) { if (err) { callback(err); } else { doc.completed = true; self.client.replaceDocument(doc._self, doc, function (err, replaced) { if (err) { callback(err); } else { callback(null, replaced); } }); } }); }, getItem: function (itemId, callback) { var self = this; var querySpec = { query: 'SELECT * FROM root r WHERE r.id = @id', parameters: [{ name: '@id', value: itemId }] }; self.client.queryDocuments(self.collection._self, querySpec).toArray(function (err, results) { if (err) { callback(err); } else { callback(null, results[0]); } }); } }; -
Save and close the taskDao.js file.
-
In the routes directory of your project, create a new file named tasklist.js.
-
Add the following code to tasklist.js. This loads the DocumentDBClient and async modules, which are used by tasklist.js. This also defined the TaskList function, which is passed an instance of the Task object we defined earlier:
var DocumentDBClient = require('documentdb').DocumentClient; var async = require('async'); function TaskList(taskDao) { this.taskDao = taskDao; } module.exports = TaskList; -
Continue adding to the tasklist.js file by adding the methods used to showTasks, addTask, and completeTasks:
TaskList.prototype = { showTasks: function (req, res) { var self = this; var querySpec = { query: 'SELECT * FROM root r WHERE r.completed=@completed', parameters: [{ name: '@completed', value: false }] }; self.taskDao.find(querySpec, function (err, items) { if (err) { throw (err); } res.render('index', { title: 'My ToDo List ', tasks: items }); }); }, addTask: function (req, res) { var self = this; var item = req.body; self.taskDao.addItem(item, function (err) { if (err) { throw (err); } res.redirect('/'); }); }, completeTask: function (req, res) { var self = this; var completedTasks = Object.keys(req.body); async.forEach(completedTasks, function taskIterator(completedTask, callback) { self.taskDao.updateItem(completedTask, function (err) { if (err) { callback(err); } else { callback(null); } }); }, function goHome(err) { if (err) { throw err; } else { res.redirect('/'); } }); } }; -
Save and close the tasklist.js file.
-
In your project directory create a new file named config.js.
-
Add the following to config.js. This defines configuration settings and values needed for our application.
var config = {} config.host = process.env.HOST || "[the URI value from the Azure Cosmos DB Keys blade on http://portal.azure.com]"; config.authKey = process.env.AUTH_KEY || "[the PRIMARY KEY value from the Azure Cosmos DB Keys blade on http://portal.azure.com]"; config.databaseId = "ToDoList"; config.collectionId = "Items"; module.exports = config; -
In the config.js file, update the values of HOST and AUTH_KEY using the values found in the Keys blade of your Azure Cosmos DB account on the Microsoft Azure portal.
-
Save and close the config.js file.
-
In the project directory, open the app.js file. This file was created earlier when the Express web application was created.
-
Add the following code to the top of app.js
var DocumentDBClient = require('documentdb').DocumentClient; var config = require('./config'); var TaskList = require('./routes/tasklist'); var TaskDao = require('./models/taskDao'); -
This code defines the config file to be used, and proceeds to read values out of this file into some variables we will use soon.
-
Replace the following two lines in app.js file:
 app.use('/', index);
 app.use('/users', users);
with the following snippet:
var docDbClient = new DocumentDBClient(config.host, { masterKey: config.authKey }); var taskDao = new TaskDao(docDbClient, config.databaseId, config.collectionId); var taskList = new TaskList(taskDao); taskDao.init(); app.get('/', taskList.showTasks.bind(taskList)); app.post('/addtask', taskList.addTask.bind(taskList)); app.post('/completetask', taskList.completeTask.bind(taskList)); app.set('view engine', 'jade'); -
These lines define a new instance of our TaskDao object, with a new connection to Azure Cosmos DB (using the values read from the config.js), initialize the task object and then bind form actions to methods on our TaskList controller.
-
Finally, save and close the app.js file, we're just about done.
Now let’s turn our attention to building the user interface so a user can actually interact with our application. The Express application we created uses Jade as the view engine. For more information on Jade please refer to http://jade-lang.com/.
-
The layout.jade file in the views directory is used as a global template for other .jade files. In this step you will modify it to use Twitter Bootstrap, which is a toolkit that makes it easy to design a nice looking website.
-
Open the layout.jade file found in the views folder and replace the contents with the following:
doctype html
html
  head
    title= title
    link(rel='stylesheet', href='//ajax.aspnetcdn.com/ajax/bootstrap/3.3.2/css/bootstrap.min.css')
    link(rel='stylesheet', href='/stylesheets/style.css')
  body
    nav.navbar.navbar-inverse.navbar-fixed-top
      div.navbar-header
        a.navbar-brand(href='#') My Tasks
    block content
    script(src='//ajax.aspnetcdn.com/ajax/jQuery/jquery-1.11.2.min.js')
    script(src='//ajax.aspnetcdn.com/ajax/bootstrap/3.3.2/bootstrap.min.js')
This effectively tells the Jade engine to render some HTML for our application and creates a block called content where we can supply the layout for our content pages.
Save and close this layout.jade file.
-
Now open the index.jade file, the view that will be used by our application, and replace the content of the file with the following:
 extends layout
 block content
    h1 #{title}
    br

    form(action="/completetask", method="post")
      table.table.table-striped.table-bordered
        tr
          td Name
          td Category
          td Date
          td Complete
        if (typeof tasks === "undefined")
          tr
            td
        else
          each task in tasks
            tr
              td #{task.name}
              td #{task.category}
              - var date  = new Date(task.date);
              - var day   = date.getDate();
              - var month = date.getMonth() + 1;
              - var year  = date.getFullYear();
              td #{month + "/" + day + "/" + year}
              td
                input(type="checkbox", name="#{task.id}", value="#{!task.completed}", checked=task.completed)
      button.btn.btn-primary(type="submit") Update tasks
    hr
    form.well(action="/addtask", method="post")
      .form-group
        label(for="name") Item Name:
        input.form-control(name="name", type="textbox")
      .form-group
        label(for="category") Item Category:
        input.form-control(name="category", type="textbox")
      br
      button.btn(type="submit") Add item
This extends layout, and provides content for the content placeholder we saw in the layout.jade file earlier.
In this layout we created two HTML forms.
The first form contains a table for our data and a button that allows us to update items by posting to /completetask method of our controller.
The second form contains two input fields and a button that allows us to create a new item by posting to /addtask method of our controller.
This should be all that we need for our application to work.
-
To test the application on your local machine, run
npm startin the terminal to start your application, then refresh your http://localhost:3000 browser page. The page should now look like the image below: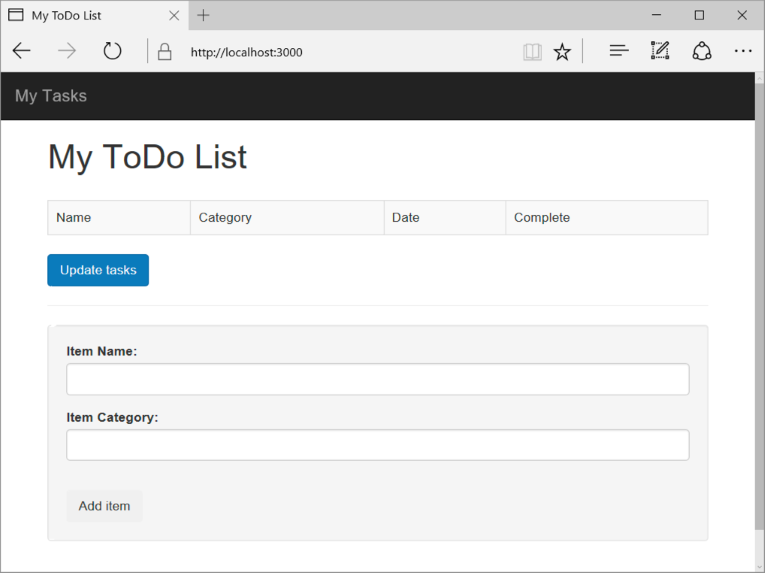
[!TIP] If you receive an error about the indent in the layout.jade file or the index.jade file, ensure that the first two lines in both files is left justified, with no spaces. If there are spaces before the first two lines, remove them, save both files, then refresh your browser window.
-
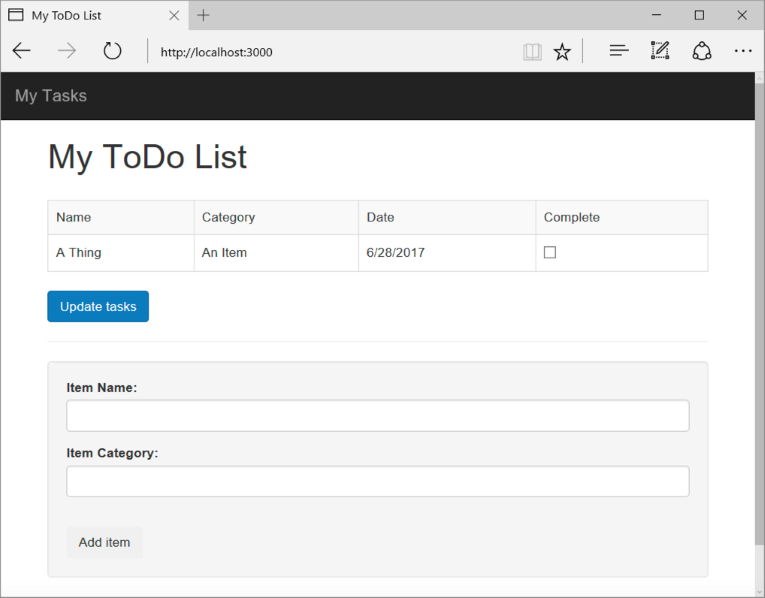
Use the Item, Item Name and Category fields to enter a new task and then click Add Item. This creates a document in Azure Cosmos DB with those properties.
-
The page should update to display the newly created item in the ToDo list.
-
To complete a task, simply check the checkbox in the Complete column, and then click Update tasks. This updates the document you already created.
-
To stop the application, press CTRL+C in the terminal window and then click Y to terminate the batch job.


-
If you haven't already, enable a git repository for your Azure Website. You can find instructions on how to do this in the Local Git Deployment to Azure App Service topic.
-
Add your Azure Website as a git remote.
git remote add azure https://[email protected]:443/your-azure-website.git -
Deploy by pushing to the remote.
git push azure master -
In a few seconds, git will finish publishing your web application and launch a browser where you can see your handiwork running in Azure!
Congratulations! You have just built your first Node.js Express Web Application using Azure Cosmos DB and published it to Azure Websites.
If you want to download or refer to the complete reference application for this tutorial, it can be downloaded from GitHub.
- Want to perform scale and performance testing with Azure Cosmos DB? See Performance and Scale Testing with Azure Cosmos DB
- Learn how to monitor an Azure Cosmos DB account.
- Run queries against our sample dataset in the Query Playground.
- Explore the Azure Cosmos DB documentation.