ClipPathLayout English Doc
Android中实现不规则图形的布局
及由此扩展的转场动画布局
将方形图片裁剪成圆形并且让圆形View的4角不接收触摸事件
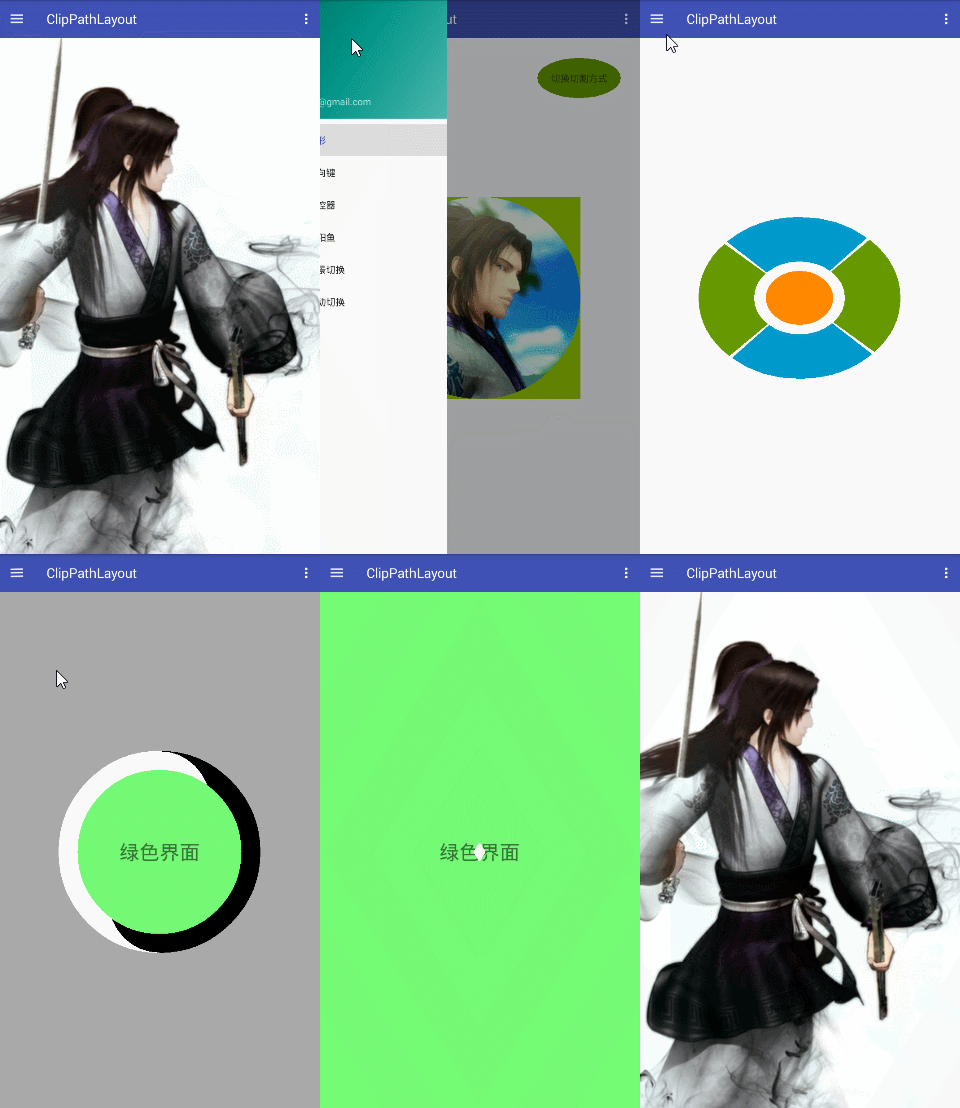
很多游戏都会有方向键,曾经我也做过一个小游戏,但是在做方向键的时候遇到一个问题,4个方向按钮的位置会有重叠,导致局部地方会发生误触. 当时没有特别好的解决办法,只能做自定义View,而自定义View特别麻烦,需要重写onTouchEvent和onDraw计算落点属于哪个方向,并增加点击效果. 简单的自定义View会丧失很多Android自带的一些特性,要支持这些特性又繁琐而复杂. 下面借助于ClipPathLayout用4个菱形按钮实现的方向控制键很好的解决了这个问题
对于遥控器的按键的模拟同样有上述问题,一般只能采用自定义View实现,较为繁琐. 以下是借助于ClipPathLayout实现的遥控器按钮,由于没有美工切图,比较丑,将就下吧
甚至我们可以将不连续的图形变成一个View,比如做一个阴阳鱼的按钮
两个View的场景切换效果,Android原生自带的场景切换效果大部分是由动画实现的平移,缩小,暗淡. 原生比较少带有那种PPT播放的切换效果,一些第三方库实现的效果一般是由在DecorView中添加一层View来实现较为和谐的切换, 沪江开心词场里使用的就是这种动画,这种动画很棒,但是也有一个小缺点,就是在切换的过程中,切换用的View和即将要切换的View没有什么关系. 借助于ClipPathLayout扩展的TransitionFrameLayout也可以实现较为和谐的切换效果,由于是示例,不写太复杂的场景,以下仅用两个TextView作为展示
在浏览QQ空间和使用QQ浏览器的过程看到腾讯的广告切换效果也是很不错的,这里借助于TransitionFrameLayout也可以实现这种效果
其实大部分的场景切换应该是用在Fragment中,这里也用TransitionFragmentContainer实现了Fragment的场景切换效果
	allprojects {
		repositories {
			...
			maven { url 'https://www.jitpack.io' }
		}
	}
在app module中的build.gradle中添加依赖
	dependencies {
	        implementation 'com.github.dqh147258:ClipPathLayout:1.1.0'
	}
如果依然使用Jcenter版本则是
implementation 'com.yxf:clippathlayout:1.0.+'
当前实现了三个不规则图形的布局
- ClipPathFrameLayout
- ClipPathLinearLayout
- ClipPathRelativeLayout
如果有其他布局要求,请自定义,参见自定义ClipPathLayout
ClipPathLayout是一个接口,以上布局都实现了ClipPathLayout接口,并且具备父类的功能.
要实现不规则图形,其实要操作的并不是父布局,而是子View. 我们需要给子View添加一些信息,这样父布局才知道应该如何去实现这个不规则图形.
这里以最简单的圆形View为例.
在一个实现了ClipPathLayout接口的ViewGroup(以ClipPathFrameLayout为例)中添加一个子View(ImageView).
<com.yxf.clippathlayout.impl.ClipPathFrameLayout xmlns:android="http://schemas.android.com/apk/res/android"
    android:id="@+id/clip_path_frame_layout"
    android:layout_width="match_parent"
    android:layout_height="match_parent">

    <ImageView
        android:id="@+id/image"
        android:layout_width="300dp"
        android:layout_height="300dp"
        android:layout_gravity="center"
        android:src="@mipmap/image" />

</com.yxf.clippathlayout.impl.ClipPathFrameLayout>
mImageView = mLayout.findViewById(R.id.image);
然后构建一个PathInfo对象
new PathInfo.Builder(new CirclePathGenerator(), mImageView)
    .setApplyFlag(mApplyFlag)
    .setClipType(mClipType)
    .setAntiAlias(false)
    .create()
    .apply();
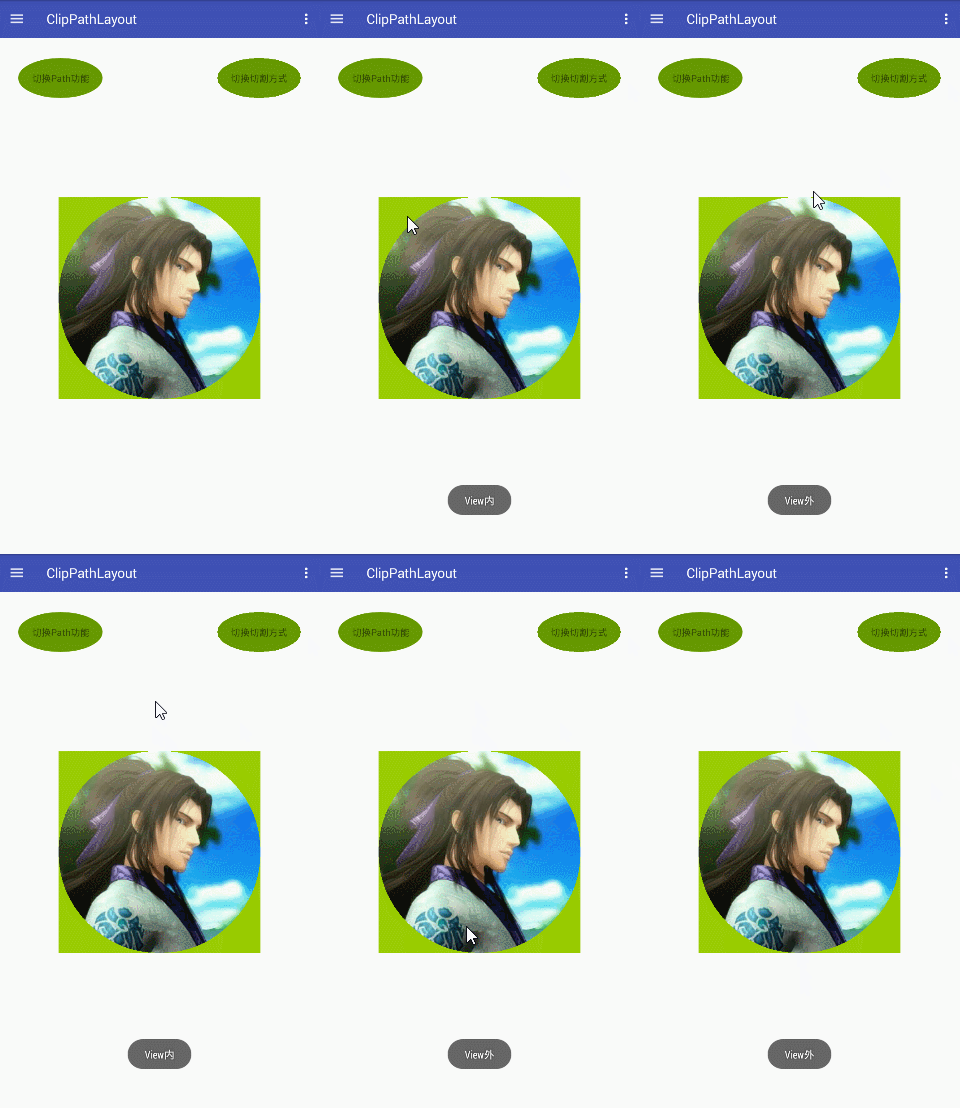
搞定!运行就可以看到一个圆形的View.
和效果展示上的这个图差不多,不过这张图多了几个按钮,然后那个圆形View有个绿色背景,那个是用来做对比的,在那个View之下添加了一个绿色的View,不要在意这些细节......
对其中使用到的参数和方法做下说明
PathInfo创建器,用于配置和生成PathInfo.
构造方法定义如下
        /**
         * @param generator Path生成器
         * @param view 实现了ClipPathLayout接口的ViewGroup的子View
         */
        public Builder(PathGenerator generator, View view) {

        }
CirclePathGenerator是一个PathGenerator接口的实现类,用于生成圆形的Path.
PathGenerator定义如下
public interface PathGenerator {

    /**
     * @param old 以前使用过的Path,如果以前为null,则可能为null
     * @param view Path关联的子View对象
     * @param width 生成Path所限定的范围宽度,一般是子View宽度
     * @param height 生成Path所限定的范围高度,一般是子View高度
     * @return 返回一个Path对象,必须为闭合的Path,将用于裁剪子View
     *
     * 其中Path的范围即left : 0 , top : 0 , right : width , bottom : height
     */
    Path generatePath(Path old, View view, int width, int height);

}
PathGenerator是使用的核心,父布局将根据这个来对子View进行裁剪来实现不规则图形.
此库内置了4种Path生成器
- CirclePathGenerator(圆形Path生成器)
- OvalPathGenerator(椭圆Path生成器)
- RhombusPathGenerator(菱形Path生成器)
- OvalRingPathGenerator(椭圆环Path生成器)
如果有其他复杂的Path,可以自己实现PathGenerator,可以参考示例中的阴阳鱼Path的生成.
Path的应用标志,有如下几种
- APPLY_FLAG_DRAW_ONLY(只用于绘制)
- APPLY_FLAG_TOUCH_ONLY(只用于触摸事件)
- APPLY_FLAG_DRAW_AND_TOUCH(绘制和触摸事件一起应用)
默认不设置的话是APPLY_FLAG_DRAW_AND_TOUCH.
切换效果如下
Path的裁剪模式,有如下两种
- CLIP_TYPE_IN(取Path内范围作为不规则图形子View)
- CLIP_TYPE_OUT(取Path外范围作为不规则图形子View)
默认不设置为CLIP_TYPE_IN.
切换效果如下
抗锯齿,true表示开启,false关闭,默认关闭.
请慎用此功能,此功能会关闭硬件加速并且会新建图层,在View绘制期间还有一个图片生成过程,所以此功能开启会严重降低绘制性能,并且如果频繁刷新界面会导致内存抖动.所以这个功能只建议在静态而且不常刷新的情况下使用.
自定义一个ClipPathLayout很简单,首先选择一个ViewGroup,然后实现ClipPathLayout接口.
然后再在自定义的ViewGroup中创建一个ClipPathLayoutDelegate对象.
ClipPathLayoutDelegate mClipPathLayoutDelegate = new ClipPathLayoutDelegate(this);
并将所有ClipPathLayout接口的实现都委派给ClipPathLayoutDelegate去实现.
这里需要注意两点:
- 需要重写ViewGroup的drawChild,按如下实现即可
    @Override
    protected boolean drawChild(Canvas canvas, View child, long drawingTime) {
        beforeDrawChild(canvas, child, drawingTime);
        boolean result = super.drawChild(canvas, child, drawingTime);
        afterDrawChild(canvas, child, drawingTime);
        return result;
    }
- requestLayout方法也需要重写,这属于ViewGroup和ClipPathLayout共有的方法,这个方法会在父类的ViewGroup的构造方法中调用,在父类构造方法被调用时,mClipPathLayoutDelegate还没有初始化,如果直接调用会报空指针,所以需要添加空判断.
    @Override
    public void requestLayout() {
        super.requestLayout();
        // the request layout method would be invoked in the constructor of super class
        if (mClipPathLayoutDelegate == null) {
            return;
        }
        mClipPathLayoutDelegate.requestLayout();
    }
这里将整个ClipPathFrameLayout源码贴出作为参考
public class ClipPathFrameLayout extends FrameLayout implements ClipPathLayout {

    ClipPathLayoutDelegate mClipPathLayoutDelegate = new ClipPathLayoutDelegate(this);

    public ClipPathFrameLayout(@NonNull Context context) {
        this(context, null);
    }

    public ClipPathFrameLayout(@NonNull Context context, @Nullable AttributeSet attrs) {
        this(context, attrs, 0);
    }

    public ClipPathFrameLayout(@NonNull Context context, @Nullable AttributeSet attrs, int defStyleAttr) {
        super(context, attrs, defStyleAttr);
    }

    @Override
    public boolean isTransformedTouchPointInView(float x, float y, View child, PointF outLocalPoint) {
        return mClipPathLayoutDelegate.isTransformedTouchPointInView(x, y, child, outLocalPoint);
    }

    @Override
    public void applyPathInfo(PathInfo info) {
        mClipPathLayoutDelegate.applyPathInfo(info);
    }

    @Override
    public void cancelPathInfo(View child) {
        mClipPathLayoutDelegate.cancelPathInfo(child);
    }

    @Override
    public void beforeDrawChild(Canvas canvas, View child, long drawingTime) {
        mClipPathLayoutDelegate.beforeDrawChild(canvas, child, drawingTime);
    }

    @Override
    public void afterDrawChild(Canvas canvas, View child, long drawingTime) {
        mClipPathLayoutDelegate.afterDrawChild(canvas, child, drawingTime);
    }

    //the drawChild method is not belong to ClipPathLayout ,
    //but you should rewrite it without changing the return value of the method
    @Override
    protected boolean drawChild(Canvas canvas, View child, long drawingTime) {
        beforeDrawChild(canvas, child, drawingTime);
        boolean result = super.drawChild(canvas, child, drawingTime);
        afterDrawChild(canvas, child, drawingTime);
        return result;
    }

    //do not forget to rewrite the method
    @Override
    public void requestLayout() {
        super.requestLayout();
        // the request layout method would be invoked in the constructor of super class
        if (mClipPathLayoutDelegate == null) {
            return;
        }
        mClipPathLayoutDelegate.requestLayout();
    }

    @Override
    public void notifyPathChanged(View child) {
        mClipPathLayoutDelegate.notifyPathChanged(child);
    }

    @Override
    public void notifyAllPathChanged() {
        mClipPathLayoutDelegate.notifyAllPathChanged();
    }
}
转场动画布局这里做了两个,一个用于普通的View(TransitionFrameLayout),一个是针对Fragment的容器(TransitionFragmentContainer).
这个布局继承于FrameLayout,用于两个View的场景切换.
要求两个子View大小宽高需要一致,位置也一致.一般不做什么特殊设置的话,FrameLayout默认就是如此的.
这个ViewGroup限定只显示一个View,如果在xml中添加了多个View,只有最后一个View会显示出来.
如果需要添加一个View或者将其中隐藏的View显示出来请调用TransitionFrameLayout的switchView方法,不要直接调用addView或者setVisibility,可能会造成不太友好的界面效果.
以两个TextView的切换为例
<com.yxf.clippathlayout.transition.TransitionFrameLayout xmlns:android="http://schemas.android.com/apk/res/android"
    android:layout_width="match_parent"
    android:layout_height="match_parent">

    <TextView
        android:id="@+id/blue_view"
        android:layout_width="match_parent"
        android:layout_height="match_parent"
        android:background="#880000ff"
        android:gravity="center"
        android:text="蓝色界面"
        android:textSize="30sp" />

    <TextView
        android:id="@+id/green_view"
        android:layout_width="match_parent"
        android:layout_height="match_parent"
        android:background="#8800ff00"
        android:gravity="center"
        android:text="绿色界面"
        android:textSize="30sp" />

</com.yxf.clippathlayout.transition.TransitionFrameLayout>
mLayout = (TransitionFrameLayout) inflater.inflate(R.layout.fragment_view_transition, null);
现在绿色界面在上面显示,蓝色隐藏.
如果需要将蓝色界面切换出来,可以调用如下代码.
TransitionAdapter adapter = mLayout.switchView(mBlueView);
switchView有两个方法
    @Override
    public TransitionAdapter switchView(View view) {
        return switchView(view, false);
    }

    /**
     * if you want add a view , just invoke switchView directly ,
     * do not invoke addView , it may cause some problem .
     *
     * @param view
     * @return
     */
    @Override
    public TransitionAdapter switchView(final View view, boolean reverse) {
        //.................
    }
reverse为false表示动画扩张,为true表示收缩.
在switchView后获得一个adapter对象,此时蓝色界面还没有展示出来.
可以通过adapter获得一个ValueAnimator对象或者一个Controller对象. 可以直接调用
adapter.animate();
来启动场景切换动画效果.
也可以通过
adapter.getAnimator();
获得一个属性动画,自己控制动画过程.
还可以获得一个Controller对象
mController = adapter.getController();
然后通过
mController.setProgress
来控制动画的实现进度.当到达1时(进度范围0~1),即动画结束时,调用
adapter.finish();
来通知转场结束了.
直接使用adapter.animate()的效果如下
这个布局作为Fragment的容器来实现Fragment的场景切换效果.
直接像FrameLayout作为Fragment容器做动态添加删除即可.
效果如下
这个类是一个Path适配器,构造方法如下
public TransitionAdapter(PathGenerator generator)
适配器需要获得一个Path内所能容下的最大矩形区域来确定一个最小的放大Scale,以获得最好的视觉效果, 当前采用了一种二分查找的方式去获得这个矩形区域,不过这种方式有个弊端,对于中心有镂空的Path, 这种方式是不可行的,所以针对这种情况,添加了一个TransitionPathGenerator的接口,定义如下
public interface TransitionPathGenerator extends PathGenerator {

    /**
     * @param similar 相似矩形参考
     * @param boundWidth Path的范围区域宽
     * @param boundHeight Path的范围区域高
     * @return 返回最大的和@param similar相似的的矩形区域,
     * 返回的矩形区域中心必须是Path的中心,即(boundWidth/2,boundHeight/2),
     * 为了尽量减少内存抖动,建议使用参数传入的矩形修改数值后返回
     */
    Rect maxContainSimilarRange(Rect similar, int boundWidth, int boundHeight);

}
如果有比较特殊的Path(比如有镂空)需要自定义包含的矩形区域范围,可以实现这个接口,然后作为TransitionAdapter的构造参数传入.
回到TransitionAdapter上
以上两种转场动画容器都有setAdapter方法,可以替换掉默认的TransitionAdapter.
从TransitionFrameLayout.switchView中获得Adapter后,还可以通过setPathCenter来控制Path的扩张和收缩中心,默认PathCenter是View中心.


