| title | description | author | manager | ms.author | ms.date | ms.topic | ms.service | services | ms.reviewer | ms.suite | tags |
|---|---|---|---|---|---|---|---|---|---|---|---|
Connect to Azure Event Hubs - Azure Logic Apps | Microsoft Docs |
Manage and monitor events with Azure Event Hubs and Azure Logic Apps |
ecfan |
jeconnoc |
estfan |
05/21/2018 |
article |
logic-apps |
logic-apps |
klam, LADocs |
integration |
connectors |
This article shows how you can monitor and manage events sent to Azure Event Hubs from inside a logic app with the Azure Event Hubs connector. That way, you can create logic apps that automate tasks and workflows for checking, sending, and receiving events from your Event Hub.
If you don't have an Azure subscription, sign up for a free Azure account. If you're new to logic apps, review What is Azure Logic Apps and Quickstart: Create your first logic app. For connector-specific technical information, see the Azure Event Hubs connector reference.
-
The logic app where you want to access your Event Hub. To start your logic app with an Azure Event Hubs trigger, you need a blank logic app.
For your logic app to access your Event Hub, check your permissions and get the connection string for your Event Hubs namespace.
-
Sign in to the Azure portal.
-
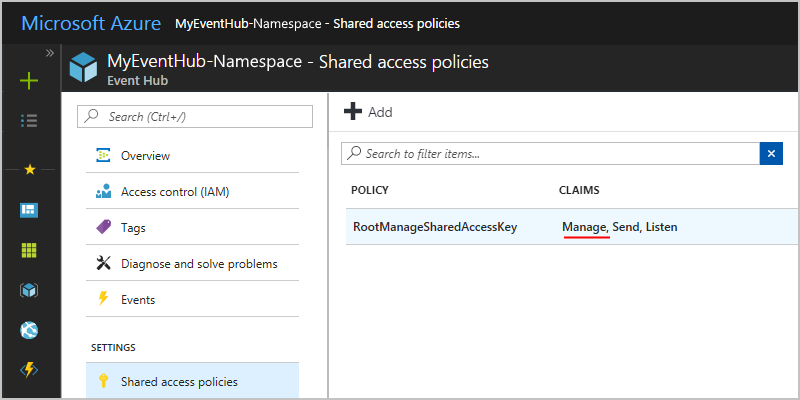
Go to your Event Hubs namespace, not a specific Event Hub. On the namespace page, under Settings, choose Shared access policies. Under Claims, check that you have Manage permissions for that namespace.
-
If you want to later manually enter your connection information, get the connection string for your Event Hubs namespace.
-
Under Policy, choose RootManageSharedAccessKey.
-
Find your primary key's connection string. Choose the copy button, and save the connection string for later use.

[!TIP] To confirm whether your connection string is associated with your Event Hubs namespace or with a specific event hub, make sure the connection string doesn't have the
EntityPathparameter. If you find this parameter, the connection string is for a specific Event Hub "entity" and is not the correct string to use with your logic app.
-
-
Now continue with Add an Event Hubs trigger or Add an Event Hubs action.


In Azure Logic Apps, every logic app must start with a trigger, which fires when a specific event happens or when a specific condition is met. Each time the trigger fires, the Logic Apps engine creates a logic app instance and starts running your app's workflow.
This example shows how you can start a logic app workflow when new events are sent to your Event Hub.
-
In the Azure portal or Visual Studio, create a blank logic app, which opens Logic Apps Designer. This example uses the Azure portal.
-
In the search box, enter "event hubs" as your filter. From the triggers list, select the trigger you want.
This example uses this trigger: Event Hubs - When events are available in Event Hub

-
If you're prompted for connection details, create your Event Hubs connection now. Or, if your connection already exists, provide the necessary information for the trigger.
-
From the Event Hub name list, select the Event Hub you want to monitor.

-
Select the interval and frequency for how often you want the trigger to check the Event Hub.
-
To optionally select some of the advanced trigger options, choose Show advanced options.

Property Details Content type Select the event's content type. The default is "application/octet-stream". Content schema Enter the content schema in JSON for the events that are read from the Event Hub. Consumer group name Enter the Event Hub consumer group name for reading events. If not specified, the default consumer group is used. Minimum partition key Enter the minimum partition ID to read. By default, all partitions are read. Maximum partition key Enter the maximum partition ID to read. By default, all partitions are read. Maximum events count Enter a value for the maximum number of events. The trigger returns between one and the number of events specified by this property.
-
-
When you're done, on the designer toolbar, choose Save.
-
Now continue adding one or more actions to your logic app for the tasks you want to perform with the trigger results.


Note
All Event Hub triggers are long-polling triggers, which means that when a trigger fires, the trigger processes all the events and then waits for 30 seconds for more events to appear in your Event Hub. If no events are received in 30 seconds, the trigger run is skipped. Otherwise, the trigger continues reading events until your Event Hub is empty. The next trigger poll happens based on the recurrence interval that you specify in the trigger's properties.
In Azure Logic Apps, an action is a step in your workflow that follows a trigger or another action. For this example, the logic app starts with an Event Hubs trigger that checks for new events in your Event Hub.
-
In the Azure portal or Visual Studio, open your logic app in Logic Apps Designer. This example uses the Azure portal.
-
Under the trigger or action, choose New step > Add an action.
To add an action between existing steps, move your mouse over the connecting arrow. Choose the plus sign (+) that appears, and then choose Add an action.
-
In the search box, enter "event hubs" as your filter. From the actions list, select the action you want.
For this example, select this action: Event Hubs - Send event

-
If you're prompted for connection details, create your Event Hubs connection now. Or, if your connection already exists, provide the necessary information for the action.
Property Required Description Event Hub name Yes Select the Event Hub where you want to send the event Event content No The content for the event you want to send Properties No The app properties and values to send For example:

-
When you're done, on the designer toolbar, choose Save.


[!INCLUDE Create connection general intro]
-
When you're prompted for connection information, provide these details:
Property Required Value Description Connection Name Yes <connection-name> The name to create for your connection Event Hubs Namespace Yes <event-hubs-namespace> Select the Event Hubs namespace you want to use. For example:

To manually enter the connection string, choose Manually enter connection information. Learn how to find your connection string.
-
Select the Event Hubs policy to use, if not already selected. Choose Create.

-
After you create your connection, continue with Add Event Hubs trigger or Add Event Hubs action.


For technical details, such as triggers, actions, and limits, as described by the connector's Swagger file, see the connector's reference page.
- For questions, visit the Azure Logic Apps forum.
- To submit or vote on feature ideas, visit the Logic Apps user feedback site.
- Learn about other Logic Apps connectors