This project is part of the 'IBM Cloud Native Reference Architecture' suite, available at https://github.com/ibm-cloud-architecture/refarch-cloudnative-kubernetes/tree/spring
- DevOps for Cloud Native Reference Application
- Table of Contents
- Introduction
- Architecture & CI/CD Workflow
- Pre-Requisites
- Deploy Jenkins to Kubernetes Cluster
- Setup Docker Registry
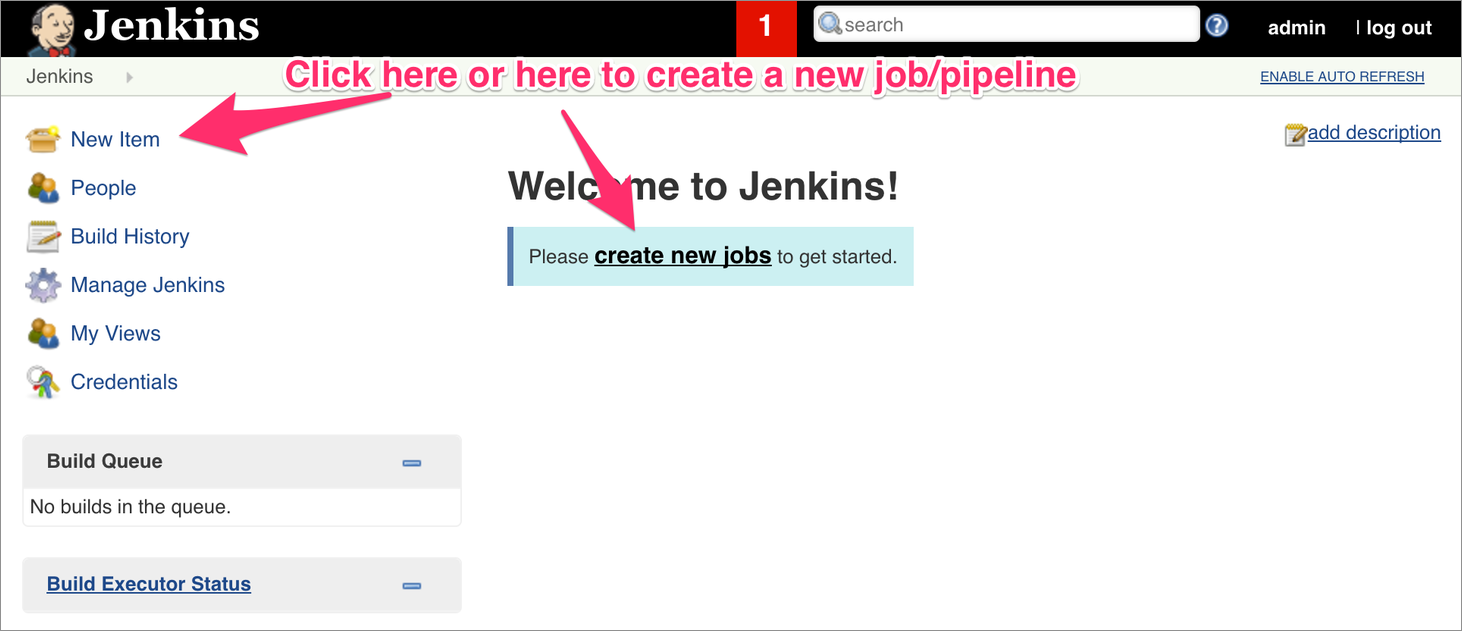
- Create and Run a Sample CI/CD Pipeline
- Conclusion
- Further Reading: Hybrid Cloud Setup
- Further Reading: Using Podman as the CI/CD Container Engine
DevOps, specifically automated Continuous Integration and Continuous Deployment (CI/CD), is important for Cloud Native Microservice style application. This project is developed to demonstrate how to use tools and services available on IBM Cloud to implement the CI/CD for the BlueCompute reference application.
The project uses the Jenkins Helm Chart to install a Jenkins Master pod with the Kubernetes Plugin in a Kubernetes Cluster. Helm is Kubernetes's package manager, which facilitates deployment of prepackaged Kubernetes resources that are reusable. This setup allows Jenkins to spin up ephemeral pods to run Jenkins jobs and pipelines without the need of Always-On dedicated Jenkins slave/worker servers, which reduces Jenkins's infrastructural costs.
Let's get started.
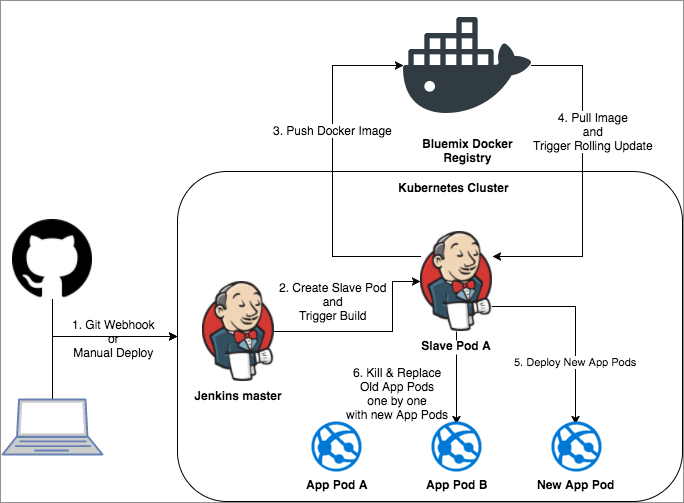
Here is the High Level DevOps Architecture Diagram for the Jenkins setup on Kubernetes, along with a typical CI/CD workflow:
This guide will install the following resources:
- 1 x 8GB Persistent Volume Claim (PVC) to Store Jenkins data and builds' information.
- Be sure that your Kubernetes Cluster can support PVCs size of 8GB
- 1 x Jenkins Master Kubernetes Pod with Kubernetes Plugin Installed.
- 1 x Kubernetes Service for above Jenkins Master Pod with port 8080 exposed to a LoadBalancer.
- All using Kubernetes Resources.
To deploy the application, you require the following tools:
- kubectl (Kubernetes CLI) - Follow the instructions here to install it on your platform.
- helm (Kubernetes package manager) - Follow the instructions here to install it on your platform.
- If using
IBM Cloud Private, we recommend you follow these instructions to installhelm.
- If using
- IBM Cloud CLI
- Only if you are using an IBM Cloud Kubernetes Service cluster.
The following clusters have been tested with this sample application:
- minikube - Create a single node virtual cluster on your workstation
- IBM Cloud Kubernetes Service - Create a Kubernetes cluster in IBM Cloud. The application runs in the Lite cluster, which is free of charge. Follow the instructions here.
- IBM Cloud Private - Create a Kubernetes cluster in an on-premise datacenter. The community edition (IBM Cloud private-ce) is free of charge. Follow the instructions here to install IBM Cloud Private CE.
This document assumes that you have installed the bluecompute-ce chart in the default namespace of your cluster. To install bluecompute-ce chart, follow these instructions based on your environment:
- Minikube: Use these instructions.
- IBM Cloud Kubernetes Service: Use these instructions.
- IBM Cloud Private: Use these instructions.
As mentioned in the Introduction Section, we will be using a Jenkins Helm Chart to deploy Jenkins into a Kubernetes Cluster. Before you do so, make sure that you installed all the required CLIs as indicated in the Pre-Requisites.
Starting with version 3.1.0 for IBM Cloud Private, you are REQUIRED to create an Image Policy in order to whitelist container images that come from registries other than the built-in Private Docker Registry. We created a simple Cluster Image Policy located at jenkins/cluster_image_policy.yaml that lets you deploy not only the Jenkins images but also some images that we built to run the CI/CD environment for this demo.
To create the Cluster Image Policy, run the following command:
kubectl apply -f jenkins/cluster_image_policy.yamlIf you would like Jenkins to use a PVC, you must provision a PVC from IBM Cloud and pass it to the helm install command once you get to the Install the Jenkins Chart and Pass an Existing PVC step.
To create a Persistent Volume Claim (PVC), use the commands below:
kubectl apply -f jenkins/ibm_cloud_container_service/pvc.yamlNote: that the minimum PVC size for IBM Cloud Kubernetes Service is 20GB.
Before you are able to use your PVC, it needs to be Bound to the cluster. To watch for changes in its provisioning status, use the following command:
kubectl get pvc jenkins-home -o wide -w
NAME           STATUS    VOLUME                                     CAPACITY  ACCESS MODES   STORAGECLASS       AGE
jenkins-home   Pending                                                                       ibmc-file-silver   3s
jenkins-home   Bound     pvc-f62fdc8a-797c-11e8-896e-02c97f163c96   20Gi      RWO            ibmc-file-silver   3m
Once see a new entry for jenkins-home with a status of Bound, it means that the PVC is ready to be used to install the Jenkins Chart.
Though not necessary to install Jenkins chart, we highly recommend that you setup Dynamic Provisioning in your ICP cluster so that you can save your Jenkins Data.
helm initThis initializes the helm client as well as the server side component called tiller.
For IKS, you need to download your cluster configuration first, setup KUBECONFIG, and then you can proceed with helm init as follows:
# Download cluster configuration to your workstation
# Make sure to run the "export KUBECONFIG=" command it spits out in the end
ibmcloud ks cluster-config ${CLUSTER_NAME}

# Init helm in your cluster
helm initIf using IBM Cloud Private, we recommend you follow these instructions to install and setup helm.
Each of the following helm install options downloads the Jenkins chart from Kubernetes Stable Charts Repository (which comes by default with helm) and installs it on your cluster.
IMPORTANT:
- The Jenkins Master itself takes a few minutes to initialize even after showing installation success. The output of the
helm installcommand will provide instructions on how to access the newly installed Jenkins Pod. For more information on the additional options for the chart, see this document. - For Jenkins to work properly, the chart also installs these plugins.
- Because Jenkins and these plugins get updated regularly, you might be required to update these plugins before you start creating pipelines. To update the plugins, please follow these intructions from the official Jenkins documentation after installing the Jenkins chart.
- If the Jenkins version that you installed is very outdated, the latest plugin versions might not work at all. This means that you might have to install a chart with the latest supported version of Jenkins before you upgrade the plugins.
The following command assumes you have Dynamic Volume Provisioning enabled, which will not only install jenkins, but also provision a Persistent Volume Claim where Jenkins can store its build data:
helm upgrade --install jenkins --namespace default \
    --set master.serviceType=NodePort \
    --set rbac.create=true \
stable/jenkins # If ICP, add the --tls flagTo Install the Jenkins Chart and Pass an Existing PVC, use the following command:
helm upgrade --install jenkins --namespace default \
    --set master.serviceType=NodePort \
    --set rbac.create=true \
    --set persistence.existingClaim=${EXISTING_PVC} \
    stable/jenkins # If ICP, add the --tls flag
Where ${EXISTING_PVC} is the name of an existing PVC, which is usually named jenkins-home.
To Install the Jenkins Chart without a PVC, use the following command:
helm upgrade --install jenkins --namespace default \
    --set master.serviceType=ClusterIP \
    --set master.ingress.enabled=true \
    --set rbac.create=true \
    --set persistence.enabled=false \
    stable/jenkins # If ICP, add the --tls flag
Though the above command won't require you have Dynamic Volume Provisioning enabled nor have an existing PVC, if Jenkins pod dies/restarts for whatever reason, you will lose your Jenkins data.
To validate Jenkins, you must obtain the Jenkins admin password, and the Jenkins URL.
After you install the chart, you will see a command to receive the password that looks like follows. Note that this command might look different based on which namespace you installed it in and the chart version:
printf $(kubectl get secret --namespace default jenkins -o jsonpath="{.data.jenkins-admin-password}" | base64 --decode);echoSave that password as you will need it to login into Jenkins UI
After you install the chart, you will see a few commands to obtain the Jenkins URL that look like follows:
  export NODE_PORT=$(kubectl get --namespace default -o jsonpath="{.spec.ports[0].nodePort}" services jenkins)
  export NODE_IP=$(kubectl get nodes --namespace default -o jsonpath="{.items[0].status.addresses[0].address}")
  echo http://$NODE_IP:$NODE_PORT/login
Note: The $NODE_IP you get might or might not be accessible depending on your Kubernetes environment.
If using minikube, the URL commands above might not work. To open a browser to the Jenkins web portal, use the following command:
minikube service jenkinsIf using IKS, then you must use the following command to obtain the public IPs of your worker nodes as the default Jenkins install output will return the worker nodes' private IPs, which are not publicly accessible:
ibmcloud ks workers ${CLUSTER_NAME}Where ${CLUSTER_NAME} is the cluster name assigned to your cluster.
The output of the above command will look something like this:
OK
ID                           Public IP        Private IP    Machine Type        State    Status   Zone    Version
kube-dal13-somerandomid-w1   111.22.333.441   10.11.22.31   u2c.2x4.encrypted   normal   Ready    dal13   1.10.3_1513
kube-dal13-somerandomid-w2   111.22.333.442   10.11.22.32   u2c.2x4.encrypted   normal   Ready    dal13   1.10.1_1508*
kube-dal13-somerandomid-w3   111.22.333.443   10.11.33.33   u2c.2x4.encrypted   normal   Ready    dal13   1.10.1_1508*
Just pick the Public IP of any worker node and use it as the NODE_IP. Note that the output above is showing sample values.
For ICP, the NODE_IP will vary on your setup, but technically the IP address of any of the worker nodes or the proxy nodes should work.
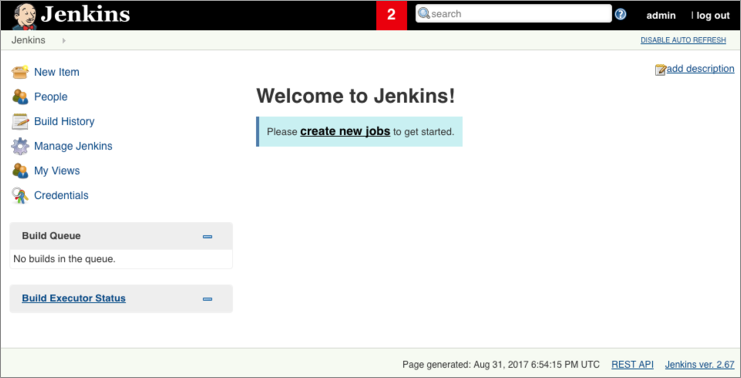
Open a new browser window and paste the URL obtained in Step 2. Then make sure you see a page that looks as follows:
Use the following test credentials to login:
- Username: admin
- Password: Password obtained in Step 2
If login is successful, you should see a page that looks like this
Congratulations, you have successfully installed a Jenkins instance in your Kubernetes cluster!
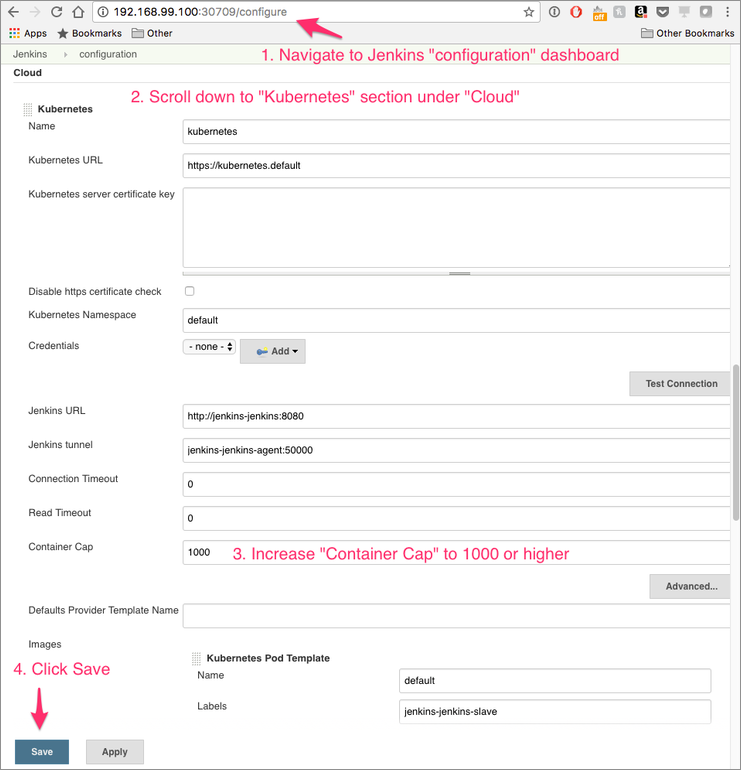
Jenkins creates pods from containers in order to run jobs, sometimes creating multiple containers until one is able to run successfully. The default container cap is set to 10, which can cause errors if multiple containers fail to create. Increase it to 1000 as follows:
To delete the Jenkins chart from your cluster, run the following:
helm delete jenkins --purge # add --tls flag if using IBM Cloud PrivateIn order to be able to build and push new images to a Docker Registry (Docker Hub or private), you will need the following information:
- Registry Location Docker Hub or a privately hosted Repository.
- Registry Username.
- If using Docker Hub, then it is your
Docker ID.
- If using Docker Hub, then it is your
- Registry Password.
- Registry Namespace: An isolated location inside the registry in which to push new images
- If using Docker Hub, then it is the same as your
Docker ID
- If using Docker Hub, then it is the same as your
If you don't already have a Docker ID, create one at https://hub.docker.com/
This information will go in a docker-registry secret, which you can create using the following:
kubectl create secret docker-registry registry-creds --docker-server=https://index.docker.io/v1/ --docker-username=${DOCKER_USERNAME} --docker-password=${DOCKER_PASSWORD} --docker-email=${EMAIL}Where:
registry-credsis the name of the secret.https://index.docker.io/v1/is Docker Hub's Fully Qualified Domain Name.${DOCKER_USERNAME}is yourDocker IDor username.${DOCKER_PASSWORD}is your Docker Hub password.${EMAIL}is your Docker Hub email.
For this guide, we are going to use the IBM Cloud Container Registry service to host our docker images. With an IBM Cloud account, you have access to a generous FREE tier. To do the initial setup, we recommend you follow their Registry Quick Start guide, in which you will setup the required CLI components and push your first image to the registry!
Now that your registry is setup we can proceed to creating a Registry Token, which will be used by the Jenkins pipeline to push and pull images from the registry. This token can be made non-expiring, which is ideal for CI/CD servers that run 24/7. Also, this token is not tied to a user account, so no need to constanly enter username and passwords manually to login into docker registry.
In order to push Docker images to the IBM Cloud Container Registry, you will first need to create a globally unique namespace:
bx cr namespace-add ${NAMESPACE}Where ${NAMESPACE} is the globally unique name for your namespace.
To create a Registry Token on IBM Cloud Container Registry, run the following command:
bx cr token-add --non-expiring --readwrite --description "For Science"# Create docker registry secret
kubectl create secret docker-registry registry-creds --docker-server=registry.ng.bluemix.net --docker-username=token --docker-password=${TOKEN} [email protected]Where:
registry-credsis the name of the secret.registry.ng.bluemix.netis the registry domain address.tokenis the username associated with the registry token.${TOKEN}is the actual token obtained in the previous step.[email protected]is just a sample email to associate with the token.
This information will go in a docker-registry secret, which you can create using the following:
kubectl create secret docker-registry registry-creds --docker-server=mycluster.icp:8500 --docker-username=${DOCKER_USERNAME} --docker-password=${DOCKER_PASSWORD} [email protected]Where:
bluemix-registryis the name of the secret.registry.ng.bluemix.netis the registry domain address.${DOCKER_USERNAME}is the username associated with the registry token.${DOCKER_PASSWORD}is the actual token obtained in the previous step.[email protected]is just a sample email to associate with the token.
When you installed the Jenkins helm chart, you also created a service account with it, which is called jenkins. This is done with the --set rbac.create=true parameter. A service account is like a regular Kubernetes user account (i.e. admin) but for procceses rather than humans. With the service account we can interact with the Kubernetes API from running pods to do things like create, get, and delete pods, deployments, etc.
In our case, we are going to use the service account to update existing deployments with a Docker image from our private registry. Since the repository is private, the service account needs acccess to the Docker Secret (which we created in Step 1) to authenticate against Docker Hub and pull down the image into our deployment. In service account terms, this kind of secret is known as an imagePullSecret. To patch the service account, run the following command:
kubectl patch serviceaccount jenkins -p '{"imagePullSecrets": [{"name": "registry-creds"}]}'NOTE: This step is not necessary if the Docker images are public. However, it is a best practice to secure your Docker registry with authentication.
For Jenkins to be able to safely use the Docker Registry Credentials in the pipelines (mostly in the docker push command), we must create a Username with password credentials in Jenkins. To do so, open a browser window and do the following:
- Enter the URL to your Jenkins instance and go to
Jenkins->Credentials->System->Global credentials (unrestricted)- Or you can use the following URL:
http://JENKINS_IP:PORT/credentials/store/system/domain/_/
- Click on
Add Credentials- Or you can use the following URL:
http://JENKINS_IP:PORT/credentials/store/system/domain/_/newCredentials
- Create
Username with passwordcredentials for the token:- Select
Username with passwordas the kind. - Make sure the
Scopestays asGlobal. - Enter your registry username as the
Username. - Enter registry password as the
Password. - Enter
registry-credentials-idas theID. - Optional: Enter a description for the credentials.
- Press the
OKbutton. - If successful, you should see the
username/******credentials entry listed.
- Select
Now that we have a fully configured Jenkins setup. Let's create a sample CI/CD Jenkins Pipeline using our sample Bluecompute Web Service from BlueCompute.
NOTE: Make sure you already installed the bluecompute-ce chart in the default namespace. To do so, follow the instructions in the Install Bluecompute Reference Architecture Chart section.
Since the pipeline will create a Kubernetes Deployment, we will be using the Kubernetes Plugin Pipeline Convention. This will allow us to define the Docker images (i.e. Node.js) to be used in the Jenkins Slave Pods to run the pipelines and also the configurations (ConfigMaps, Secrets, or Environment variables) to do so, if needed.
Click here to see the sample Pipeline we will be using.
The next step is to create the pipeline parameters. You will need the following parameters with their respective default values:
- CLOUD:
kubernetes. - NAMESPACE:
default.- Only needed if using IBM Cloud Private's Docker Registry.
- REGISTRY:
docker.ioif using Docker Hub ormycluster.icp:8500(or whatever the cluster name is) for IBM Cloud Private's Docker Registry. - IMAGE_NAME: If using Docker Hub, then use
${DOCKER_USERNAME}/bluecompute-web.- If using IBM Cloud Private's Docker Registry, then just use
bluecompute-web.
- If using IBM Cloud Private's Docker Registry, then just use
- SERVICE_ACCOUNT:
jenkins. - REGISTRY_CREDENTIALS:
registry-credentials-id.- Where
registry-credentials-idis the Jenkins credentials that you created for the registry in Step 3: Save Docker Credentials in Jenkins.
- Where
To create a parameter in Jenkins, just follow the instructions below:
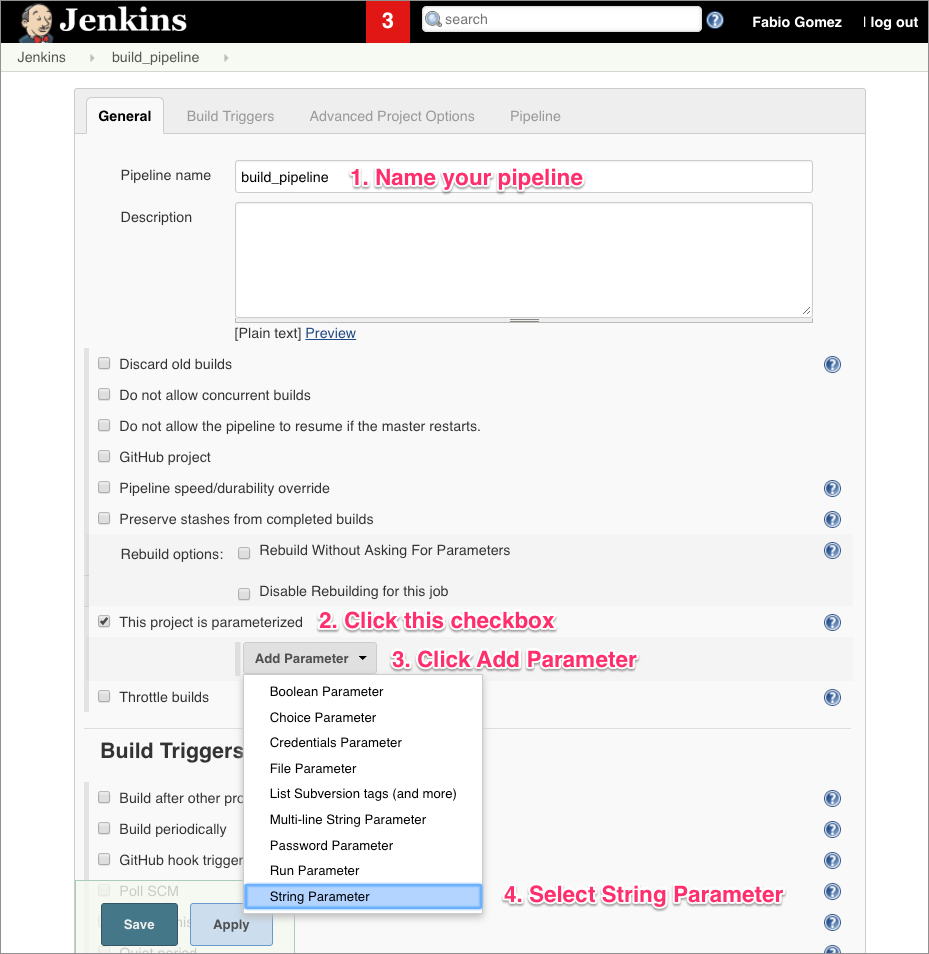
Once you create a parameter, then fill in the details as shown below:
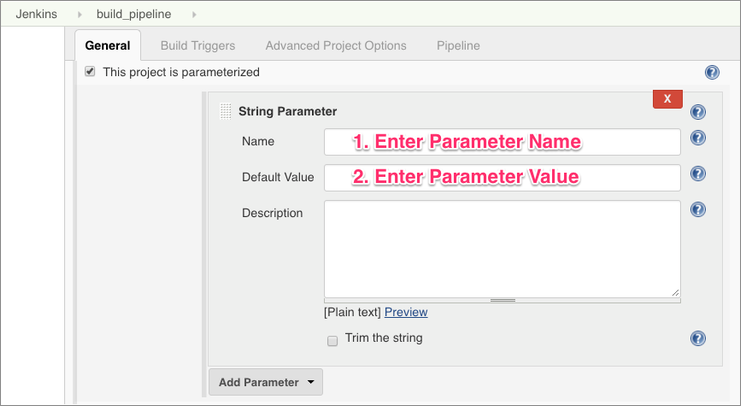
Do the above for all 5 parameters.
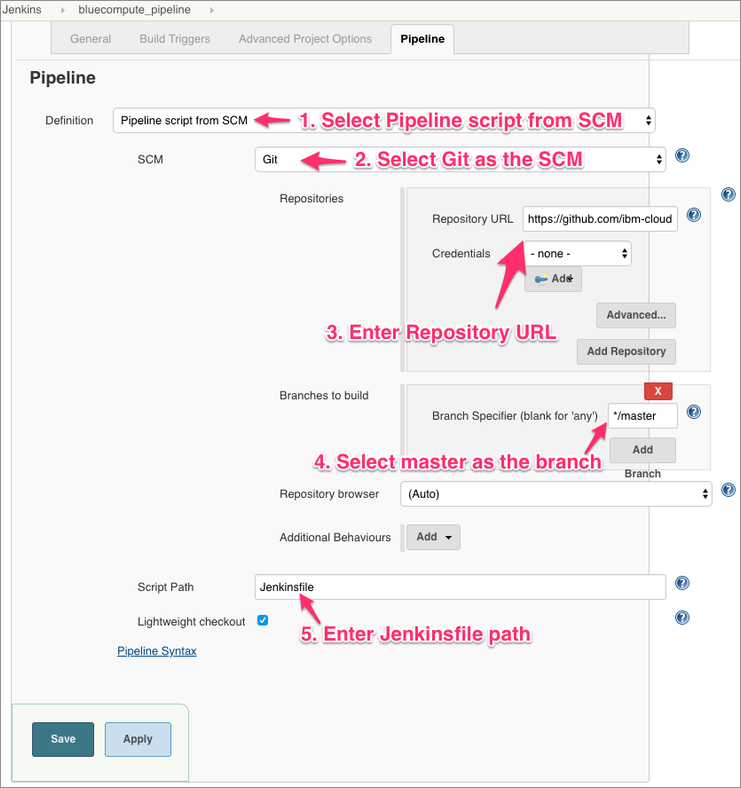
Now scroll down to Pipeline section and enter the following for git repository details:
- Repository URL:
https://github.com/ibm-cloud-architecture/refarch-cloudnative-bluecompute-web - Branch:
spring - Script Path:
Jenkinsfile
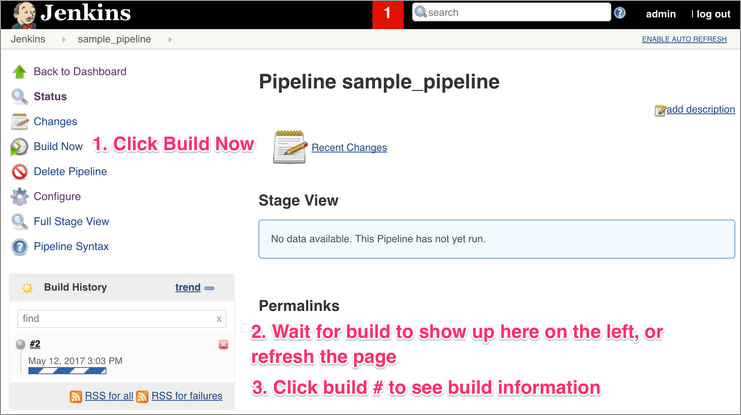
Once you do the above, press the Save button. You have successfully setup your Build pipeline.
That's it! You now have setup and ran a Jenkins CI/CD pipeline for Kubernetes deployments.
Congratulations on getting to the end of this document! The journey to fully automated CI/CD for Kubernetes is a bit tedious but it is worth it in the end. Here is an overview of what you have done so far:
- Provisioned 1 Kubernetes cluster.
- Installed Jenkins Chart on Kubernetes Cluster.
- Setup your Private Docker Registry.
- Setup a CI/CD pipeline, which runs from Kubernetes using Kubernetes Plugin.
- Ran the CI/CD pipeline.
With this knowledge, you will be able to setup your own fully automated Kubernetes CICD pipelines.
All that remains is to use this knowledge to put together your own pipelines and create webhooks that will trigger the pipelines via the git push command. There are plenty of tutorials online that explain how to setup GitHub (or any other source control) to trigger Jenkins pipelines via webhooks. We recommend that you checkout our Microclimate guide, specifically the Create GitHub Web Hook, if you are interested in setting this up.
Most companies already have a standalone Jenkins deployment and would like to integrate new technologies (i.e. Kubernetes) with it. Also, a standalone Jenkis is usually used to deploy to multiple environments (i.e. Public Cloud for Dev and On-Premise for Prod).
To learn about this use case, we encourage you to read our Hybrid Cloud DevOps guideline here.
To learn more about how podman is a much better suited container engine for CI/CD when compared to Docker, checkout this document:
