Coffee Chat Voice Assistant is an advanced, voice-driven ordering system leveraging Azure OpenAI GPT-4o Realtime API to recreate the authentic experience of ordering coffee from a friendly café barista. This system provides natural conversations to deliver engaging and intuitive responses, ensuring a seamless and enjoyable user experience. With real-time transcription, every spoken word is captured and displayed, ensuring clarity and accessibility.
As users place their orders, live updates are dynamically reflected on the screen, allowing them to see their selections build in real time. By simulating a true-to-life customer interaction, Coffee Chat Voice Assistant highlights the transformative potential of AI to enhance convenience and personalize the customer experience, creating a uniquely interactive and intuitive journey, adaptable for various industries and scenarios.
Beyond coffee enthusiasts, this technology can enhance accessibility and inclusivity, providing a hands-free, voice-driven experience for retail, hospitality, transportation, and more. Whether ordering on-the-go in a car, placing a contactless order from home, or supporting users with mobility challenges, this assistant demonstrates the limitless potential of AI-driven solutions for seamless user interactions.
- Coffee Chat Voice Assistant
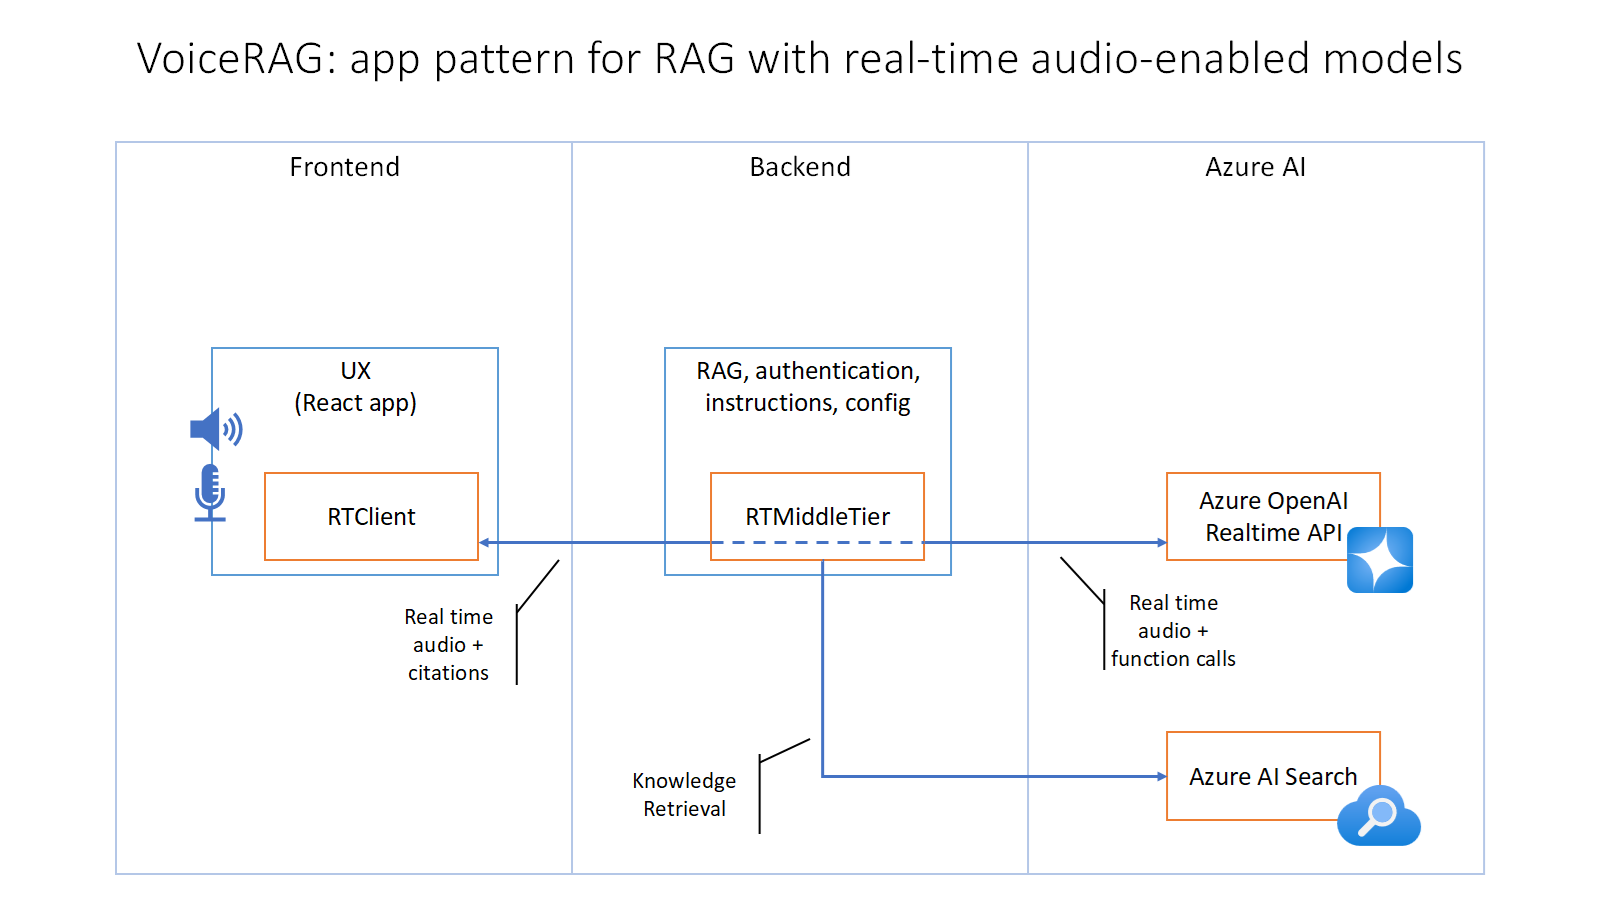
This project builds upon the VoiceRAG Repository: an example of how to implement RAG support in applications that use voice as their user interface, powered by the GPT-4o realtime API for audio. The pattern is described in more detail in this blog post, and you can see this sample app in action in this short video. For the Voice RAG README, see voice_rag_README.md."
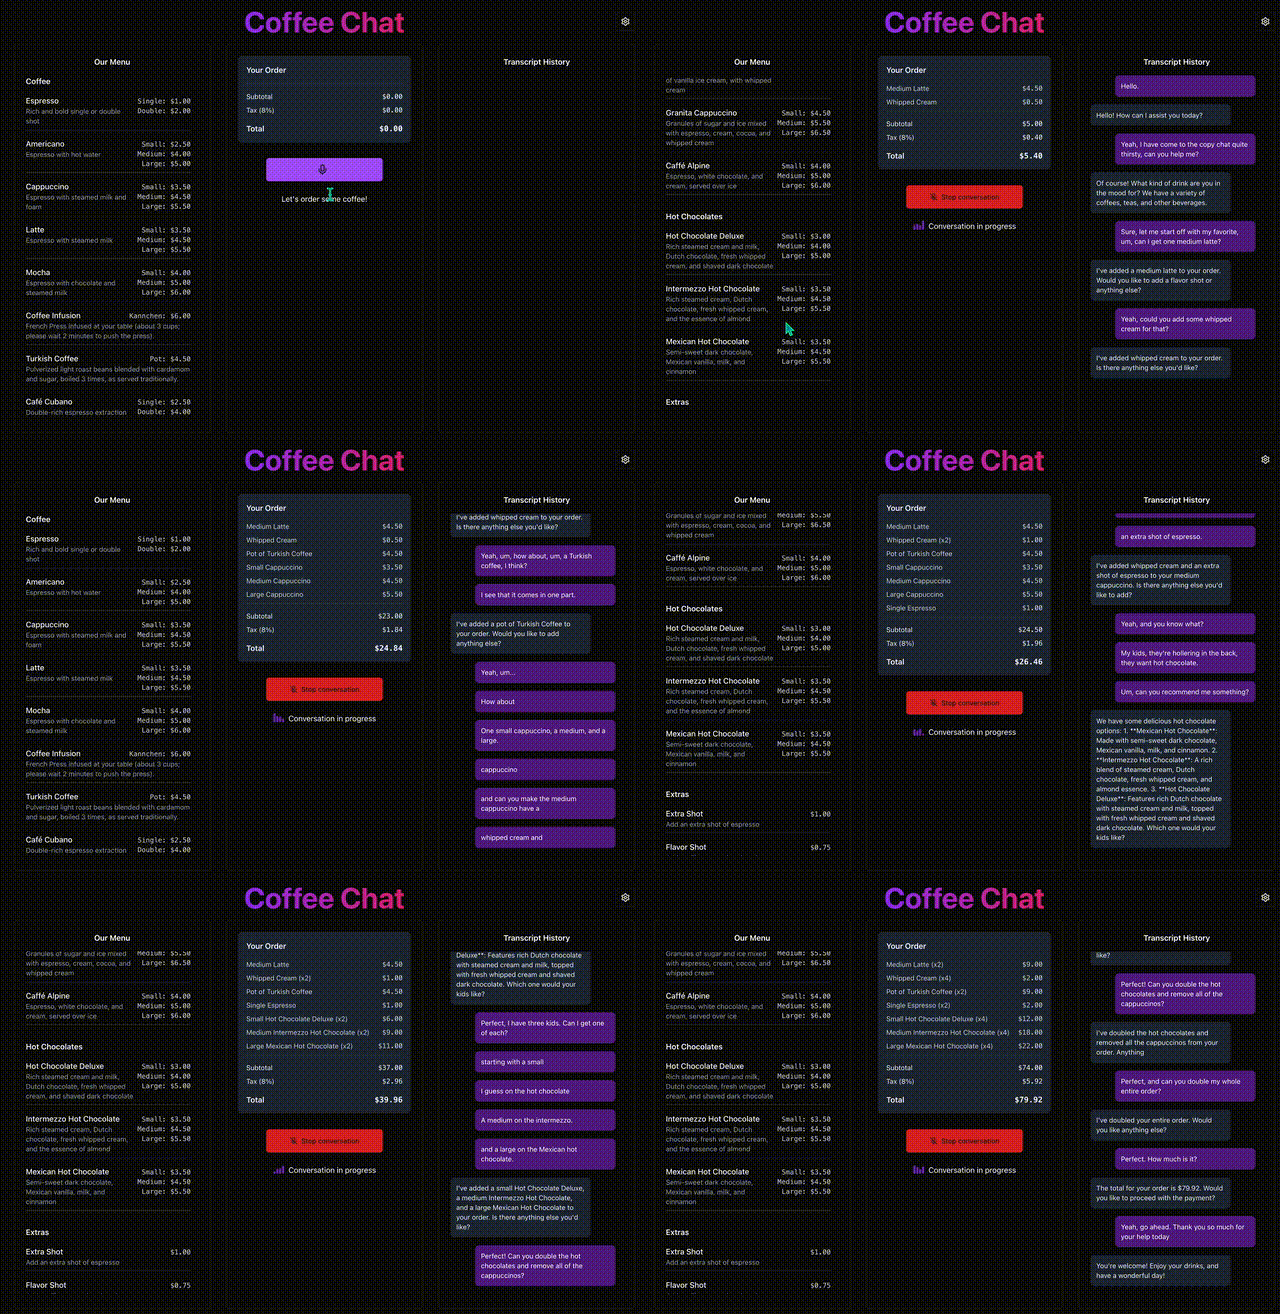
This video showcases a 4-minute interaction where a user places a large order using the Coffee Chat Voice Assistant.
Watch the full video with audio
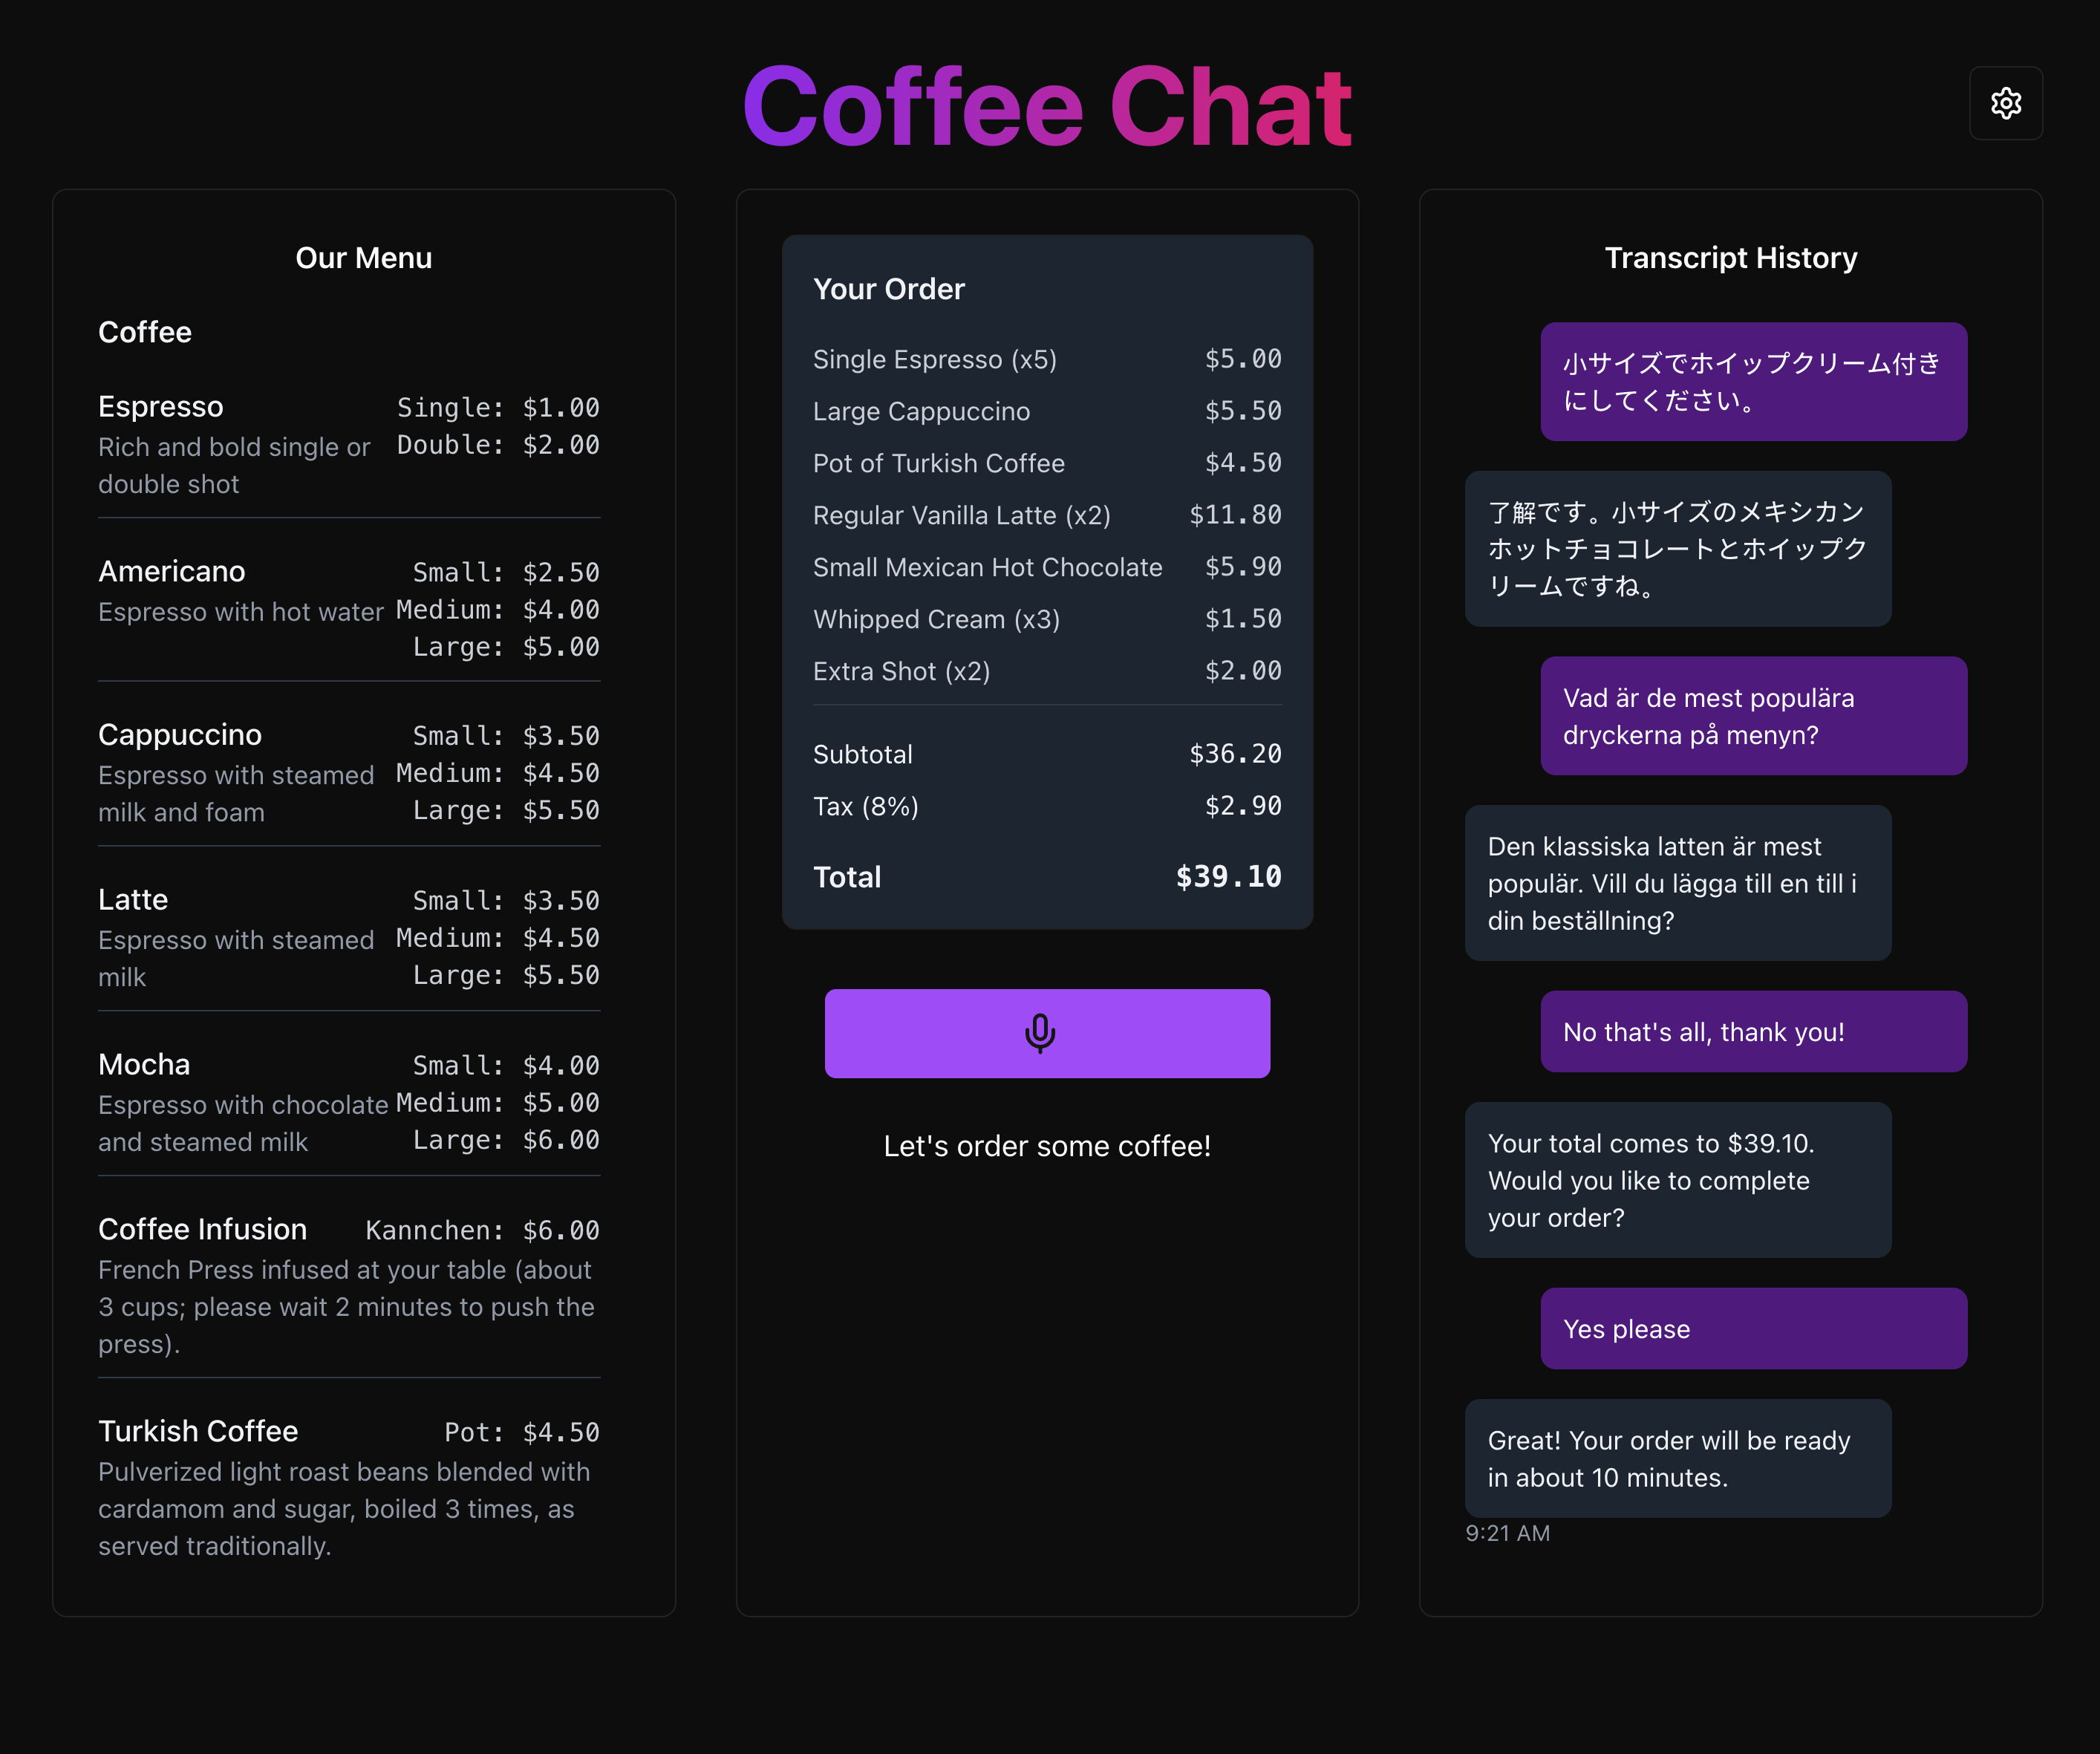
This video demonstrates the multilingual ordering capabilities of the Coffee Chat Voice Assistant.
Watch the full video with audio
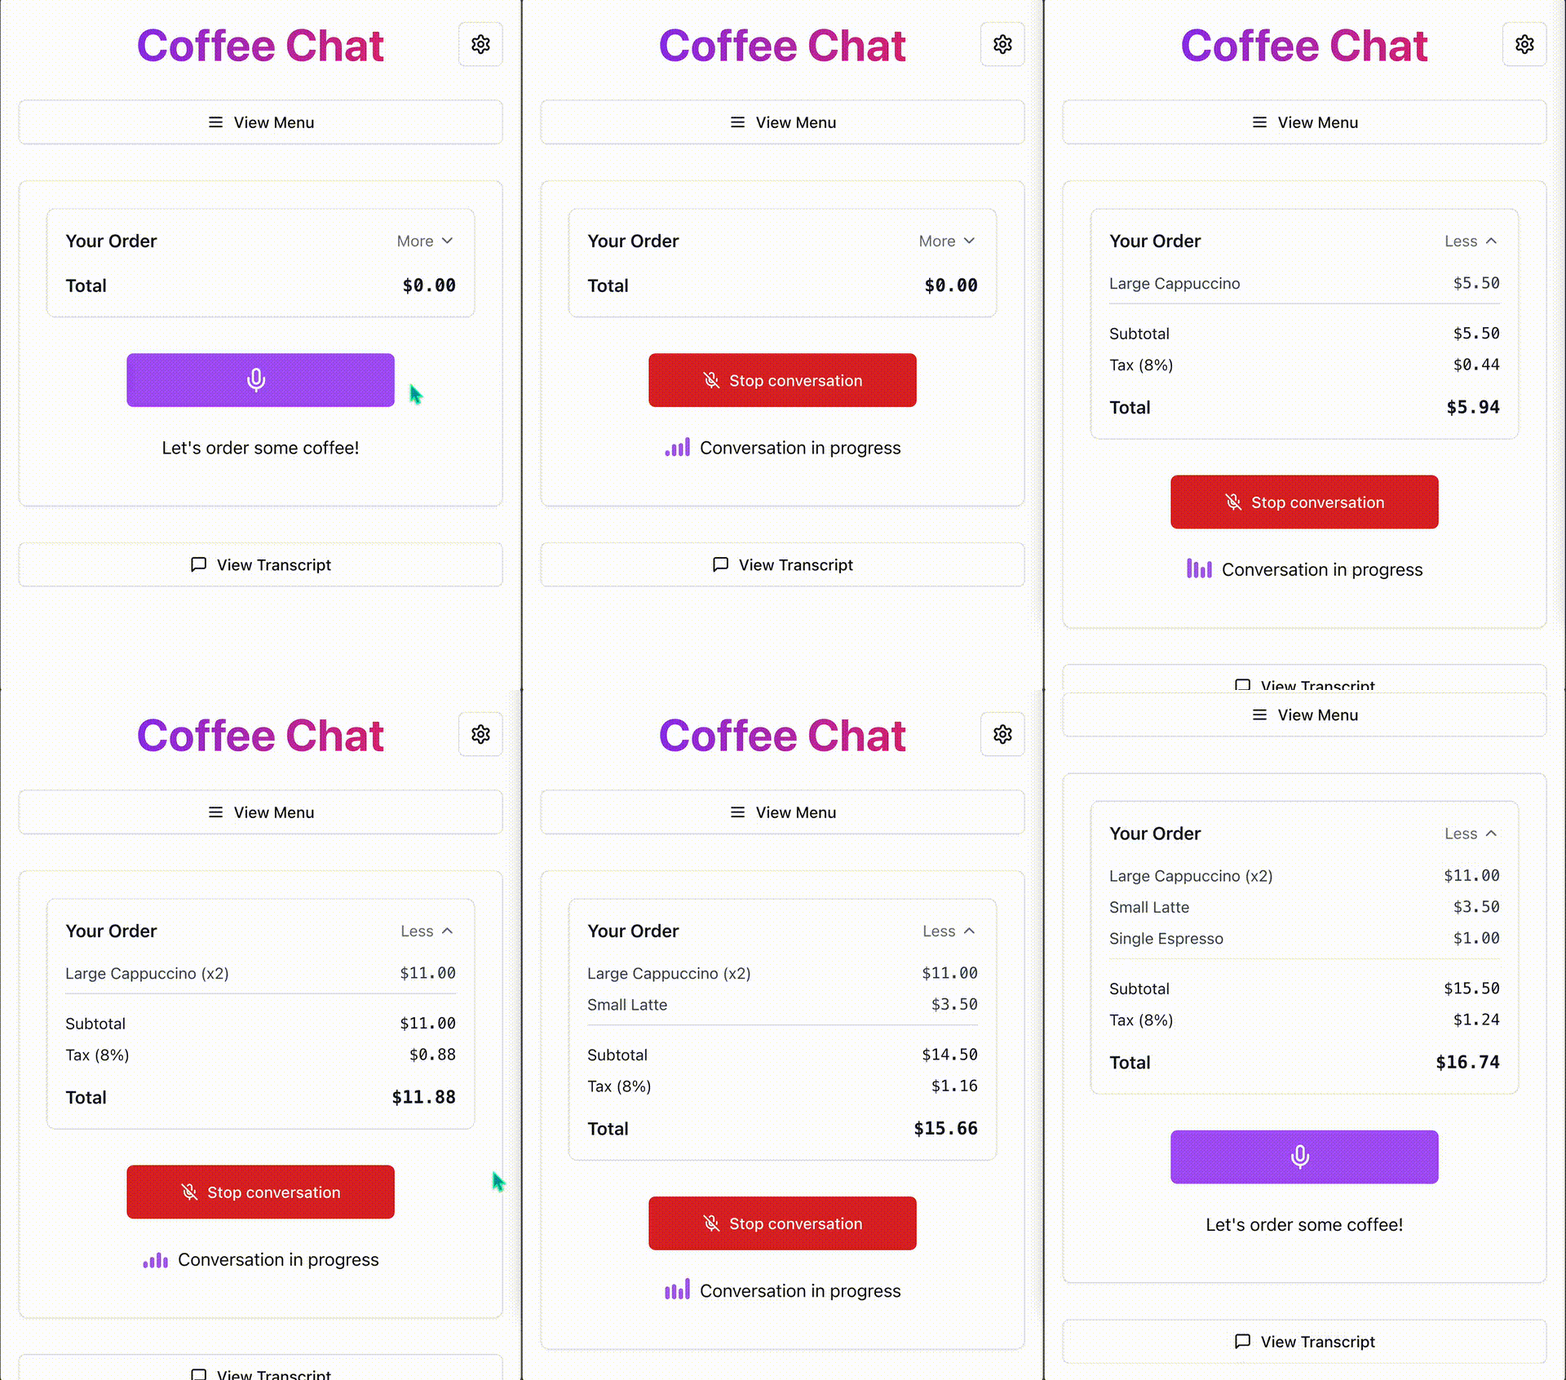
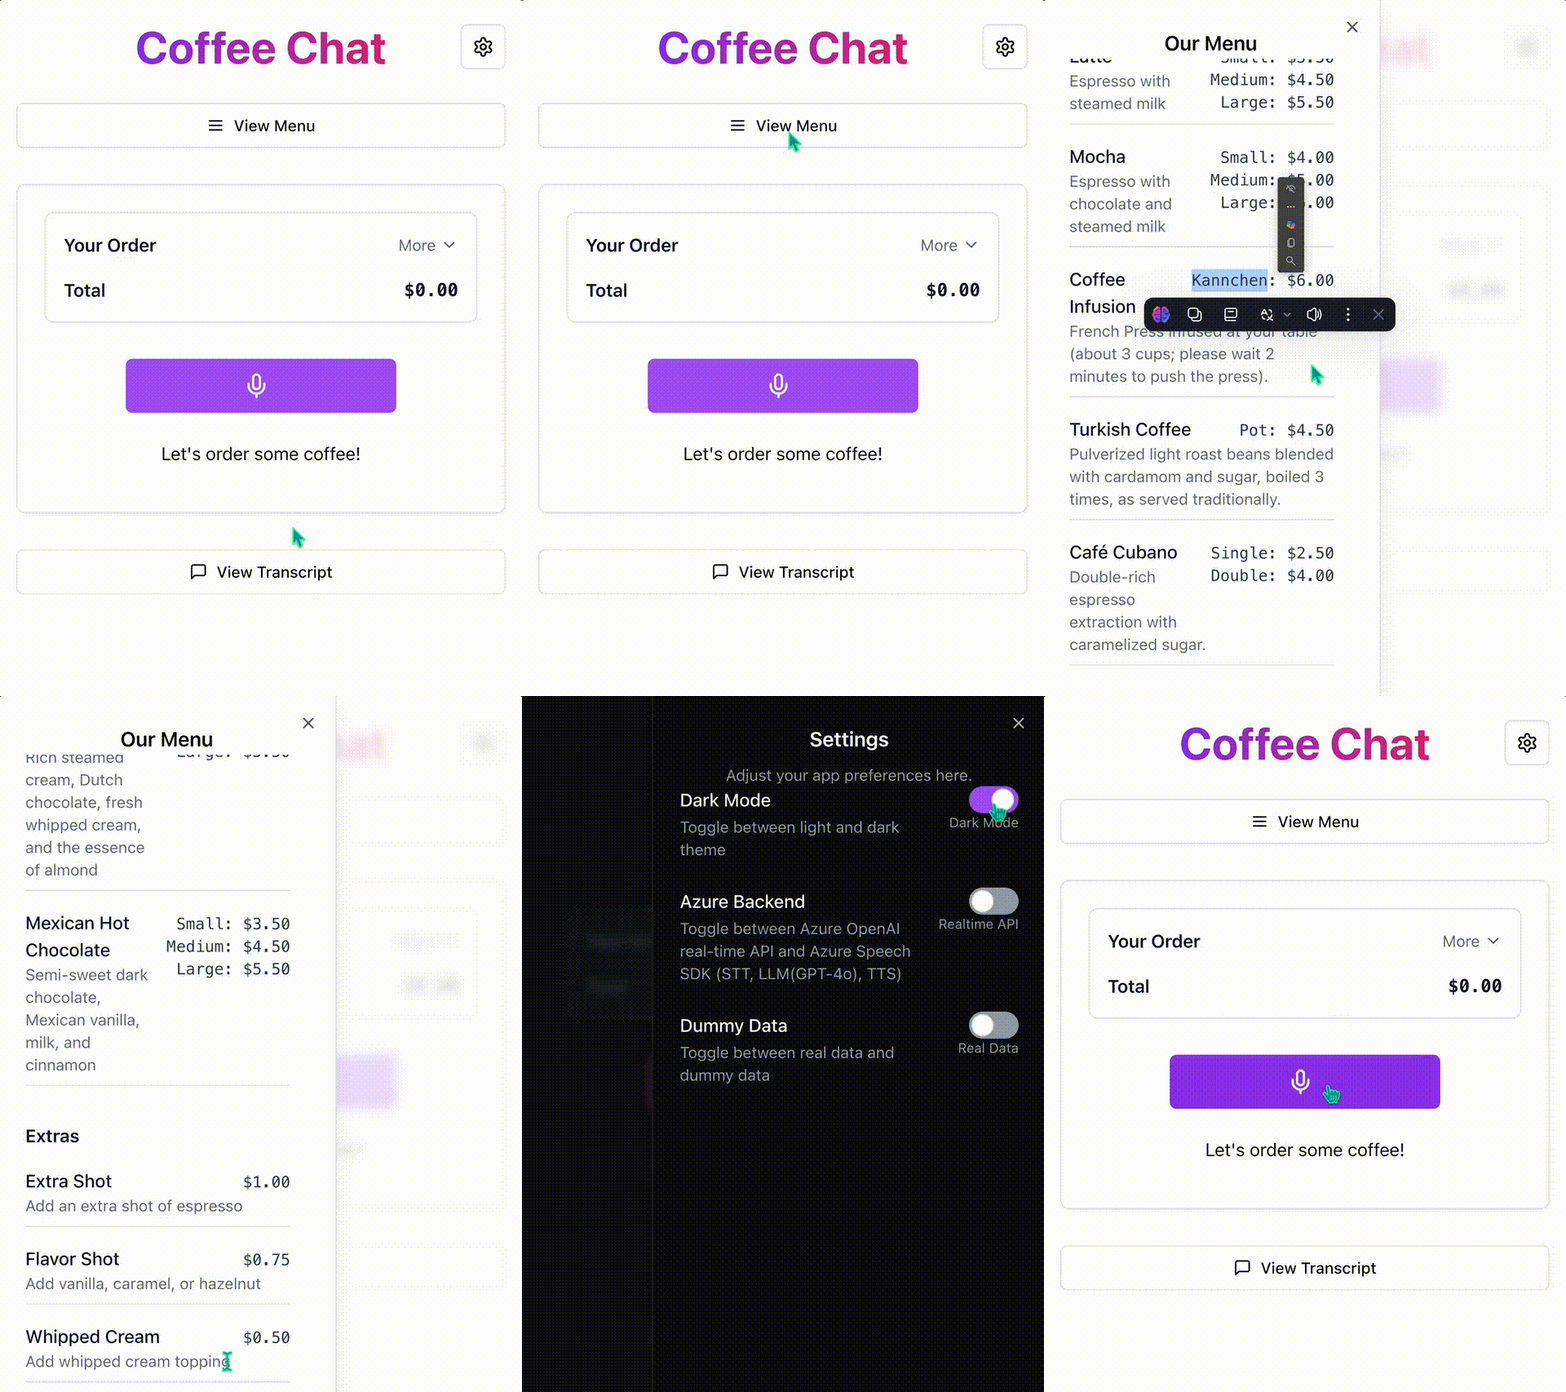
This video provides a walkthrough of the various UI elements in the Coffee Chat Voice Assistant.
Watch the full video with audio
- Voice Interface: Speak naturally to the app, and it processes your voice input in real-time using a flexible backend that supports various voice-to-text and processing services.
- Retrieval-Augmented Generation (RAG): Leverages knowledge bases to ground responses in relevant and contextual information, such as menu-based ordering.
- Real-Time Transcription: Captures spoken input and provides clear, on-screen text transcriptions for transparency and accessibility.
- Live Order Updates: Dynamically displays order changes during the conversation by integrating advanced function-calling capabilities.
- Audio Output: Converts generated responses into human-like speech, with the app playing audio output through the browser's audio capabilities for seamless hands-free interactions.
The RTClient in the frontend receives the audio input, sends that to the Python backend which uses an RTMiddleTier object to interface with the Azure OpenAI real-time API, and includes a tool for searching Azure AI Search.
This repository includes infrastructure as code and a Dockerfile to deploy the app to Azure Container Apps, but it can also be run locally as long as Azure AI Search and Azure OpenAI services are configured.
You have a few options for getting started with this template. The quickest way to get started is GitHub Codespaces, since it will setup all the tools for you, but you can also set it up locally. You can also use a VS Code dev container
You can run this repo virtually by using GitHub Codespaces, which will open a web-based VS Code in your browser:
Once the codespace opens (this may take several minutes), open a new terminal and proceed to deploy the app.
You can run the project in your local VS Code Dev Container using the Dev Containers extension:
-
Start Docker Desktop (install it if not already installed)
-
Open the project:
-
In the VS Code window that opens, once the project files show up (this may take several minutes), open a new terminal, and proceed to deploying the app.
-
Install the required tools:
- Azure Developer CLI
- Node.js
- Python >=3.11
- Important: Python and the pip package manager must be in the path in Windows for the setup scripts to work.
- Important: Ensure you can run
python --versionfrom console. On Ubuntu, you might need to runsudo apt install python-is-python3to linkpythontopython3.
- Git
- Powershell - For Windows users only.
-
Clone the repo (
git clone https://github.com/john-carroll-sw/coffee-chat-voice-assistant) -
Proceed to the next section to deploy the app.
If you have a JSON file containing the menu items for your café, you can use the provided Jupyter notebook to ingest the data into Azure AI Search.
- Open the
menu_ingestion_search_json.ipynbnotebook. - Follow the instructions to configure Azure OpenAI and Azure AI Search services.
- Prepare the JSON data for ingestion.
- Upload the prepared data to Azure AI Search.
This notebook demonstrates how to configure Azure OpenAI and Azure AI Search services, prepare the JSON data for ingestion, and upload the data to Azure AI Search for hybrid semantic search capabilities.
Link to JSON Ingestion Notebook
If you have a PDF file of a café's menu that you would like to use, you can use the provided Jupyter notebook to extract text from the PDF, parse it into structured JSON format, and ingest the data into Azure AI Search.
- Open the
menu_ingestion_search_pdf.ipynbnotebook. - Follow the instructions to extract text from the PDF using OCR.
- Parse the extracted text using GPT-4o into structured JSON format.
- Configure Azure OpenAI and Azure AI Search services.
- Prepare the parsed data for ingestion.
- Upload the prepared data to Azure AI Search.
This notebook demonstrates how to extract text from a menu PDF using OCR, parse the extracted text into structured JSON format, configure Azure OpenAI and Azure AI Search services, prepare the parsed data for ingestion, and upload the data to Azure AI Search for hybrid semantic search capabilities.
Link to PDF Ingestion Notebook
The steps below will provision Azure resources and deploy the application code to Azure Container Apps.
-
Login to your Azure account:
azd auth login
For GitHub Codespaces users, if the previous command fails, try:
azd auth login --use-device-code
-
Create a new azd environment:
azd env new
Enter a name that will be used for the resource group. This will create a new folder in the
.azurefolder, and set it as the active environment for any calls toazdgoing forward. -
(Optional) This is the point where you can customize the deployment by setting azd environment variables, in order to use existing services or customize the voice choice.
-
Run this single command to provision the resources, deploy the code, and setup integrated vectorization for the sample data:
azd up
- Important: Beware that the resources created by this command will incur immediate costs, primarily from the AI Search resource. These resources may accrue costs even if you interrupt the command before it is fully executed. You can run
azd downor delete the resources manually to avoid unnecessary spending. - You will be prompted to select two locations, one for the majority of resources and one for the OpenAI resource, which is currently a short list. That location list is based on the OpenAI model availability table and may become outdated as availability changes.
- Important: Beware that the resources created by this command will incur immediate costs, primarily from the AI Search resource. These resources may accrue costs even if you interrupt the command before it is fully executed. You can run
-
After the application has been successfully deployed you will see a URL printed to the console. Navigate to that URL to interact with the app in your browser. To try out the app, click the "Start conversation button", say "Hello", and then ask a question about your data like "Could I get a small latte?" You can also now run the app locally by following the instructions in the next section.
You can run this app locally using either the Azure services you provisioned by following the deployment instructions, or by pointing the local app at already existing services.
-
If you deployed with
azd up, you should see aapp/backend/.envfile with the necessary environment variables. -
If you did not use
azd up, you will need to createapp/backend/.envfile with the necessary environment variables. You can use the provided sample file as a template:cp app/backend/.env-sample app/backend/.env
Then, fill in the required values in the
app/backend/.envfile. You can find the sample file here. -
Run this command to start the app:
Windows:
pwsh .\scripts\start.ps1
Linux/Mac:
./scripts/start.sh
-
The app is available on http://localhost:8765.
Once the app is running, when you navigate to the URL above you should see the start screen of the app shown in the Visual Demonstrations section.
To try out the app, click the "Start conversation button", say "Hello", and then ask a question about your data like "Could I get a small latte?"
Contributions are welcome! Please open an issue or submit a pull request.
- OpenAI Realtime API Documentation
- Azure OpenAI Documentation
- Azure AI Services Documentation
- Azure AI Search Documentation
- Azure AI Services Tutorials
- Azure AI Community Support
- Azure AI GitHub Samples
- Azure AI Services API Reference
- Azure AI Services Pricing
- Azure Developer CLI Documentation
- Azure Developer CLI GitHub Repository
