This example project shows how to set up a Firebase Phone Auth in Flutter with Riverpod for its state management
You will need to setup Firebase and add the GoogleService-Info.plist to the iOS project and google-services.json to the Android project. Don't forget to enable Phone Authentication on your Firebase project.
This app uses Freezed, a package which generates some code. In order to generate it, just type this command in your Terminal:
flutter pub run build_runner build --delete-conflicting-outputs
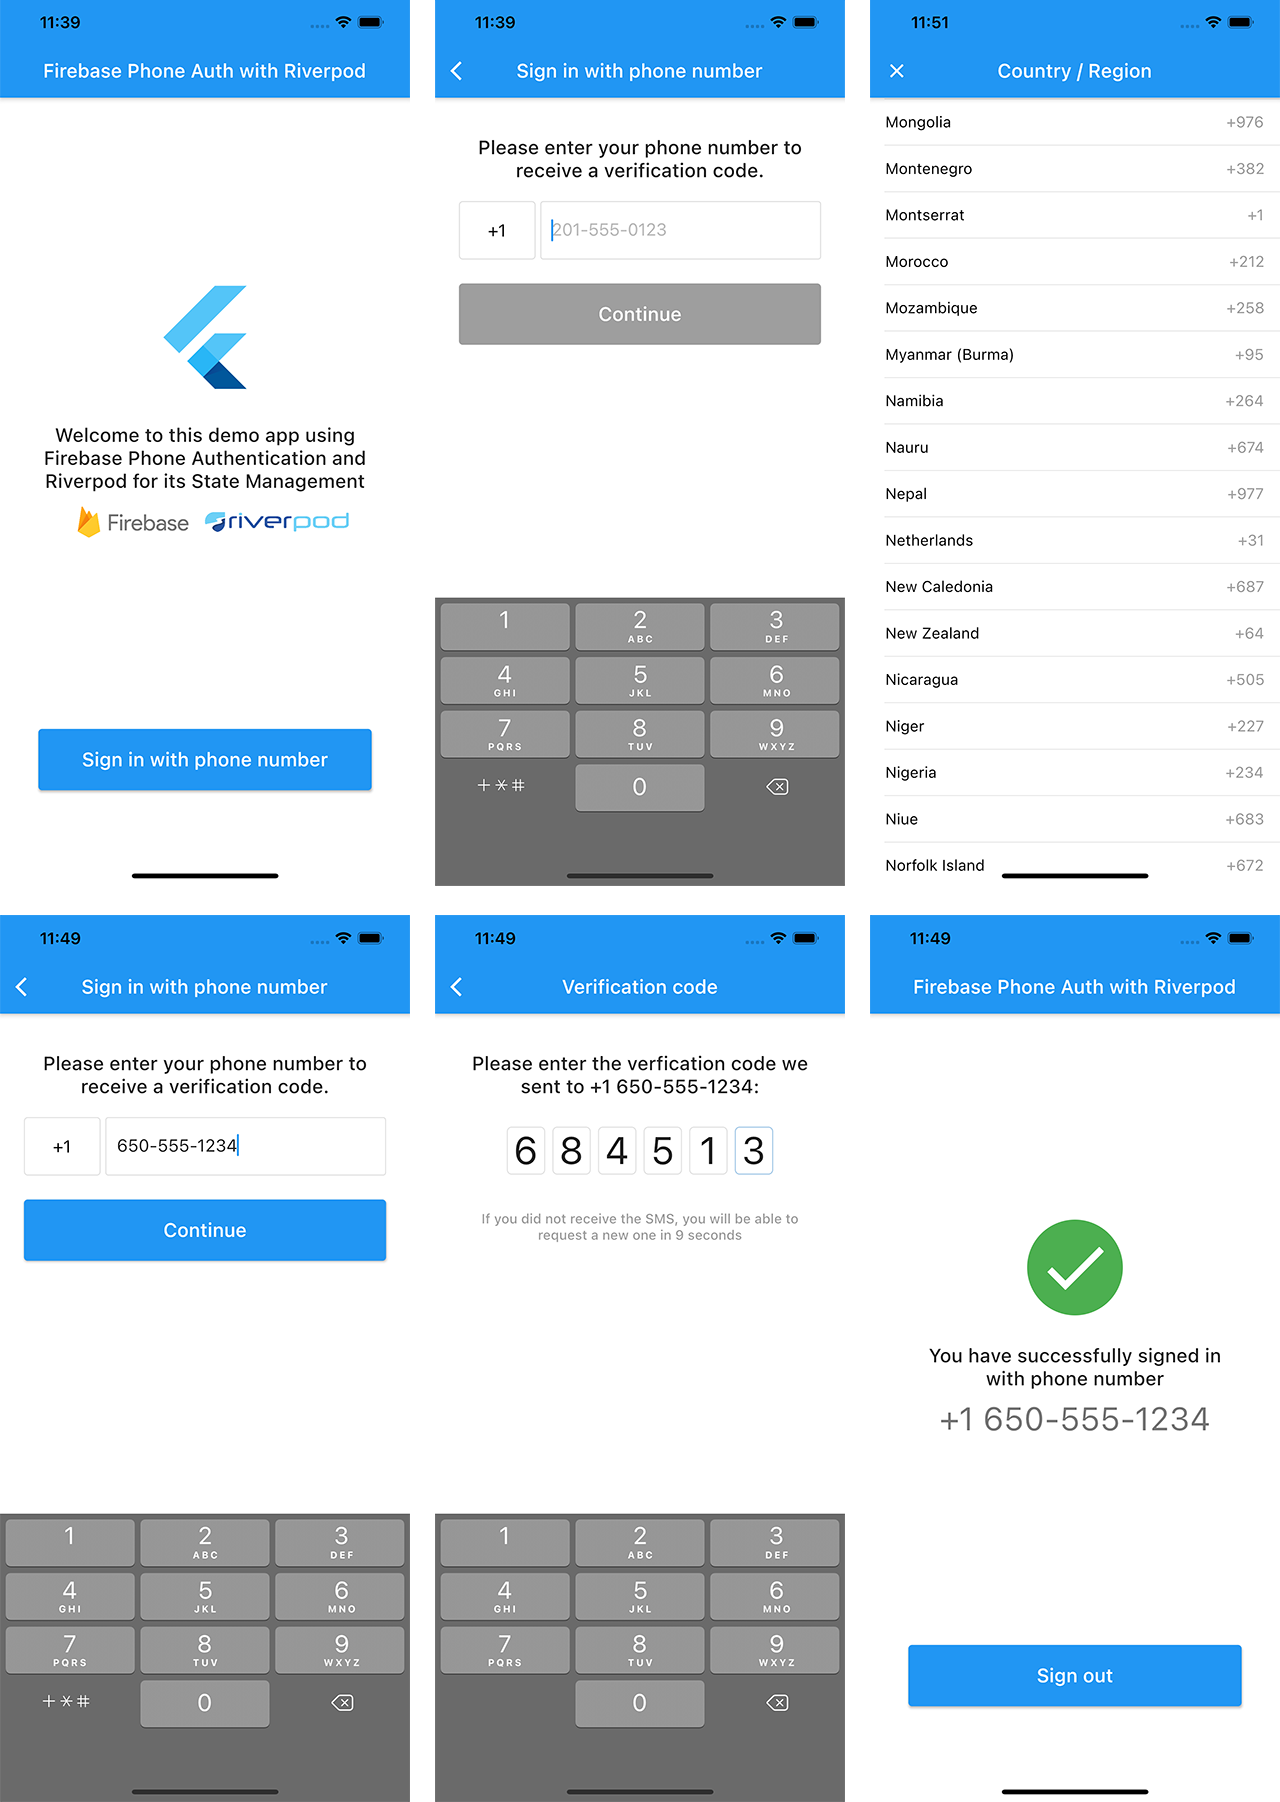
The app displays a landing screen when the user is not authenticated.
Then the user can move to a sign-in flow with phone authentication, where he can select his country to get the right phone code.
When the verification code is sent, the user is moved to a new screen requesting the verification code.
A countdown is displayed before the user can make a new verification code request, to avoid excessive requests.
When the verification code is approved, the user is moved to a home page with a logout button.
On this screen, the user is asked to type his phone number. His country has been automatically detected by the app but he can change it by typing the country code, which open a new screen with all the countries available and their phone code.
The phone number is automatically formatted and verified as it is entered, filling spaces and dashes when needed. An error is displayed if the phone number is not a mobile number.
When the phone number is detected as valid, the "Continue" button is enabled.
This screen displays a TextField where the user is asked to type the verification code. Since we know that Firebase verification codes is 6-digit, the TextField is formatted to fit this structure.
There is no validation button on this screen because the TextField autovalidates the code when it reaches the 6th number.
The user can request a new verification code on this screen, but only after a delay, to avoid repeated requests.
This app uses some external librairies:
- Flutter_libphonenumber to manage country codes and phone number formatting
- Riverpod for the state management
- Freezed for building immutable state classes
- Pinput for the verification code TextField
The project is structured like this:
/app
  /common_widgets
  /home
  /routing
  /sign_in
/services
/state
lib folder only contains main.dart which the first screen and global_providers.dart which contain the providers accessible from everywhere in the app.
Then inside lib you will find:
statewhich contains our "freezed" state filesserviceswith contains the AuthService classappwith all the app stuff, with more details below.
All widgets which are used more than once are stored in app/common_widgets, for example the blue ElevatedButton.
All routes of the app are stored in app/routing.
Every single part of the app has its own folder, for this very simple app, it only has two: app/home and app/sign_in.
app/sign_in contains the sign in screens but also what we could call the view models.
The main goal of this sample project is to learn how to use Riverpod for this kind of authentication.
I used several of the providers available in the Riverpod package because I know that the large number of providers available tends to confuse a bit the Riverpod novices.
final authServiceProvider = Provider<AuthService>((ref) => AuthService());

final authStateProvider = StateNotifierProvider<AuthService, AuthState>((ref) {
  final authService = ref.watch(authServiceProvider);
  return authService;
});

final authStateChangesProvider = StreamProvider<User>(
(ref) => ref.watch(authServiceProvider).authStateChanges());authServiceProvideruses a simple Provider because its goal is to access theAuthServicemethods from everywhere, it is not intended to observe the state ofAuthService.authStateProvideris intended to observe the state ofAuthService, this is why we use here a StateNotifierProvider.authStateChangesProvideruses a StreamProvider because it observes theUserchanges from FirebaseAuth which is a Stream.
final signInPhoneModelProvider = StateNotifierProvider.autoDispose<SignInPhoneModel, SignInState>((ref) {
  final authService = ref.watch(authServiceProvider);
  return SignInPhoneModel(
    authService: authService,
  );
});

final selectedCountryProvider = Provider.autoDispose<CountryWithPhoneCode>((ref) {
  final authState = ref.watch(authStateProvider.state);
  return authState.maybeWhen(
    ready: (selectedCountry) => selectedCountry,
    orElse: () => null,
  );
});signInPhoneModelProvideruses a StateNotifierProvider because we observe the state ofSignInPhoneModel(which returns aSignInState)selectedCountryProvideruses a Provider because it's just here to provider a value ofCountryWithPhoneCodeobtained in the state ofAuthService.
final signInVerificationModelProvider =
    StateNotifierProvider.autoDispose<SignInVerificationModel, SignInState>((ref) {
  final authService = ref.watch(authServiceProvider);
  return SignInVerificationModel(
    authService: authService,
  );
});

final countdownProvider = StreamProvider.autoDispose<int>((ref) {
  final signInVerificationModel = ref.watch(signInVerificationModelProvider);
  return signInVerificationModel.countdown.stream;
});signInVerificationModelProvideruses a StateNotifierProvider for the same reasons assignInPhoneModelProvider.countdownProvideruses a StreamProvider because it observes a countdown which is updated from a StreamController inside theSignInVerificationModel.
final phoneNumberProvider = Provider.autoDispose<String>((ref) {
  final authService = ref.watch(authServiceProvider);
  return authService.formattedPhoneNumber;
});phoneNumberProvideruses a Provider because it's just here to provider string value obtained from the instance ofAuthService.
This sample app is an extract from Beebop, an app that I'm currently writing and that will be available in the next months on the App Store and Google Play.
If you have questions, feel free to ask on Twitter.


