dapr run --app-id palprimesapi --app-port 5296 --dapr-http-port 3500 dotnet run
dapr run --app-id palapi --app-port 5221 --dapr-http-port 3510 dotnet run
dapr run --app-id primespi --app-port 5225 --dapr-http-port 3520 dotnet run
- Dockerize (DONE)
- Frontend app,
- Blazor
- SignalR (DONE)
- Angular (DONE)
- Implementer algorithm's for Prime og Pal (DONE)
- Fix bug med Prime-api (DONE)
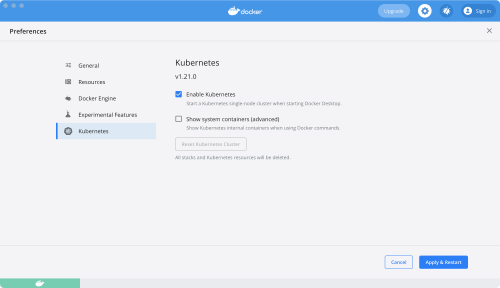
- Docker-Desktop Kubernetes (DONE) 1. Add SignalR back plane.
- Get open tracing to work with zipkin on Docker and Kubernetes 1. General info: https://docs.microsoft.com/en-us/dotnet/architecture/dapr-for-net-developers/observability 1. Example with Zipkin exporter: https://github.com/open-telemetry/opentelemetry-dotnet/tree/main/examples/AspNetCore (DONE)
- Competing consumers - skalering ("consumer.groups in redis") (DONE)
- Azure Kubernetes
Run all commands from root folder.
docker-compose.exe -f .\docker-compose.yml -f .\docker-compose.debug.yml up --build -d
Hit http://localhost:5220 in your browser to go to angular frontend.
docker-compose.exe -f .\docker-compose.yml -f .\docker-compose.debug.yml down
In case you want to run angular frontend outside Docker than start backend in Docker first and run ng serve.
CD to Frontend/Angular/angular-app folder and run the command below.
ng serve
Hit http://localhost:4200 in your browser.
Before you continue make sure to 1) Setup Kubernetes and Dapr and 2) Setup Open Telemetry on Kubernetes.
-
Run docker compose in case you need new build
docker-compose.exe -f .\docker-compose.yml up -d --build -
Run below commands to create helm package for each app
helm package --version "0.0.0-latest" --app-version latest --destination ./dist/helm ./src/Frontend/Angular/angular-app/charts helm package --version "0.0.0-latest" --app-version latest --destination ./dist/helm ./src/Palprimes.Api/Charts helm package --version "0.0.0-latest" --app-version latest --destination ./dist/helm ./src/Pal.Api/Charts helm package --version "0.0.0-latest" --app-version latest --destination ./dist/helm ./src/Prime.Api/Charts -
Run below commands to deploy all apps
In case you want to test the output just uncomment
--dry-run >> ./dist/{appname}.yaml.helm upgrade angularapp -f ./src/Frontend/Angular/angular-app/charts/values.yaml --install --recreate-pods --version=latest -n palprimes --set buildID=latest --set image.tag=latest ./dist/helm/angularapp-0.0.0-latest.tgz # --dry-run >> ./dist/angularapp.yaml helm upgrade palprimesapi -f ./src/Palprimes.Api/Charts/values.yaml --install --recreate-pods --version=latest -n palprimes --set buildID=latest --set image.tag=latest --set ASPNETCORE_ENVIRONMENT=Production ./dist/helm/palprimesapi-0.0.0-latest.tgz #--dry-run >> dist/palprimesapi.yaml helm upgrade primeapi -f ./src/Prime.Api/Charts/values.yaml --install --recreate-pods --version=latest -n palprimes --set buildID=latest --set image.tag=latest --set ASPNETCORE_ENVIRONMENT=Production ./dist/helm/primeapi-0.0.0-latest.tgz #--dry-run >> dist/primeapi.yaml helm upgrade palapi -f ./src/Pal.Api/Charts/values.yaml --install --recreate-pods --version=latest -n palprimes --set buildID=latest --set image.tag=latest --set ASPNETCORE_ENVIRONMENT=Production ./dist/helm/palapi-0.0.0-latest.tgz #--dry-run >> dist/palapi.yaml
    helm uninstall angularapp --namespace palprimes
    helm uninstall palprimesapi --namespace palprimes
    helm uninstall palapi --namespace palprimes
    helm uninstall primeapi --namespace palprimes
Required only the first time.
Good in case you want visuals of Kubernetes cluster with some basic administration.
-
Install dashboard
kubectl apply -f https://raw.githubusercontent.com/kubernetes/dashboard/v2.5.0/aio/deploy/recommended.yaml -
Create admin user and role
kubectl apply -f .\kubernetes\dashboard\admin-user.yaml kubectl apply -f .\kubernetes\dashboard\cluster-rolebinding.yaml -
Get token for login
kubectl -n kubernetes-dashboard get secret $(kubectl -n kubernetes-dashboard get sa/admin-user -o jsonpath="{.secrets[0].name}") -o go-template="{{.data.token | base64decode}}" -
Copy the token to use it with Dashboard login.
-
Run command below
kubectl proxy -
Access dashboard at http://localhost:8001/api/v1/namespaces/kubernetes-dashboard/services/https:kubernetes-dashboard:/proxy/ after running
-
Add repo
helm repo add ingress-nginx https://kubernetes.github.io/ingress-nginx -
Create namespace
kubectl create namespace ingress-nginx kubectl label namespace ingress-nginx cert-manager.io/disable-validation=true -
Create admission controller roles
kubectl apply -f .\kubernetes\ingress\admission-service-account.yaml -
Install Nginx Ingress
helm install ingress-nginx ingress-nginx/ingress-nginx -n ingress-nginx -
Wait until nginx containers run
kubectl get pods -n ingress-nginx
NAME                                       READY   STATUS    RESTARTS   AGE
ingress-nginx-controller-cb87575f5-pztmr   1/1     Running   0          74s
-
Add repo
helm repo add jetstack https://charts.jetstack.io -
Create namespace
kubectl create namespace cert-manager -
Install Cert-Manager
helm install cert-manager jetstack/cert-manager --namespace cert-manager --create-namespace --version v1.3.1 --set installCRDs=true -
Wait until cert-manager pods are running
kubectl get pod -n cert-manager NAME READY STATUS RESTARTS AGE cert-manager-7998c69865-s9lwk 1/1 Running 0 28s cert-manager-cainjector-7b744d56fb-ldgbv 1/1 Running 0 28s cert-manager-webhook-97f8b47bc-cr96d 1/1 Running 0 28s -
Install lets-encrypt
kubectl apply -f ./kubernetes/letsencrypt/letsencrypt-staging-clusterissuer.yaml -n cert-manager -
Verify creation of lets-encrypt
kubectl describe clusterissuer letsencrypt-staging -n cert-manager
Inspiration taken from her: https://docs.dapr.io/operations/hosting/kubernetes/kubernetes-deploy/
Note Dapr has been installed using helm charts.
-
Add dapr helm repo
 helm repo add dapr https://dapr.github.io/helm-charts/
 helm repo update
Optionally search for newest version
helm search repo dapr --devel --versions -
Install dapr
helm upgrade --install dapr dapr/dapr --version=1.6 --namespace dapr-system --create-namespace --wait --set global.logAsJson=trueUninstall dapr by running
helm uninstall dapr --namespace dapr-system -
Verify dapr installation
kubectl get pods --namespace dapr-system NAME READY STATUS RESTARTS AGE dapr-dashboard-8664d5c45f-4nxpw 1/1 Running 0 2m19s dapr-operator-58b9d5fd59-x44mr 1/1 Running 0 2m19s dapr-placement-server-0 1/1 Running 0 2m19s dapr-sentry-858fddc4f7-9hp2w 1/1 Running 0 2m19s dapr-sidecar-injector-7497b7945-b9g5g 1/1 Running 0 2m19s -
Create palprimes namespace
kubectl create namespace palprimes
-
Add bitnami repo
helm repo add bitnami https://charts.bitnami.com/bitnami helm repo update -
Install Redis
helm install redis bitnami/redis --namespace palprimes --set auth.password=gexo1! -
Verify Redis installation
kubectl get pods --namespace palprimes

NAME               READY   STATUS    RESTARTS   AGE
redis-master-0     1/1     Running   0          64s
redis-replicas-0   1/1     Running   0          64s
redis-replicas-1   0/1     Running   0          22s
Uninstall Redis by running
helm uninstall redis --namespace palprimes -
Configure redis pubsub and statestore dapr components
kubectl apply -f ./kubernetes/components/redis-statestore.yaml
kubectl apply -f ./kubernetes/components/redis-pubsub.yaml
The guide is inspired by this quick start: https://strimzi.io/quickstarts/
-
Install strimzi Custom Resource Definition (CRD).
kubectl create -f 'https://strimzi.io/install/latest?namespace=palprimes' -n palprimes -
Wait until strimzi pod is created
kubectl get pods -n palprimes NAME READY STATUS RESTARTS AGE redis-master-0 1/1 Running 0 2m35s redis-replicas-0 1/1 Running 0 2m35s redis-replicas-1 1/1 Running 0 107s redis-replicas-2 1/1 Running 0 80s strimzi-cluster-operator-587cb79468-g9d5x 1/1 Running 0 89s -
Provision the Apache Kafka cluster
kubectl apply -f https://strimzi.io/examples/latest/kafka/kafka-persistent-single.yaml -n palprimes -
Wait while Kubernetes starts the required pods, services and so on:
kubectl wait kafka/my-cluster --for=condition=Ready --timeout=300s -n palprimes -
Create topics
 kubectl create -f ./kubernetes/topics/receivenumber-topic.yaml
 kubectl create -f ./kubernetes/topics/results-topic.yaml
You can delete topic by running
kubectl delete -f ./kubernetes/topics/receivenumber-topic.yaml -
Configure Kafka pubsub
kubectl apply -f ./kubernetes/components/kafka-pubsub.yaml
-
Create Zipkin Deployment
kubectl create deployment zipkin --image openzipkin/zipkin --namespace dapr-system -
Create a Kubernetes service for the Zipkin pod
kubectl expose deployment zipkin --type ClusterIP --port 9411 --namespace dapr-system -
Deploy Dapr config
kubectl apply -f ./kubernetes/config/tracing.yaml
-
Forward zipkin port
kubectl port-forward svc/zipkin 9411:9411 --namespace dapr-system -
Access it at http://localhost:9411
-
Run below command
dapr dashboard -k -
Access Dapr dashboard at http://localhost:8080
Inspiration from https://dev.to/docker/enable-kubernetes-metrics-server-on-docker-desktop-5434
kubectl apply -f .\kubernetes\metrics\components.yaml
Metrics yaml fetched from https://github.com/kubernetes-sigs/metrics-server/releases
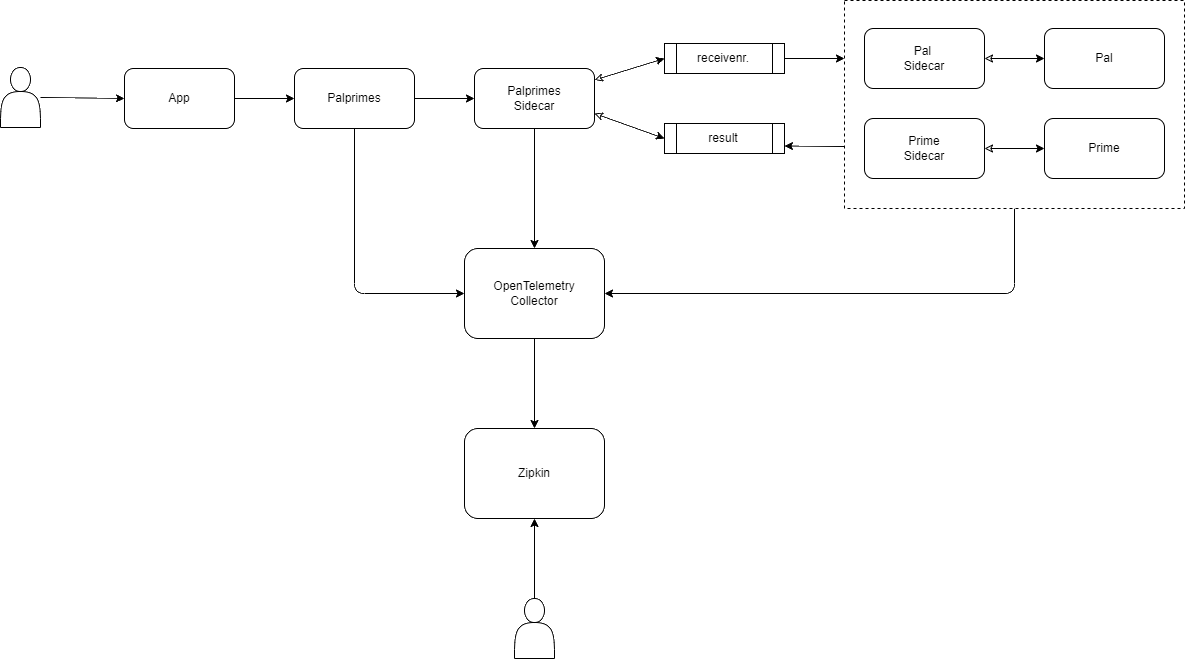
We are using OpenTelemetry Collector to collect all metrics and telemetry from services and service sidecar pods.
This runs only on Kubernetes.
-
Install collector
kubectl apply -f ./kubernetes/otel-collector/open-telemetry-collector-generic.yaml -
Install Dapr component
kubectl apply -f ./kubernetes/config/otel-collector.yaml
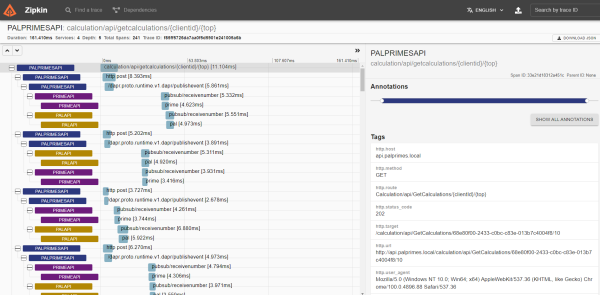
Now if you run Palprimes on Kubernetes, you should see the instrumentation logs in Zipkin.
-
Create test topic
docker exec broker kafka-topics --bootstrap-server broker:9092 --create --topic quickstart -
Write messages to the topic
docker exec --interactive --tty broker kafka-console-producer --bootstrap-server broker:9092 --topic quickstartWrite some text in the terminal window (such as
Hello) and hit Enter. -
Start new terminal window and execute command below to read messages from the topic
docker exec --interactive --tty broker kafka-console-consumer --bootstrap-server broker:9092 --topic quickstart --from-beginningNow you can produce messages in one terminal window and see them consumed in another.
-
Delete topic by running
docker exec broker kafka-topics --bootstrap-server broker:9092 --delete --topic quickstart
Display Dapr config in kubernetes
dapr configurations --kubernetes


