Welcome to the opsCloud wiki!
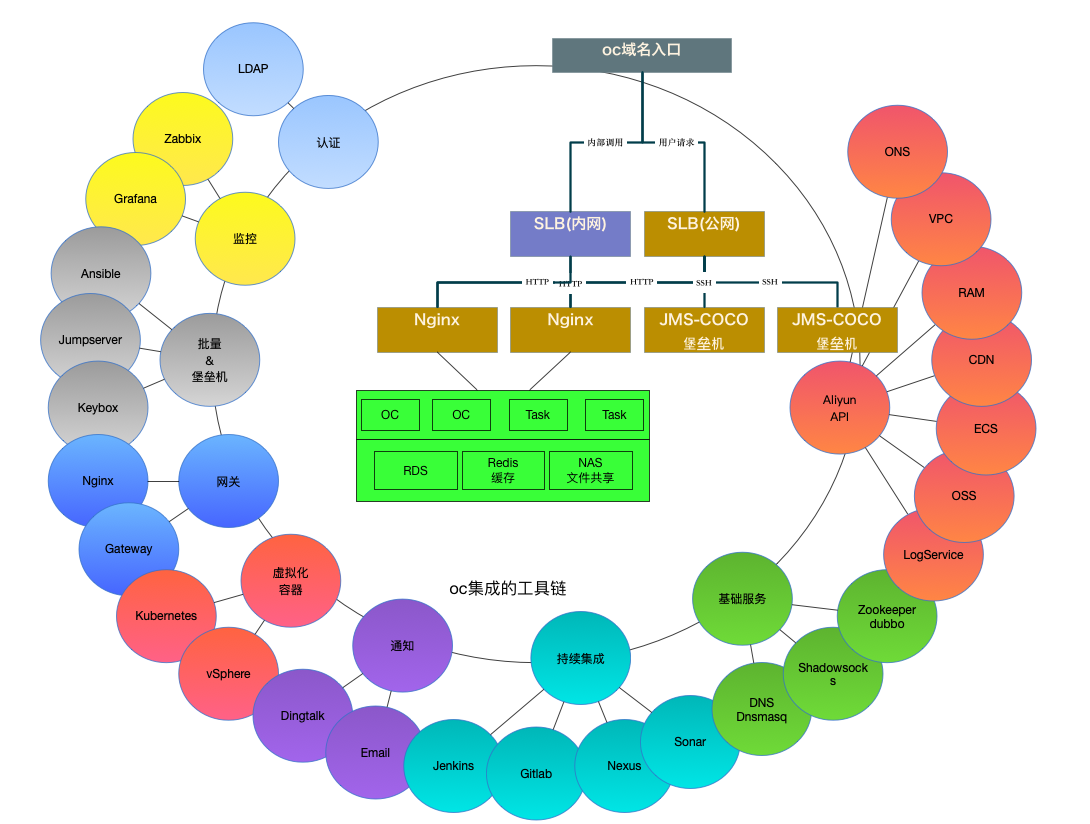
OpsCloud是云时代的全工具链集成运维平台(DevOps)
开源协议:GNU General Public License v2
- 白衣(liangjian)
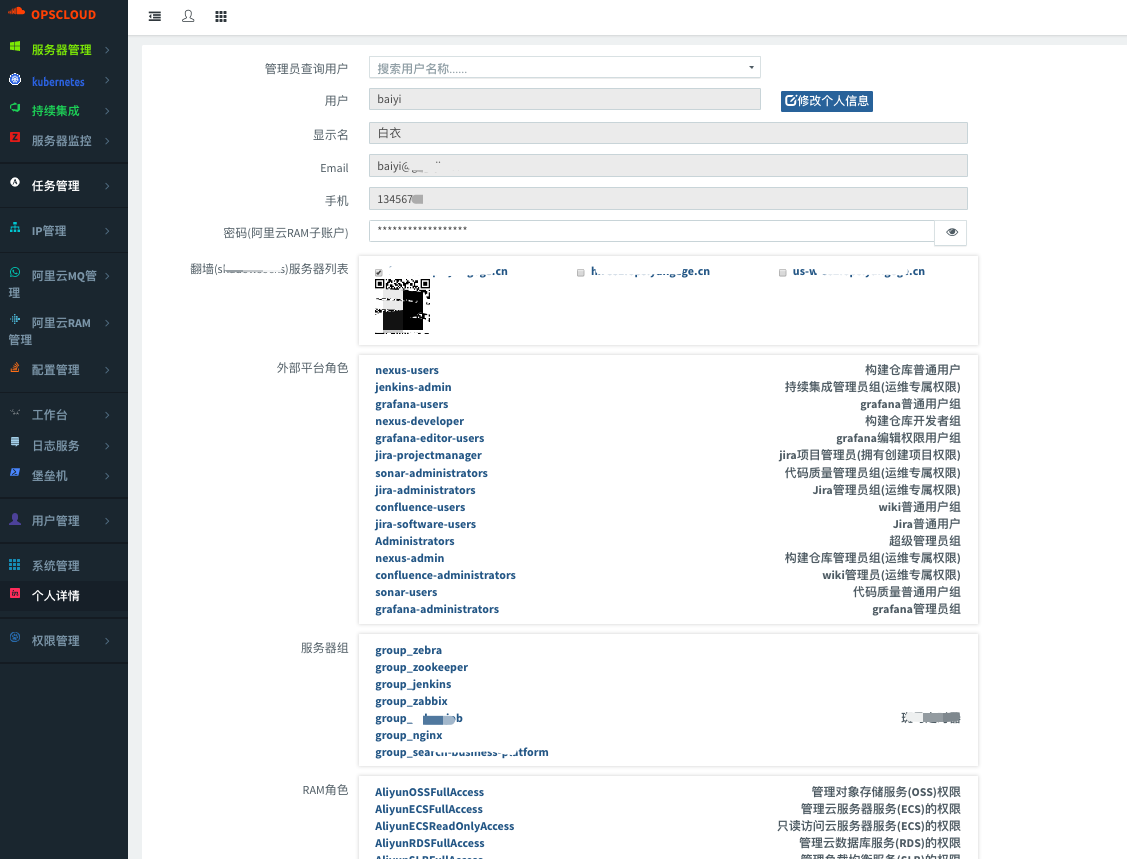
- 集中认证LDAP
- LDAP用户/用户组管理
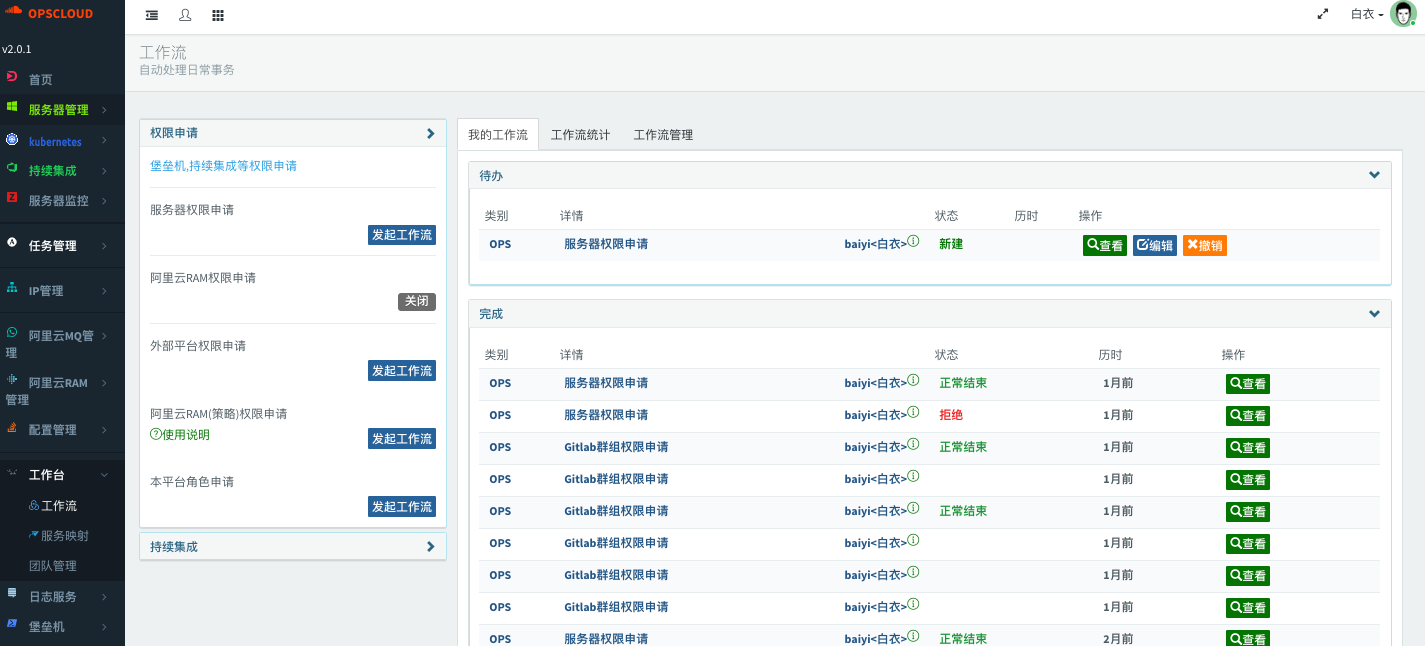
- 工作流支持用户自动授权
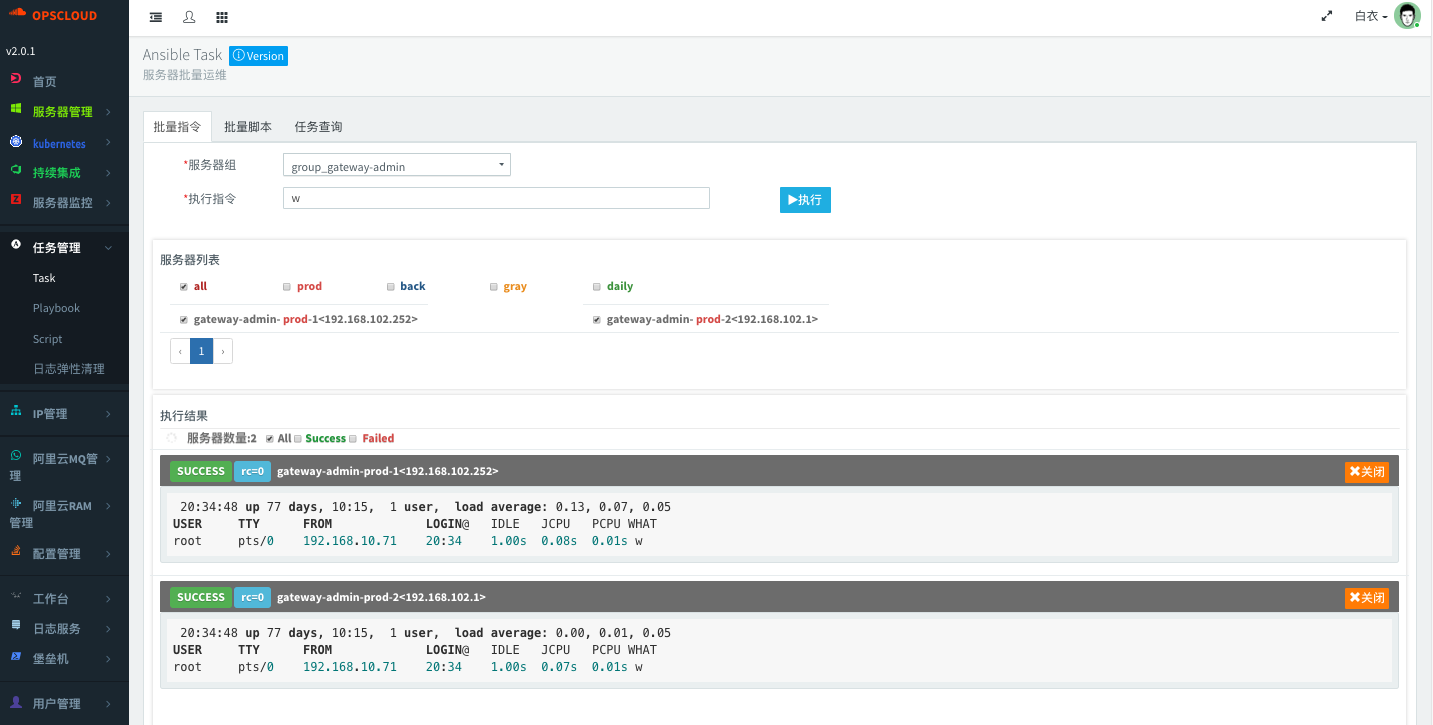
- 批量运维
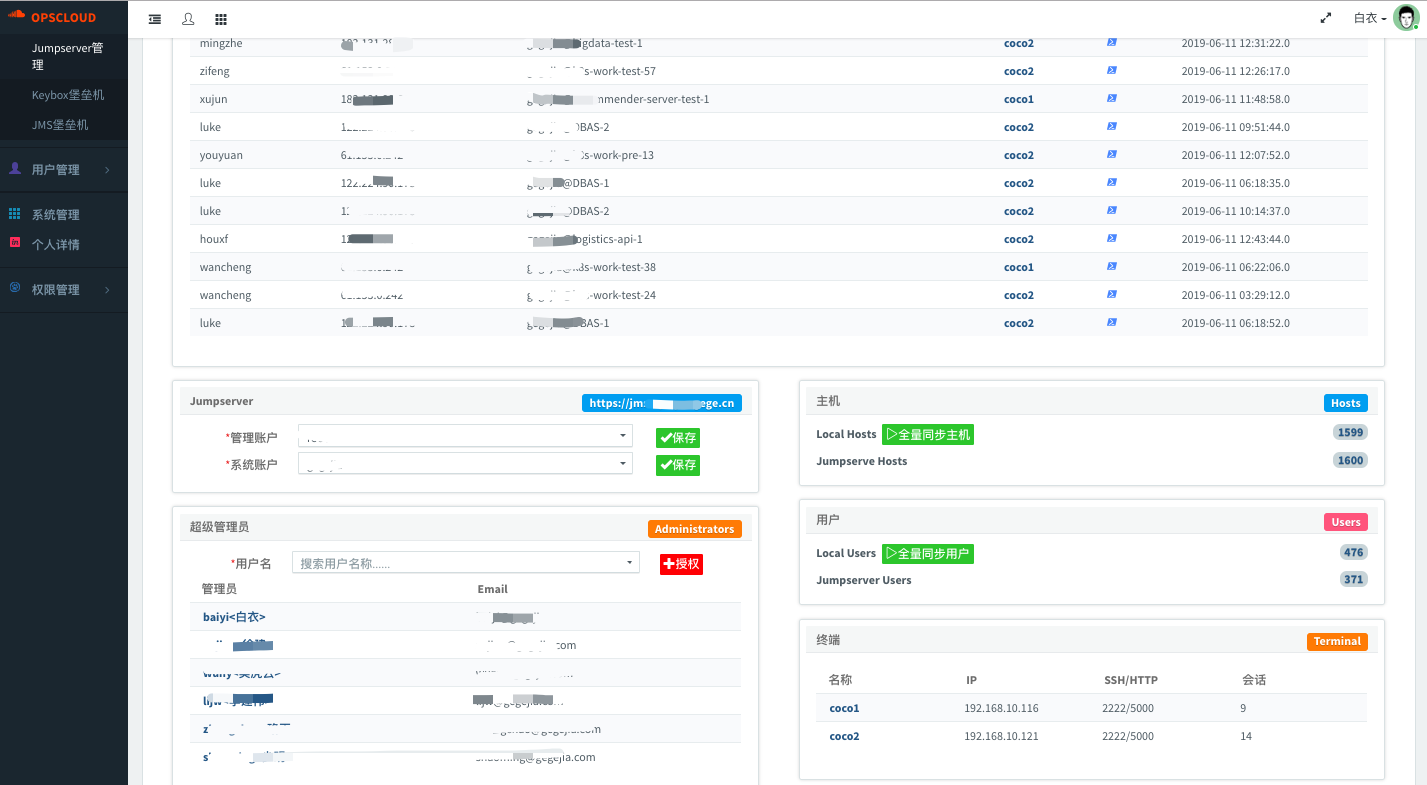
- Jumpserver全自动配置
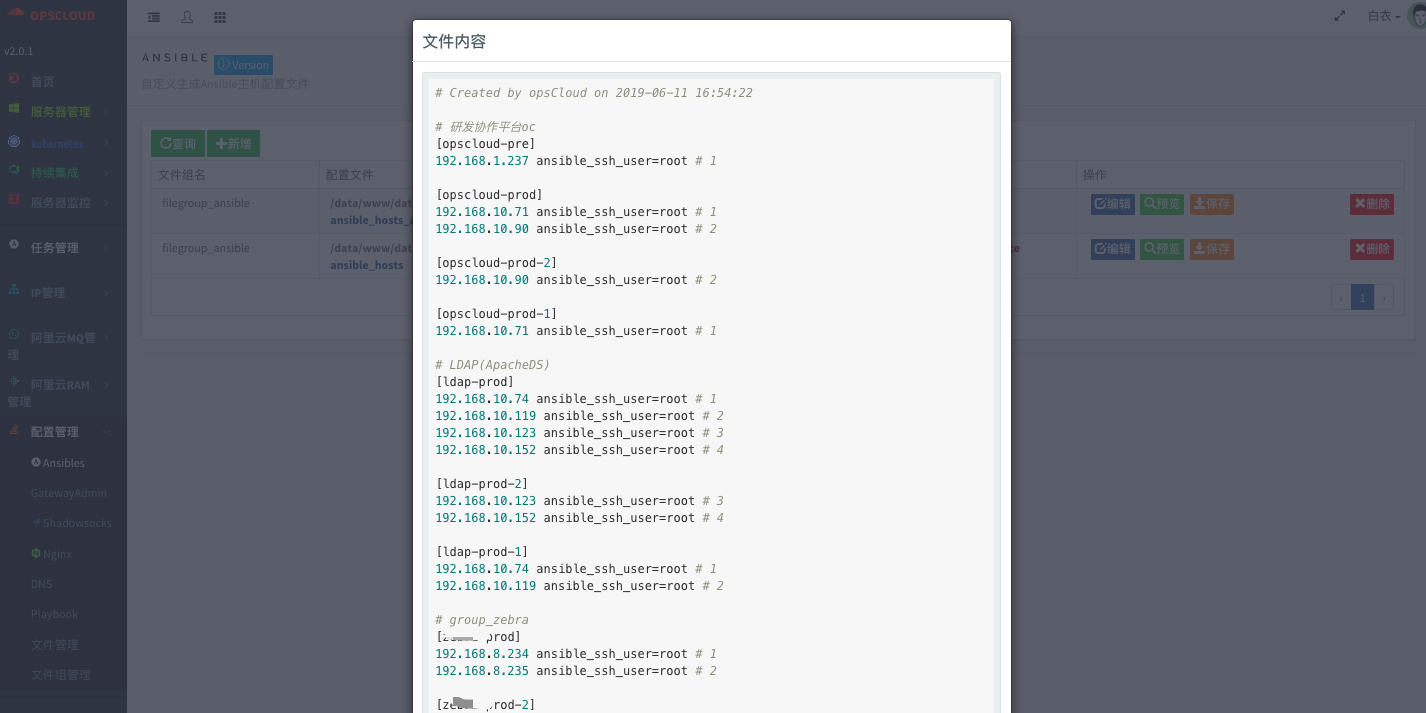
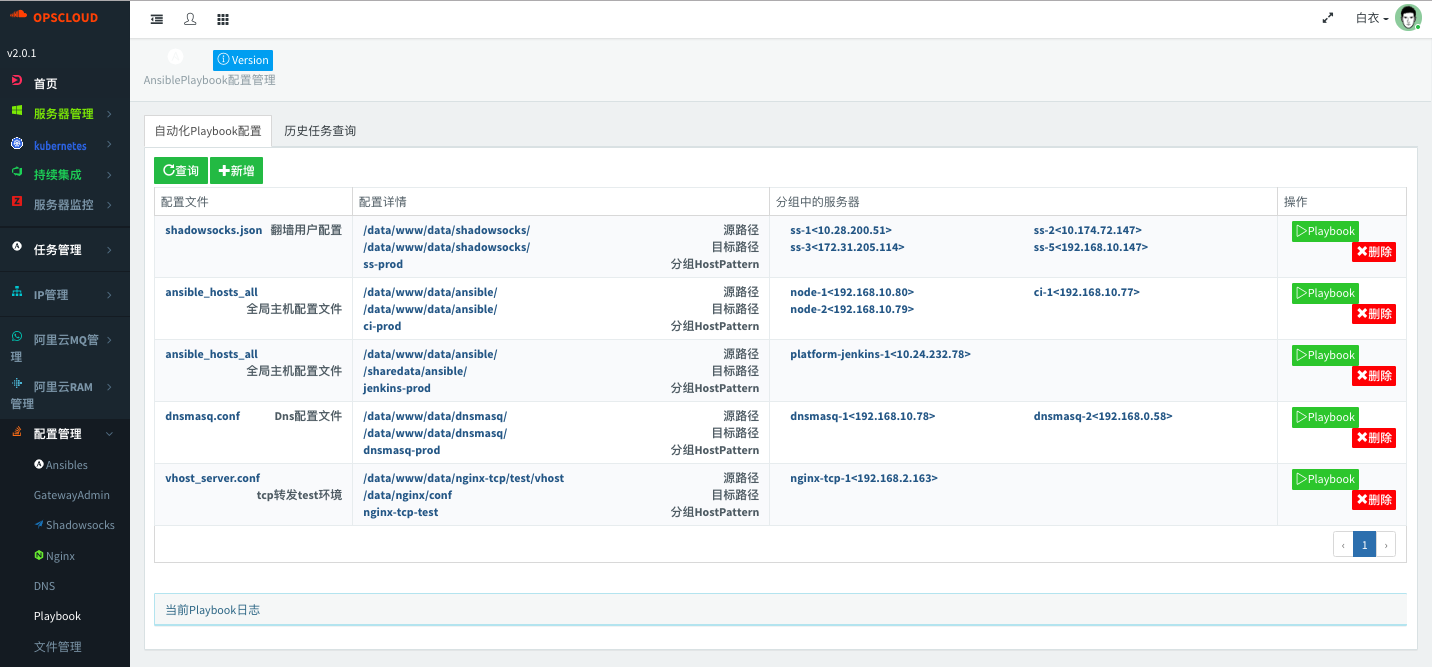
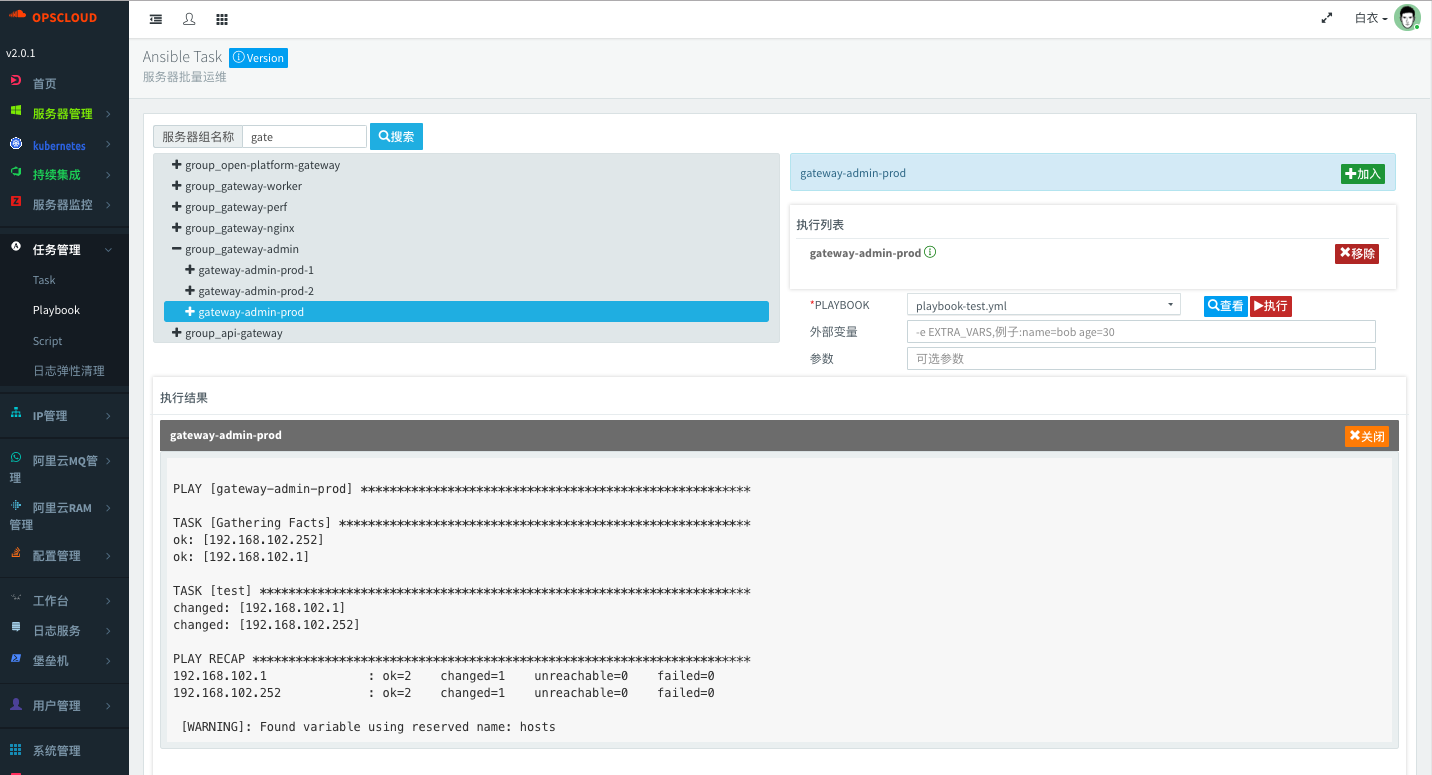
- Ansilbe-Playbook支持
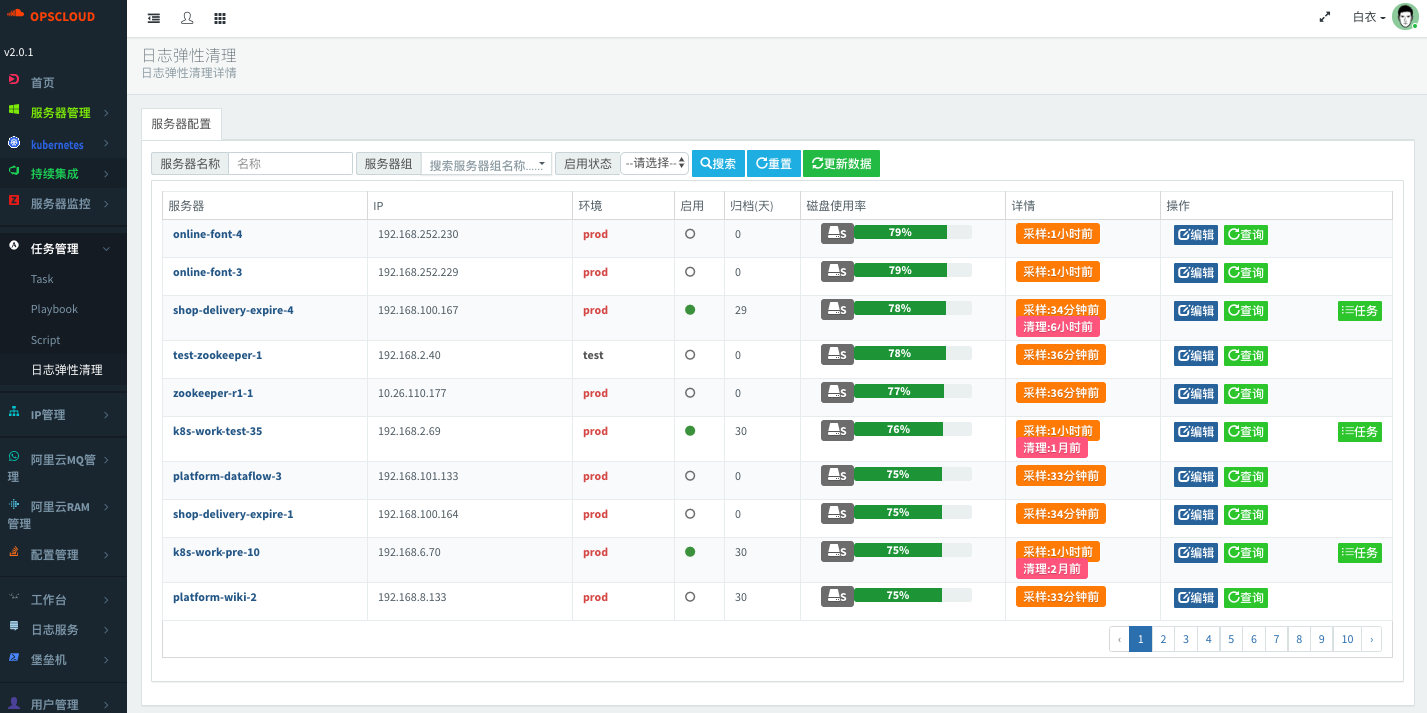
- 日志弹性清理
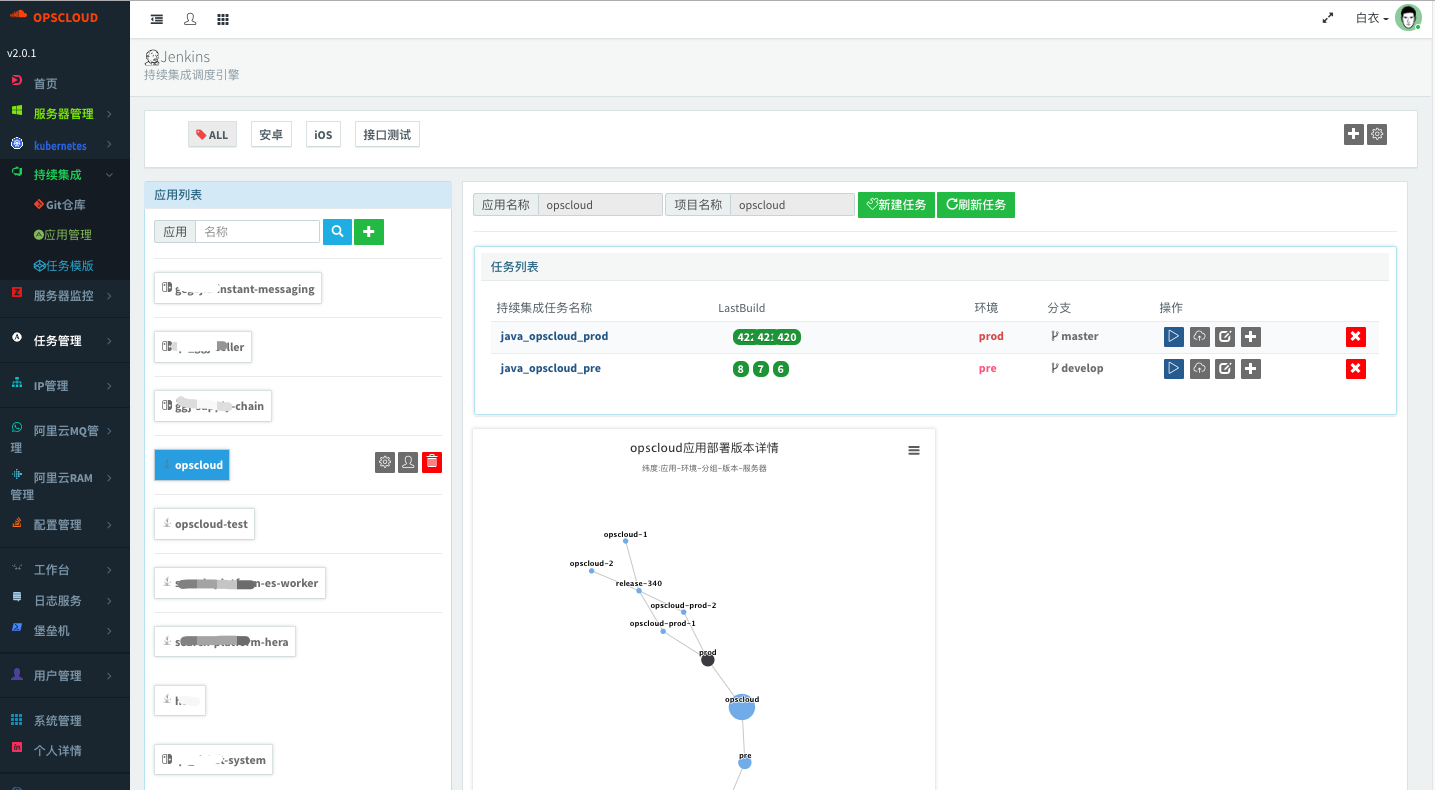
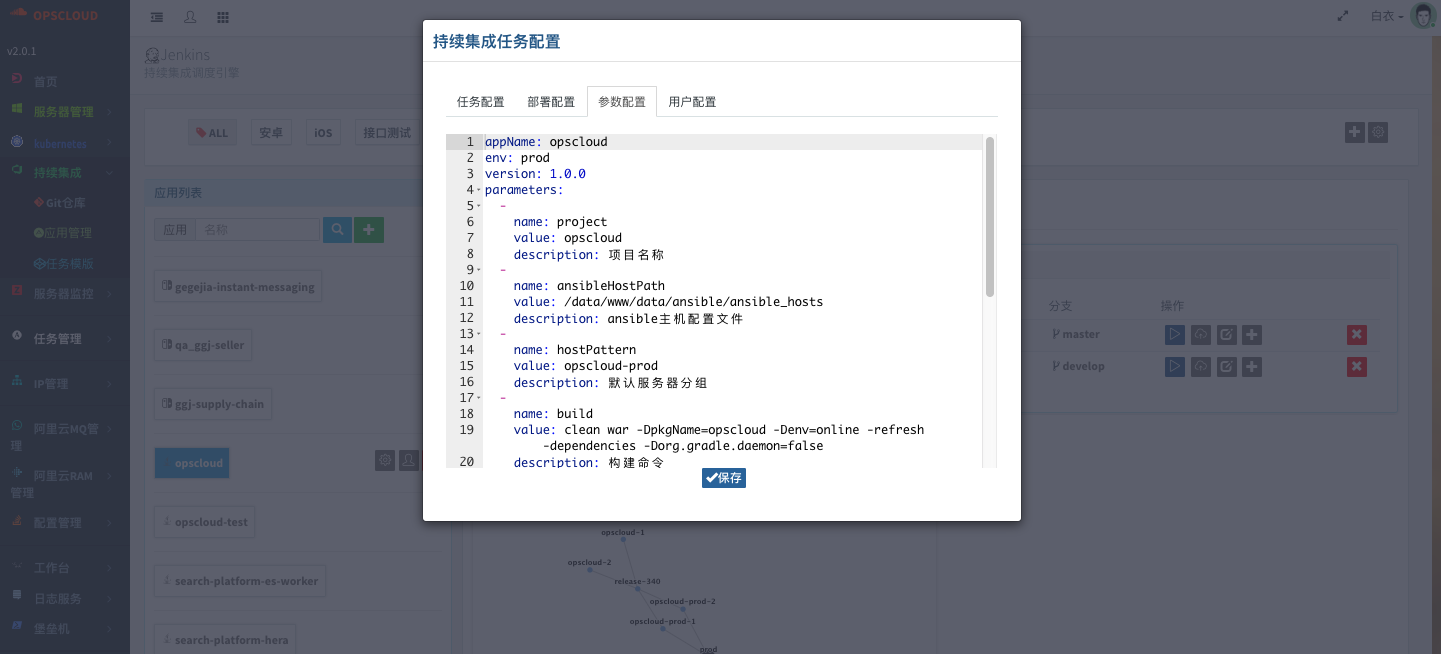
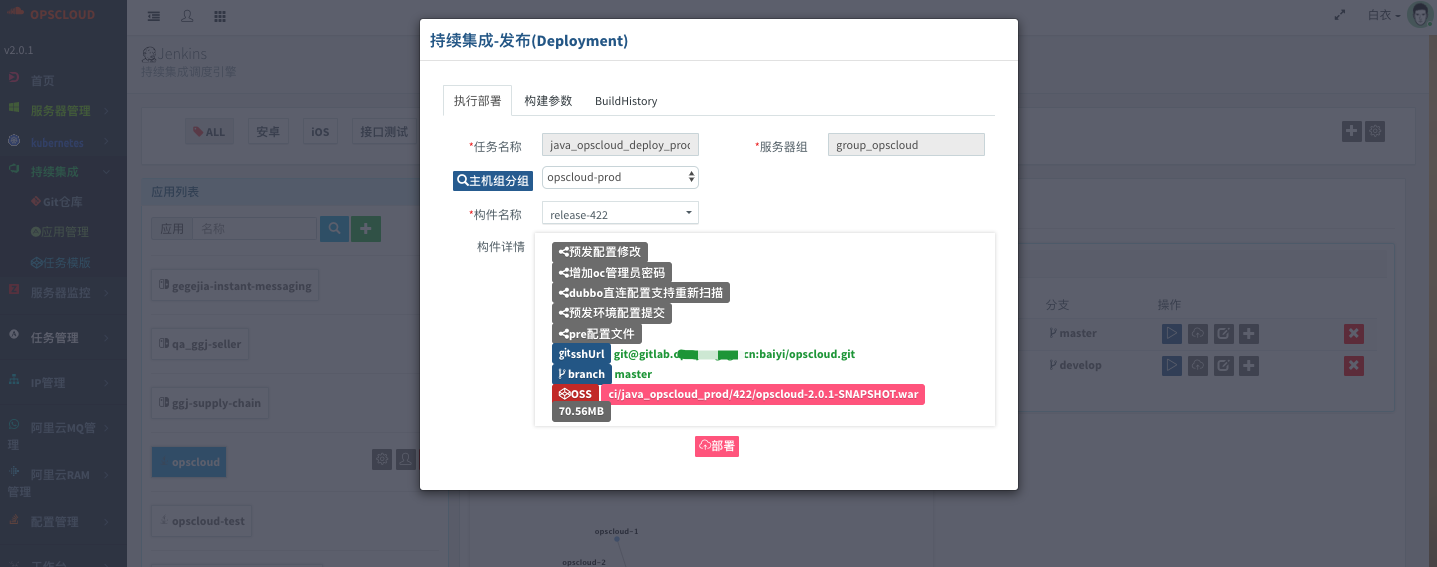
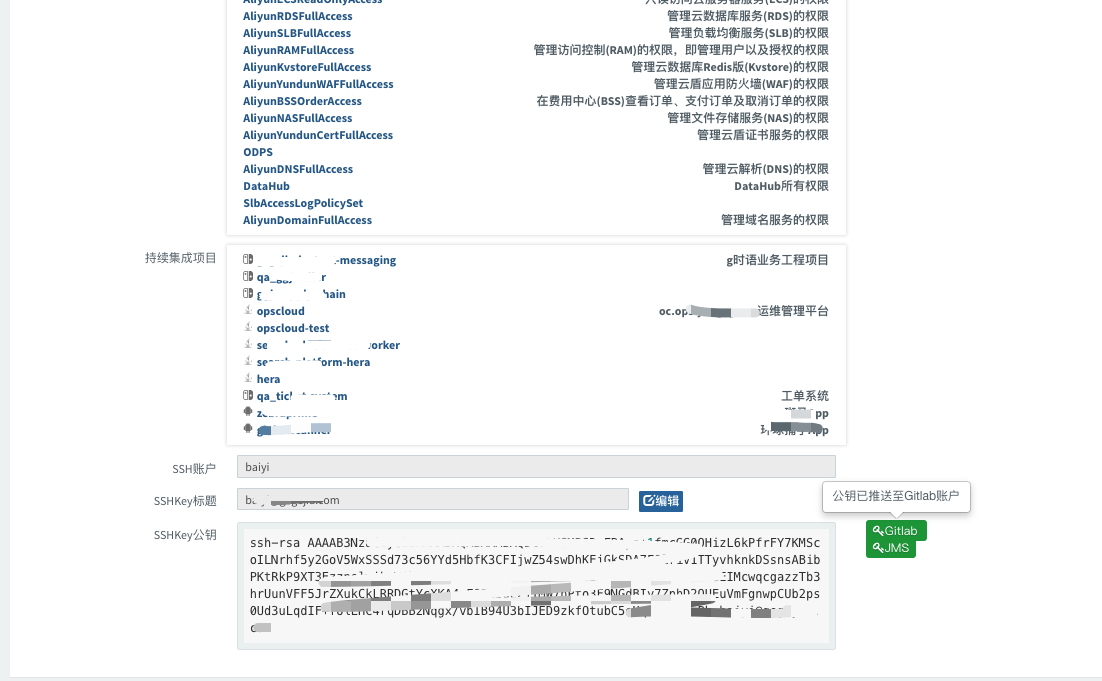
- Jenkins持续集成
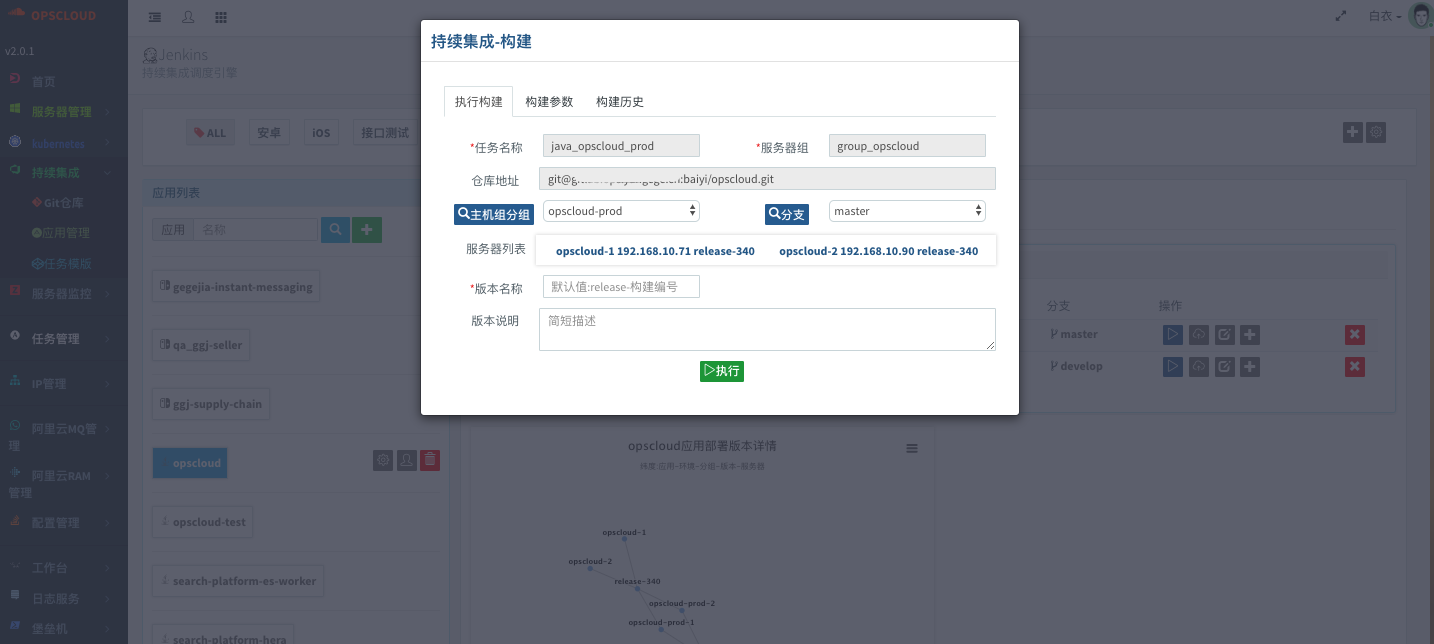
- 支持参数化构建,参数配置支持YAML格式,克隆参数配置
- 支持模版注入静态变量(jacoco插件不支持变量)
- 校验模版Hash生成版本,按模版生成job,支持从模版更新job(大批量job自动化运维)
- 支持CI/CD任务分离(仿Bamboo),多批次滚动发布
- 支持AliyunOSS文件校验
- 支持在运维的约束下由研发自主配置持续集成应用+任务
- 支持钉钉任务通知
- 应用权限封装
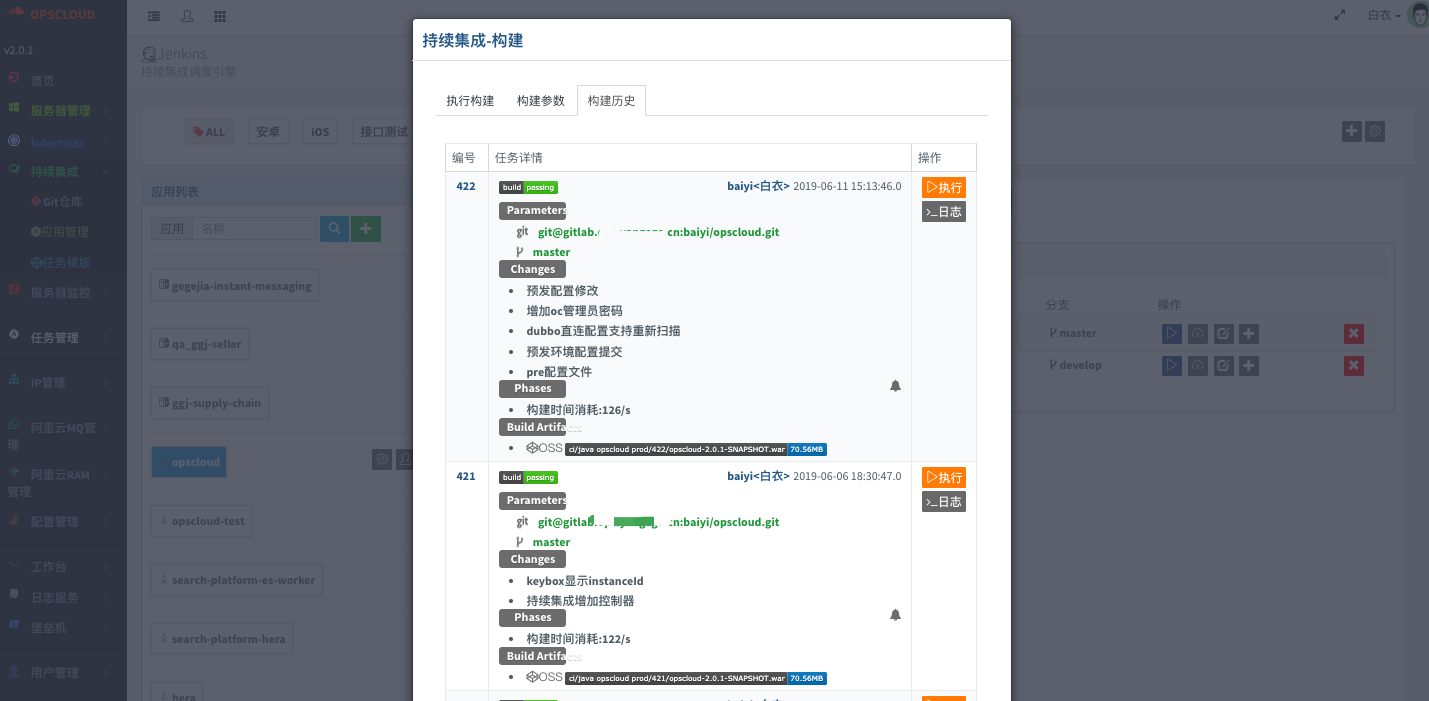
- 所有构建任务回调并入库
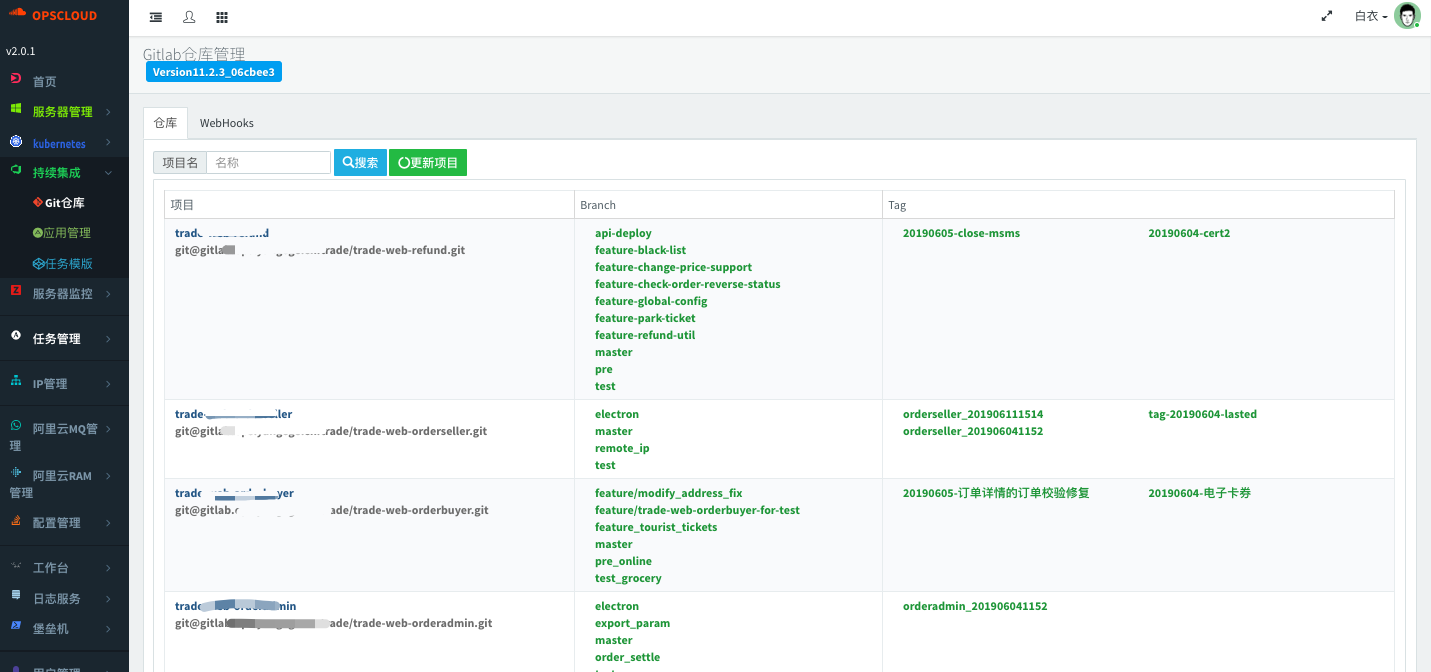
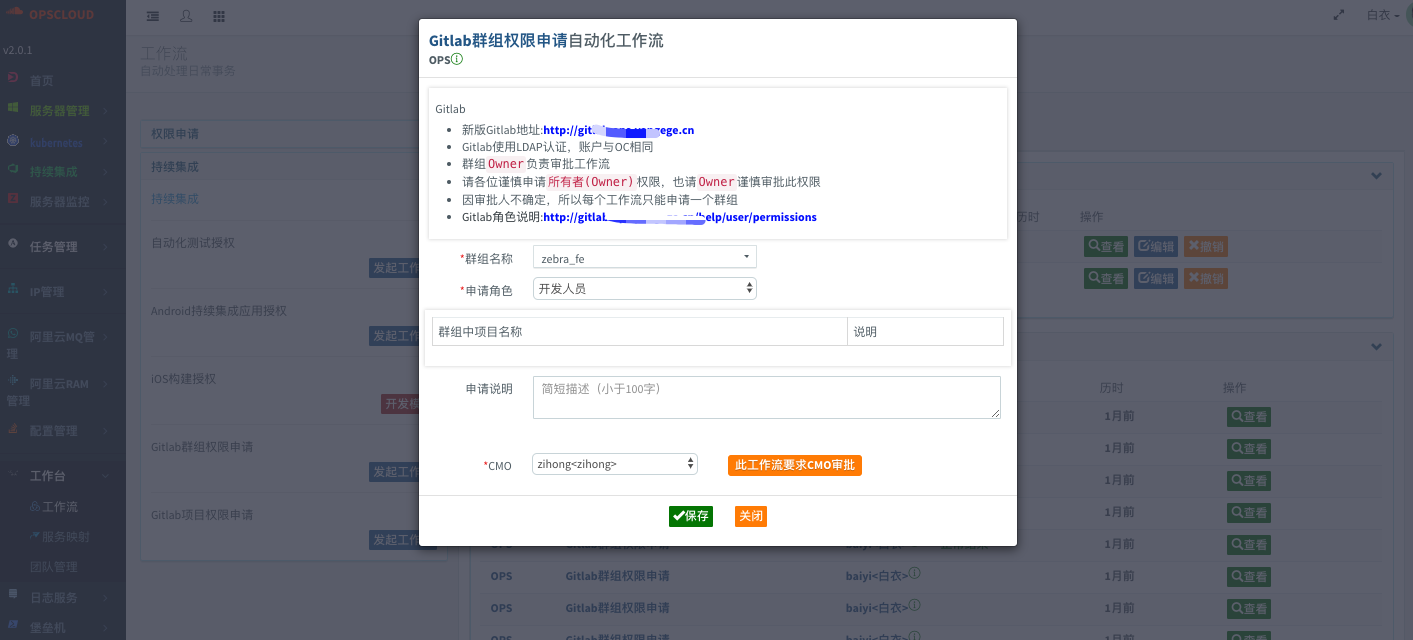
- Gitlab管理(API v4)
- 工作流支持用户自动项目或群组授权
- webhook支持,系统hook触发同步数据
- 支持push代码触发持续集成任务
- 持续集成中可选项目/分支
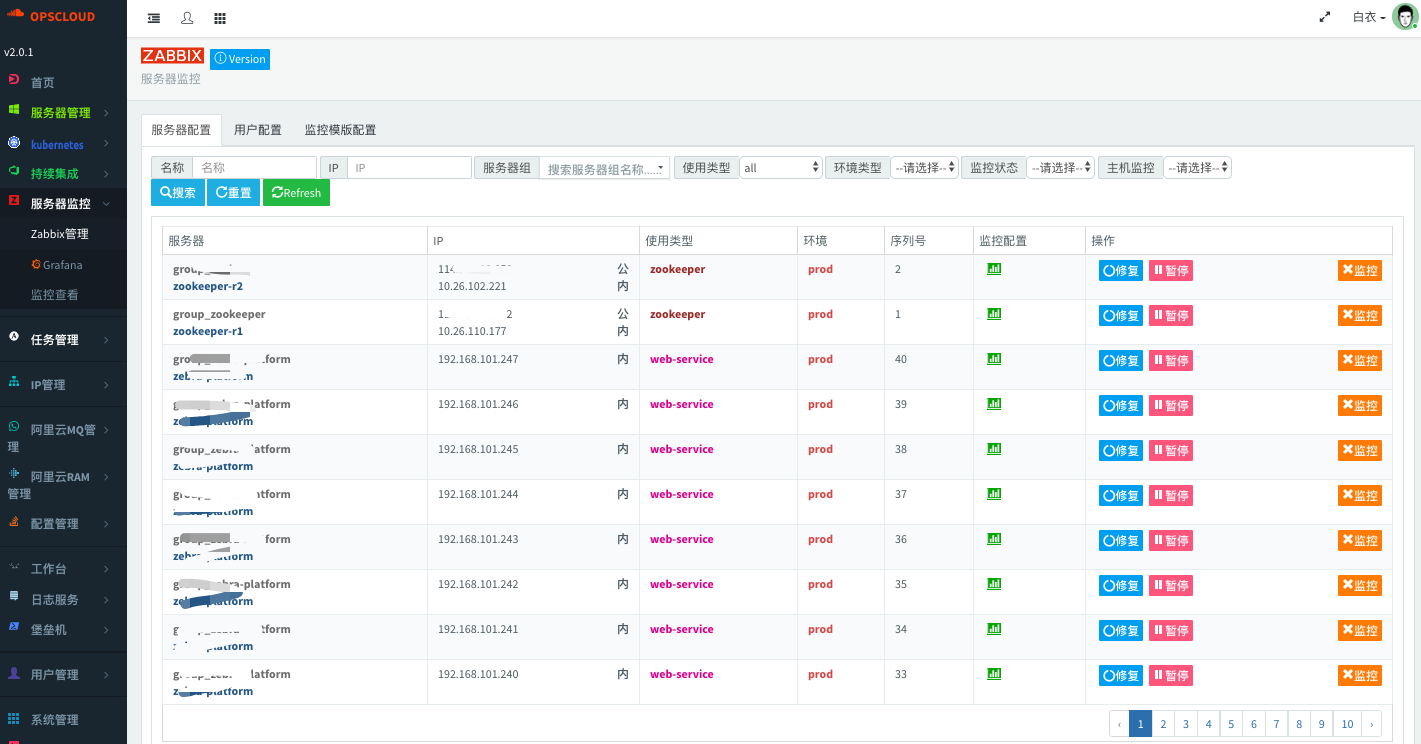
- Zabbix管理
- 用户授权绑定服务器组
- 支持Zabbix自动化运维
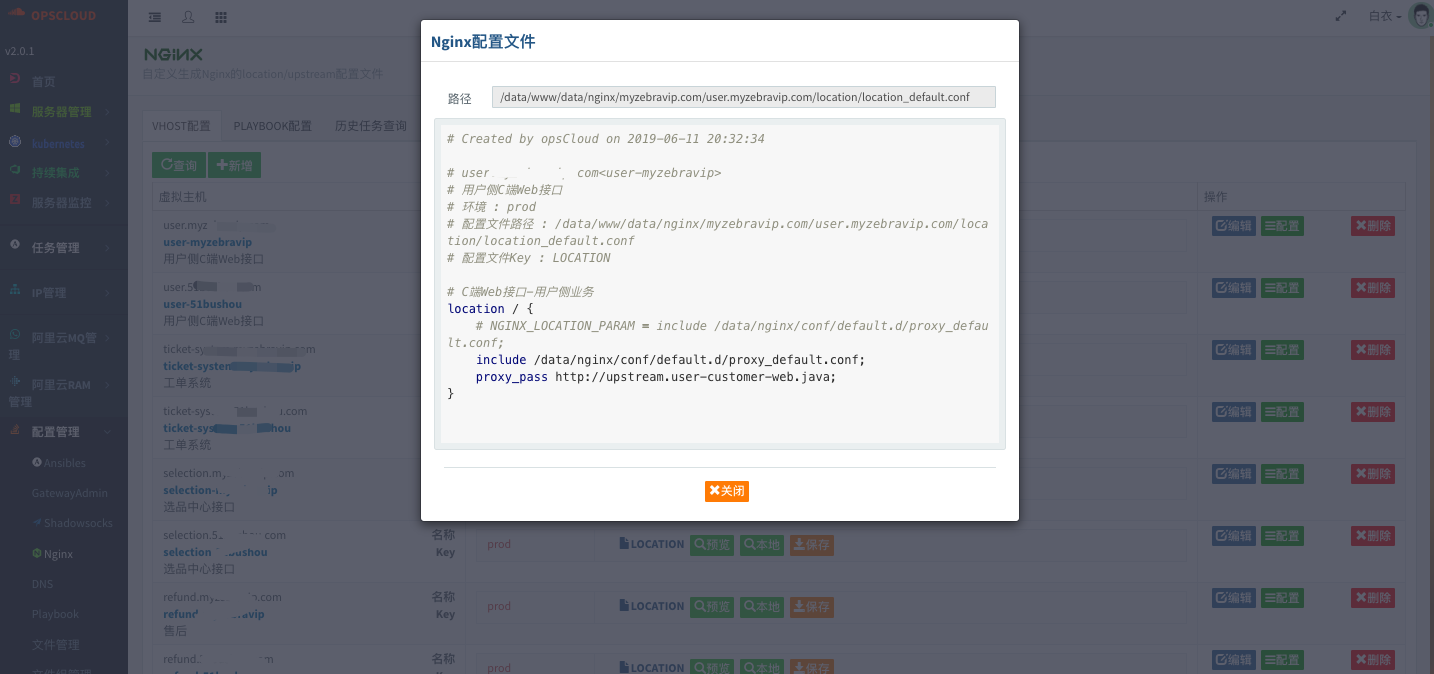
- Nginx配置管理优化
- 自动化配置location,upstream
- 自动同步配置,并重启服务
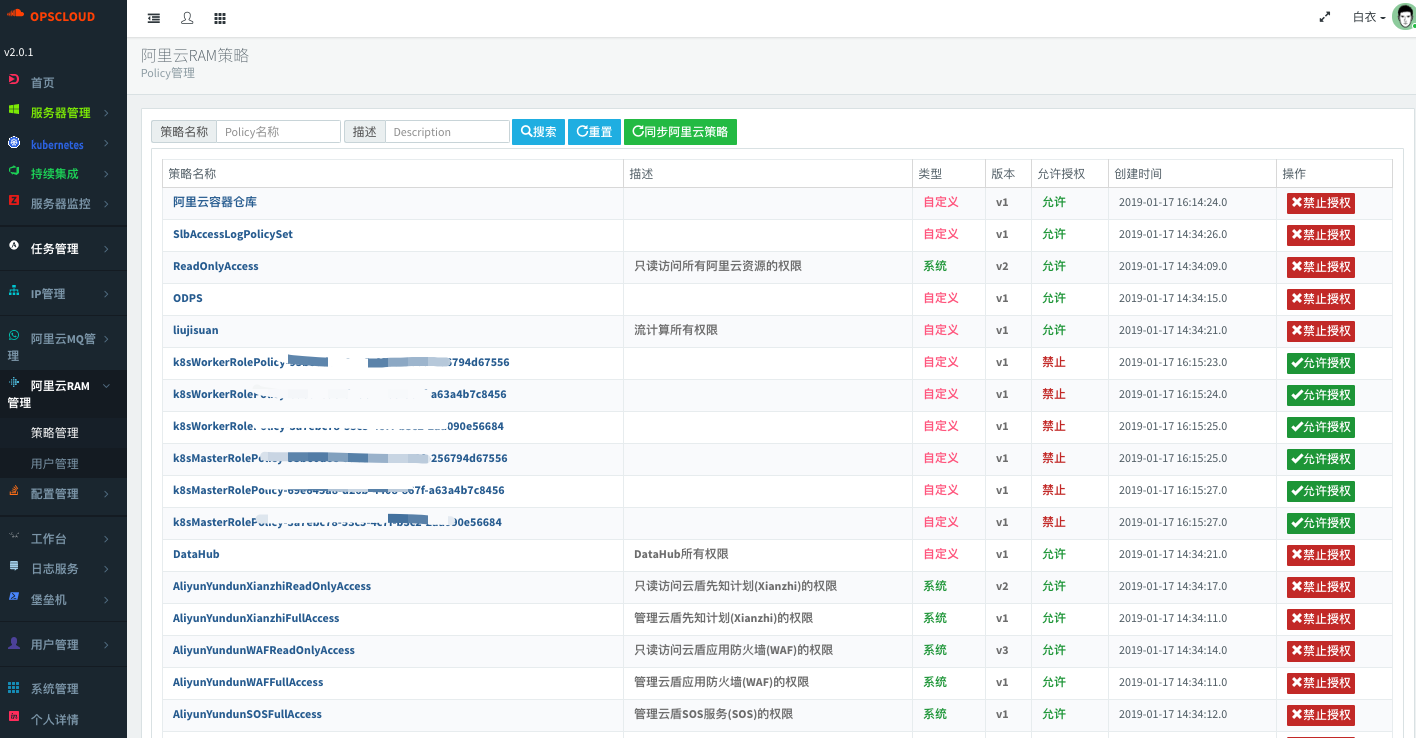
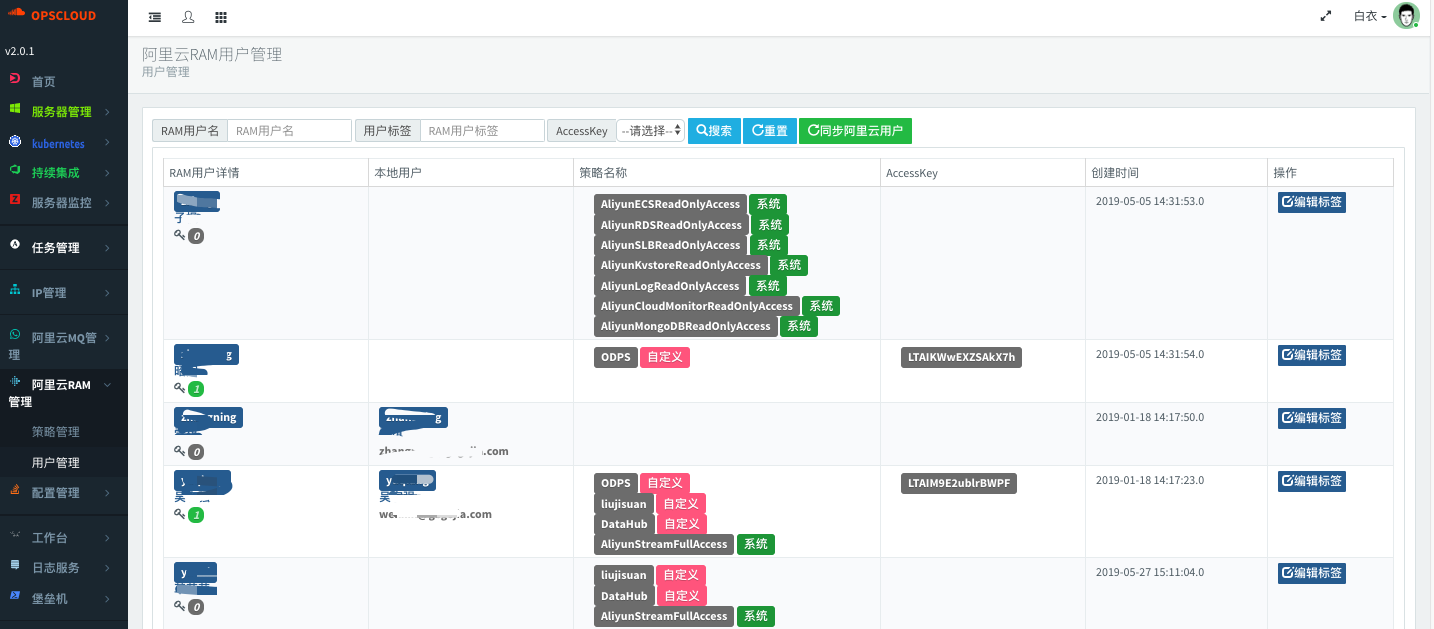
- 阿里云
- 阿里云RAM子账户管理
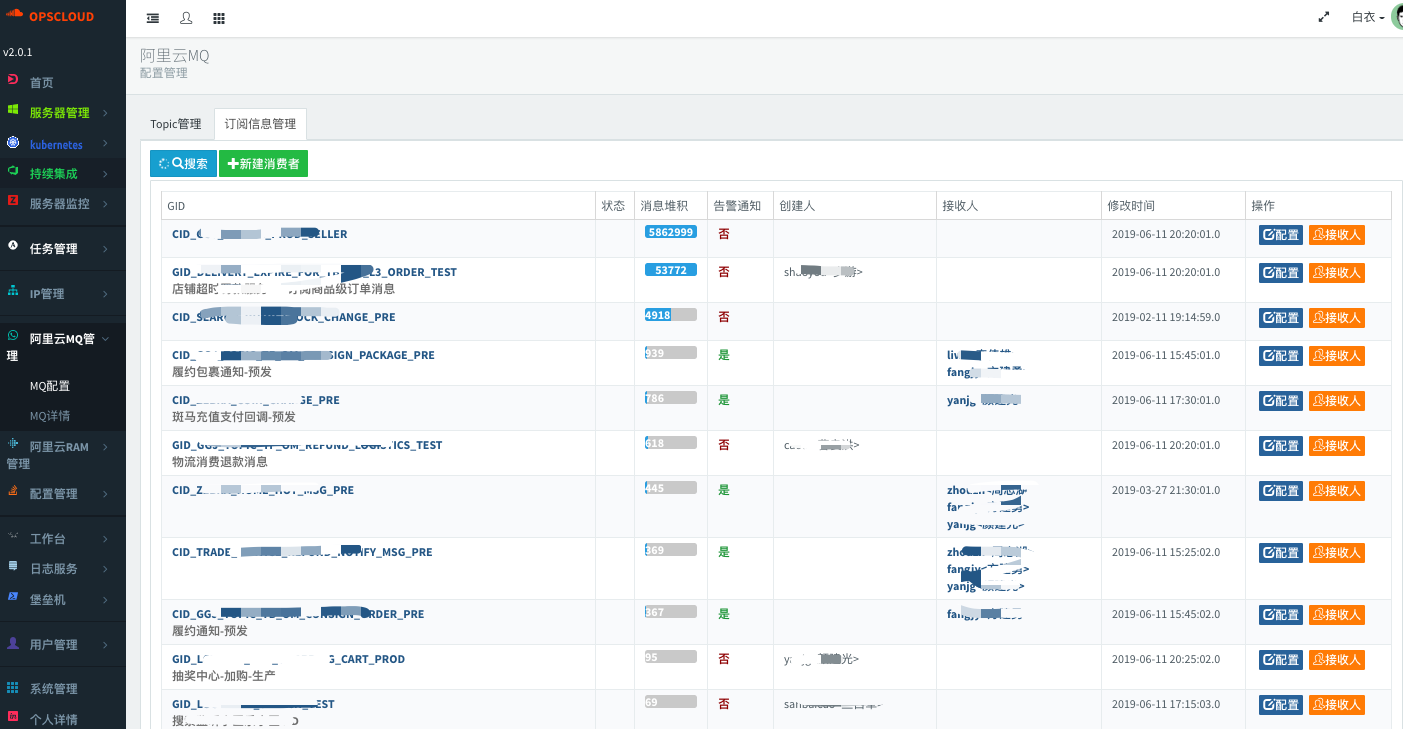
- 阿里云MQ管理(需要购买铂金版,铂金版才支持API)
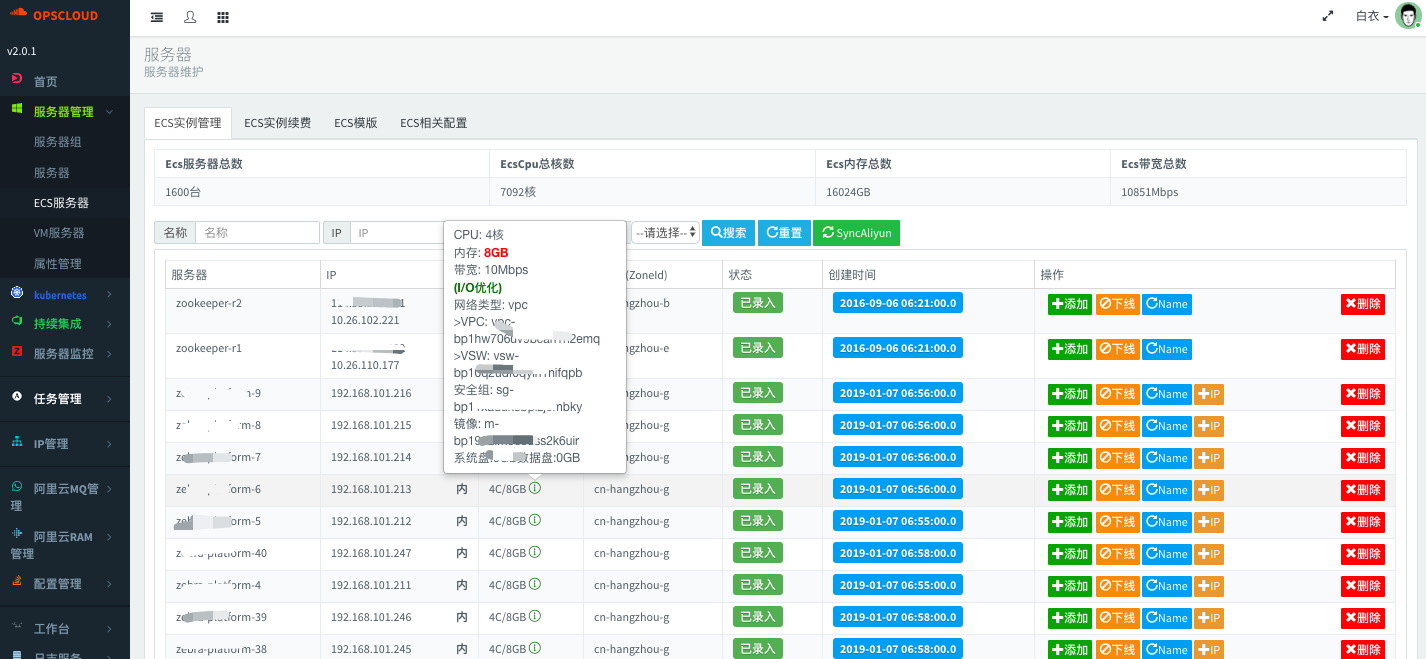
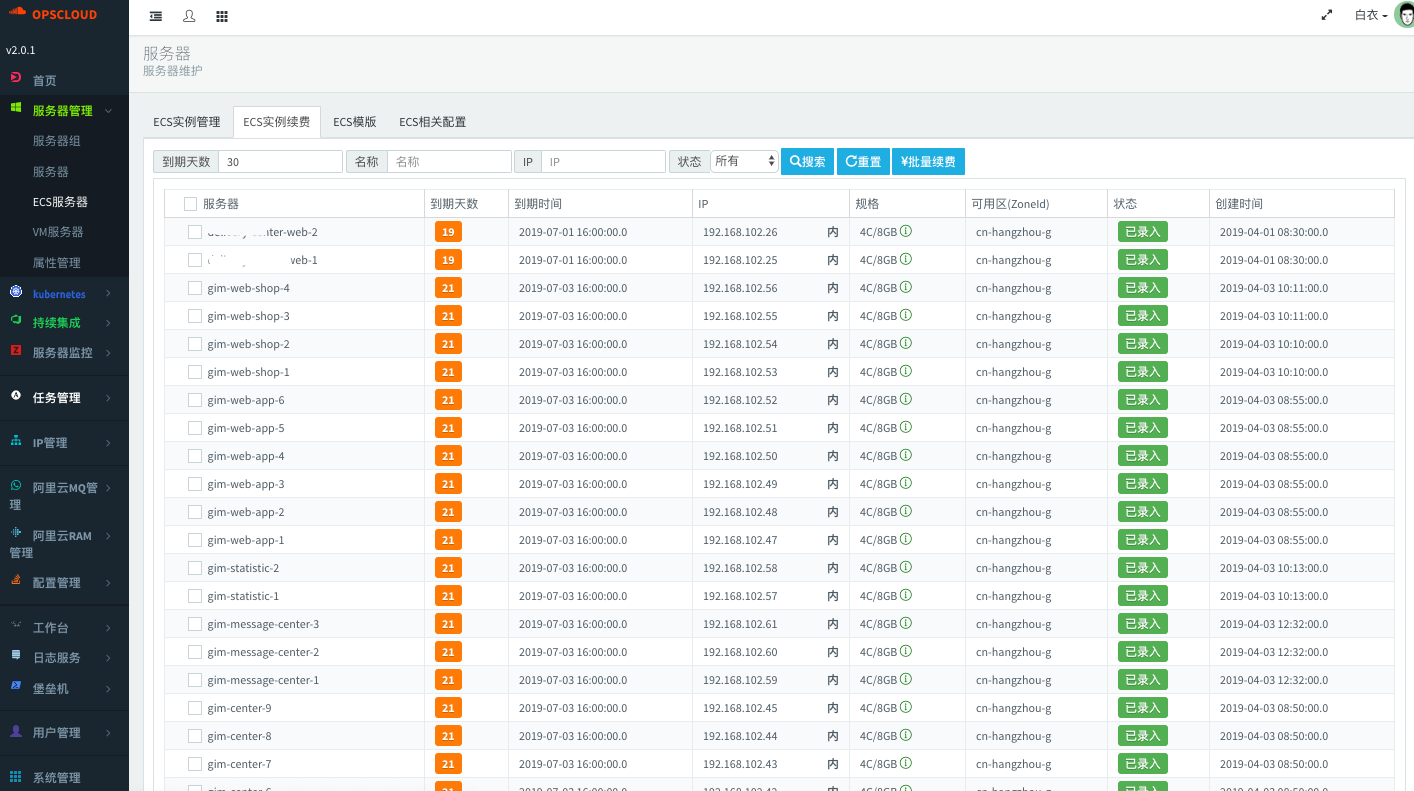
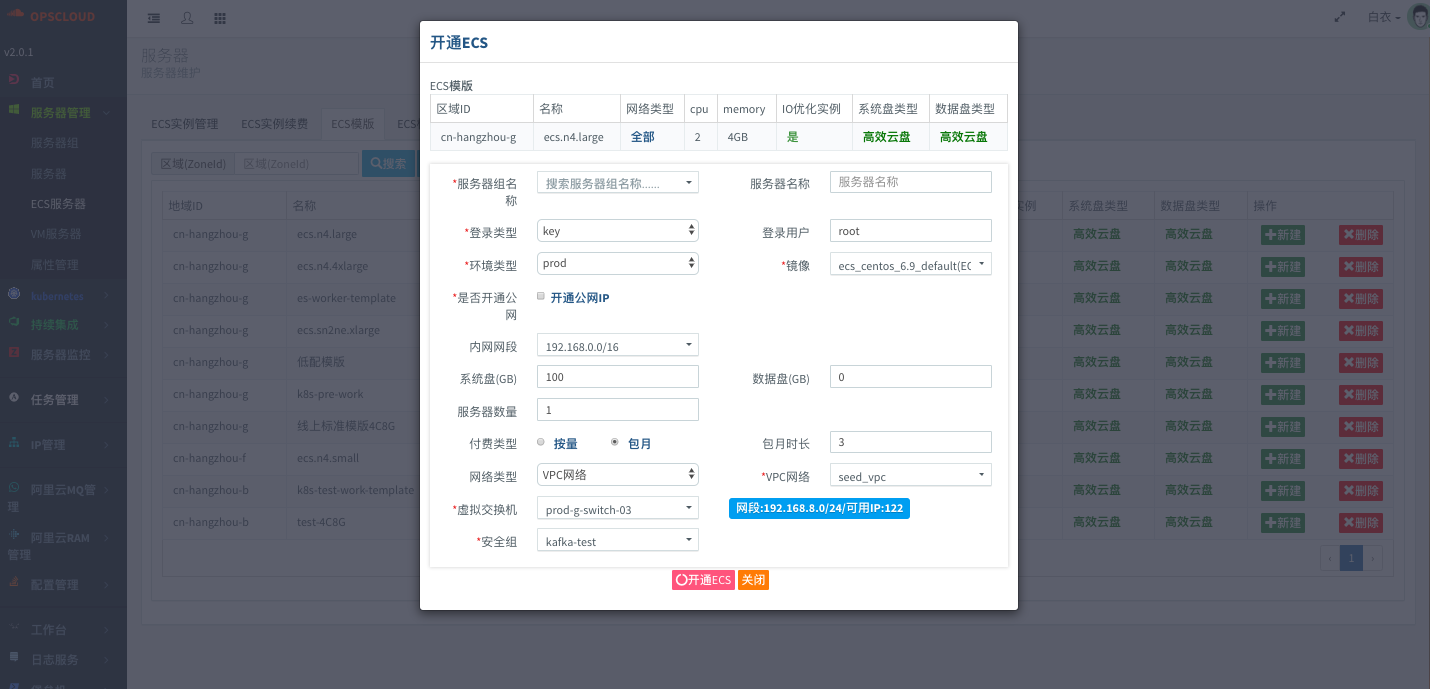
- ECS管理
- 日志服务同步主机组
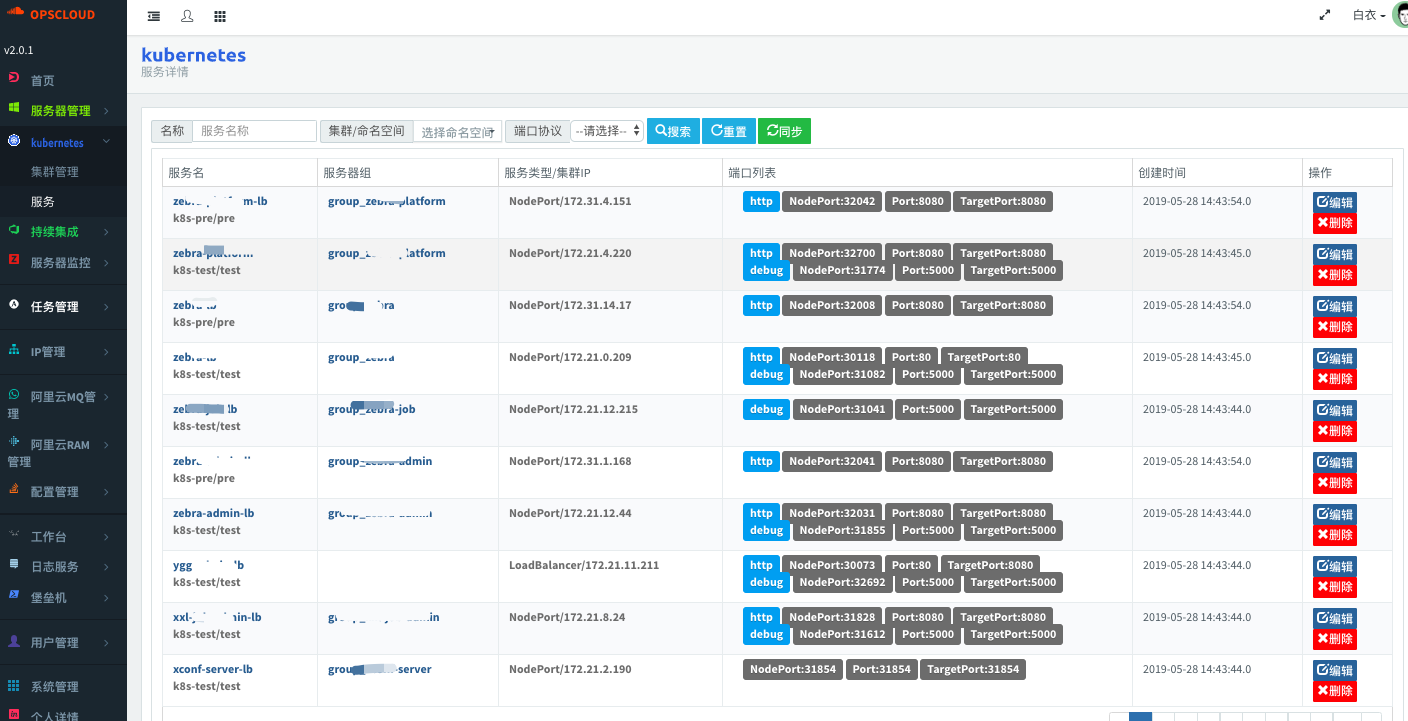
- Kubernetes
- 支持多集群扫描服务
- 其他
- 支持配置文件加密
- 支持Markdown格式帮助

- MacOS10.13.5
- JRE1.8.0_144(Java8)
- Gradle3.1
- IntelliJ IDEA
- Centos6/7(2vCPU/内存4G)
- JDK1.8
- Tomcat8.0.36
- Mysql5.6(兼容阿里云RDS)
- Redis3.0.3
- LDAP(最新版本apacheDS http://directory.apache.org)
- Ansible2.4
- version 2.0.1
- 安装包(war):opscloud-2.0.1-SNAPSHOT.war
- 数据库文件:opscloud.sql
# 可选参数(指定jdk位置,适用多版本安装) -Dorg.gradle.java.home=/usr/java/jdk1.8.0_51
# 可选参数(刷新gradle依赖缓存,避免依赖包同版本号更新导致编译失败) -refresh-dependencies
$ gradle clean war -DpkgName=opscloud -Denv=online -Dorg.gradle.daemon=false
# 安装 Mysql5.6 或使用AliyunRDS

# 建库
create database opscloud character set utf8 collate utf8_bin;
grant all PRIVILEGES on opscloud.* to opscloud@'%' identified by 'opscloud';
# 导入db
# 此sql从阿里云RDS导出,若提示错误可忽略,或删除错误指定行
$ mysql -f -uopscloud -popscloud opscloud < ./opscloud.sql


# Mysql5.7 兼容性问题
已知问题1:如安装的是mysql5.7+,需要关闭mysql的"ONLY_FULL_GROUP_BY"
# 查询
select @@global.sql_mode
# 修改
set @@global.sql_mode=‘STRICT_TRANS_TABLES,NO_ZERO_IN_DATE,NO_ZERO_DATE,ERROR_FOR_DIVISION_BY_ZERO,NO_AUTO_CREATE_USER,NO_ENGINE_SUBSTITUTION’;
# 安装Redis3 或使用阿里云Redis
$ wget http://download.redis.io/releases/redis-3.2.11.tar.gz
$ tar -xzvf redis-3.2.11.tar.gz
$ cd redis-3.2.11
$ make && make install
- 安装JDK8 下载地址 http://www.oracle.com/technetwork/java/javase/downloads/jdk8-downloads-2133151.html CentOS可直接下载rpm包安装
- 在/etc/profile中添加
# JAVA 请修改为安装的版本目录
JAVA_HOME=/usr/local/jdk/jdk1.8.0_91
PATH=$PATH:$JAVA_HOME/bin:/usr/bin:/usr/sbin:/bin:/sbin:/usr/X11R6/bin
CLASSPATH=.:$JAVA_HOME/lib/tools.jar:$JAVA_HOME/lib/dt.jar
export JAVA_HOME
export PATH
export CLASSPATH
# JAVA
- 官网 http://directory.apache.org/apacheds/download/download-linux-bin.html
- 下载安装包 wget http://mirrors.tuna.tsinghua.edu.cn/apache//directory/apacheds/dist/2.0.0-M24/apacheds-2.0.0-M24-64bit.bin
$ chmod +x apacheds-2.0.0-M24-64bit.bin && ./apacheds-2.0.0-M24-64bit.bin
Do you agree to the above license terms? [yes or no]
yes
Unpacking the installer...
Extracting the installer...
Where do you want to install ApacheDS? [Default: /opt/apacheds-2.0.0-M24]

Where do you want to install ApacheDS instances? [Default: /var/lib/apacheds-2.0.0-M24]

What name do you want for the default instance? [Default: default]

Where do you want to install the startup script? [Default: /etc/init.d]

Which user do you want to run the server with (if not already existing, the specified user will be created)? [Default: apacheds]

Which group do you want to run the server with (if not already existing, the specified group will be created)? [Default: apacheds]

Installing...
id: apacheds: No such user
Done.
ApacheDS has been installed successfully.
$ /etc/init.d/apacheds-2.0.0-M24-default start
Starting ApacheDS - default...
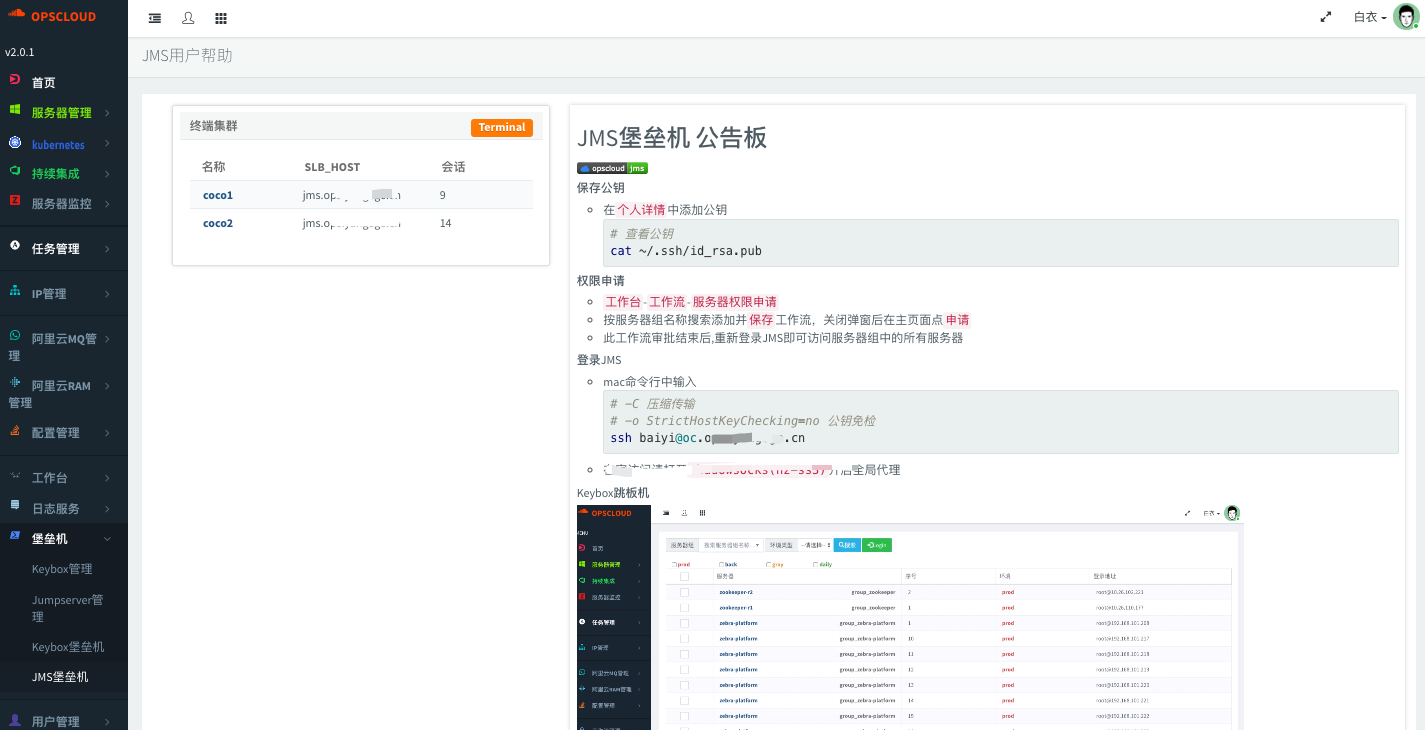
如果只使用admin账户可以不安装apacheDS,其他账户都会存储在LDAP中,cn=liangjian,ou=users,ou=system ApacheDS配置指南
推荐使用Tomcat 8.0.36(更高版本会导致权限校验接口访问400错误)
假如Tomcat安装路径为 /usr/local/tomcat
- 删除/usr/local/tomcat/webapps/ 所有文件和目录
- 解压opscloud.war,并将解压文件复制到/usr/local/tomcat/webapps/ROOT/ 注意:不要带项目路径opscloud
- 修改opscloud配置文件/usr/local/tomcat/webapps/ROOT/WEB-INF/classes/server.properties
- 启动Tomcat:/usr/local/tomcat/bin/startup.sh (关闭/usr/local/tomcat/bin/shutdown.sh)
- 修改相关配置内容
- 配置文件路径 war包解压路径/WEB-INF/classes/server.properties.example
- 修改配置后将文件改名为server.properties
- 启动Tomcat 首次登录使用admin/opscloud
- 如果启用了Nginx反向代理Tomcat(opscloud),需要配置nginx支持websocket(KeyBox)
server {
        listen 443;
        server_name opscloud.com;
        ssl on;
        ssl_certificate /usr/local/nginx/conf/ssl_key/opscloud.com.crt;
        ssl_certificate_key /usr/local/nginx/conf/ssl_key/opscloud.com.key;
        ssl_session_timeout 5m;
        ssl_protocols SSLv2 SSLv3 TLSv1;
        ssl_ciphers ALL:!ADH:!EXPORT56:RC4+RSA:+HIGH:+MEDIUM:+LOW:+SSLv2:+EXP;
        ssl_prefer_server_ciphers on;

        location = /favicon.ico {
            root /data/www/ROOT/static ;
        }

        location ~  ^/(css|fonts|img|js|l10n|tpl|vendor)/ {
            root /data/www/ROOT/opscloud;
            expires 2m;
        }

        # ====keybox/getway独立部署启用此配置======
        location ~  ^/keybox/ws {
            proxy_set_header Host  $host;
            proxy_set_header X-Forwarded-For  $remote_addr;
            proxy_pass http://upstream.getway.java;
            proxy_http_version 1.1;
            proxy_set_header Upgrade $http_upgrade;
            proxy_set_header Connection "Upgrade";
            # 限制访问,不做限制请删除
            allow 192.168.0.0/24;
            deny all;
        }
        # =====keybox/getway独立部署启用此配置=====

        location / {
            proxy_set_header Host  $host;
            proxy_set_header X-Forwarded-For  $remote_addr;
            proxy_pass http://127.0.0.1:8080;
            proxy_http_version 1.1;
            proxy_set_header Upgrade $http_upgrade;
            proxy_set_header Connection "Upgrade";
            keepalive_timeout  180; #  连接超时时间,1分钟,具体时间可以根据请求(例如后台导入)需要的时间来设置
            proxy_connect_timeout 180;  #   1分钟
            proxy_read_timeout 180;  #  1分钟
            # 限制访问,不做限制请删除
            allow 192.168.0.0/24;
            deny all;
        }

        access_log  /data/www/logs/opscloud/access.log  access;

}
- 安装
$ yum install epel-release -y
$ yum install ansible –y
- 配置
# 查看配置文件路径 (/etc/ansible/ansible.cfg)
$ ansible --version
ansible 2.5.3
  config file = /etc/ansible/ansible.cfg
  configured module search path = [u'/root/.ansible/plugins/modules', u'/usr/share/ansible/plugins/modules']
  ansible python module location = /usr/lib/python2.6/site-packages/ansible
  executable location = /usr/bin/ansible
  python version = 2.6.6 (r266:84292, Aug 18 2016, 15:13:37) [GCC 4.4.7 20120313 (Red Hat 4.4.7-17)]
参考配置文件
# config file for ansible -- http://ansible.com/
# ==============================================

# nearly all parameters can be overridden in ansible-playbook
# or with command line flags. ansible will read ANSIBLE_CONFIG,
# ansible.cfg in the current working directory, .ansible.cfg in
# the home directory or /etc/ansible/ansible.cfg, whichever it
# finds first

[defaults]

# some basic default values...
inventory      = /etc/ansible/hosts
#library        = /usr/share/my_modules/
remote_tmp     = /tmp/.ansible/tmp
pattern        = *
forks          = 5
poll_interval  = 15
sudo_user      = root
local_tmp      = /tmp/.ansible/tmp
#ask_sudo_pass = True
#ask_pass      = True
transport      = smart
#remote_port    = 22
module_lang    = C
gathering = implicit
# uncomment this to disable SSH key host checking
host_key_checking = False
# change this for alternative sudo implementations
#sudo_exe = sudo
deprecation_warnings=False

# SSH timeout
timeout = 10
remote_user = manage
#remote_user = xqadmin
private_key_file = ~/.ssh/id_rsa
ansible_managed = Ansible managed: {file} modified on %Y-%m-%d %H:%M:%S by {uid} on {host}

#action_plugins     = /usr/share/ansible_plugins/action_plugins
#callback_plugins   = /usr/share/ansible_plugins/callback_plugins
#connection_plugins = /usr/share/ansible_plugins/connection_plugins
#lookup_plugins     = /usr/share/ansible_plugins/lookup_plugins
#vars_plugins       = /usr/share/ansible_plugins/vars_plugins
#filter_plugins     = /usr/share/ansible_plugins/filter_plugins

fact_caching = memory
log_path = /data/www/logs/ansible/ansible.log

[privilege_escalation]

[paramiko_connection]

[ssh_connection]
ssh_args = ""
scp_if_ssh = True

[accelerate]
accelerate_port = 5099
accelerate_timeout = 30
accelerate_connect_timeout = 5.0

# The daemon timeout is measured in minutes. This time is measured
# from the last activity to the accelerate daemon.
accelerate_daemon_timeout = 30

# If set to yes, accelerate_multi_key will allow multiple
# private keys to be uploaded to it, though each user must
# have access to the system via SSH to add a new key. The default
# is "no".
accelerate_multi_key = yes

[selinux]