Serve your blog and website using S3 and Cloudfront, Amazon's fast CDN. It will be easy to maintain, and cheap to operate. It will be 'responsive' and work on mobile devices. This stack includes Middleman for site-building, skeleton for responsive CSS, and Slim and Sass html and CSS preprocessors to keep things tidy and readable. There are lots of other good choices for these pieces, but lets start with this.
The goal here is just to get you running middleman as quick as possible. We are just going to download the right ruby gems, run the server, and make a simple change to prove that everything is working.
-
Ensure you have ruby installed type
ruby --versionat the console. Version 2.0+ would be good. One recommended way to install and manage ruby versions is to use RVM. But I am omitting that step. -
Make sure you have the ruby package management tool Bundler installed.
gem install bundler. -
Install middleman gem
gem install middleman -
Initialize a middleman project
middleman init our-project -
Start the server:
cd our-project; middleman server- -
Open a browser to http://localhost:4567/
-
Make some changes to the file
our-project/source/index.html.erb–erbfiles are ruby template files. Ruby inside of<%= %>blocks will be evaluated, this file becomes a.htmlfile. Have a look at http://localhost:4567/__middleman/sitemap/ to see how sources files are mapped. -
Reload the browser and see your changes!
Pressing the browser refresh button is slow. When a file changes, the browser should update instantly. We can do that with LiveReload.
-
Stop your currently running version of middleman, if its running by using
ctr-cin the console where you started it. -
Install the chrome extension for LiveReload.
-
Configure Middleman to use it. Do this by uncommenting lines
39-41inour-project/config.rbso that it looks like this:# Reload the browser automatically whenever files change configure :development do activate :livereload end -
Start your sever again
middleman serverand open http://localhost:4567/ -
Make changes to
our-project/source/index.html.erb. When you clicksavein your editor, you should notice your browser refresh immediately.
Middleman supports many templating languages and preprocessors to make maintaining web content easier. We are going to use Slim.
Slim is an elegant markup that is terse and easy to read. From the projects description page:
Slim is a template language whose goal is reduce the syntax to the essential parts without becoming cryptic.
-
Add the following text to lines 16-17 to your
Gemfile.# Terse markup with Slim gem "middleman-slim" -
Install the newly added dependency:
bundle install -
When we add new libraries to middleman we need to restart our server for those libraries to work. So restart middleman again:
middleman server. -
It would help to install Slim syntax support for your editor. Here is a list:
- atom editor → language-slim and linter-slim
- brackets editor → brackets-slim
- sublime editor → ruby-slim.tmbundle
- vim editor → vim-slim
- emacs editor → emacs-slim
-
Create a new page that uses Slim. Add
secondpage.html.slimunder thesourcedirectory:--- title: Testing Slim --- h1 Slim is better! p class="doc" | you can go a href="/index.html" back to the index -
Middleman lets us mix and match markup engines, so your layout can be in ERB, and your pages can be in SLIM if you want to. Eventually you will want to convert HTML or ERB into SLIM markup. Two command line tools
html2slimanderbtoslimcan be installed with the html2slim gem. We can do that from the command line:gem install html2slim
-
Download Skeleton from the skeleton website
-
Copy the CSS files into our middleman project:
cp ~/Downlaods/Skeleton-2.0.4/css/ ./source/css -
Remove
layouts/layout.erband add a new file "layouts/layout.slim"doctype html html[lang="en"] head meta[charset="utf-8"] title | Your page title here :) meta[name="description" content=""] meta[name="author" content=""] meta[name="viewport" content="width=device-width, initial-scale=1"] link[href="//fonts.googleapis.com/css?family=Raleway:400,300,600" rel="stylesheet" type="text/css"] link[rel="stylesheet" href="/css/normalize.css"] link[rel="stylesheet" href="/css/skeleton.css"] link[rel="icon" type="image/png" href="images/favicon.png"] body class="#{page_classes}" .container = yield -
delete the old Javascript and stylesheets directories:
rm -rf source/stylesheets rm -rf source/javascripts -
Change
stylesheetsdirectory tocssand theJavascriptdirectory tojsinconfig.rb, on lines 52-54:set :css_dir, 'css' set :js_dir, 'js' -
Reload http://localhost:4567/. You should see that it's using the "Raleway" font.
-
Let's set up two column responsive post using slim. Rename
source/index.html.erbtosource/index.html.slmthen open it in your editor, and replace the content with:--- title: Welcome to Middleman --- .six.columns h2 left six column content p This should collapse on smaller devices .documenation a href="http://middlemanapp.com" middleman docs a href="http://getskeleton.com/" skeleton docs .six.columns h2 right six column content p In full page this will be on the right side. .documenation a href="http://middlemanapp.com" middleman docs a href="http://getskeleton.com/" skeleton docs -
One again, we changed config.rb, so we had better restart middleman. Hit
<ctr>-cin your middleman console if its still running. thenmiddleman server. -
Open your browser to http://localhost:4567/ and try resizing the page. The two-column content should collapse to a single column when the window size is reduced.
You may want to purchase and use custom fonts on your site. Even if you aren't, you should follow along, because this section also talks about adding your own CSS files. Here we use a freeware font downloaded from Font Squirell
Middleman uses sprokets to combine, and minimize our CSS and JS files. This current best practice of combining and minimizing will become an anti-pattern when http2 is adopted, but in the meantime we need to keep minifying and combining our assets.
We are going to add new CSS files to our project. These CSS files will be automatically combined into one file called css/all.css. The process is easy.
-
Create a new CSS file called
css/all.css. Using special comments, this CSS file will tell middleman to require our other CSS files.css/all.cssshould look like this:/* *= require normalize *= require skeleton *= require fonts *= require our */ -
css/normalize.cssandcss/skeleton.cssalready exist, but we need to make two new files.css/our.scsswill be where we add custom CSS to override the behavior skeleton and define new styles.css/fonts.scssis where we will put our fonts. We could define fonts in any CSS file, but I like keeping the CSS files small and modular. BTW:.scssfile extensions are for Sass files. Middleman converts Sass into CSS files for us the same way it converts slim to html. Here is what we put incss/fonts.scss:/* Font face "walkway" (Freeware License v1.00) Downloaded from "Font Squirell" http://www.fontsquirrel.com/fonts/Walkway Designed by GemFonts Formats: TTF - Works in most browsers except IE and iPhone. EOT - IE only. WOFF - Compressed, emerging standard. SVG - iPhone/iPad. */ @font-face { font-family: 'walkway'; src: url('../fonts/Walkway_SemiBold-webfont.eot'); src: url('../fonts/Walkway_SemiBold-webfont.eot?#iefix') format('embedded-opentype'), url('../fonts/Walkway_SemiBold-webfont.woff') format('woff'), url('../fonts/Walkway_SemiBold-webfont.ttf') format('truetype'), url('../fonts/Walkway_SemiBold-webfont.svg#walkway_ultraboldregular') format('svg'); font-weight: normal; font-style: normal; } @font-face { font-family: 'walkway'; src: url('../fonts/Walkway_Black-webfont.eot'); src: url('../fonts/Walkway_Black-webfont.eot?#iefix') format('embedded-opentype'), url('../fonts/Walkway_Black-webfont.woff') format('woff'), url('../fonts/Walkway_Black-webfont.ttf') format('truetype'), url('../fonts/Walkway_Black-webfont.svg#walkway_blackregular') format('svg'); font-weight: bold; font-style: normal; } @font-face { font-family: 'walkway'; src: url('../fonts/Walkway_Oblique-webfont.eot'); src: url('../fonts/Walkway_Oblique-webfont.eot?#iefix') format('embedded-opentype'), url('../fonts/Walkway_Oblique-webfont.woff') format('woff'), url('../fonts/Walkway_Oblique-webfont.ttf') format('truetype'), url('../fonts/Walkway_Oblique-webfont.svg#walkway_obliqueregular') format('svg'); font-weight: normal; font-style: italic; }
The above section defines three variants on 'walkway' (normal/normal, bold/normal, normal/italic). It also specifies fall-back formats (other than woff) for old browsers. In the next file you will see how these fonts are used in our CSS. This is what to put in css/our.scss:
    .font-test {
      font-size: 40px;
      .walkway {
        font-family: walkway;
        .bold {
          font-weight: bold;
        }
        .italic {
          font-style: italic;
        }
      }
    }
-
We now want to change the reference to our stylesheets in our layout. Instead of including both
css/normalize.cssandcss/skeletinnow we only includecss/all.cssinlayouts/layout.slimfile:doctype html html lang="en" head meta charset="utf-8" title = current_page.data.title or "Our stie" meta name="description" content="" meta name="author" content="" meta name="viewport" content="width=device-width, initial-scale=1" link href="//fonts.googleapis.com/css?family=Raleway:400,300,600" rel="stylesheet" type="text/css" link rel="stylesheet" href="/css/all.css" link rel="icon" type="image/png" href="images/favicon.png" body class="#{page_classes}" .container .meta h1 = current_page.data.title .article = yield -
I almost forgot! We need to put our downloaded font files (*.tff, *.woff, *.eot, *.svg) into a new folder
source/fonts. Find your downloaded files, and put them in. make sure the paths in thesrcattribute ofcss/fonts.scssmatch up. They should if you have been following along with my example. -
Finally we need to create a new page to test our freshly added fonts. Create
source/font-test.html.slim:.font-test .walkway p WalkWay regular. p.italic WalkWay italic? p.bold WalkWay bold!
You can now see your new fonts at the sample page: http://localhost:4567/font-test.html
So far we have only been using middleman server to preview our changes. When we put our static pages up on a server, we aren't going to need to run anything. We generate the files before hand. Let's try that now before we get any farther.
-
stop middleman by using
ctr-cin the console. -
run
middleman build --clean -
if everything goes right, you should see a new directory called
build. Take a look around in there and see the static files that were created for us. -
You can now run a web server inside that directory (using python on port 8000).
cd build && python -c 'import SimpleHTTPServer; SimpleHTTPServer.test()' -
Open http://localhost:8000/font-test.html in your browser.
We have middleman installed with our favorite template engine (slim) and skeleton. Before we go any further, what can we do with the setup we have?
- We can add slim files to
source/*.slimto make new pages available athttp://localhost://*.html - We can add new CSS files to our
css/all.cssto add new module styles. - We can change the layout by editing
layouts/layout.slim
This is a big change. You can view the commit here: 55aa1300
Basically, we added:
- A new stylesheet
navigation.scss, and a new reference to it inall.css - New javascript (in the form of coffeescript in a view partial) for the dropdown hamburger menu.
- Meta-data to
index.html.slimfor the navigation links (internal to index) - Small changes to
layout.slimto add jquery, and insert the navigation menu partial.
  /*
  *= require normalize
  *= require skeleton
  *= require fonts.css
  *= require navigation
  *= require our.css
  */
This is the bulk of the change actually. This stylesheet has a media query which tells us whether to display a hamburger or just list the links across the top of the page. Here we also introduce some SASS magic, namely variables for sizes and colors. There is also some math and color adjustment. (see if you can spot it).
  $nav-height: 4rem;
  $nav-background: hsla(128, 0, 0, 1.0);
  $link-color: hsla(128, 0, 40, 1.0);

  nav {
    div {
      margin-left: 1rem;
      margin-right: 1rem;
    }
    a {
      margin-left: 2rem;
      color: $link-color;
      text-decoration: none;
      transition: 1.8s;
    }
    a:hover{
      color: lighten($link-color, 50%);
      transition: 0.1s;
    }
    width: 100%;
    position:fixed;
    top: 0;
    height: $nav-height;
    z-index: 3;
    font-size: $nav-height * 0.75;
    background-color: $nav-background;
    padding: 1rem;
    .title {
      font-weight: bold;
      color: lighten($link-color, 100%);
      display: inline-block;
    }
    .right {
      position: absolute;
      right: 0px;
      padding-right: 2rem;
      display: inline-block;
    }
    .links {
      font-size: $nav-height * 0.5;
      display: none;
    }
    #hamburger {
      display: inline-block;
      #menu {
        position: fixed;
        top: 0px;
        right: 0px;
        margin: 0px;
        padding: 1rem;
        background-color: $nav-background;
        overflow: hidden;
        z-index: 2;
        transition: 0.2s;
        display: inline-block;
        &.hidden {
          top: -400px;
          transition: 2s;
        }
        a {
          display: block;
        }
      }
    }
  }


  .container {
    margin-top: $nav-height * 2;
  }

  /* Hide the burger, and switch to links across top for larger screens */
  @media (min-width: 700px) {
    nav {
      .links {
        display: inline-block;
      }
      #hamburger {
        display: none;
      }
    }
  }
-
add links meta-data to the top. (These are internal links to the h2's) We are adding a new value to
current_page.datacalledlinks. Links is an array of objects withnameandurlproperties. These values get used bysource/partials/_nav.html.slim--- title: a twelve column row. links: - name: One url: "#one" - name: Two url: "#two" - name: Three url: "#three" --- -
Add id's to the
<h2>tags on our page, for internal document links. For example on the first<h2>element, we add the idone. Which we link to as#onein the navigation menu.h2#one 1 Some exciting headline. -
add splashes of ipsum text to make our paragraphs longer, so that we can see that the navigation is fixed to the top of the page when content scrolls.
p Lorem ipsum dolor sit amet, consectetur adipisicing elit, sed do eiusmod tempor incididunt ut labore
Add jquery and a nav partial in: our-project/source/layouts/layout.slim (remove stars when pasting)
   meta name="viewport" content="width=device-width, initial-scale=1"
   link href="//fonts.googleapis.com/css?family=Raleway:400,300,600" rel="stylesheet" type="text/css"
   link rel="stylesheet" href="/css/all.css"
   script src="//code.jquery.com/jquery-1.11.3.min.js"  ★★
   link rel="icon" type="image/png" href="images/favicon.png"
   body class="#{page_classes}"
    = partial "partials/nav" ★★
Add a new file in a new directory (source/partials) for the navigation.
This file includes inline ruby (preceeded by - in slim), and inline coffeescript
preceeded by the cofffee: marker. in our-project/source/partials/_nav.html.slim:
  - @links = [\
    {name: "google", url: "http://google.com/"}, \
    {name: "home", url: "/"}, \
    {name: "blog", url: "/"}, \
  ] + (current_page.data.links || [])
  - @title = current_page.data.title || "Our Site"
  nav
    .title = @title
    .right
      .links
        - @links.each do |link|
            a href=link[:url] #{link[:name]}

      #hamburger
        a href="#" [=]
        #menu.hidden
          - @links.each do |link|
              a href="#{link[:url]}" #{link[:name]}

  coffee:
    $(document).on 'ready', ->
      hamburger = $("#hamburger")
      menu = $("#menu")

      isChild = (elm,selector) ->
        $(elm).parent(selector).length > 0

      hideMenu = (e) ->
        unless e and isChild(e.target,"#menu")
          hamburger.bind "click", showMenu
          $('body').unbind "click", hideMenu
          menu.addClass  "hidden"

      showMenu = (e) ->
        e.stopPropagation()
        hamburger.unbind "click", showMenu
        $('body').bind "click", hideMenu
        menu.removeClass "hidden"
        setTimeout hideMenu, 4000

      hideMenu()
Prerequisites: You need to signup for an AWS account if you don't have one already.
We are going to setup S3 website publishing using a ruby gem called "s3_website". First we will create a virtual authorized AWS user, and give that user the correct permissions to manage our s3 bins. Next we will add the s3_website gem to our Gemfile, and install it. Then we will configure the s3_webiste gem to work with our middleman setup. Finally we will push our changes to amazon.
We wont be doing DNS tweaking in this episode. We will be testing using the default AWS domain names.
In these examples, wherever you see "yourdomain.com" you should use your own (eventual) domain name.
As part of this process we store confidential information in a file called '.env'. This file shouldn't be shared, stored on a public server, or checked into version control. (eg: git)
-
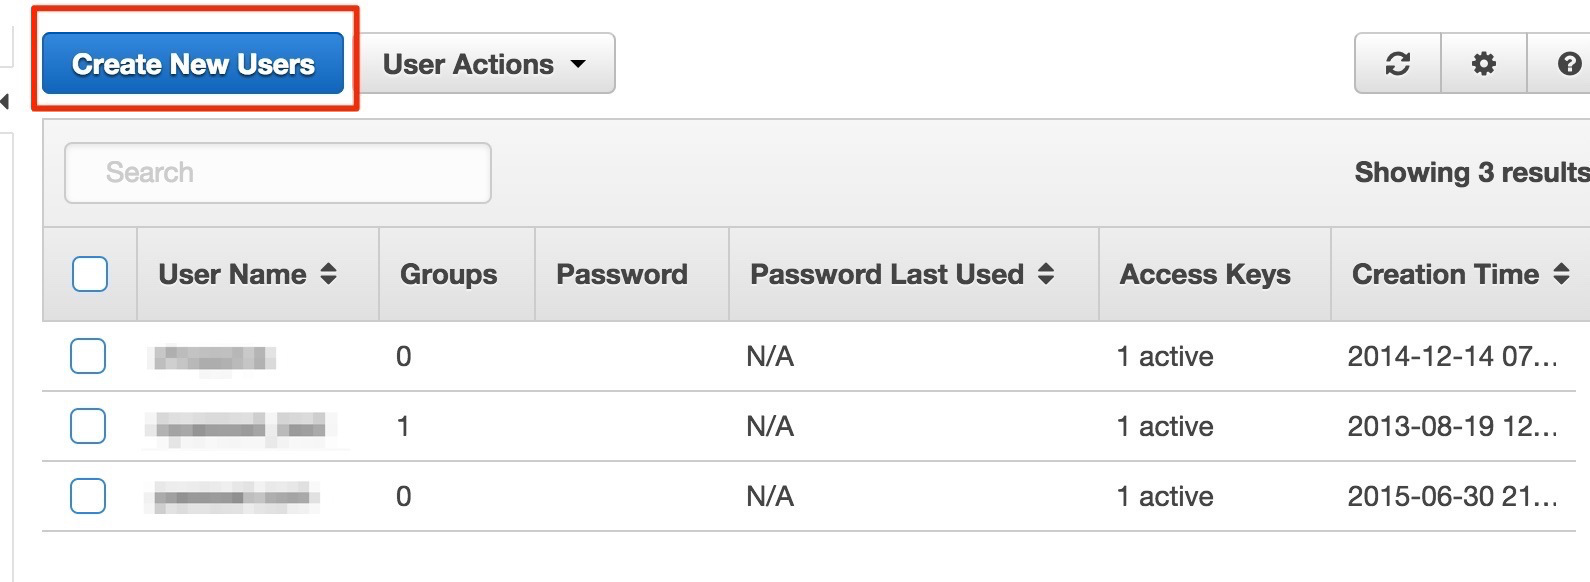
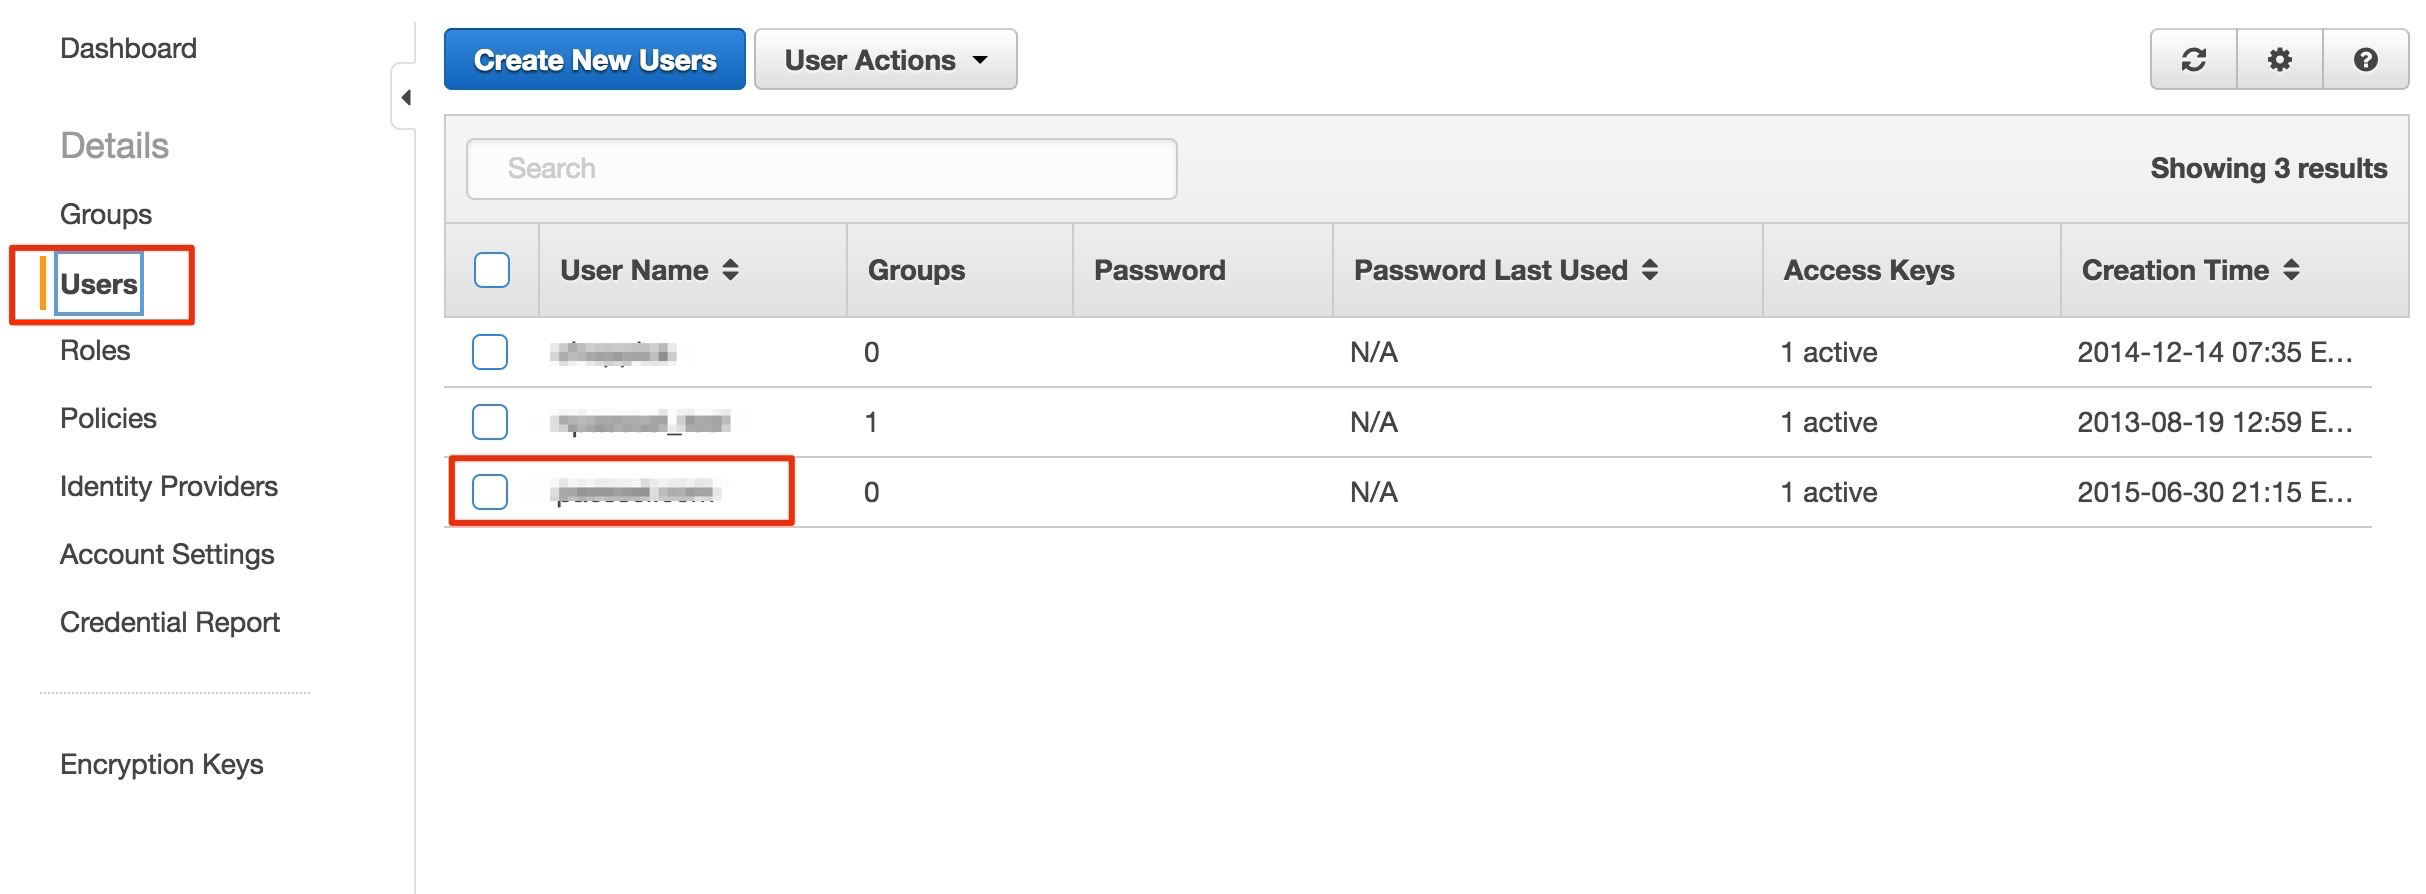
Log into the AWS IAM console Create a new user by clicking on the "users" link. This new user will only have limited capabilities (to write to your S3 bucket).

-
Give the user a name matching your domain name so that you don't forget what it is for.
-
After creating the user, you will be shown some access tokens on the screen. Copy the tokens into a new file called
our_project/.envusing the following format. Don't share this file.S3_ID=XXXXXXX S3_SECRET=XXXXXXXX -
Close the window which displays the use credentials, and click on the newly added user in the users listing
-
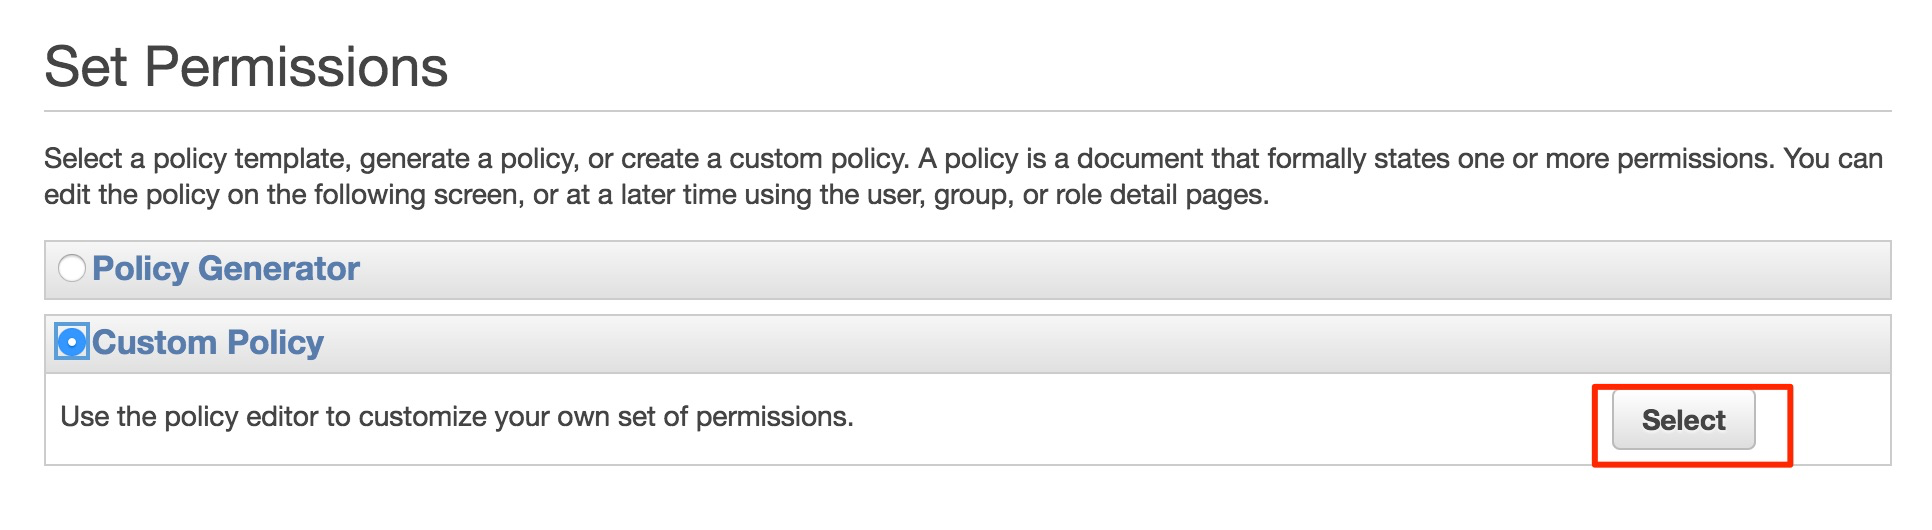
Now add a new 'inline policy" for the user. 
-
Copy this text into the policy file:
 {
     "Statement": [
         {
             "Action": [
                 "cloudfront:*"
             ],
             "Effect": "Allow",
             "Resource": [
                 "*"
             ]
         },
         {
             "Action": [
                 "s3:*"
             ],
             "Effect": "Allow",
             "Resource": [
                 "arn:aws:s3:::yourdomain.com",
                 "arn:aws:s3:::yourdomain.com/*"
             ]
         }
     ]
 }


DONT USE yourdomain.com -- Use whatever domain name you will be using.
-
Add the s3_website gem
oursite/Gemfile# Deployment to S3 gem "s3_website" -
Install the newly added gem by running:
bundle install -
Use the
s3_websitetool to create a configuration file:s3_website cfg create -
Edit the file we just created in
oursite/s3_website.ymlThe top of the file should look like this. (the sensitive authentication tokens are being read in from the.envfile.) You will just change the s3_bucket name to the whatever your bucket name is.s3_id: <%= ENV['S3_ID'] %> s3_secret: <%= ENV['S3_SECRET'] %> s3_bucket: yourdomain.com max_age: "*": 300 "fonts/*": 6000 gzip: true cloudfront_invalidate_root: true -
Saved
oursite/s3_website.ymland run:s3_website cfg apply
You will be asked if you want to use Amazons cloudfront CDN. Answer yes. You will see something about please allow 15 minutes..... This message is letting us know that couldfront is starting for us, and wont be ready for some time, but we can continue anyway.
-
Build your project, and push it up using these two commands:
middleman build
s3_website push
When s3_website push is finished, it will print out the current URL for the S3 website. It should be something like http://yourdomain.com.s3-website-us-east-1.amazonaws.com THIS SITE WILL BE SLOW, because its not being served from the CDN. Don't panic. It will be much faster when the CDN is ready.
-
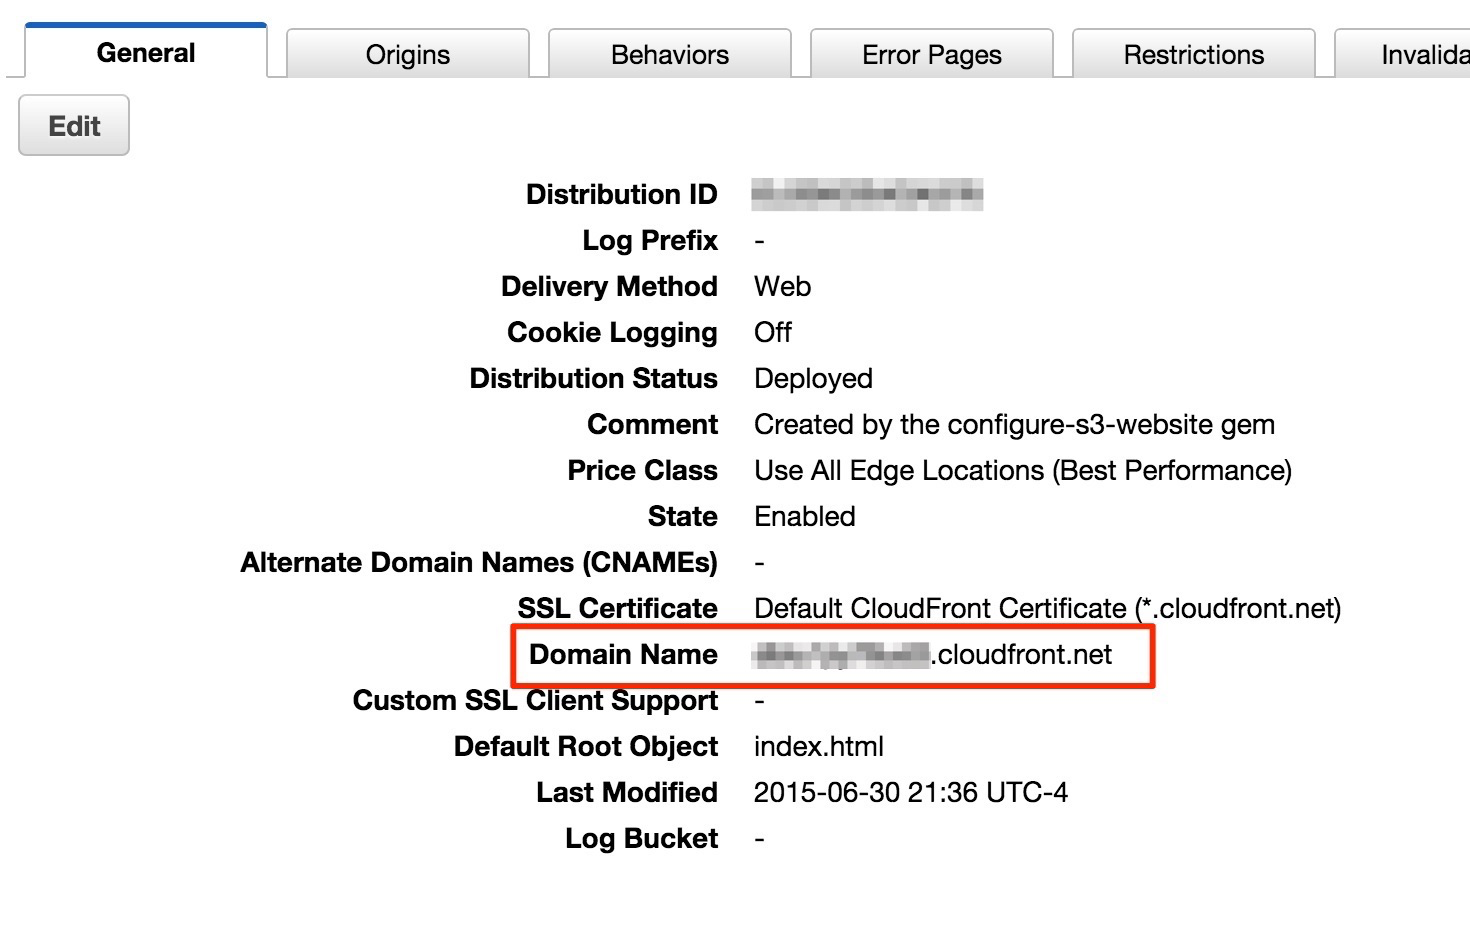
After 15 minutes or so, you should be able to check cloudfront. You will see your distribution listed here: https://console.aws.amazon.com/cloudfront where you can monitor its progress. By clicking on the newly created distribution name, you can find the DNS entry for your CDN, eg: dbluxxxxxud3.cloudfront.net
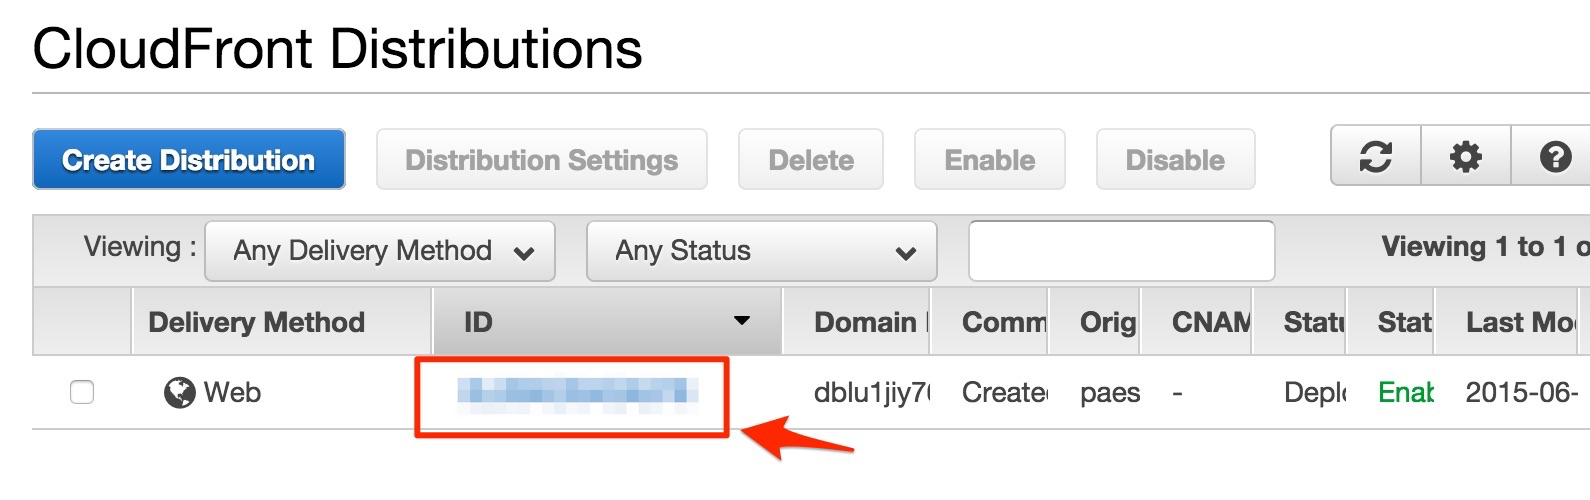
 It really does take about 5-10 minutes the first time. Keep refreshing the console page. Or just try continually reloading URL in a browser. The couldfront distribution ID has been added automatically to the s3_website.yml configuration file (incase you see multiple in your console).
 -
DNS: You can use any method you want to redirect your domain name to that CDN server, including using a CNAME from your DNS provider, but in a future installment I will cover a performant way to do it using AWS DNS servers.
-
Future builds and workflow: Subsequent builds will go much faster. It will just be a matter of running
middleman build && s3_website push


google page speed identified a number of slowdowns on our site. The basic recommendations it made were:
- Concatenate and minify javascript & css files
- Load scripts asynchronously if possible.
- Use correct cache headers.
This resulted in:
- Modifying middleman's build configuration in config.rb to concatenate and minify assets.
- Adjusting s3_website.yml for better cache settings, and compressed files.
- Changing layout.slim to load jquery asynchronously.
- Changing the coffeescript in _nav.html.slim so that it doesn't load until after jquery has loaded.
In _nav.html.slim:
    coffee:
      enable_menu = ->
        hamburger = $("#hamburger")
        menu = $("#menu")

        isChild = (elm,selector) ->
          $(elm).parent(selector).length > 0

        hideMenu = (e) ->
          unless e and isChild(e.target,"#menu")
            hamburger.bind "click", showMenu
            $('body').unbind "click", hideMenu
            menu.addClass  "hidden"

        showMenu = (e) ->
          e.stopPropagation()
          hamburger.unbind "click", showMenu
          $('body').bind "click", hideMenu
          menu.removeClass "hidden"
          setTimeout hideMenu, 4000

        hideMenu()
        window.addEventListener('load', enable_menu, false)
In layout.slim, find the jquery line, and change it to
load asynchronously like this:
script src="//code.jquery.com/jquery-1.11.3.min.js" async="async"
In config.rb, find the build section and change it like so:
    configure :build do
      # For example, change the Compass output style for deployment
      activate :minify_css

      # Minify Javascript on build
      activate :minify_javascript
    end
Once those changes are made, we want to force an update to all files, including files that haven't changed. We push all files, so that the cache settings can be pushed up. To do this we run:
middleman build && s3_website push --force