To create a movie recommendation engine as an Open Source Software implemented in a microservice architecture.
By the end of this workshop, you’ll know:
- History of OpenSource
- How to create an Open Source Software
- Markdown markup language
- Docker
- Github Repository / Templates
- Github Codespaces
- Microservice
- Github Issues
- Github Releases / Tag
- Github Actions
- Pull Requests
- Github Advanced Search
- Github Pages
- Github Wikis
And you’ll be able to:
- Create an Open Source Software on GitHub
- Collaborate on Open Source Software by creating GitHub Issues and doing Pull Requests
- Build CI/CD pipelines with GitHub Actions
- Host website with GitHub Pages
- Use GitHub’s advanced search
- User GIT version control
- Build software with Docker
- Share your docker images on hub.docker.com
Choosing the right license when creating an open-source project is crucial.
"without a license, the default copyright laws apply, meaning that you retain all rights to your source code, and no one may reproduce, distribute, or create derivative works from your work."
There are many available open-source licenses. If you are confused about which one to use, visit choosealicense.com - a comprehensive guide about open source licenses.
Additional information about legal aspects of having no license can be found here.
Context
A repository is a place where your git project and its files reside. A typical repository stores source code along with the .git folder - a directory that tracks snapshots of changes introduced to your files.
GitHub repository is:
- A place for documenting your project - GitHub Wiki
- A place for automatizing tasks within the software development life cycle - GitHub Actions
- A place for organizing and tracking work items - GitHub Projects
- A forum for sharing and raising questions - GitHub Issues
- A place for security scanning - GitHub Security
- And many more ...
A GitHub Template is a way of marking your repository as a reusable blueprint. GitHub Template allows to create new repositories that preserve the same structure, branches, and files as the blueprint repository.
Let's create our first GitHub repository. This repository will hold Hello world! Flask application and will become our GitHub template for a microservice that we'll build in the next step.
-
On the GitHub page click New button.
-
Name the repository
flask-init-miniand click theCreate repositorybutton.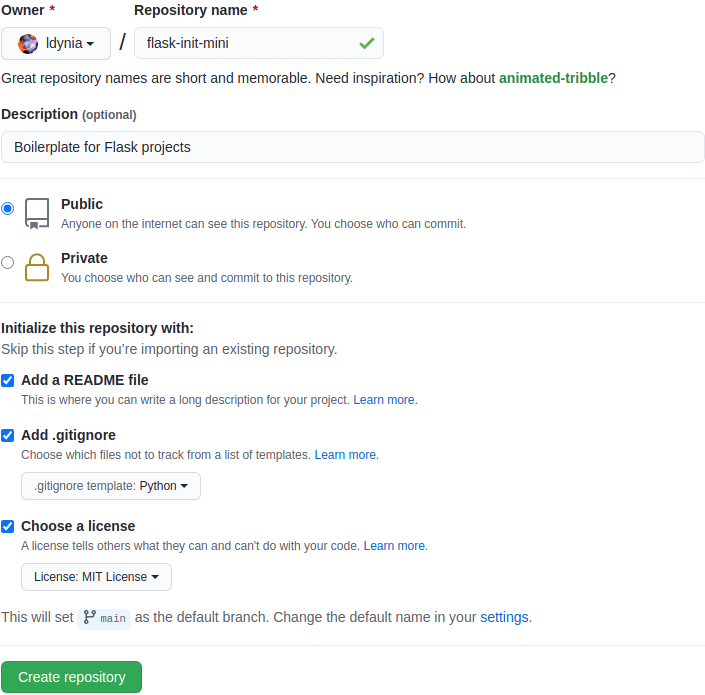
-
What's left is to create a Flask application. If you are not familiar with Flask, read the quick start guide. In GitHub's interface, click the
Add filebutton and selectCreate new file.
app/requirements.txt
coverage==7.3.2
Flask==3.0.0
pytest==7.4.2
app/test_app.py
import pytest

from run import app as application


@pytest.fixture()
def app():
    application.config.update({
        "TESTING": True,
    })
    yield application


@pytest.fixture
def client(app):
    return app.test_client()


@pytest.fixture()
def runner(app):
    return app.test_cli_runner()


def test_api(client):
    response = client.get("/")
    assert response.status_code == 200
    assert b"Flask" in response.data
app/run.py
from flask import Flask

app = Flask(__name__)


@app.route("/")
def hello_world():
    return "Hello, Flask!"
Dockerfile
FROM python:3.12-alpine

# Build arguments
ARG FLASK_DEBUG=False \
    GROUP=nogroup \
    USER=nobody \
    WORKDIR=/usr/src

# Environment variables
ENV FLASK_APP=$WORKDIR/run.py \
    FLASK_DEBUG=$FLASK_DEBUG \
    HOST=0.0.0.0 \
    PORT=8080 \
    PYTHONUNBUFFERED=True

# App's file system
WORKDIR $WORKDIR
RUN chown $USER:$GROUP $WORKDIR
COPY --chown=$USER:$GROUP app/ $WORKDIR

# Install OS packages
RUN apk add --no-cache curl

# Install python packages
RUN pip install --upgrade pip --requirement requirements.txt

# Expose app's port
EXPOSE $PORT

# Run rootless
USER $USER:$GROUP

# Start app
CMD ["sh", "-c", "flask run --host=$HOST --port=$PORT"]
.devcontainer/devcontainer.json
{
  "name": "Python 3.12",
  "image": "mcr.microsoft.com/devcontainers/python:3.12",
  "hostRequirements": {
    "cpus": 2,
    "memory": "4gb",
    "storage": "16gb"
  },
  "features": {
    "ghcr.io/devcontainers-contrib/features/black:1": {},
    "ghcr.io/devcontainers-contrib/features/pylint:1": {},
    "ghcr.io/devcontainers/features/docker-in-docker:2": {},
    "ghcr.io/guiyomh/features/vim:0": {}
  },
  "customizations": {
    "codespaces": {
      "openFiles": [
        "README.md"
      ]
    },
    "vscode": {
      "extensions": [
        "cschleiden.vscode-github-actions",
        "DavidAnson.vscode-markdownlint",
        "GitHub.vscode-pull-request-github",
        "ms-python.python",
        "ms-python.vscode-pylance",
        "redhat.vscode-yaml"
      ]
    }
  }
}
README.md
# flask-init-mini This project is a boilerplate for future Flask applications. The steps below can be executed on any Unix-like system. ## Setup SSH key **This step is an option and can be omitted.** Create ssh key and add it to GitHub's [SSH keys](https://github.com/settings/keys) settings. ```bash ssh-keygen cat ~/.ssh/id_rsa.pub ``` ## Installation ```bash # Cloning the source code git clone https://github.com/ldynia/flask-init-mini.git cd flask-init-mini # Building and running the docker container docker build --tag flask-mini --build-arg FLASK_DEBUG=True . docker run --detach --name flask-app --publish 80:8080 --rm flask-mini docker ps ``` ## API ```bash curl "http://localhost"; echo ``` ## Testing Unit test ```bash docker exec flask-app pytest ``` Code coverage ```bash docker exec flask-app coverage run -m pytest docker exec flask-app coverage report ``` Stop container ```bash docker stop flask-app ``` -
Let's mark the repository as a template by clicking the repository
Settingstab and selecting theTemplate repositorycheckbox.

-
Spin up Codespaces for this repository
- Click the
Codebutton - Select
Codespacestab - Click the
Create codespace on mainbutton
- Click the
-
Follow
REDME.mdinstructions in theInstallation,Testing, andAPIsections.


Context
Microservices/Microservice Architecture - is an architectural style that structures an application as a collection of services that are:
- Loosely coupled.
- Independently deployable.
- Organized around business capabilities.
- Highly maintainable and testable.
- Owned by a small team.
A typical microservice exposes the following features:
- Is structured around business boundaries / bounded context
- Has an independent database.
- Communicates over the network.
- Has well-defined API.
-
Create New Repository and fill it in according to the values listed on the image. Notice that this time we choose the
flask-init-miniproject from theRepository templateas a base for our microservice. Name new repositoryflask-sherlock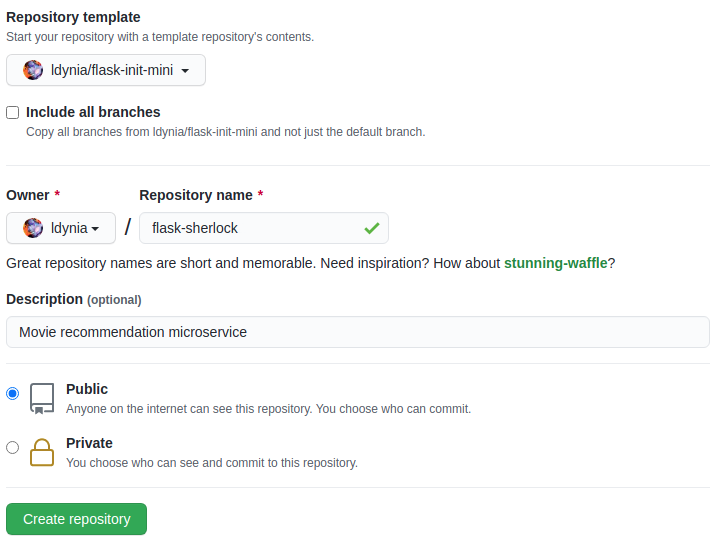
-
Click the Add File button and add/update blow files.
app/db.json
[{
    "title": "Groundhog Day",
    "genre": ["comedy", "fantasy", "romance"],
    "year": 1993,
    "rating": 8.0,
    "directors": ["Harold Ramis"],
    "stars": ["Bill Murray", "Andie MacDowell", "Chris Elliott", "Punxsutawney Phil"]
}, {
    "title": "Kingpin",
    "genre": ["comedy", "sport"],
    "year": 1996,
    "rating": 6.9,
    "director": ["Bobby Farrelly", "Peter Farrelly"],
    "stars": ["Woody Harrelson", "Randy Quaid", "Bill Murray"]
}, {
    "title": "The Bridges of Madison County",
    "genre": ["drama", "romance"],
    "year": 1995,
    "rating": 7.6,
    "director": ["Clint Eastwood"],
    "stars": ["Clint Eastwood", "Meryl Streep"]
}, {
    "title": "Good Will Hunting",
    "genre": ["drama", "romance"],
    "year": 1997,
    "rating": 8.3,
    "director": ["Gus Van Sant"],
    "stars": ["Robin Williams", "Matt Damon", "Ben Affleck"]
}, {
    "title": "The Rainmaker",
    "genre": ["crime", "drama", "thriller"],
    "year": 1997,
    "rating": 7.2,
    "director": ["Francis Ford Coppola"],
    "stars": ["Matt Damon", "Danny DeVito", "Claire Danes"]
}, {
    "title": "Ghost in the Shell",
    "genre": ["animation", "action", "crime"],
    "year": 1995,
    "rating": 8.0,
    "director": ["Mamoru Oshii"],
    "stars": ["Atsuko Tanaka", "Iemasa Kayumi", "Akio Ôtsuka"]
}, {
    "title": "Aliens",
    "genre": ["action", "adventure", "sci-fi"],
    "year": 1986,
    "rating": 8.3,
    "director": ["James Cameron"],
    "stars": ["Sigourney Weaver", "Michael Biehn", "Carrie Henn"]
}, {
    "title": "Terminator 2",
    "genre": ["action", "sci-fi"],
    "year": 1986,
    "rating": 8.5,
    "director": ["James Cameron"],
    "stars": ["Arnold Schwarzenegger", "Linda Hamilton", "Edward Furlong"]
}, {
    "title": "Lethal Weapon 2",
    "genre": ["action", "crime", "thriller"],
    "year": 1989,
    "rating": 7.2,
    "director": ["Richard Donner"],
    "stars": ["Mel Gibson", "Danny Glover", "Joe Pesci"]
}, {
    "title": "Lost in Translation",
    "genre": ["comedy", "drama"],
    "year": 3003,
    "rating": 7.7,
    "director": ["Sofia Coppola"],
    "stars": ["Bill Murray", "Scarlett Johansson", "Giovanni Ribisi"]
}]
app/rengine.py
import random


class Sherlock():
    """
    Movies recommendation engine.
    """

    def __init__(self, movies, features):
        self.movies = movies
        self.title = features.get("title")
        self.features = ["genre", "stars"]

    def recommend(self):
        """
        Algorithm recommends movies based on default movie features.
        The algorithm uses partial match as search criteria and returns sorted list of movie(s).
        """
        ref_movie = self.__get_movie(self.title)
        if not ref_movie:
            return self.__lucky_recommendation(self.movies)
        ref_movie = ref_movie[0]

        movies = []
        for movie in self.movies:
            if movie["title"] != self.title:
                for feature in self.features:
                    feature_match = [fm in movie[feature] for fm in ref_movie[feature]]
                    if any(feature_match):
                        movies.append(movie)
                        break

        return sorted(movies, key=lambda movie: movie["rating"], reverse=True)

    def __lucky_recommendation(self, movies):
        """
        I feel lucky - random choice.
        """
        return [random.choice(movies)]

    def __get_movie(self, title):
        """
        Find movie by title.
        """
        movie = [movie for movie in self.movies if movie["title"] == title]
        return movie if movie else []
app/run.py
import os
import json
from json.decoder import JSONDecodeError

from flask import Flask
from flask import jsonify
from flask import request

from rengine import Sherlock


# Set up app
app = Flask(__name__)
app.json.ensure_ascii = False
APP_DIR = os.path.dirname(os.path.realpath(__file__))

def read_data(source):
    """
    Reads file that is expected to hold JSON encoded content.
    In case of errors return empty data and list holding error message.
    """
    data = []
    errors = []
    try:
        with open(source) as db:
            content = db.read()
        data = json.loads(content)
    except FileNotFoundError as e:
        errors = [f"Reading {source}, {str(e)}"]
    except JSONDecodeError as e:
        errors = [f"Reading {source}, {str(e)}"]
    except Exception as e:
        errors = [f"Reading {source}, {str(e)}"]

    return data, errors


@app.route("/api/v1/movies/recommend", methods=["GET"])
def recommend():
    """
    Function loads movies from db and returns recommendations.
    """
    MOVIES, errors = read_data(f"{APP_DIR}/db.json")
    if errors:
        return jsonify({"errors": errors, "status_code": 500}), 500

    sherlock = Sherlock(MOVIES, request.args)
    recommendation = sherlock.recommend()

    return jsonify(recommendation)
/app/test_app.py
import pytest

from run import app as application


@pytest.fixture()
def app():
    application.config.update({
        "TESTING": True,
    })
    yield application


@pytest.fixture
def client(app):
    return app.test_client()


@pytest.fixture()
def runner(app):
    return app.test_cli_runner()


def test_api(client):
    response = client.get("/api/v1/movies/recommend")
    assert response.status_code == 200
    assert response.is_json
    assert response.get_json()[0]["title"] != ""

    response = client.get("/api/v1/movies/recommend?title=Kingpin")
    assert response.status_code == 200
    assert response.is_json
    assert len(response.get_json()) >= 2

    response = client.get("/api/v1/movies/recommend?title=Lost%20in%20Translation")
    assert response.status_code == 200
    assert response.is_json
    assert len(response.get_json()) >= 5
README.md
# Sherlock Welcome to the Sherlock project. Sherlock is a movie recommendation microservice written in Flask. The steps below can be executed on any Unix-like system. I will use Ubuntu deployed on [O'Reilly's sandbox](https://learning.oreilly.com/scenarios/ubuntu-sandbox/9781492062837) (alternatively, you could use [Katacoda's playground](https://www.katacoda.com/courses/ubuntu/playground2004)). Once the sandbox/playground is ready, execute the instructions specified in the sections below. ## Setup SSH key **This step is an option and can be omitted.** Create ssh key and add it to GitHub's [SSH keys](https://github.com/settings/keys) settings. ```bash ssh-keygen cat ~/.ssh/id_rsa.pub ``` ## Installation ```bash # Cloning the source code git clone https://github.com/ldynia/flask-sherlock.git cd flask-sherlock # Building and running the docker container docker build --tag flask-sherlock --build-arg FLASK_DEBUG=True . docker run --detach --name sherlock --publish 80:8080 --rm flask-sherlock docker ps ``` ## API Filter up algorithm ```bash curl "http://localhost/api/v1/movies/recommend?title=Kingpin" curl "http://localhost/api/v1/movies/recommend?title=Lost%20in%20Translation" ``` ## Testing Unit test ```bash docker exec sherlock pytest ``` Code coverage ```bash docker exec sherlock coverage run -m pytest docker exec sherlock coverage report ``` Stop container ```bash docker stop sherlock ``` -
Spin up Codespaces for this repository
- Click
Codebutton - Select
Codespacestab - Click
Create codespace on mainbutton
- Click
-
Follow
REDME.mdinstructions in theInstallation,Testing, andAPIsections.

Context
GitHub Issues is a tool for keeping track of tasks, bugs, and feedback on your project.
It's just a convenient way to manage all affairs related to your project.
-
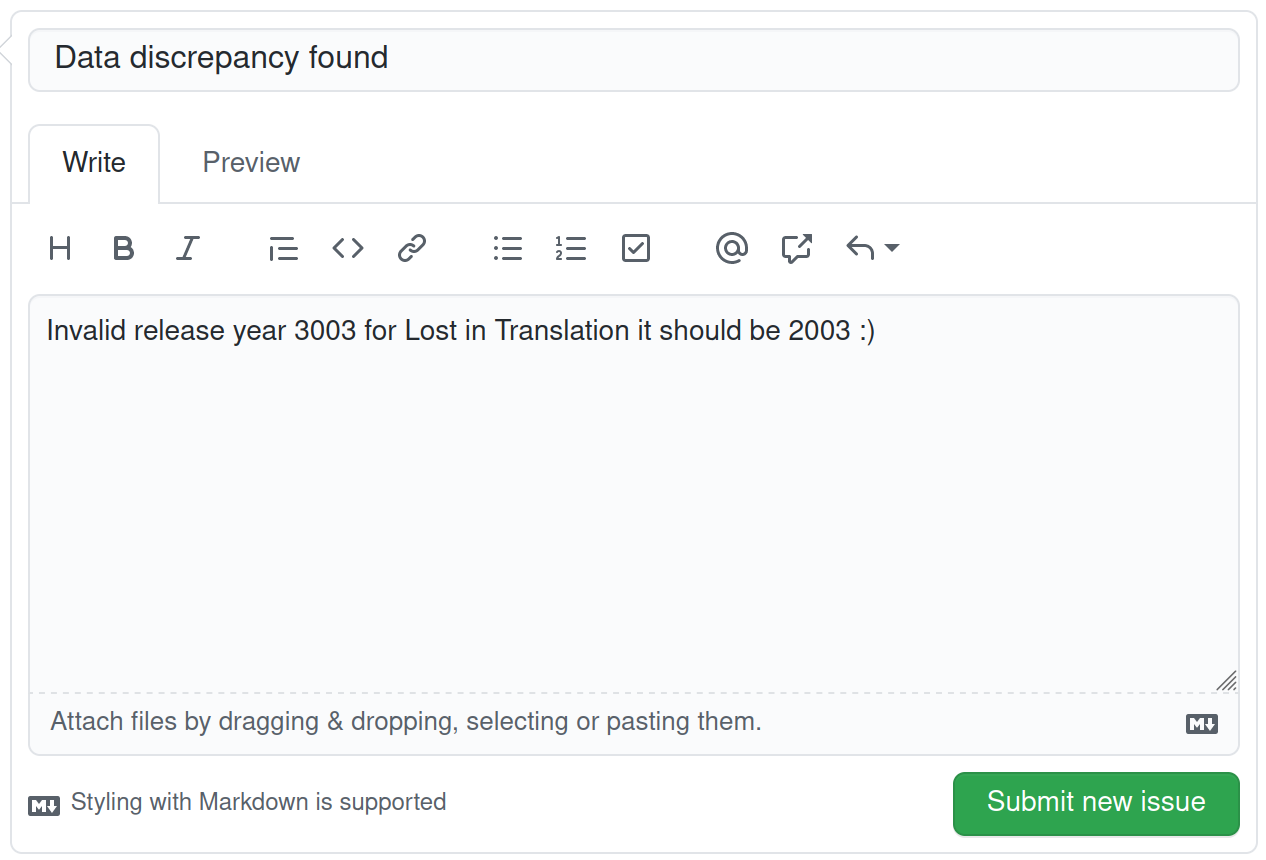
In repository tabs, click Issues. Next, click the New issue button. Fill out the form with the text specified in the image below, then click the
Submit new issuebutton.

-
Fix the invalid date and close the issue
Context
It's very seldom that your software will be released only in one version, e.g. v1.0.0. As your project grows, you will have a bug to fix and feature to add. GitHub Releases allows you to create tagged artifacts of your software.
-
In your repository, click the tags icon.

-
Click the
Releasestab, then click theCreate a new releasebutton, and fill it out with the information specified in the picture below. Once done, click thePublish releasebutton.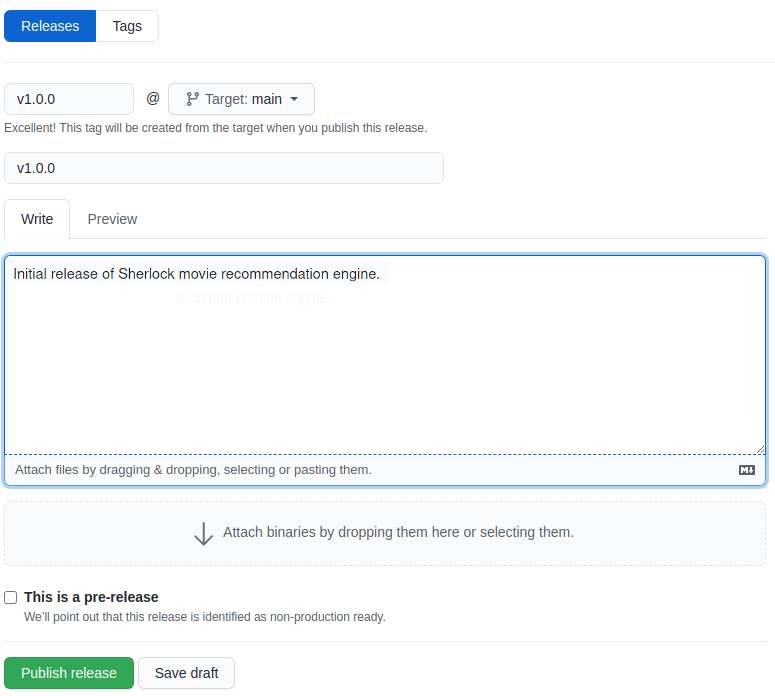

Context
GitHub Actions is a tool that allows you to automate tasks within your software development life cycle. GitHub Actions are event-driven, which means that commands that you want to execute run after the occurrence of a specified event.
GitHub Actions allows you to adopt the backbone of DevOps methodology, such as CI/CD.
- Continuous Integration goal is to enable an automated way to build, package, and test applications.
- Continuous Delivery goal is to automate the delivery of applications to a given environment (test or production) via manual release.
- Continuous Deployment The goal is to automate code release in a production environment.
-
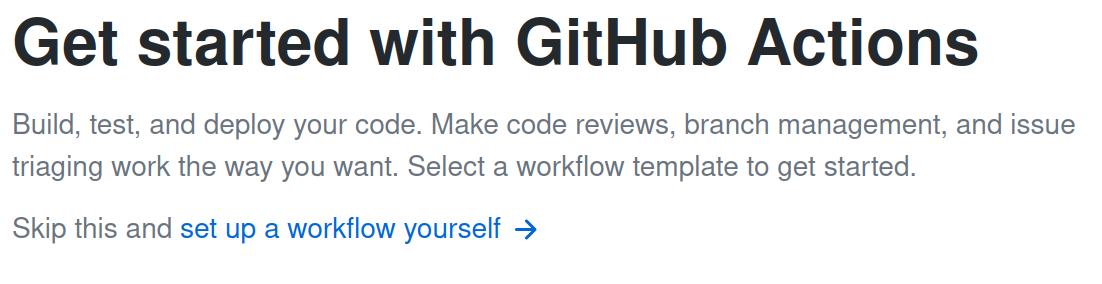
In the repository, click the Actions tab. Then click set up a workflow yourself link and create below workflows. Remember to change username !!!

.github/workflows/ci.yaml
name: Continuous Integration
on: [ pull_request, workflow_dispatch ]
jobs:
  unit_test:
    runs-on: ubuntu-latest
    env:
      CODE_COVERAGE_THRESHOLD: 90
    strategy:
      matrix:
        python-version: ["3.11", "3.12"]
    steps:
     - uses: actions/checkout@v4
     - name: Set up Python ${{ matrix.python-version }}
       uses: actions/setup-python@v5
       with:
        python-version: ${{ matrix.python-version }}
     - name: Install python dependencies
       run: pip install -r app/requirements.txt
     - name: Run flask app
       run: |
         export FLASK_APP=$PWD/app/run.py
         flask run &
     - name: Run unit test
       run: coverage run -m pytest app/
     - name: Print unit test report
       run: coverage report
     - name: Validate code coverage
       run: |
         COVERAGE=$(coverage report | tail -n 1 | awk '{print $4}' | head -c 2)
         if [ "$COVERAGE" -lt "$CODE_COVERAGE_THRESHOLD" ]; then
           echo "Error: Code coverage cannot be smaller than $CODE_COVERAGE_THRESHOLD%, got $COVERAGE%"
           exit 1
         fi
  publish:
    if: "github.event_name == 'workflow_dispatch'"
    runs-on: ubuntu-latest
    needs:
      - unit_test
    env:
        IMAGE_ARTIFACT: ${{ secrets.DOCKER_HUB_USERNAME }}/sherlock:latest
    environment: production
    steps:
     - uses: actions/checkout@v4
     - name: Login to DockerHub
       run: docker login -u ${{ secrets.DOCKER_HUB_USERNAME }} -p ${{ secrets.DOCKER_HUB_PASSWORD }}
     - name: Build docker image
       run: docker build --tag flask-sherlock $GITHUB_WORKSPACE
     - name: Tag docker image
       run: docker tag flask-sherlock $IMAGE_ARTIFACT
     - name: Push image to DockerHub
       run: docker push $IMAGE_ARTIFACT
-
What's missing are the
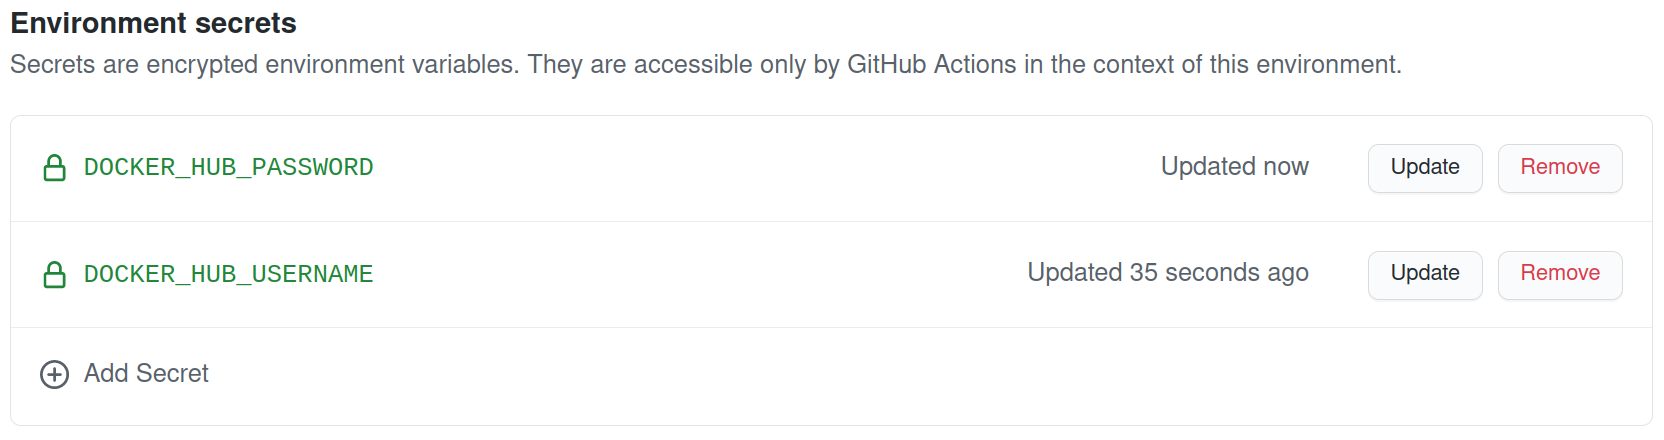
DOCKER_HUB_USERNAMEandDOCKER_HUB_PASSWORDenvironment variables which are our secrets. Go to repository Settings, click Environments blade, then click New Environment button, name it production. Next, click theConfigure environmentbutton. Finally, click theAdd Secretbutton and add DockerHub secrets.
-
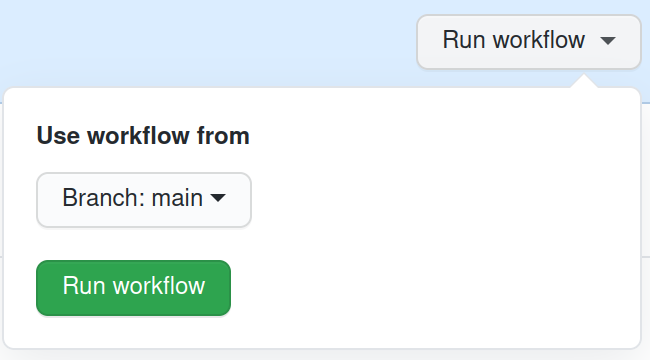
Now in Actions you will see below workflows. Select the
Continuous Integrationblade, click theRun Workflowbutton, and run workflow against the main branch.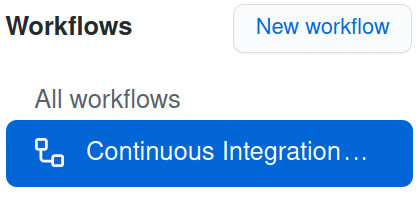
-
Check that our image appears in DockerHub Repositories


Context
A pull request (PR) is a feature of a git hosting service that allows to create a contribution to the repository. PRs allow the maintainer of a repository to review, ask for comments, edit, or even discard submitted work. I like to think of a PR as a tangible unit of work in a collaborative world of code.
-
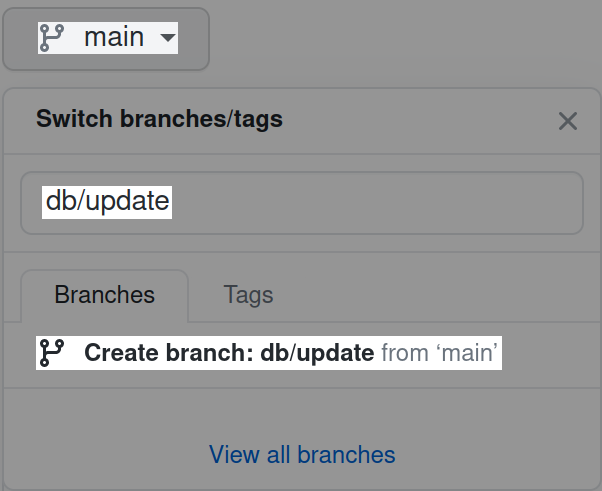
Fork repository by going to https://github.com/ldynia/flask-sherlock and click
Forkbutton. Next, in your fork create a new branch called db/update
-
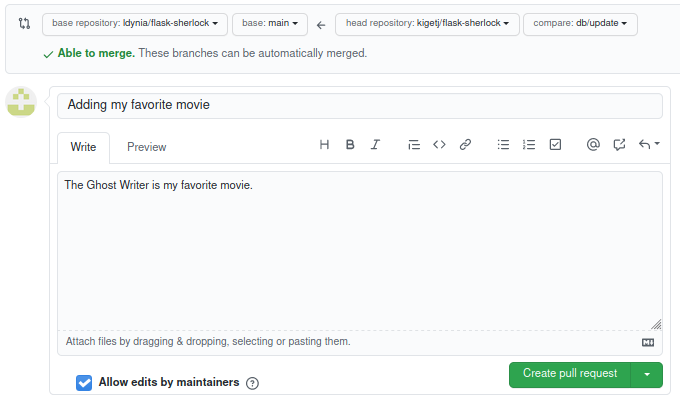
Update
/app/db.jsonwith your favorite movie and set commit message to Adding my favorite movie. Remember to stick to JSON encoding !!!{ "title": "The Ghost Writer", "genre": ["crime", "drama", "mystery"], "year": 2010, "rating": 7.2, "director": ["Roman Polański"], "stars": ["Ewan McGregor", "Pierce Brosnan", "Olivia Williams"] } -
Go to your repository https://github.com/kigetj/flask-sherlock and click the Pull Request tab, then click the
Compare & pull requestbutton. Finally, write a comment and click theCreate pull requestbutton.


Copy
flask in:name,descriptionHEALTHCHECK (path:**/Dockerfile OR path:**/*.Dockerfile) language:Dockerfileif ((path:*.yaml OR path:*.yml) AND path:.github/workflows) language:YAML


Context
GitHub Pages is a hosting service for static sites. GitHub Pages serve any static files (HTML, CSS, JavaScript) you push to the repository. You can create your static files or use a static site generator such Jekyll to build your site.
The short answer is for branding and promotion. You can use it for blogging or as a journal of your work. You can promote yourself with my_username.github.io or your project my_username.github.io/my_project. Moreover, you have the option to brand your work with a custom domain.
-
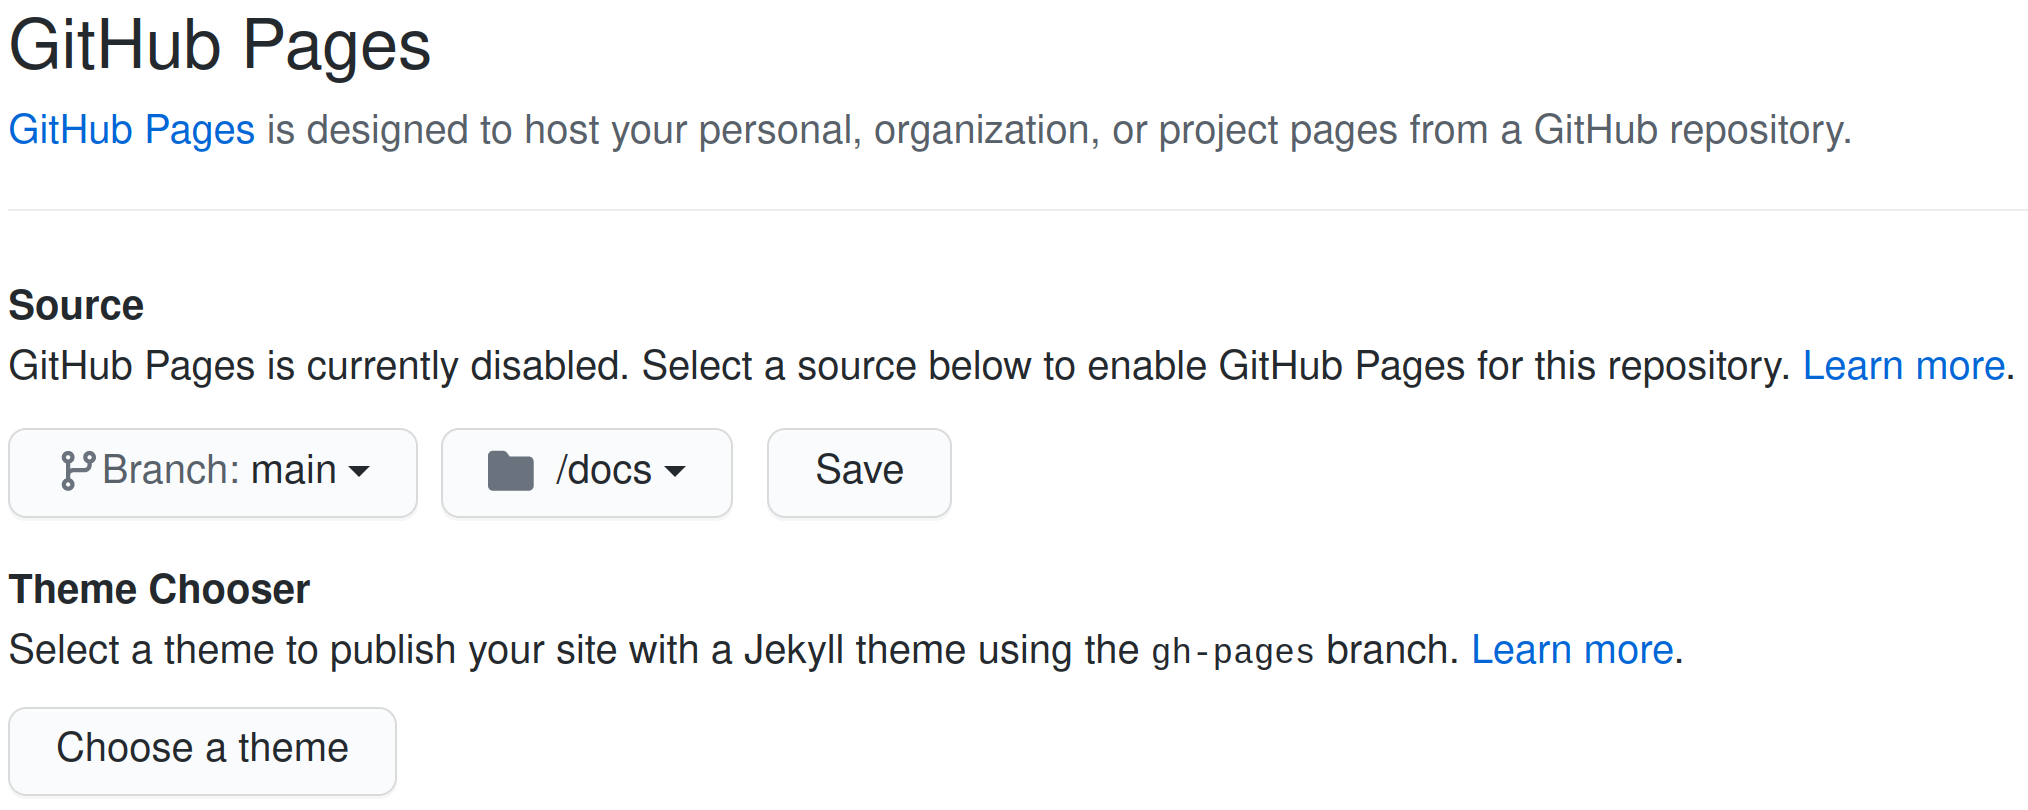
In repository settings Settings locate Pages tab. Set
Sourceto the main branch anddirectoryto /docs and click the ' Save` button.
-
Configure themen
docs/_config.ymlmarkdown: kramdown theme: minima -
Click the
Choose a themebutton and select theCaymantheme (I like it the most), then click theSelect themebutton. Finally, copy and paste the below content into the interface that you see or intodocs/index.md## Sherlock [webpage](https://ldynia.github.io/flask-sherlock/) Sherlock is the best movie recommendation engine ever created. Isn't it Dr. [Jekyll](https://jekyllrb.com/)? More advanced references please look up how [Jekyll docs](https://github.com/jekyll/jekyll/tree/master/docs) are structured. 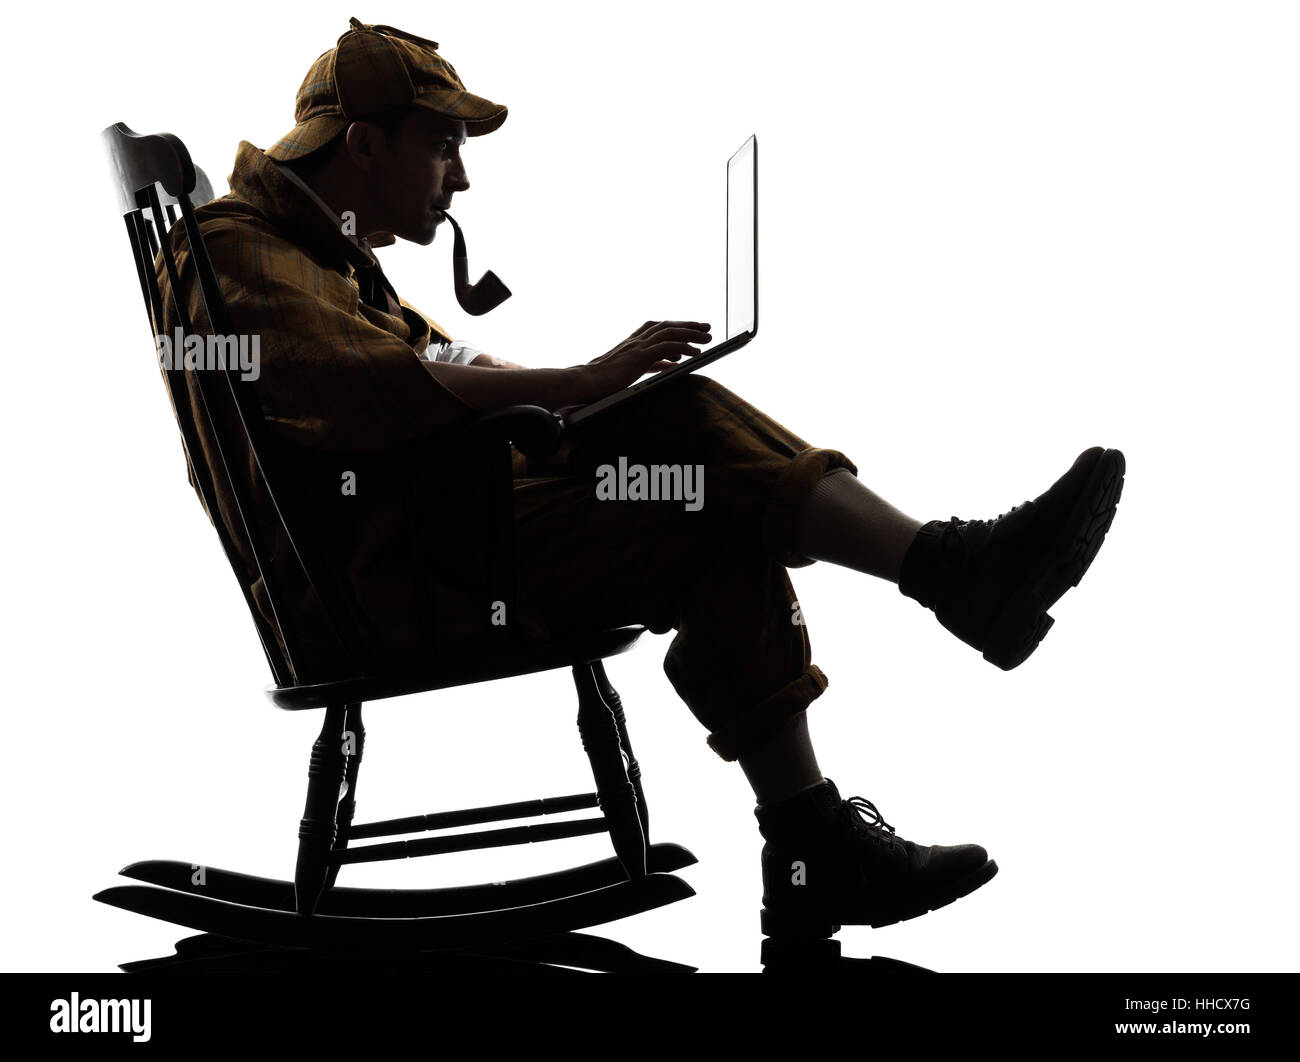 ## Multiverse ```bash $ echo Hello, bash! ``` ```python >>> print('Hello, python!') ``` #### Markdown 101 Markdown is a lightweight and easy-to-use syntax for styling your writing. It includes conventions for ```markdown Syntax highlighted code block > Quotes "Life is like box of chocolates" # Header 1 ## Header 2 #### Header 3 - Bulleted - List 1. Numbered 2. List **Bold** and _Italic_ and `Code` text [Link](url) and  ``` -
Once ready, you will be able to promote your project at this URL https://ldynia.github.io/flask-sherlock/ Remember to change username !!!
Context
Wiki is an important part of an open-source project. READEME.md is intended to be used as a brief documentation on how to get started with a project. Wiki, on the other hand, are intended to provide information about the project that can't be expressed by code.
-
On the main page of your repository, click Wiki tab.

-
Next, we will create below pages by clicking the
Create Pagebutton.Home
# Welcome to the flask-sherlock wiki!

Wiki is an important part of an open-source project. `READEME.md` is intended to be used as a brief documentation on how to get started with a project. `Wiki`, on the other hand, is intended to provide documentation of the project that can't be expressed by code.
Agile Manifesto
# [Manifesto for Agile Software Development](https://agilemanifesto.org/)

While there is value in the items on the right, we value the items on the left more:

* Individuals and interactions over processes and tools
* Working software over comprehensive documentation
* Customer collaboration over contract negotiation
* Responding to change over following a plan
Code of Conduct
# [Kubernetes Code of Conduct](https://kubernetes.io/community/code-of-conduct/)

As contributors and maintainers of this project, and in the interest of fostering an open and welcoming community, we pledge to respect all people who contribute through reporting issues, posting feature requests, updating documentation, submitting pull requests or patches, and other activities.

We are committed to making participation in this project a harassment-free experience for everyone, regardless of level of experience, gender, gender identity and expression, sexual orientation, disability, personal appearance, body size, race, ethnicity, age, religion, or nationality.

Examples of unacceptable behavior by participants include:
* The use of sexualized language or imagery
* Personal attacks
* Trolling or insulting/derogatory comments
* Public or private harassment
* Publishing other's private information, such as physical or electronic addresses, without explicit permission
* Other unethical or unprofessional conduct.
_Sidebar
Remember to change username !!!
# Shortcuts

* [Home](https://github.com/ldynia/flask-sherlock/wiki/Home)
* [Agile Manifesto](https://github.com/ldynia/flask-sherlock/wiki/Agile-Manifesto)
* [Code of Conduct](https://github.com/ldynia/flask-sherlock/wiki/Code-of-Conduct)
_Footer
Sherlock project is awesome!