How to install Ubuntu 20.04 + WSL2 + VScode + Windows Terminal + Anaconda + Git + ZSH + WSLU + WSL Sudo
- WSL
- WSL2
- VSCode
- Windows Terminal
- Requirements
- Installing
- Adding Ubuntu Tab to Windows Terminal => coming soon
- Configuring
- Changing Default Console, colorschemes, fontface, icon and command line => coming soon
- [Method1 Using Setting]
- [Method1 Using JSON File]
- Anaconda
- Git
- ZSH
- WSLU
- WSL Sudo
- VIM => coming soon
- Windows 7, 8, 8.1 do not support WSL.
- Versions lower than 1803 of Windows 10 do not support WSL.
To check, press the ⊞ Win + R keys and run winver , you should see your version of Windows 10:

If you have an older version, you can get it manually through the Update Assistant.

If you have a Windows 7, 8 or 8.1, you can upgrade it to Windows 10 manually through the Create Windows 10 installation media.

Now that you have the right version of Windows, you can install WSL.
Press the ⊞ Win + R keys and run optionalfeatures , you should see Windows Features:

Check the Windows Subsystem for Linux option and click the OK button.Then click the Restart now button.
Open PowerShell as an Administrator (Press ⊞ Win + X keys then select Windows PowerShell (Admin)) and run the following script:
dism.exe /online /enable-feature /featurename:Microsoft-Windows-Subsystem-Linux /all /norestartAfter the script is complete, you need to reboot your machine, since this enables new Windows features.
Once you complete the steps, the environment will be configured to download and run the distros of Linux on Windows 10.
- Open Microsoft Store.
- Search for the Ubuntu
- Select the Ubuntu 20.04 to install on your device.

Open Powershell and Type the following command to download Ubuntu in temp folder and install it then press Enter:
- For x64:
cd C:\windows\Temp; Invoke-WebRequest -Uri https://aka.ms/wslubuntu2004 -OutFile Ubuntu.appx -UseBasicParsing; Add-AppxPackage .\Ubuntu.appx- For ARM64:
cd C:\windows\Temp; Invoke-WebRequest -Uri https://aka.ms/wslubuntu2004arm -OutFile Ubuntu.appx -UseBasicParsing; Add-AppxPackage .\Ubuntu.appxTo use Windows Package Manager, you should install it first:
Open Powershell and Type the following command to download Windows Package Manager in temp folder and install it then press Enter:
cd C:\windows\Temp; Invoke-WebRequest -Uri https://github.com/microsoft/winget-cli/releases/download/v1.0.11692/Microsoft.DesktopAppInstaller_8wekyb3d8bbwe.msixbundle -OutFile WPM.msixbundle -UseBasicParsing; Add-AppxPackage .\WPM.msixbundleOpen Powershell or Command Prompt and Type the following command to install Ubuntu 20.04
winget install Canonical.UbuntuThe first launch will do the actual installation and will take a few seconds. The setup will also ask you for a username and a password for your Ubuntu configuration.
- For x64 systems: Version 1903 or higher, with Build 18362 or higher.
- For ARM64 systems: Version 2004 or higher, with Build 19041 or higher.
- Builds lower than 18362 do not support WSL 2. If you have an older version, Following the instructions here
Press the ⊞ Win + R keys and run optionalfeatures , you should see Windows Features:

Check the Virtual Machine Platform option and click the OK button.Then click the Restart now button.
Open PowerShell as an Administrator (Press ⊞ Win + X keys then select Windows PowerShell (Admin)) and run the following script:
dism.exe /online /enable-feature /featurename:VirtualMachinePlatform /all /norestartAfter the script is complete, you need to reboot your machine, since this enables new Windows features.
Once your PC has rebooted, we need to update the WSL 2 Linux kernel.Follow the download link, an msi installation will complete the update:
- For x64 systems: WSL2 Linux kernel update package
- For ARM64 systems: WSL2 Linux kernel update package

OK, now it is time to set WSL2 to be the default for all WSL installations. Trust me, you don’t need to use WSL version 1 ever again. Open PowerShell and run:
wsl --set-default-version 2; wsl --set-version Ubuntu-20.04 2; wsl -l -vNow, You have Ubuntu-20.04 on version 2
.NET Framework 4.5.2 or higher is required for VS Code. You can download latest version from here
Go to here and download the latest installer for your Windows and follow the installation wizard to set up VS Code.
To use Windows Package Manager, you should install it first. Then open Powershell or Command Prompt and Type the following command to install Visual Studio Code
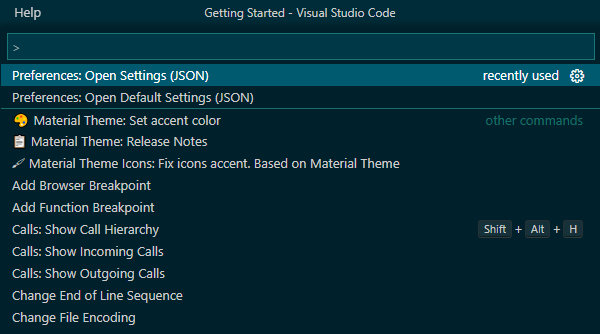
winget install Microsoft.VisualStudioCodeTo edit your VS Code configuration in JSON, open the command palette (Go to View -> Command Palette, or Press Ctrl + Shift + P), type Open Settings JSON and select Preferences: Open Settings (JSON):
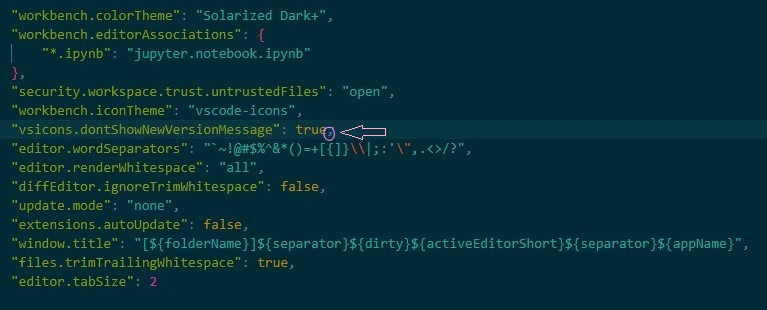
The settings.json file with all the non-default VS Code settings will open:

You can use these additional settings:
"editor.wordSeparators": "`~!@#$%^&*()=+[{]}\\|;:'\",.<>/?",
"editor.renderWhitespace": "all",
"diffEditor.ignoreTrimWhitespace": false,
"update.mode": "none",
"extensions.autoUpdate": false,
"window.title": "[${folderName}]${separator}${dirty}${activeEditorShort}${separator}${appName}",
"files.trimTrailingWhitespace": true,
"editor.tabSize": 2
editor.wordSeparators: I removed the — from the word separators so I can select identifiers with a — in it via double-click on a word (sometimes these can be used in bash scripts)editor.renderWhitespace: I always want to see all the spaces in my source filesdiffEditor.ignoreTrimWhitespace: when I do a git merge, I want to see the differences due to space changesupdate.modeandextensions.autoUpdate: I don’t want the extensions to autoupdate, I need to control when they are updated as sometimes with WSL they breakwindow.title: I added the [foldername] to the beginning of the window title, so I can recognize different go projects instances by their folder names (I can have 5 or 6 open at the same time, this is a saviour!)files.trimTrailingWhitespace: when a file is saved, all the extra spaces at the end of a line are trimmed outeditor.tabSize: I like to use 2 spaces for tabs
Add the ones you want to use to your settings.json file and save it:
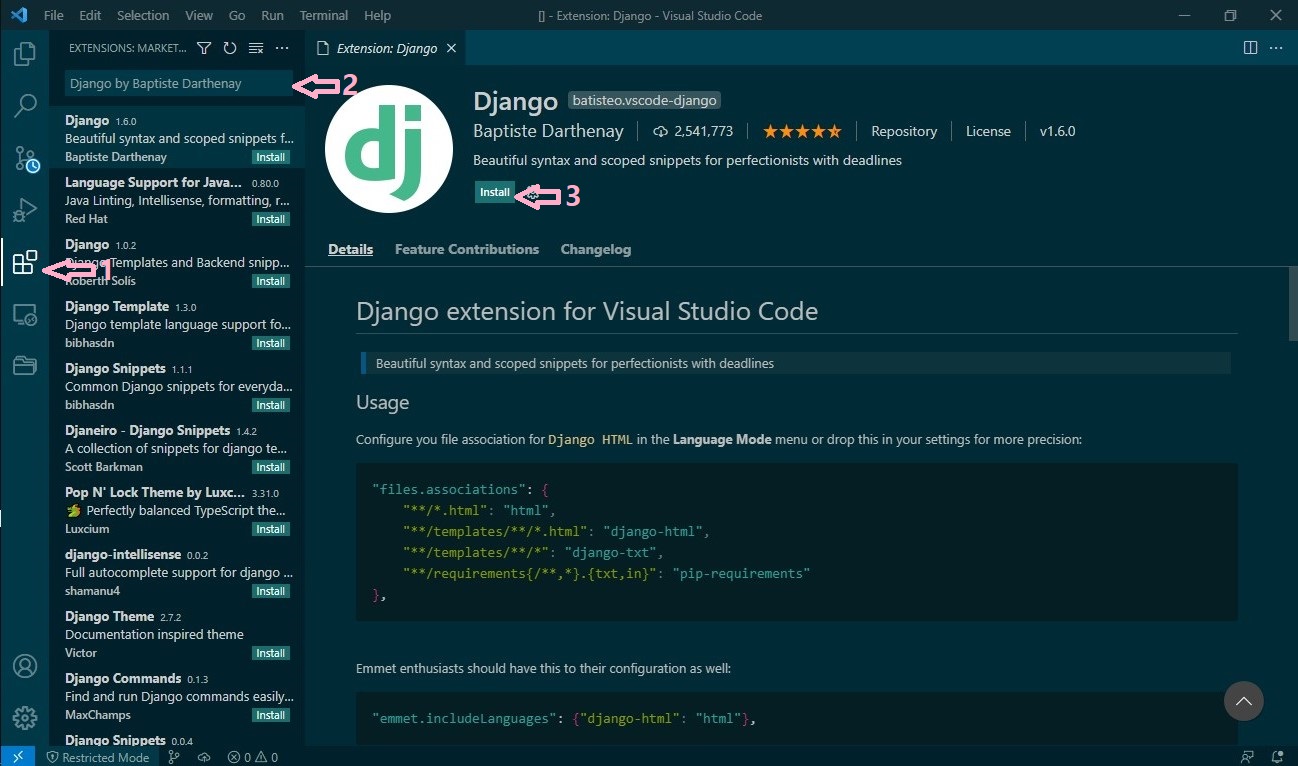
To install an extension, select the Install button. Once the installation is complete, the Install button will change to the Manage gear button.
VSCode has many extensions. You can find a list of pre-installed extensions at here
- vscode-icons by VSCode Icons Team
- Project Manager by Alessandro Fragnani
- Git Graph by mhutchie
- Git Tree Compare by Maik Riechert
- GitLens — Git supercharged by Eric Amodio
- Git History by Don Jayamanne
- Python by Microsoft
- Python Type Hint by njqdev
- Pyright by ms-pyright
- Python Indent by Kevin Rose
- Sort lines by Daniel Imms
- Sourcery by sourcery
- Tabnine AI Code Completion by TabNine
- Python Preview by dongli
- AREPL for python by Almenon
- Python Test Explorer for Visual Studio Code by Little Fox Team
- Python Docstring Generator by Nils Werner
- TODO Highlight
- python snippets by Ferhat Yalçın
- Visual Studio IntelliCode by Microsoft
- Jupyter by Microsoft
- Django by Baptiste Darthenay
- Code Spell Checker by Street Side Software
- Bookmarks by Alessandro Fragnani
- Better Comments by Aaron Bond
- Settings Sync by Shan Khan
- Peacock by John Papa
- Bracket Pair Colorizer 2 by CoenraadS
- Indent-Rainbow by oderwat
- Indenticator by SirTori
- Dash by Budi Irawan
- Material Theme by Equinusocio
- Noctis by Liviu Schera
- Solarized by Ryan Olson
- Remote - WSL by Microsoft
- Auto Rename Tag by Jun Han
- Auto Close Tag by Jun Han
Versions 1903 (build 18362) of Windows 10
- Open Microsoft Store.
- Search for the Windows Terminal
- Select the Windows Terminal to install on your device.

- Open Powershell and Type the following command to download Windows Terminal in temp folder and install it then press Enter:
cd C:\windows\Temp; Invoke-WebRequest -Uri https://github.com/microsoft/terminal/releases/download/v1.8.1444.0/Microsoft.WindowsTerminal_1.8.1444.0_8wekyb3d8bbwe.msixbundle -OutFile Terminal.msixbundle -UseBasicParsing; Add-AppxPackage .\Terminal.msixbundletype A to changing the execution policy and installing fonts.
To use Windows Package Manager, you should install it first. Then open Powershell or Command Prompt and Type the following command to install Windows Terminal
winget install Microsoft.WindowsTerminalOpen Powershell and Type the following command to download requirement fonts in temp folder and install it then press Enter:
Set-ExecutionPolicy -Scope CurrentUser -ExecutionPolicy Unrestricted; cd C:\windows\Temp; Invoke-WebRequest -Uri https://github.com/malekifar/wsl/releases/download/v1.0/Fonts.zip -OutFile Fonts.zip; Expand-Archive C:\windows\Temp\Fonts.zip -DestinationPath C:\windows\Temp; .\install.ps1Windows Terminal will install and open with the default shell (PowerShell), color scheme, fontface and icon and command line let’s cuStomize it. Press the Ctrl + , keys or select the Settings menu as in the picture below:

Windows Terminal lets you define your own color schemes, either by using the built-in preset schemes, or by creating your own scheme from scratch.

Type the following command to download Anaconda in tmp folder and install it then press Enter:
- For x86:
sudo apt install curl && cd /tmp && curl https://repo.anaconda.com/archive/Anaconda3-2021.05-Linux-x86_64.sh --output anaconda.sh && bash anaconda.sh -b -p $HOME/anaconda- For ARM64:
sudo apt install curl && cd /tmp && curl https://repo.anaconda.com/archive/Anaconda3-2021.05-Linux-aarch64.sh --output anaconda.sh && bash anaconda.sh -b -p $HOME/anaconda- For x86:
sudo apt install curl && cd /tmp && curl https://repo.anaconda.com/archive/Anaconda3-2021.05-Linux-x86_64.sh --output anaconda.sh && bash anaconda.sh- For ARM64:
sudo apt install curl && cd /tmp && curl https://repo.anaconda.com/archive/Anaconda3-2021.05-Linux-aarch64.sh --output anaconda.sh && bash anaconda.shYou’ll receive these following outputs in normally mode:
Output:
Welcome to Anaconda3 2021.05
In order to continue the installation process, please review the license agreement
Please, press ENTER to continue
Press Enter to continue and then press Enter to read through the license. Once you’re done reading the license, you’ll be prompted to approve the license terms:
Output:
Do you approve the license terms? [yes|no]
As long as you agree, type yes.
Output:
Anaconda3 will now be installed into this location:
/home/usename/anaconda3
- Press ENTER to confirm the location
- Press CTRL-C to abort the installation
- Or specify a different location below
[/home/username/anaconda3] >>>
At this point, you’ll be prompted to choose the location of the installation. You can press Enter to accept the default location, or specify a different location to modify it.
output:
Preparing transaction: done
Executing transaction: done
installation finished.
Do you wish the installer to initialize Anaconda3
by running conda init? [yes|no]
[no] >>>
Type yes so that you can initialize Anaconda3. You’ll receive some output that states changes made in various directories. One of the lines you receive will thank you for installing Anaconda.
Output:
Thank you for installing Anaconda3!
source ~/anaconda3/etc/profile.d/conda.sh && conda init bash && conda init zshInstall Git using apt-get:
sudo apt-get update && sudo apt-get install gitType the following commands to update apt and install zsh then press Enter:
sudo apt update && sudo apt install zshNow set zsh to be your default shell:
chsh -s $(which zsh)Open a new terminal and the initial zsh prompt will show up, signaling that zsh is now the default shell. At this point pick 2 — it will populate the zsh configuration file ~/.zshrc with defaults.
Let’s check again that zsh is the default shell:
echo $SHELL && $SHELL --versionyou should get the following results:
output:
/usr/bin/zsh
zsh 5.8 (x86_64-ubuntu-linux-gnu)
Installing oh-my-zsh
Now we can install oh-my-zsh
sudo apt install curl && sh -c "$(curl -fsSL https://raw.github.com/ohmyzsh/ohmyzsh/master/tools/install.sh)"Notice that oh-my-zsh updated your ~/.bashrc file and made a backup of the old one. Also notice that the prompt changed now, it is just your username.
OK, we are readty to customize oh-my-zsh next.
source ~/anaconda3/etc/profile.d/conda.sh && conda init zshOh-My-ZSH has many plugins. You can find a list of pre-installed plugins at here
git clone --depth 1 https://github.com/junegunn/fzf.git ${ZSH_CUSTOM:=~/.oh-my-zsh/custom}/plugins/.fzf && ${ZSH_CUSTOM:=~/.oh-my-zsh/custom}/plugins/.fzf/installgit clone git://github.com/wting/autojump.git ${ZSH_CUSTOM:=~/.oh-my-zsh/custom}/plugins/autojump && python ${ZSH_CUSTOM:=~/.oh-my-zsh/custom}/plugins/autojump && echo "source ~/.autojump/etc/profile.d/autojump.sh" >> ~/.zshrcgit clone https://github.com/zsh-users/zsh-autosuggestions ${ZSH_CUSTOM:=~/.oh-my-zsh/custom}/plugins/zsh-autosuggestions && echo "source ~/.oh-my-zsh/custom/plugins/zsh-autosuggestions/zsh-autosuggestions.zsh" >> ~/.zshrcgit clone https://github.com/b4b4r07/enhancd ${ZSH_CUSTOM:=~/.oh-my-zsh/custom}/plugins/enhancd && echo "source ~/.oh-my-zsh/custom/plugins/enhancd/init.sh" >> ~/.zshrcgit clone https://github.com/zsh-users/zsh-completions ${ZSH_CUSTOM:=~/.oh-my-zsh/custom}/plugins/zsh-completions && echo "source ~/.oh-my-zsh/custom/plugins/zsh-completions/zsh-completions.plugin.zsh" >> ~/.zshrcgit clone https://github.com/zdharma/fast-syntax-highlighting ${ZSH_CUSTOM:=~/.oh-my-zsh/custom}/plugins/fast-syntax-highlighting && echo "source ~/.oh-my-zsh/custom/plugins/fast-syntax-highlighting/fast-syntax-highlighting.plugin.zsh" >> ~/.zshrcsed -i 's/plugins=\(.*\)/plugins=\(git docker zsh-completions colored-man-pages fast-syntax-highlighting colorize dash command-not-found extract\)/g' ~/.zshrcWe are going to make our color pretty and prompt useful. There are a lot of themes in oh-my-zsh, you can see them here:
PowerLevel10K(recommended)
- Installing
git clone --depth=1 https://github.com/romkatv/powerlevel10k.git ${ZSH_CUSTOM:-$HOME/.oh-my-zsh/custom}/themes/powerlevel10k- Enabling
sed -i 's/ZSH_THEME=".*"/ZSH_THEME="powerlevel10k\/powerlevel10k"/g' ~/.zshrc (recommended)
- Configuring: To run Powerlevel10k configuration wizard again, type the following commands:
p10k configure- Enabling
sed -i 's/ZSH_THEME=".*"/ZSH_THEME="agnoster"/g' ~/.zshrc- Hiding computer name
echo "export DEFAULT_USER=$(whoami)" >> ~/.zshrc
sed -i 's/ZSH_THEME=".*"/ZSH_THEME="robbyrussell"/g' ~/.zshrc
This is a collection of utilities for Windows 10 Linux Subsystem, such as retrieving Windows 10 environment variables or creating your favorite Linux GUI application shortcuts on Windows 10 Desktop. To install it:
sudo apt install gnupg2 apt-transport-https && wget -O - https://pkg.wslutiliti.es/public.key | sudo tee -a /etc/apt/trusted.gpg.d/wslu.asc && echo "deb https://pkg.wslutiliti.es/debian buster main" | sudo tee -a /etc/apt/sources.list && sudo apt update && sudo apt install wslu && sudo apt-get remove lynx links links2For changing your default browser:
wslview -r $(wslpath -au 'exe file of browser')For Chrome:
wslview -r $(wslpath -au 'C:\Program Files (x86)\Google\Chrome\Application\chrome.exe')For Firefox:
wslview -r $(wslpath -au 'C:\Program Files\Mozilla Firefox\firefox.exe')For Edge:
wslview -r $(wslpath -au 'C:\Program Files (x86)\Microsoft\Edge\Application\msedge.exe')This tool allows you to run applications in windows elevated user mode from a non-elevated wsl shell. To install it:
mkdir ~/.wudo && cd ~/.wudo && git clone https://github.com/Chronial/wsl-sudo.git && alias wudo="python3 ~/.wudo/wsl-sudo/wsl-sudo.py"create a sh alias for this command
echo 'alias git-pull-all="find . -maxdepth 3 -name .git -type d | rev | cut -c 6- | rev | xargs -I {} git -C {} pull"' >> ~/.zshrc && zshand just type
git-pull-all#Tools
sudo apt-get install fd-find grep unzip zip gzip bzip2 && echo 'alias fd=fdfind' >> ~/.zshrc && zsh