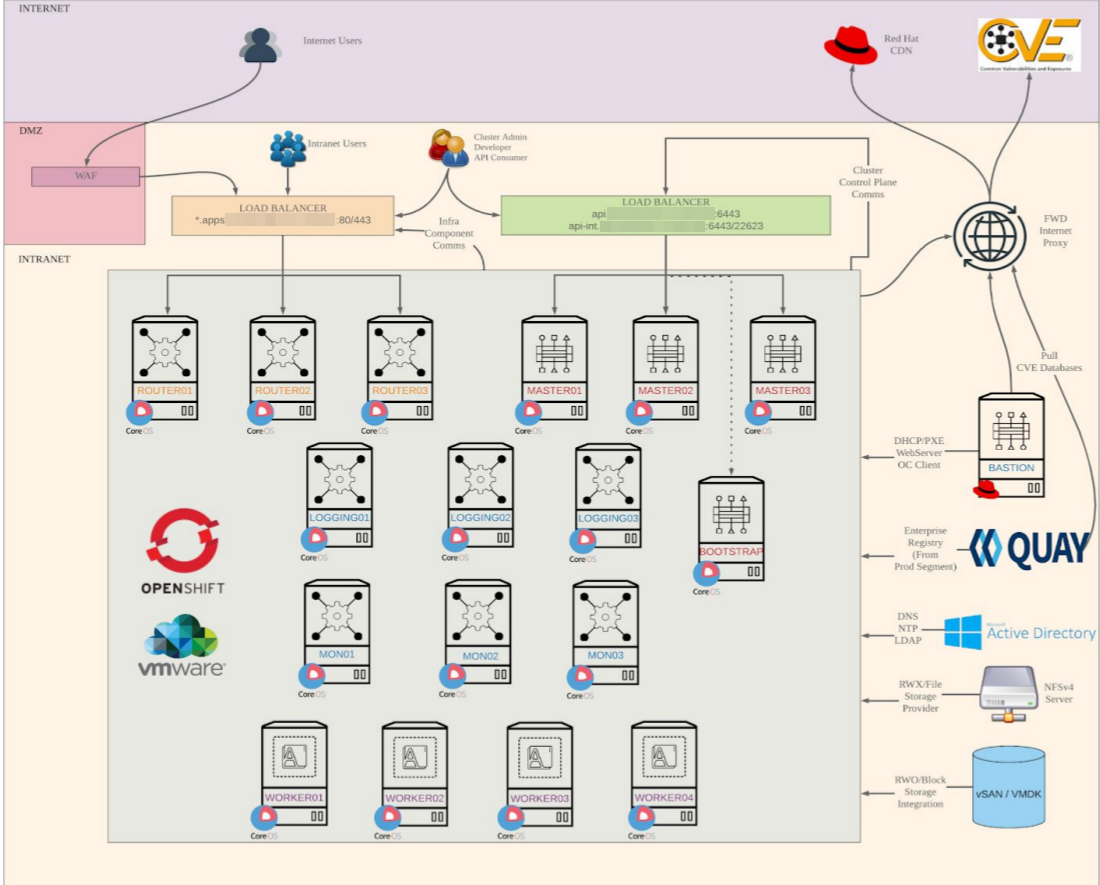
- Master = 3 (vCPU = 4, RAM = 16 GB, HDD = 120 GB)
- Worker = 3 (vCPU = 8, RAM = 32 GB, HDD = 120 GB)
- Bootstrap = 1 (vCPU = 4, RAM = 16 GB, HDD = 120 GB) --> Temporary Node
- Bastion = 1 (vCPU = 4, RAM = 8 GB, HDD = 120 GB)
- Helper = 1 (vCPU = 4, RAM = 8 GB, HDD = 120 GB)
- Master (10.0.22.22-24 /24)
- Worker (10.0.22.25-27 /24)
- Bootstrap (10.0.22.21 /24)
- Bastion (10.0.22.20 /24)
- Helper (10.0.22.18 /24)
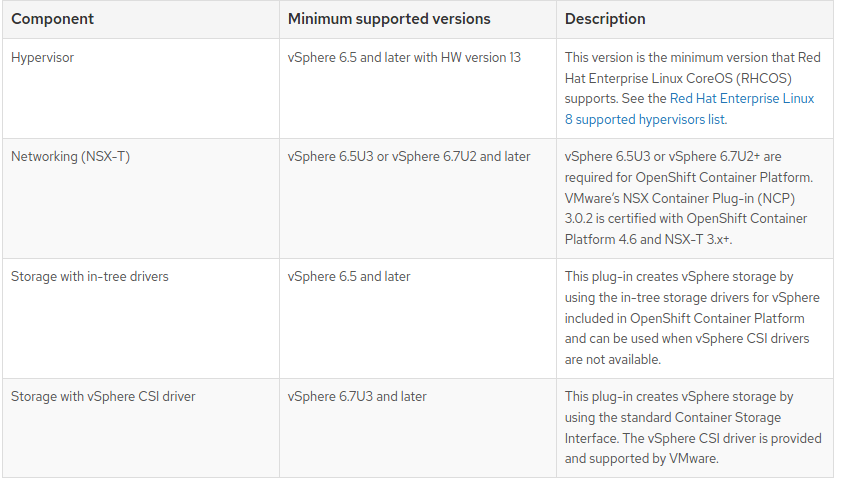 Note : If you use a vSphere version 6.5 instance, consider upgrading to 6.7U3 or 7.0 before you install OpenShift Container Platform.
- You must ensure that the time on your ESXi hosts is synchronized before you install OpenShift Container Platform. See Edit Time Configuration for a Host in the VMware documentation.
- A limitation of using VPC is that the Storage Distributed Resource Scheduler (SDRS) is not supported. See vSphere Storage for Kubernetes FAQs in the VMware documentation.
Before you deploy an OpenShift Container Platform cluster that uses user-provisioned infrastructure, you must create the underlying infrastructure.
Prerequistes
- Review the OpenShift Container Platform 4.x Tested Integrations page before you create the supporting infrastructure for your cluster.
Procedure
- Configure DHCP or set static IP addresses on each node.
- Provision the required load balancers.
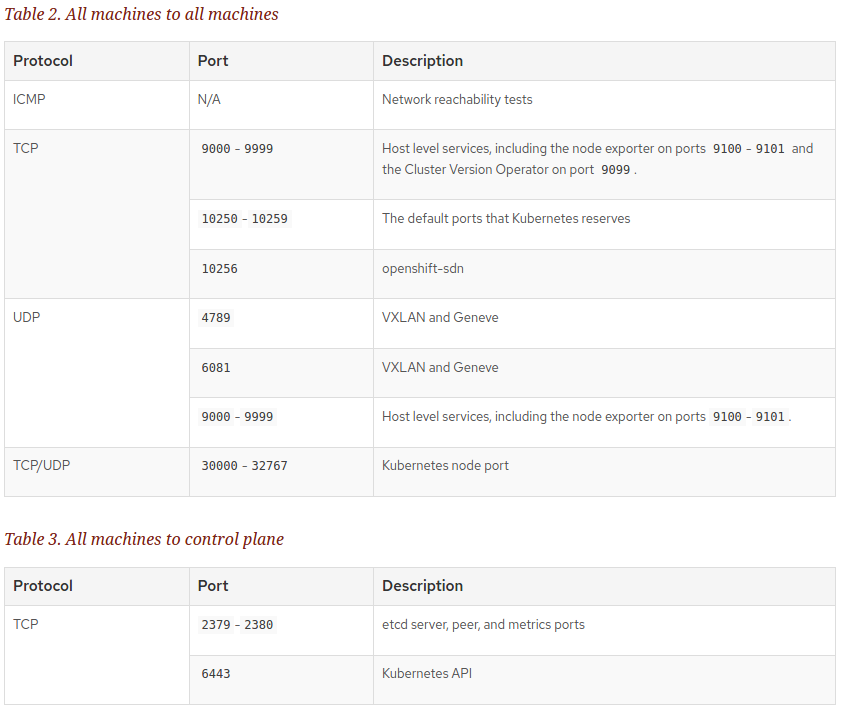
- Configure the ports for your machines.
- Configure DNS.
- Ensure network connectivity.
All the Red Hat Enterprise Linux CoreOS (RHCOS) machines require network in initramfs during boot to fetch Ignition config from the machine config server.
During the initial boot, the machines require either a DHCP server or that static IP addresses be set on each host in the cluster in order to establish a network connection, which allows them to download their Ignition config files.
It is recommended to use the DHCP server to manage the machines for the cluster long-term. Ensure that the DHCP server is configured to provide persistent IP addresses and host names to the cluster machines.
The Kubernetes API server must be able to resolve the node names of the cluster machines. If the API servers and worker nodes are in different zones, you can configure a default DNS search zone to allow the API server to resolve the node names. Another supported approach is to always refer to hosts by their fully-qualified domain names in both the node objects and all DNS requests.
Configure Bind Server :
root@helper# git clone https://github.com/alanadiprastyo/openshift-4.6.git
root@helper# yum -y install bind bind-utils
root@helper# setenforce 0
or
root@helper# echo "0" > /selinux/enforce [Doc](https://www.system-linux.eu/index.php?post/2016/03/09/Activer-Désactiver-SELinux)
root@helper# cp openshift-4.6/dns/named.conf /etc/named.conf
Configure A Record :
root@helper# cp openshift-4.6/dns/lab-home.example.com /var/named/
Configure PTR Record :
root@helper# cp openshift-4.6/dns/10.0.22.in-addr.arpa /var/named/
Restart Service Bind :
root@helper# systemctl restart named
root@helper# systemctl enable named
root@helper# systemctl status named
Make sure DNS can reply your query :
[root@helper ~]# nslookup ocp4-bootstrap.lab-home.example.com
Server:         10.0.22.18
Address:        10.0.22.18#53

Name:   ocp4-bootstrap.lab-home.example.com
Address: 10.0.22.21

[root@helper ~]# dig -x 10.0.22.21
;; ANSWER SECTION:
21.22.0.10.IN-ADDR.ARPA. 3600   IN      PTR     ocp4-bootstrap.lab-home.example.com.

;; AUTHORITY SECTION:
22.0.10.IN-ADDR.ARPA.   3600    IN      NS      bastion.lab-home.example.com.

;; ADDITIONAL SECTION:
bastion.lab-home.example.com. 604800 IN A       10.0.22.20

[root@helper ~]# dig -t srv _etcd-server-ssl._tcp.lab-home.example.com.
;; ANSWER SECTION:
_etcd-server-ssl._tcp.lab-home.example.com. 86400 IN SRV 0 10 2380 etcd-0.lab-home.example.com.
_etcd-server-ssl._tcp.lab-home.example.com. 86400 IN SRV 0 10 2380 etcd-1.lab-home.example.com.
_etcd-server-ssl._tcp.lab-home.example.com. 86400 IN SRV 0 10 2380 etcd-2.lab-home.example.com.

;; AUTHORITY SECTION:
lab-home.example.com.   604800  IN      NS      bastion.lab-home.example.com.

;; ADDITIONAL SECTION:
etcd-0.lab-home.example.com. 604800 IN  A       10.0.22.22
etcd-1.lab-home.example.com. 604800 IN  A       10.0.22.23
etcd-2.lab-home.example.com. 604800 IN  A       10.0.22.24
bastion.lab-home.example.com. 604800 IN A       10.0.22.20

[root@helper ~]# cat /etc/resolv.conf
# Generated by NetworkManager
nameserver 10.0.22.18
nameserver 10.0.22.238
NOTE: Update file /var/named/lab-home.example.com and 10.0.22.in-addr.arpa be adapted to your environment
root@helper# yum -y install haproxy
root@helper# cp openshift-4.6/haproxy/haproxy.cfg /etc/haproxy/
Please edit IP Address for Bootstrap, Master and Router (Worker). You can check file conf /etc/haproxy/haproxy.cfg
Port 6443 : Bootstrap and Master ( API)
Port 22623 : Bootstrap and Master ( machine config)
Port 80 : Router-infra ( ingress http)
Port 443 : Router-infra ( ingress https)
Port 9000 : GUI for HAProxy
Before you install openshift 4, you must create redhat account at cloud.redhat.com
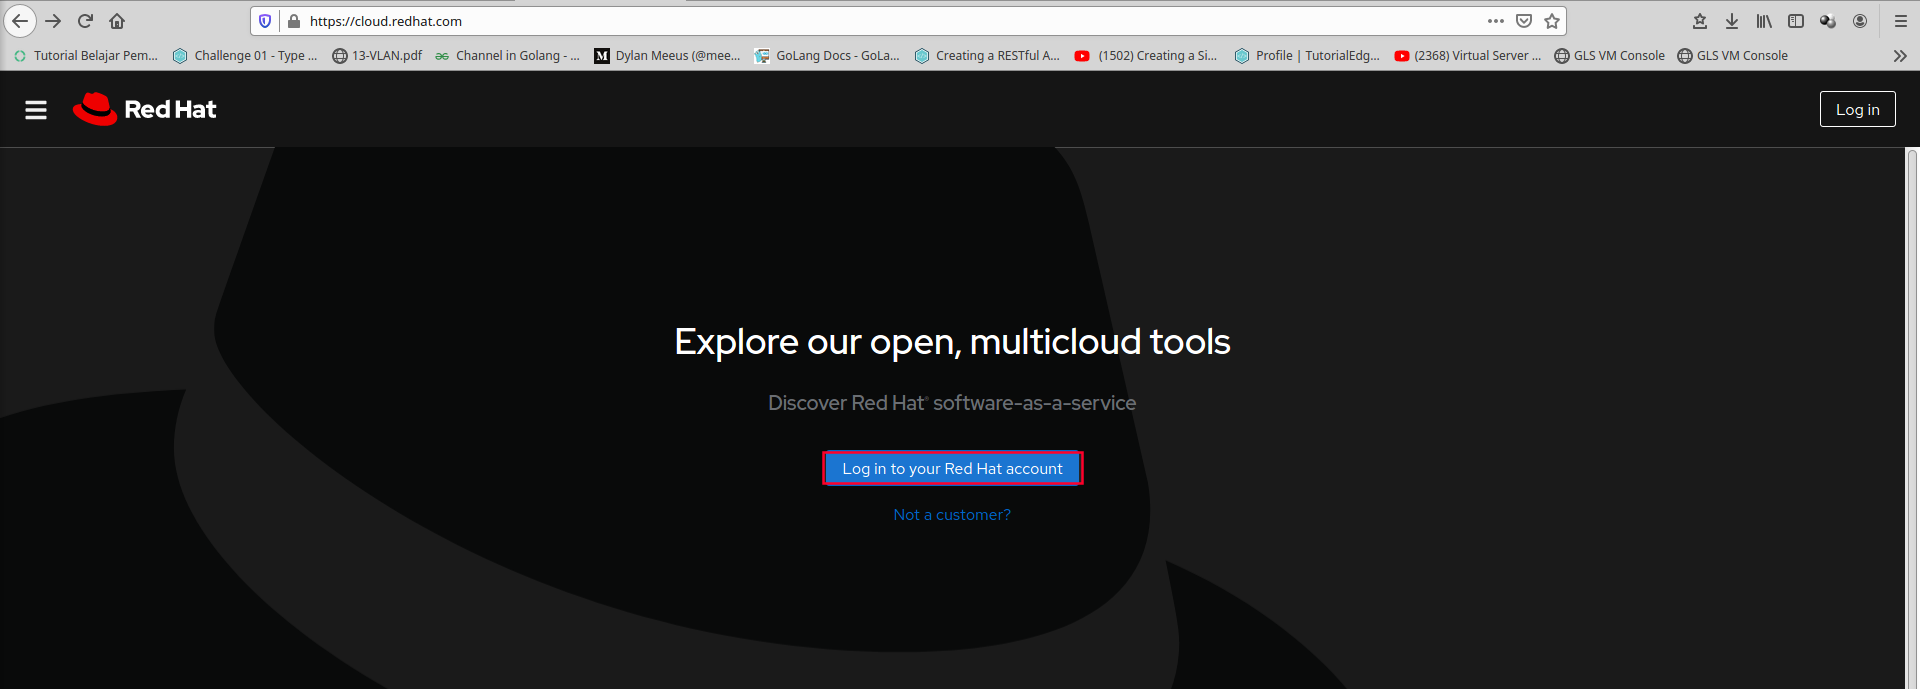 Choose Red Hat Openshift Cluster Manager
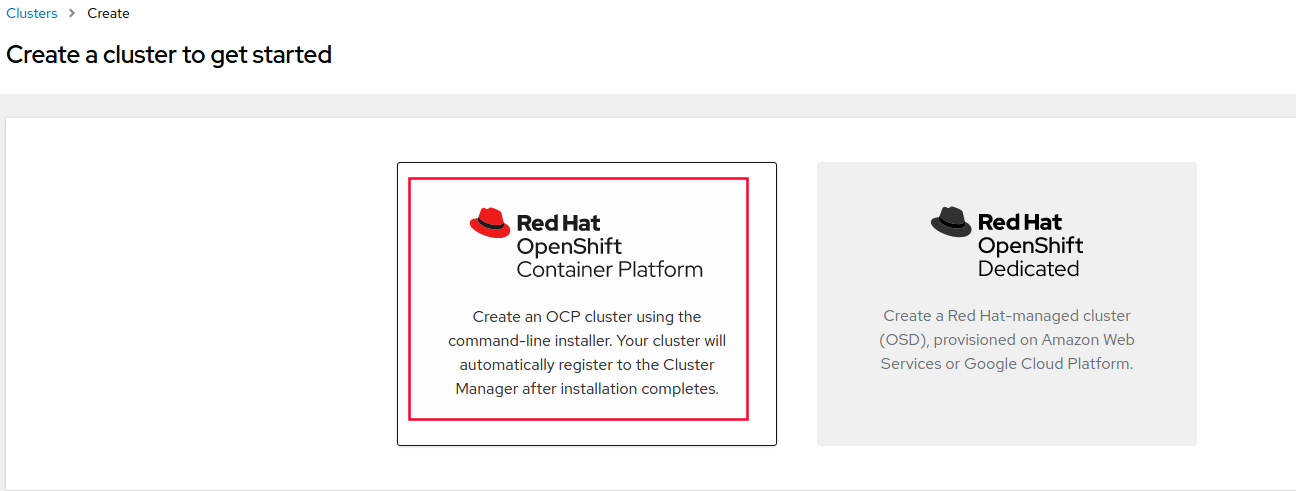
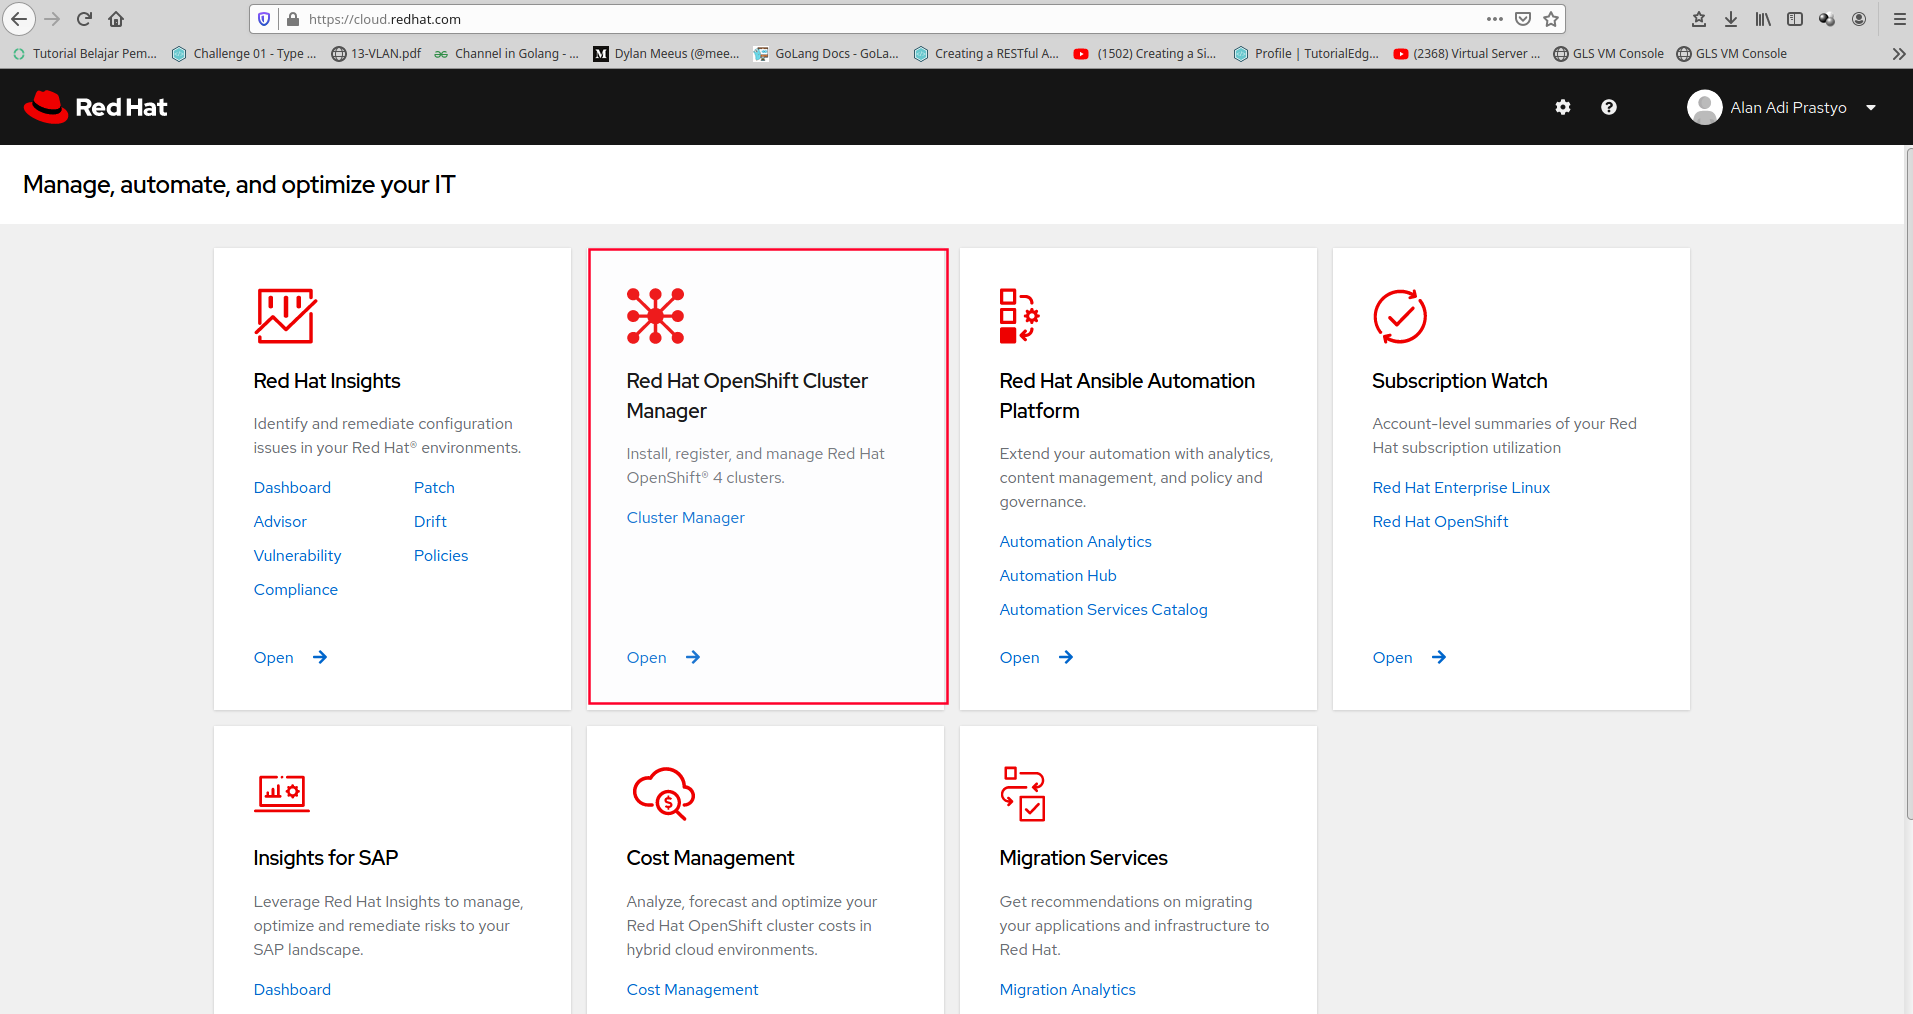 Click Create Cluster
 Click Redhat Openshift Container Platform
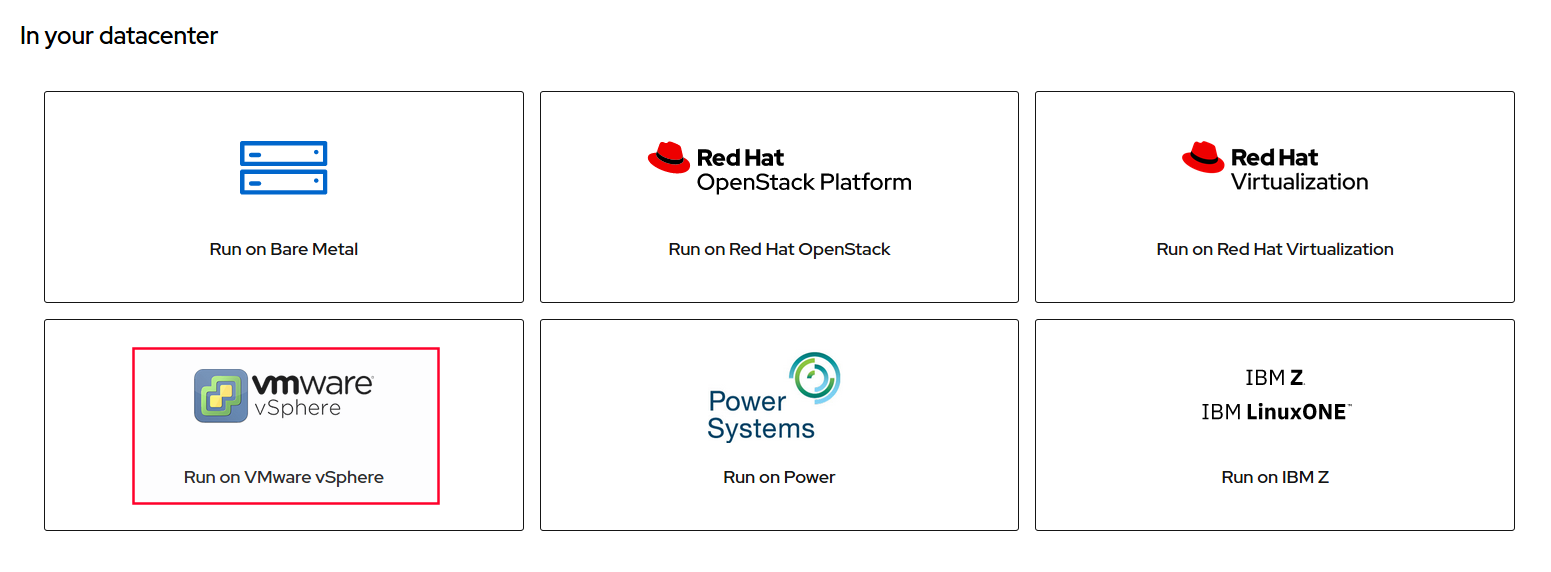
 and Choose Run on Vmware VSphere
Download Openshift Installer - Bastion Node:
https://mirror.openshift.com/pub/openshift-v4/clients/ocp/latest/openshift-install-linux.tar.gz
Download CLI (oc client & kubectl) - Bastion Node:
https://mirror.openshift.com/pub/openshift-v4/clients/ocp/latest/openshift-client-linux.tar.gz
Download RHCOS OVA (Template VM) :
root@helper# yum -y install httpd
Change the port Listen to Port 8000
root@helper# cp openshift-4.6/httpd/httpd.conf /etc/httpd/conf/httpd.conf
Start Service httpd
root@helper# systemctl start httpd
root@helper# systemctl enable httpd
root@helper# systemctl status httpd
root@helper# yum -y install https://dl.fedoraproject.org/pub/epel/epel-release-latest-7.noarch.rpm
root@helper# yum -y install dnsmasq tree python36 jq oniguruma
Disable DNS Service on DNSMasq port=0
vi /etc/dnsmasq.conf
...
port=0
...
Setting DHCP Server with Static IP use Mac Address
root@helper# cp openshift-4.6/dnsmasq/dnsmasq-pxe.conf /etc/dnsmasq.d/dnsmasq-pxe.conf
Start Service DNSMasq
root@helper# systemctl start dnsmasq
root@helper# systemctl enable dnsmasq
root@helper# systemctl status dnsmasq
root@bastion# ssh-keygen -t rsa -b 4096 -N ''
root@bastion# mkdir -p lab-home/{installer,ocp}
root@bastion# cd /root/lab-home/installer
root@bastion# wget https://mirror.openshift.com/pub/openshift-v4/clients/ocp/latest/openshift-install-linux.tar.gz
root@bastion# wget https://mirror.openshift.com/pub/openshift-v4/clients/ocp/latest/openshift-client-linux.tar.gz
root@bastion# tar zxvf openshift-install-linux.tar.gz openshift-client-linux.tar.gz
root@bastion# cp openshift-install oc kubectl /usr/bin/
Please update the credential pull secret : (Sample install-config.yaml in openshift-4.6/install-config/install-config-UPDATE_THIS_FILE.yaml)
root@bastion# cat install-config.yaml
apiVersion: v1
baseDomain: example.com
compute:
- hyperthreading: Enabled
  name: worker
  replicas: 0
controlPlane:
  hyperthreading: Enabled
  name: master
  replicas: 3
metadata:
  name: lab-home
networking:
  clusterNetworks:
  - cidr: 10.128.0.0/14
    hostPrefix: 23
  networkType: OpenShiftSDN
  serviceNetwork:
  - 172.30.0.0/16
platform:
  vsphere:
    vcenter: lab-vcenter.example.com
    username: [email protected]
    password: RAHASIADONG
    datacenter: DATACENTER
    defaultDatastore: datastore1
    folder: "/DATACENTER/vm/ngoprek"
fips: false
pullSecret: '<isikan pull Secret dari cloud.redhat.com>'
sshKey: '<isikan file /root/.ssh/id_rsa.pub>'
Copy file install-config.yaml to /root/lab-home/ocp
root@bastion# cd /root/lab-home/ocp
root@bastion# cp /root/openshift-4.6/install-config/install-config-UPDATE_THIS_FILE.yaml install-config.yaml
root@bastion# openshift-install create manifests
Example Output
INFO Consuming Install Config from target directory
WARNING Making control-plane schedulable by setting MastersSchedulable to true for Scheduler cluster settings
root@bastion# rm -f openshift/99_openshift-cluster-api_master-machines-*.yaml openshift/99_openshift-cluster-api_worker-machineset-*.yaml
Modify the manifests/cluster-scheduler-02-config.yml Kubernetes manifest file to prevent pods from being schedule on the control plane machines:
- Open the manifests/cluster-scheduler-02-config.yml file
- Locate the mastersSchedulable parameter and set its value to False.
root@bastion# openshift-install create ignition-configs
Output Example :
.
├── auth
│   ├── kubeadmin-password
│   └── kubeconfig
├── bootstrap.ign
├── master.ign
├── metadata.json
└── worker.ign
Before you install a cluster that contains user-provisioned infrastructure on VMware vSphere, you must create RHCOS machines on vSphere hosts for it to use.
Save the following secondary Ignition config file for your bootstrap node to your computer as append-bootstrap.ign
root@bastion# cp /root/openshift-4.6/install-config/append-bootstrap.ign /root/lab-home/ocp/append-bootstrap.ign
root@bastion# cat /root/lab-home/ocp/append-bootstrap.ign
{
  "ignition": {
    "config": {
      "merge": [
        {
          "source": "http://10.0.22.20:8000/bootstrap.ign"
        }
      ]
    },
    "version": "3.1.0"
  }
}
root@bastion# base64 -w0 /root/lab-home/ocp/master.ign > /root/lab-home/ocp/master.64
root@bastion# base64 -w0 /root/lab-home/ocp/worker.ign > /root/lab-home/ocp/worker.64
root@bastion# base64 -w0 /root/lab-home/ocp/append-bootstrap.ign > /root/lab-home/ocp/append-bootstrap.64
root@bastion# scp -R *.ign root@helper:/var/www/html/
Download RHCOS OVA image on here
https://mirror.openshift.com/pub/openshift-v4/dependencies/rhcos/latest/latest/rhcos-vmware.x86_64.ova
-
Click the VMs and Templates views -> right click the name of datacenter -> click new folder -> new vm and template folder
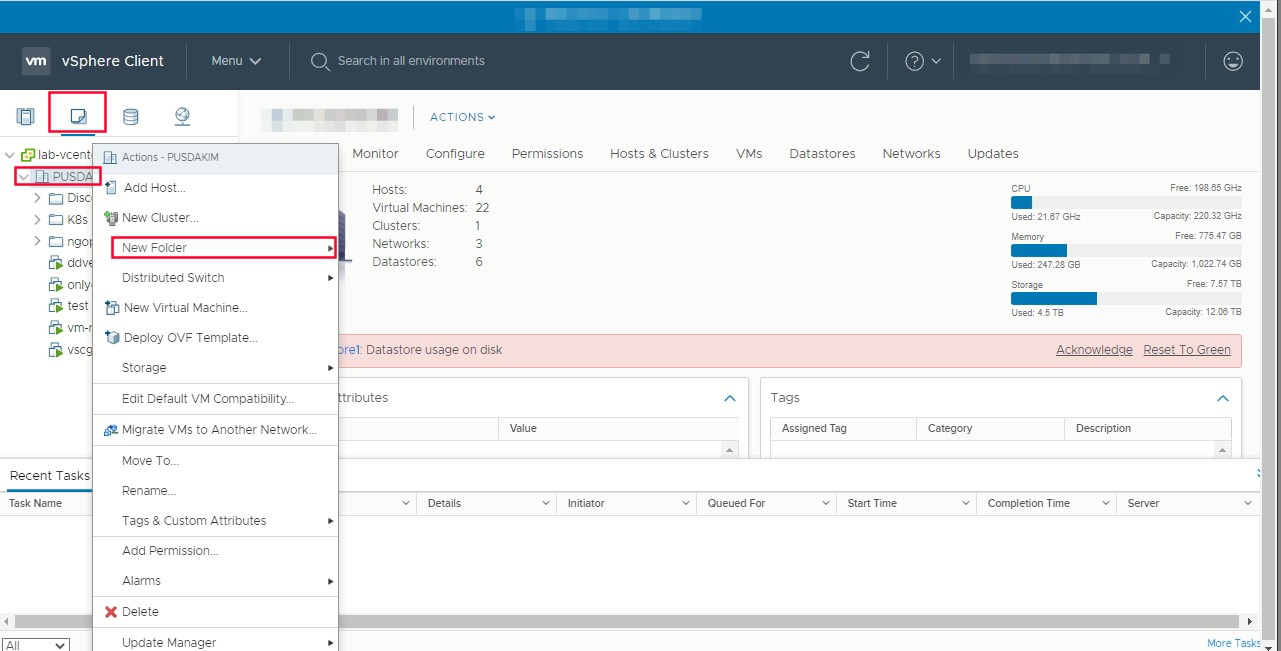
-
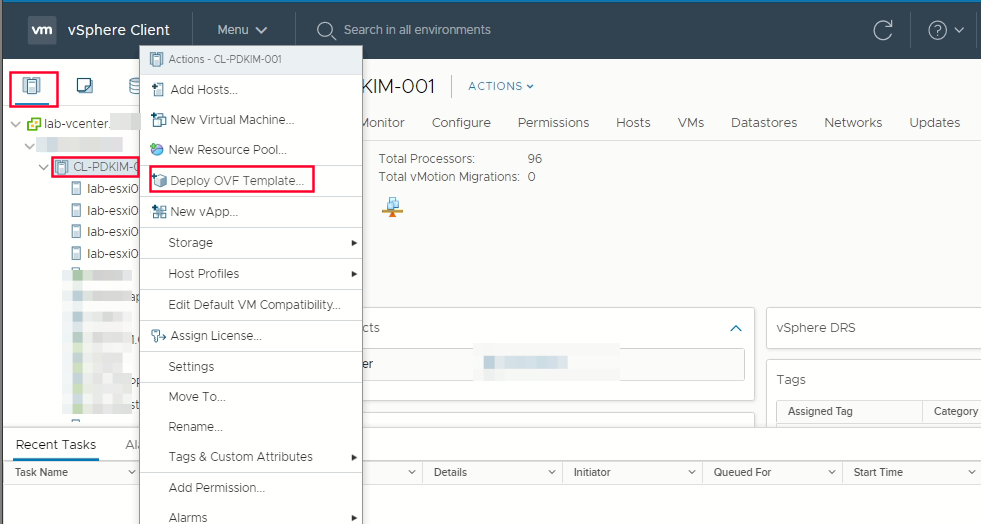
Create template from OVA images -> from Hosts and Cluster right click your cluster name -> Deploy OVF Template
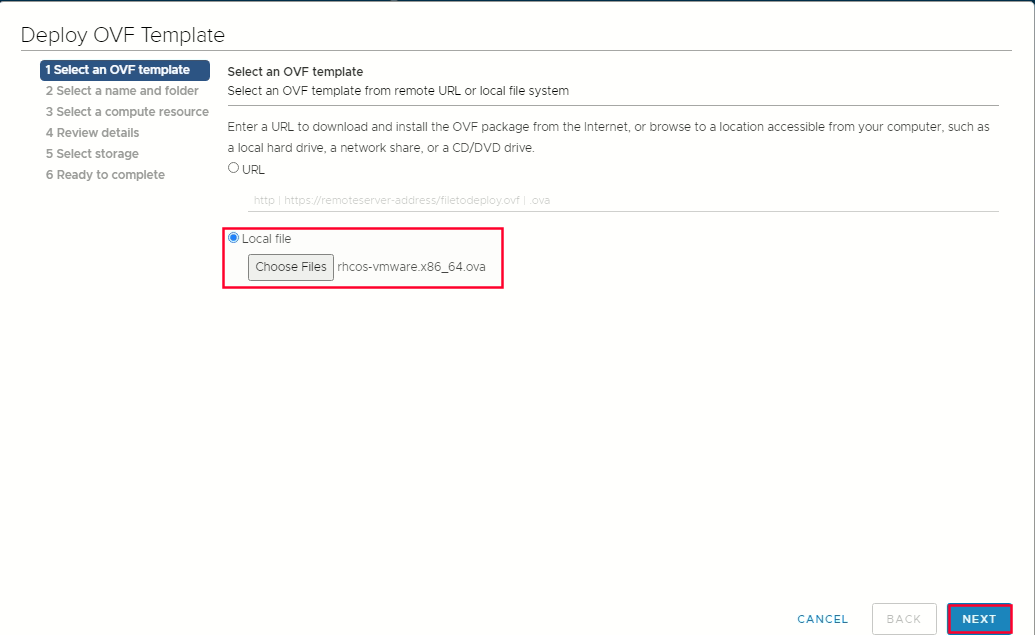
 Select OVF tab, to specify the name of the RHCOS ova file that you downloaded
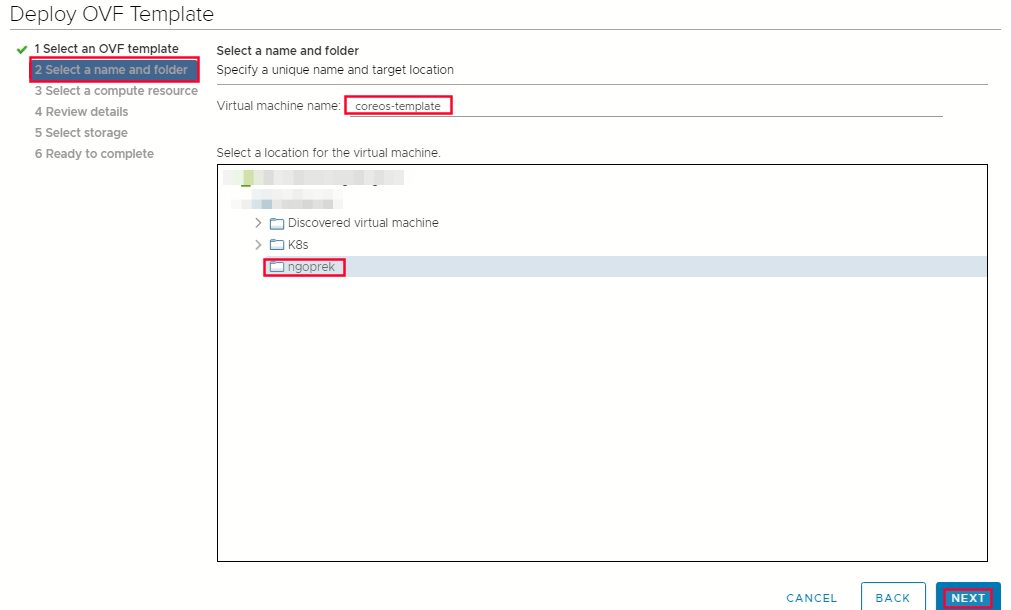
 Select a name and folder tab set a Virtual Machine name, such as rhcos-template
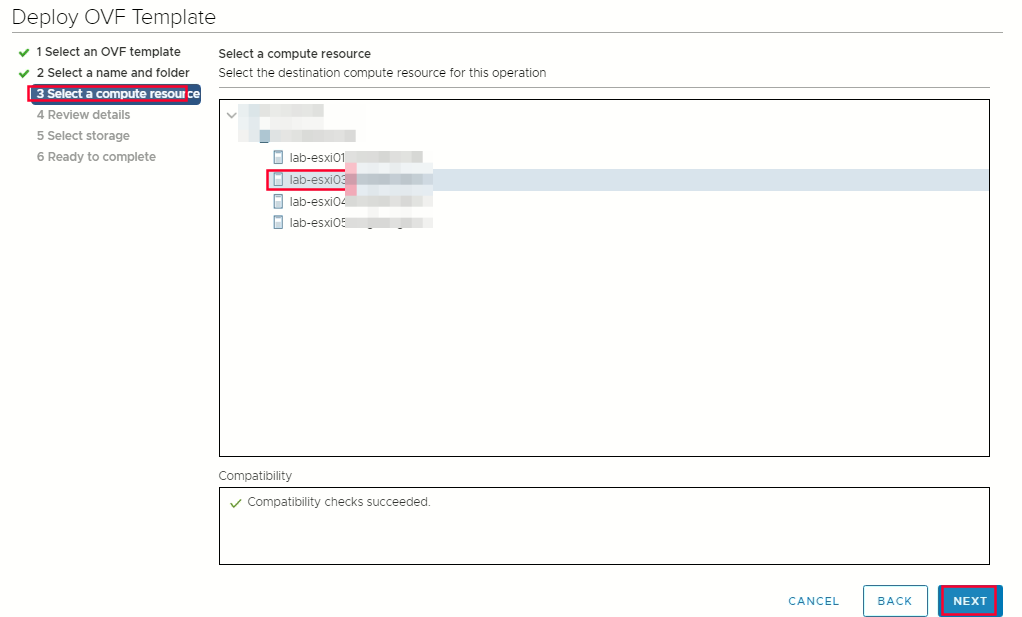
 Select compute resources
 Select storage -> select thin provision or thick provision -> select datastore that you specified in your install-config.yaml
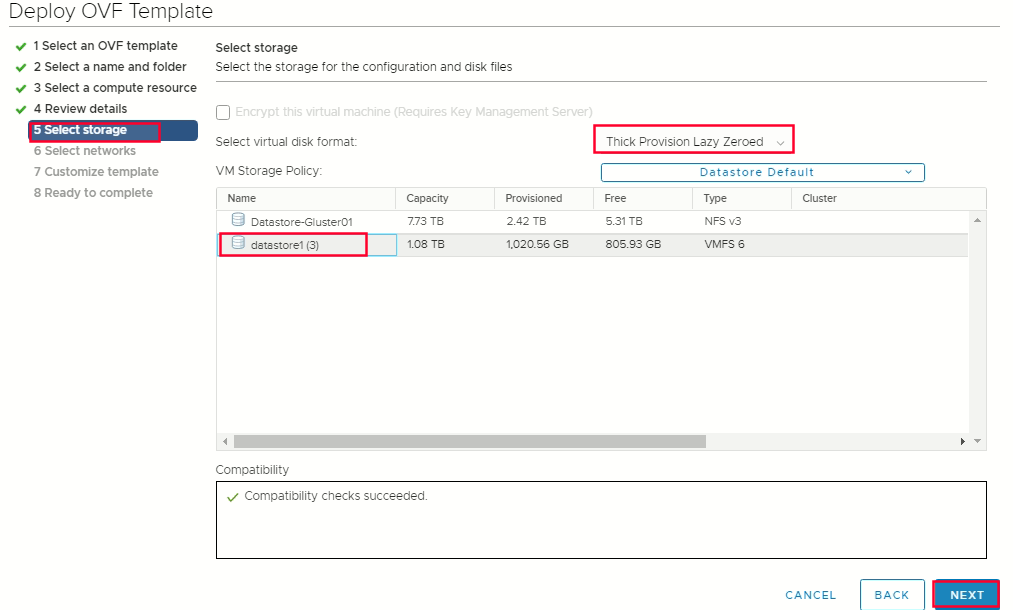 select network -> ready to complate finish
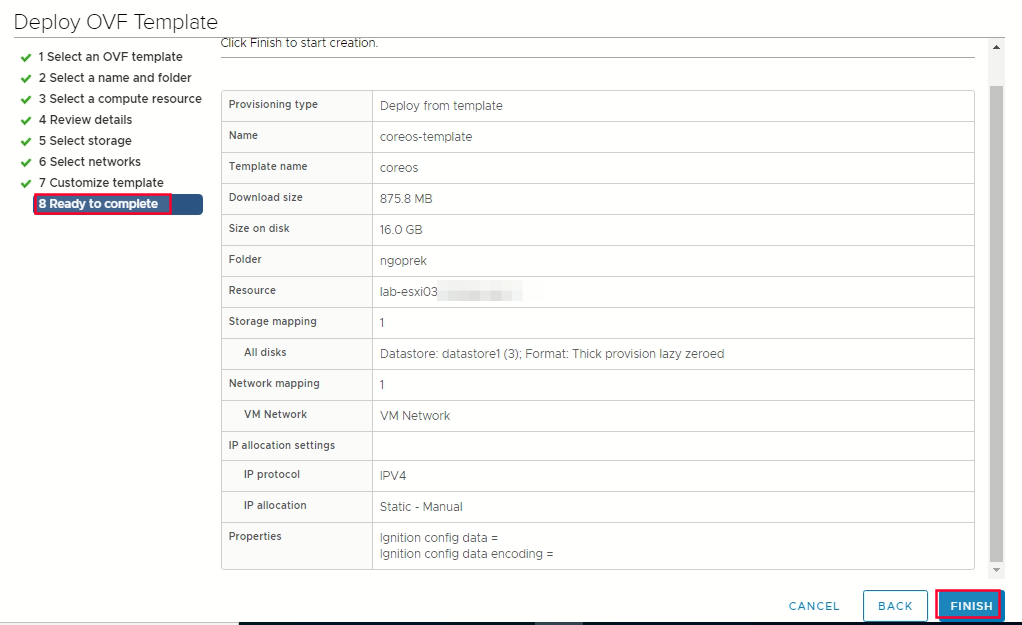
Right click the template coreos -> click clone -> clone to virtual machine
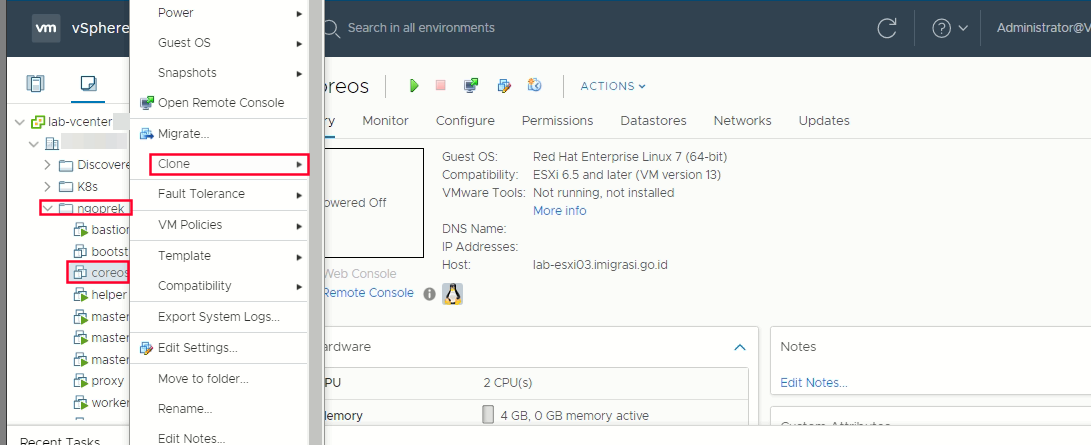 Select a name and folder (create vm with name master-1/2/3 and worker-1/2/3) -> Select a compute resource -> Select storage -> Customize hardware -> click vm options -> Advanced
Optional: In the event of cluster performance issues, from the Latency Sensitivity list, select High.
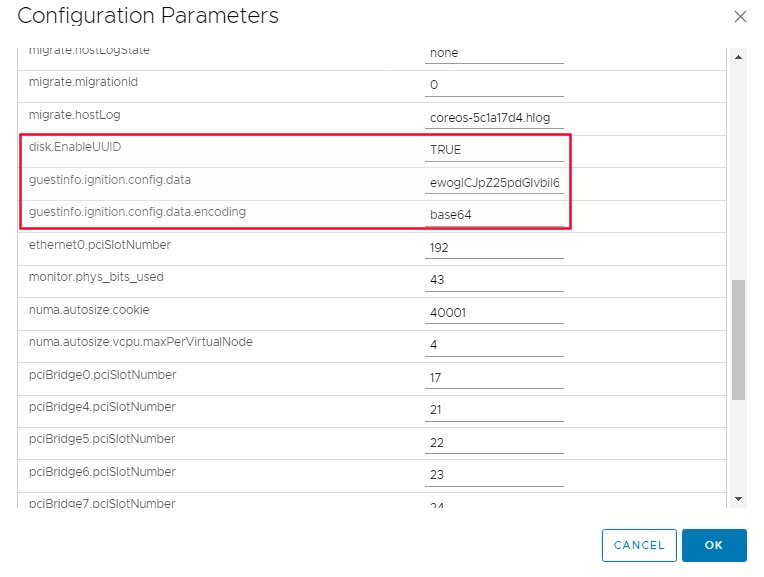
Edit Configuration on the configuration parameters -> click add configuration params
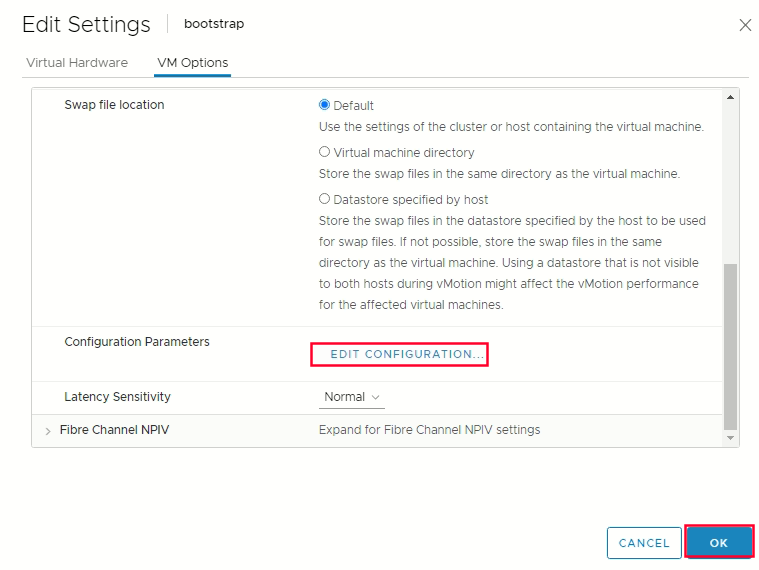 Define the following paramters name and values :
- guestinfo.ignition.config.data : Paste the contents of the base64-encoded Ignition config file for this machine type.
- guestinfo.ignition.config.data.encoding : Specify base64.
- disk.EnableUUID : Specify TRUE
To create the OpenShift Container Platform cluster, you wait for the bootstrap process to complete on the machines that you provisioned by using the Ignition config files that you generated with the installation program.
- Running VM for Bootstrap and All VM Master
- Monitor the bootstrap process
root@bastion# openshift-install wait-for bootstrap-complete --log-level=info
or ssh to vm bootstrap to check process journal
root@bastion# ssh core@bootstrap
Example Output if process complate
INFO Waiting up to 30m0s for the Kubernetes API at https://api.lab-home.example.com:6443...
INFO API v1.19.0 up
INFO Waiting up to 30m0s for bootstrapping to complete...
INFO It is now safe to remove the bootstrap resources
- After bootstrap process is complete, remove the bootstrap machine from the load balancer.
export the kubeadmin credentials
root@bastion# export KUBECONFIG=/root/lab-home/ocp/auth/kubeconfig
verify you can run oc commands successfully using the exported configuration :
root@bastion# oc whoami
Example Output:
system:admin
When you add machine to a cluster, two pending certificate signing request (CSRs) are generate for each machine that you added. You mas confirm that these CSRs are approved or if necessary approve them yourslef
- Check Nodes
[root@bastion ~]# oc get nodes
NAME                                        STATUS   ROLES               AGE   VERSION
ocp4-compute-1.lab-home.example.com         Ready    worker   		12m   v1.19.0+9f84db3
ocp4-compute-2.lab-home.example.com         NotReady    worker   		12m   v1.19.0+9f84db3
ocp4-compute-3.lab-home.example.com         NotReady    worker   		12m   v1.19.0+9f84db3
ocp4-control-plane-1.lab-home.example.com   Ready    master              12m   v1.19.0+9f84db3
ocp4-control-plane-2.lab-home.example.com   Ready    master              12m   v1.19.0+9f84db3
ocp4-control-plane-3.lab-home.example.com   Ready    master              12m   v1.19.0+9f84db3
- Check CSRs
[root@bastion ~]#oc get csr
NAME        AGE     REQUESTOR                                                                   CONDITION
csr-8b2br   15m     system:serviceaccount:openshift-machine-config-operator:node-bootstrapper   Pending
csr-8vnps   15m     system:serviceaccount:openshift-machine-config-operator:node-bootstrapper   Pending
csr-bfd72   5m26s   system:node:ocp4-compute-2.lab-home.example.com                       Pending
csr-c57lv   5m26s   system:node:ocp4-compute-3.lab-home.example.com                       Pending
- Approve CSRs them individually
oc adm certificate approve <csr_name>
- or Approve all pending CSR
oc get csr --no-headers | awk '{print $1}' | xargs oc adm certificate approve
After the control plane initializes, you must immediately configure some Operators so that they all become available.
watch -n5 oc get clusteroperators
Example Output:
NAME                                       VERSION AVAILABLE   PROGRESSING   DEGRADED   SINCE
authentication                             4.6.0   True        False         False      3h56m
cloud-credential                           4.6.0   True        False         False      29h
cluster-autoscaler                         4.6.0   True        False         False      29h
config-operator                            4.6.0   True        False         False      6h39m
console                                    4.6.0   True        False         False      3h59m
csi-snapshot-controller                    4.6.0   True        False         False      4h12m
dns                                        4.6.0   True        False         False      4h15m
etcd                                       4.6.0   True        False         False      29h
image-registry                             4.6.0   True        False         False      3h59m
ingress                                    4.6.0   True        False         False      4h30m
insights                                   4.6.0   True        False         False      29h
kube-apiserver                             4.6.0   True        False         False      29h
kube-controller-manager                    4.6.0   True        False         False      29h
kube-scheduler                             4.6.0   True        False         False      29h
kube-storage-version-migrator              4.6.0   True        False         False      4h2m
machine-api                                4.6.0   True        False         False      29h
machine-approver                           4.6.0   True        False         False      6h34m
machine-config                             4.6.0   True        False         False      3h56m
marketplace                                4.6.0   True        False         False      4h2m
monitoring                                 4.6.0   True        False         False      6h31m
network                                    4.6.0   True        False         False      29h
node-tuning                                4.6.0   True        False         False      4h30m
openshift-apiserver                        4.6.0   True        False         False      3h56m
openshift-controller-manager               4.6.0   True        False         False      4h36m
openshift-samples                          4.6.0   True        False         False      4h30m
operator-lifecycle-manager                 4.6.0   True        False         False      29h
operator-lifecycle-manager-catalog         4.6.0   True        False         False      29h
operator-lifecycle-manager-packageserver   4.6.0   True        False         False      3h59m
service-ca                                 4.6.0   True        False         False      29h
storage                                    4.6.0   True        False         False      4h30m
