A Git/Fortran/CMake/Jenkins example
using Fortran, CMake to generate a project
CMake generates a lot of files, so it is recommended that you build the program in a separate directory. On Linux and Unix, CMake defaults to creating a traditional Makefile, but CMake can also produce Ninja files to speed-up compilation (but see note below).
$ mkdir build
$ cd build
build $ cmake ..
build $ make
To take advantage of the Ninja build system, you must install Kitware’s Ninja branch which contains enhancements needed to compile Fortran programs. The -GNinja flag instructs CMake to generate Ninja files:
build $ cmake -GNinja ..
build $ ninja
You can use -D flags to override internal variables. For example:
build $ cmake -GNinja -DCMAKE_BUILD_TYPE=Debug -DCMAKE_Fortran_COMPILER=ifort -DCMAKE_INSTALL_PREFIX=/usr/local ..
build $ ninja
## change branch name
#$ git branch -m main
# add remote repository
$ git remote add origin [email protected]:markchron/jenkins-cmake.git
#
$ git push -u origin master
# link repository
$ git remote add origin [email protected]:markchron/jenkins-cmake.git
#$ git branch -m main
# Push code into repository
$ git push -u origin master
- Install plugin: Dashboard -> Manage Jenkins -> Under 'SYstem Configuration' -> Manage Plugins -> From the aviable plugins, search 'CMake'| 'xUnit' . Select them, and 'Install without restart'.
-
Create a 'New Item' that has name 'cmake-demo' with 'FreeStyle'
-
Source code management: Git https://github.com/markchron/jenkins-cmake.git Credentials:
-
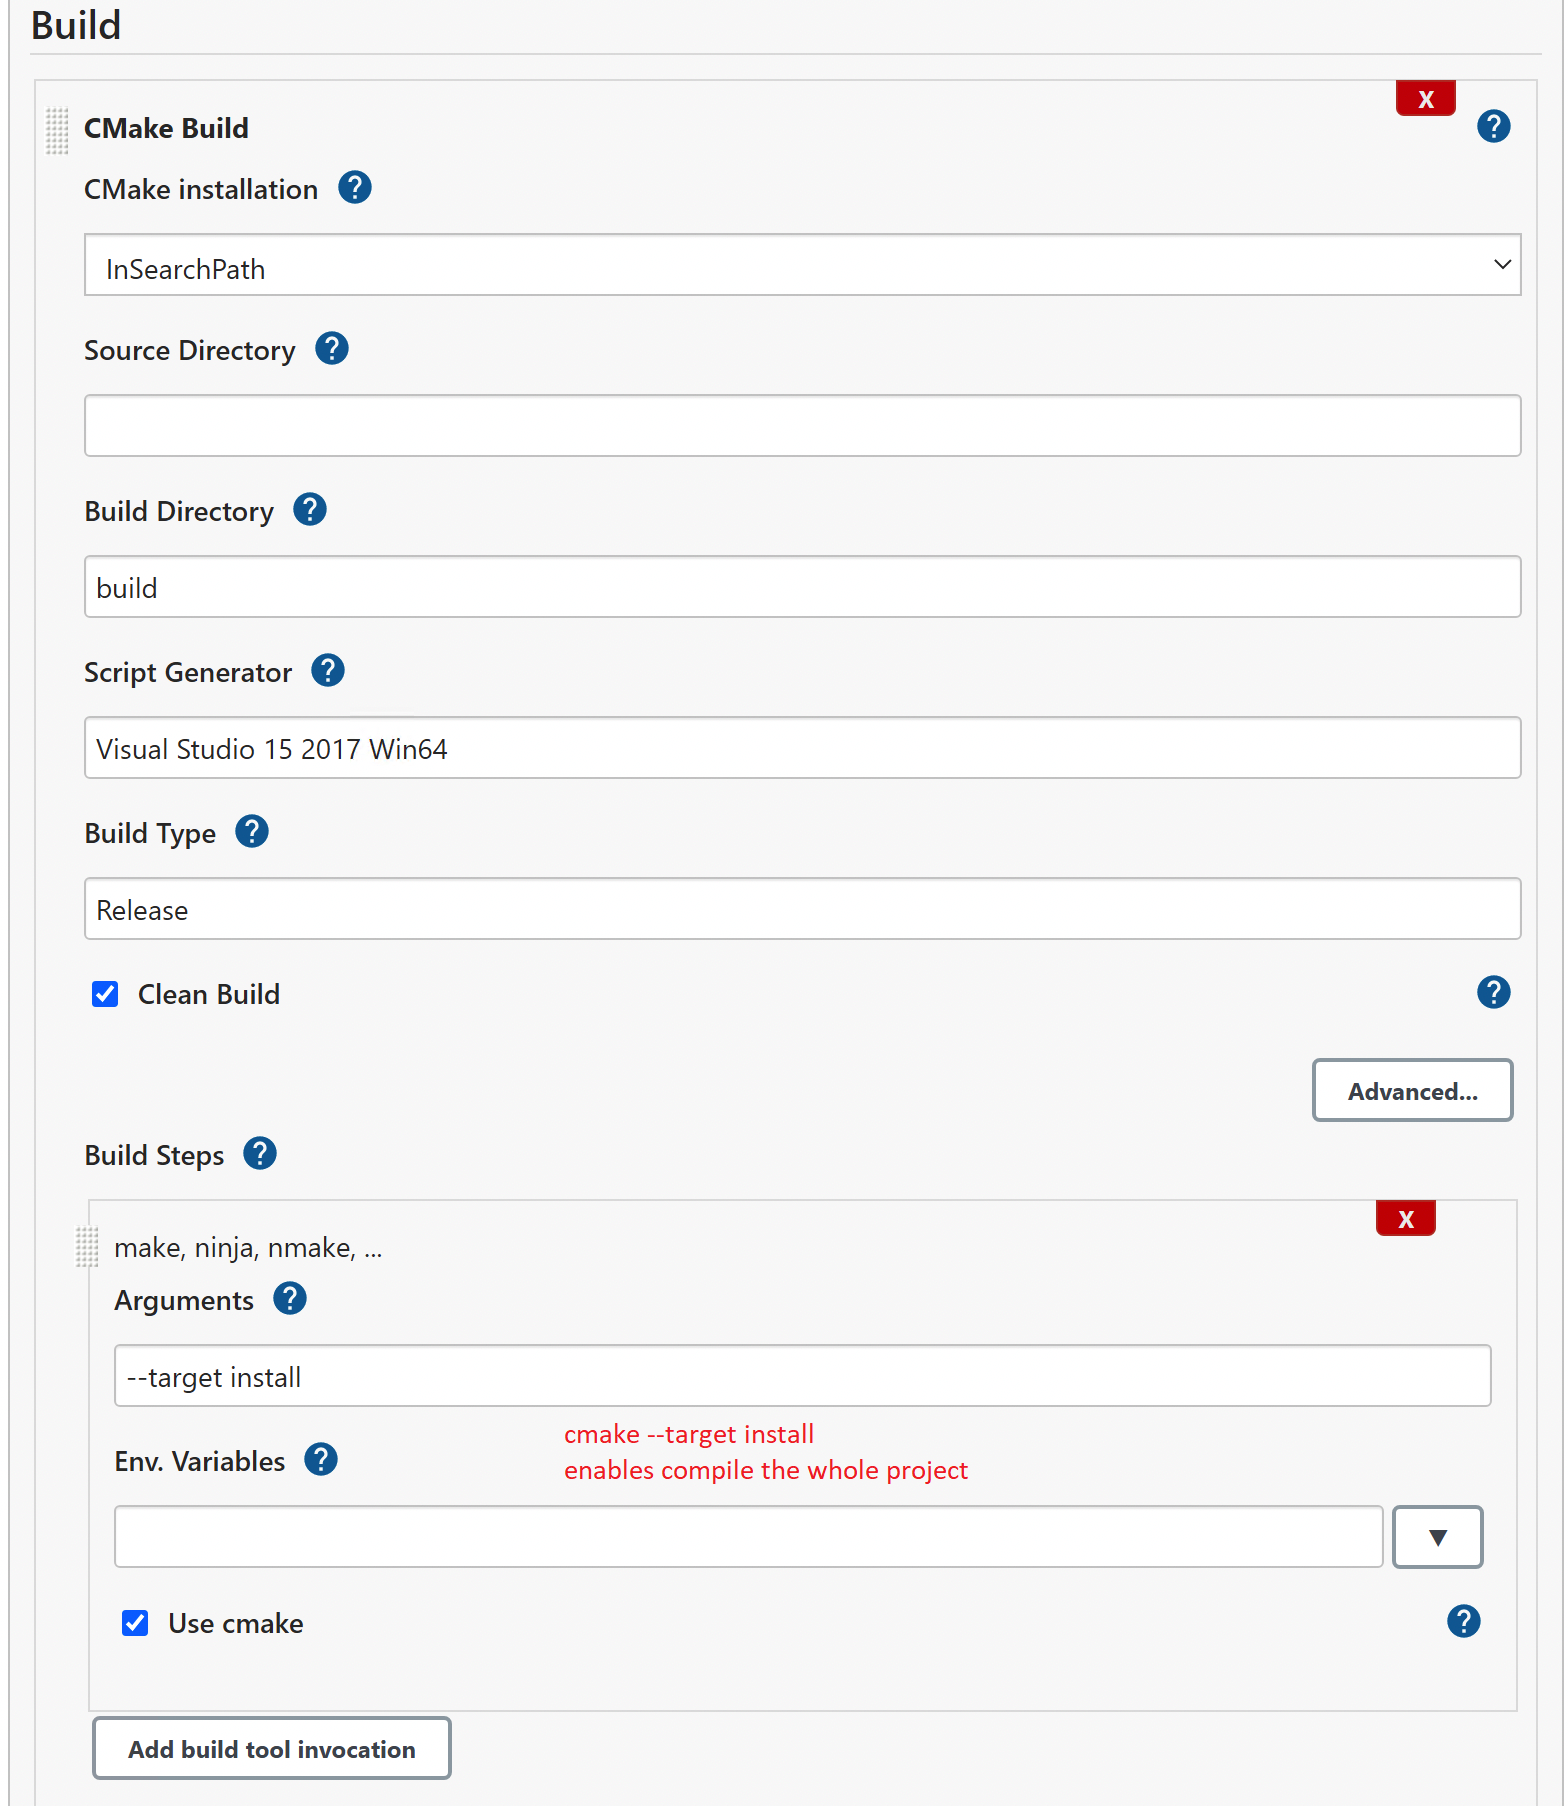
Under Build section, and select 'Add build step' -> CMake Build Fill out the build options CMake installation : InSearchPath #"Jenkins finds CMake. Make sure PATH variable links to it." Build Directory: build Script Generator: Visual Studio 15 2017 Win64 #Compiler on agent Build Type: Release (Works for Single configurations)
It's a good idea to set the Clean Build flag to make the job always start with a clean state.
- Check 'Console output' for any issue
Error: Cannot run program "cmake" ... CreateProcess error=2, The system cannot find the file specified
Add a download-on-demand installation on the global jenkins tool configuration page and specify that in your job. Or make sure cmake is in $PATH on the node.
Error: generator: Visual Studo 15 2017 Win64 Does not match the generator used previously
Clear the folder C:\Users\Mark\AppData\Local\Jenkins\.jenkins\workspace\cmake-demo\build
Manually-specified variables were not used by the project: CMAKE_BUILD_TYPE
- Hit "Add build tool invocation"
check "Use cmake" to let cmake handle the invocation of your build tool (e.g. make). You also specify the target here, which is typically "install" or "package" via the "–target" switch.
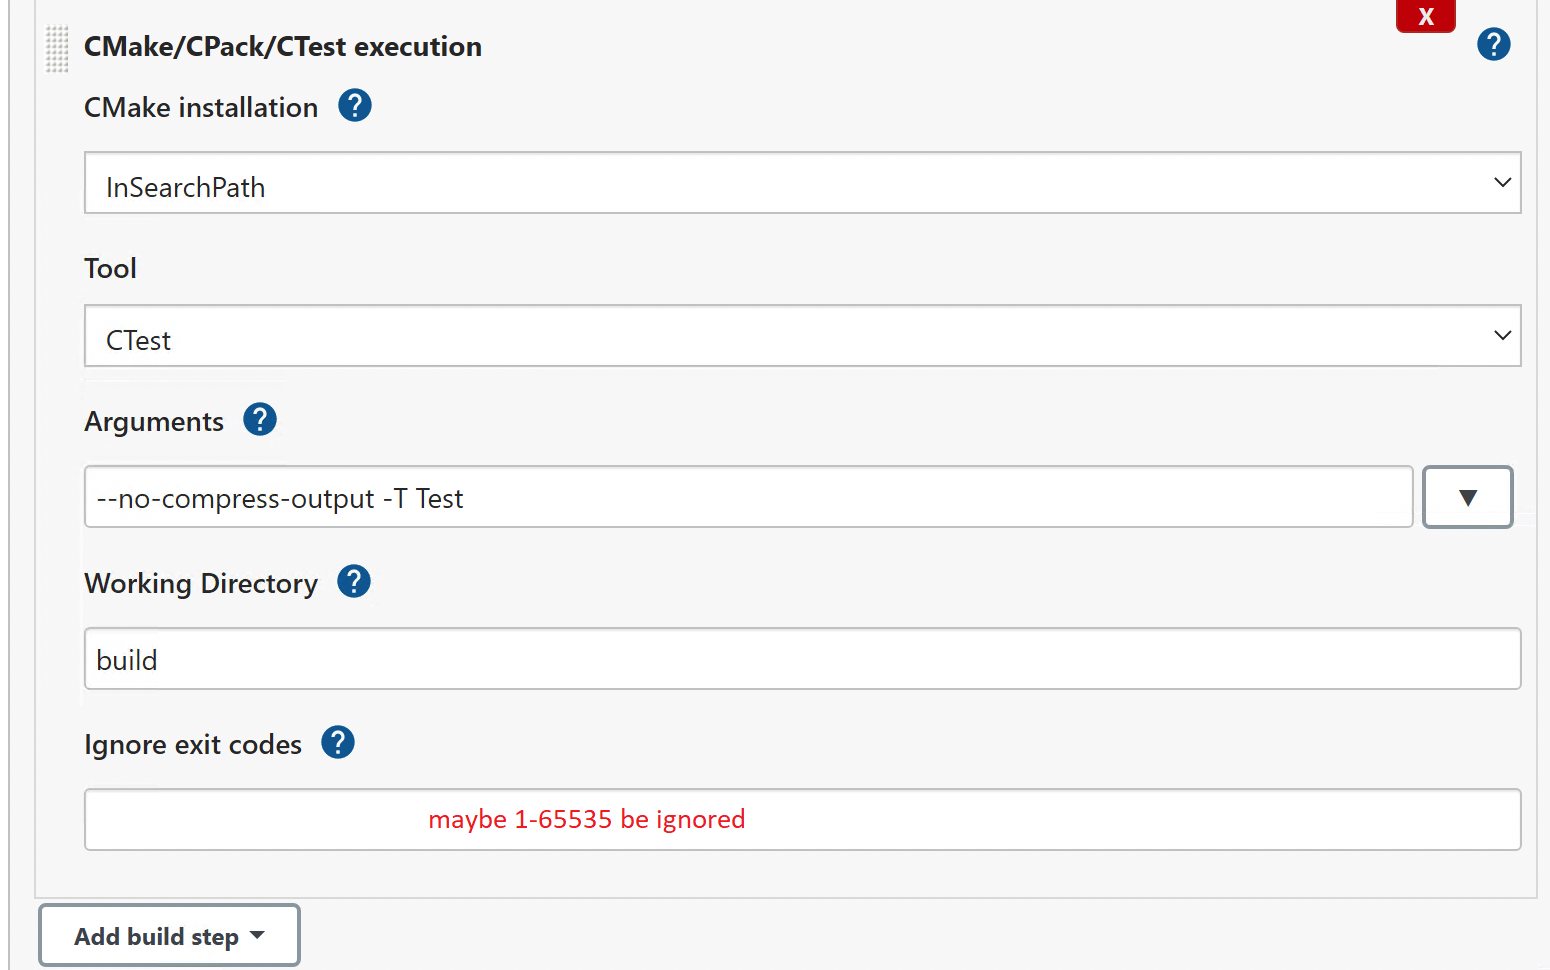
- Add another step that runs the tests via CTest. Add another Build Step, this time "CMake/CPack/CTest Execution" and pick CTest.
Working Directory: build
Otherwise, ctest runs under No test configuration file found!.
if using windowns, Arguments: --no-compress-output -T Test || verify > NUL
if using Unix, Arguments: --no-compress-output -T Test || /usr/bin/true
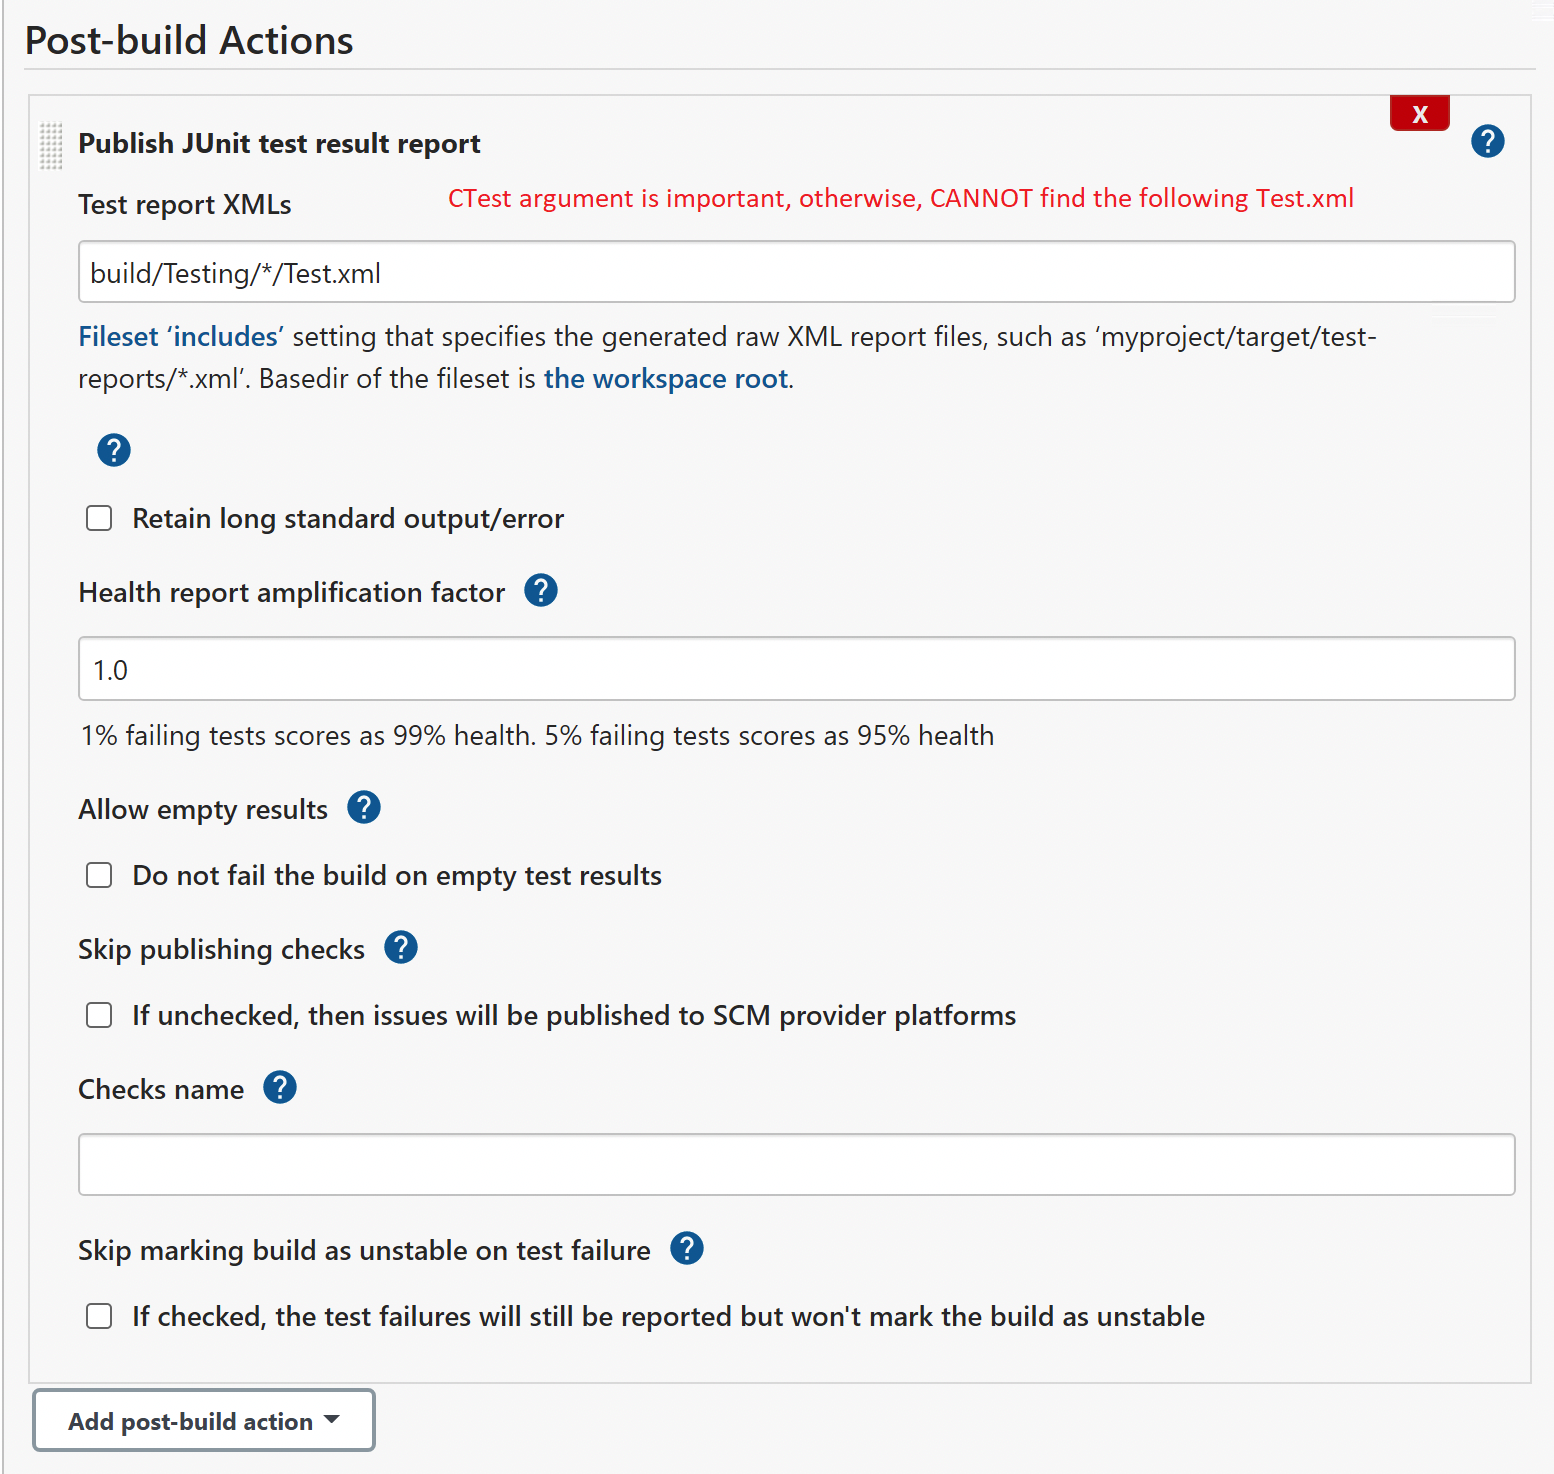
Running ctest with the option -T Test will make CTest generate an XML output file in a sub-folder Testing inside the build folder, which can be picked up by the xUnit plug-in in a post-build action then.
The one quirk with this is that it will let the build fail
when CTest returns a non-zero exit code - which it does when any tests fail.
Usually, you want the build to become unstable and not failed if that happens.
Hence set "1-65535" in the "Ignore exit codes" input.

Finally the xUnit plugin must be configured as:
Add a Publish xUnit test result report post-build action and then use the plugin's Add button to create a CTest-Version test result report. In the CTest-Version (default) Pattern enter the file pattern build/Testing/**/Test.xml.
-
Push notification: version control notifies Jenkins on new commit configure both Jenkins and source code management.
-
Polling: Jenkins polls in regular intervalls 'Scan Multibranch Pipeline Triggers' -> Click 'Periodically if not otherwise run' and select Interval
'Pipeline Syntax'-> Sample Step: git:Git
pipeline {
    agent any

    stages {
        stage ('Clone repository') {
            steps {
                echo "Clone the GIT repository ..."
                // Generated by 'Pipeline Syntax'-> Sample Step: git:Git
                git credentialsId: 'git_https', url: 'https://github.com/markchron/jenkins-cmake.git'
            }
        }

        stage("Configure") {
            steps {
                echo "Configuring the application..."
                dir('build') {
                    bat 'cmake -G "Visual Studio 15 2017 Win64" -config release ..'
                }
            }
        }
        stage("Build") {
            steps {
                echo "Building the application..."
                dir('build') {
                    bat 'cmake --build .'
                }
            }
        }
        stage("Test") {
            steps {
                echo "Testing the application..."

                dir('build') {
                    bat 'ctest --no-compress-output --test-action Test'
                }
            }
        }
    }

    post {
        always {
            // Archive the CTest xml output
            archiveArtifacts (
                artifacts: 'build/Testing/**/*.xml',
                fingerprint: true
            )

            // Process the CTest xml output with the xUnit plugin
            xunit (
                testTimeMargin: '3000',
                thresholdMode: 1,
                thresholds: [
                    skipped(failureThreshold: '0'),
                    failed(failureThreshold: '0')
                    ],
                    tools: [CTest(
                        pattern: 'build/Testing/**/*.xml',
                        deleteOutputFiles: true,
                        failIfNotNew: false,
                        skipNoTestFiles: true,
                        stopProcessingIfError: true
                        )]
            )
            // Clear the source and build dirs before next run
            deleteDir()
        }
    }
}
[email protected]: Permission denied (publickey).
Check if our key is being used to make an SSH connection, by cmd
eval "$(ssh-agent -s)" ssh-add -l -E md5
The first output shows the SSH agent PID on your computer.
Then lists all the SSH keys that are configured on your machine.
Check to see if they match the one you've uploaded to GitHub.
Generate an SSH key ssh-keygen -t rsa -b 4096 -C "[email protected]" ssh-add -K ~/.ssh/id_rsa

