UNK stands for Ultimate Ngoprek Keyboard, my own version of UHK. Hope this will be my endgame (I know it's a lie) keyboard. This is still a work-in-progress build logs. The build logs is nearly complete.
- Cheap 👎
- As thin as possible (thinner than Vortex Core) 👎
- Fully programmable (QMK) ✅
- Almost zero learning curve (horizontally staggered,
ortholinear,symbols through modifier/layer) ✅ - Ergonomic as UHK (splitted) ✅
- Generic size of keycaps (combinations from 145 keycaps set should be fitted) ✅
- Interchangeable middle modules (touchpad, trackball, smartphone dock) 👎
- Combined : http://www.keyboard-layout-editor.com/#/gists/457787e3b1938c4cbe9d65c7b7bd31ef
- Left half: http://www.keyboard-layout-editor.com/#/gists/f117f3cbc2d0b1bf17206992068f9017
- Right half: http://www.keyboard-layout-editor.com/#/gists/e9e79566d1be71f77f1f2d33660011e5
Download:
The greens are on the top plate. The oranges are on the bottom.
- USB-C female to Micro USB male converter
- Pro Micro clone
- Tactile switch
- TRRS jack
- Neodyum magnets
The list is excluding shipping cost and wrong parts those I purchased. Some items were purcashed more than the need for spare/stockpile. If the whole things counted, it reached almost 2 million rupiahs.
$ git clone https://github.com/qmk/qmk_firmware.git
$ ./util/qmk_install.sh
Then copy the UNK firmware directory to QMK
$ cp -vR /path/to/unk/firmware keyboards/unk
$ make unk/rev1:default
Press the reset button twice and fast, then:
$ sudo avrdude -p atmega32u4 -c avr109 -U ./.build/unk_rev1_default.hex -P /dev/ttyACM0
Uncomment the line that state #define MASTER_LEFT in keyboards/unk/rev1/config.h, then:
$ make unk/rev1:default
Press the reset button twice and fast, then:
$ sudo avrdude -p atmega32u4 -c avr109 -U ./.build/unk_rev1_default.hex -P /dev/ttyACM0
Layer+1to switch to Qwerty layoutLayer+2to switch to Colemak layout
The sources I read for building this keyboard:
- Keyboard layout editor, http://www.keyboard-layout-editor.com/
- Plate builder, http://builder.swillkb.com/
- Laser cutting service, https://lasergist.com/shop/lasergist/
- Pro micro official guides/FAQ, https://learn.sparkfun.com/tutorials/pro-micro--fio-v3-hookup-guide/troubleshooting-and-faq
- Handwiring split guide based on lets_split, https://johannes-jansson.github.io/projects/2018/07/23/hand-wiring-lets-split.html
- Handwiring guide, https://geekhack.org/index.php?topic=87689.0
- https://www.reddit.com/r/olkb/comments/5s8q76/help_pro_micro_pinout_for_qmk/
- Thinkpad trackpoint, https://electronics.stackexchange.com/questions/189790/determining-trackpoint-pinout
- Pro micro built-in LEDs, https://www.electronicsweekly.com/blogs/engineer-in-wonderland/arduino-micro-direct-access-board-leds-2017-08/
- TRRS in Pro Micro + QMK, https://beta.docs.qmk.fm/using-qmk/hardware-features/feature_split_keyboard
- Blackberry trackpad, https://vlukash.com/2019/01/15/trackpad-in-keycap-corne-crkbd-keyboard/
- Adding layers, https://thomasbaart.nl/2018/12/06/qmk-basics-how-to-add-a-layer-to-your-keymap/
- Layers, https://jayliu50.github.io/qmk-cheatsheet/
The wish was occured a loooooong time ago but I began to (seriously) design the keyboard from this date. I also started to purchase the parts that I need to build the keyboard.
Pro micro clones arrived. Small important things.
The plates arrived. The top plate's thickness is 1.5mm and the bottom plate is 2mm. I'm a bit surprissed that these plates were quite heavy. Heavy (p)unk keyboard!
I put carbon-like sticker on the inner side of bottom plate to avoid shorting from the wiring.
Also there were four strong neodyum magnets to help the two parts stick together.
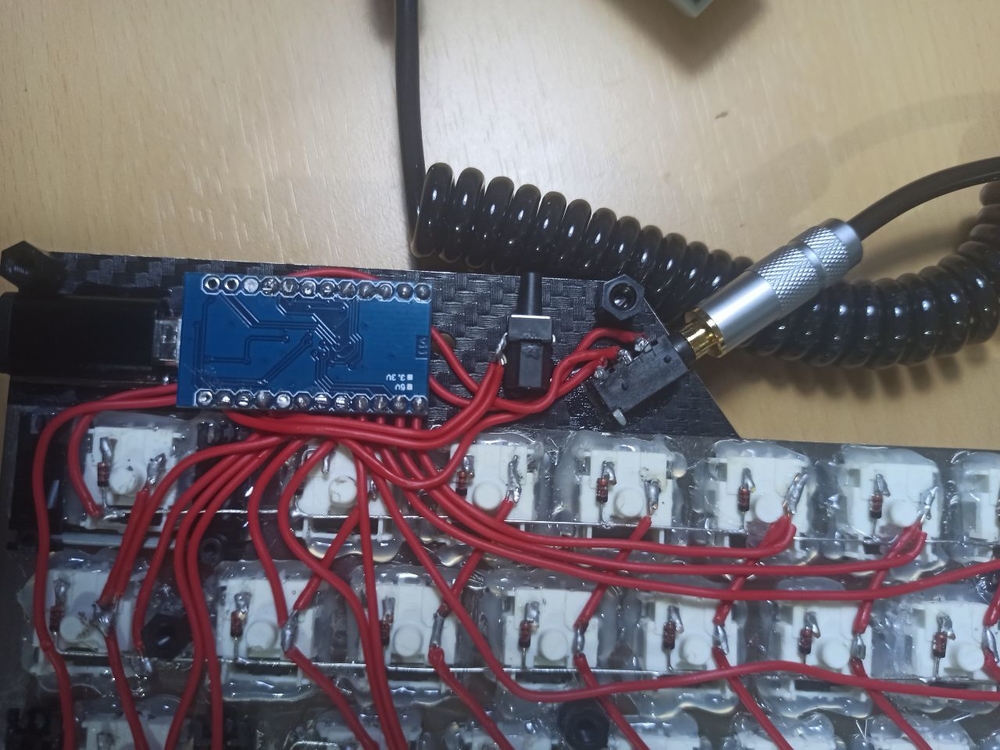
Handwired. Pardon my mediocre soldering skill.
Fully working left half. I was still playing and learn how to work with QMK firmware code.
DO NOT USE SUPER GLUE TO GLUE YOUR SWITCHES TO THE PLATE.
Oh boy, just don't. I'm a big fan of super glue as it's very versatile, strong adhesive, and quick-drying. Super glue has this kind of vapor that makes white mark around the surface that you glued on. My super glue is the strong one. This marks got into my switches' housing, contaminated the copper contacts, and makes it unusable!
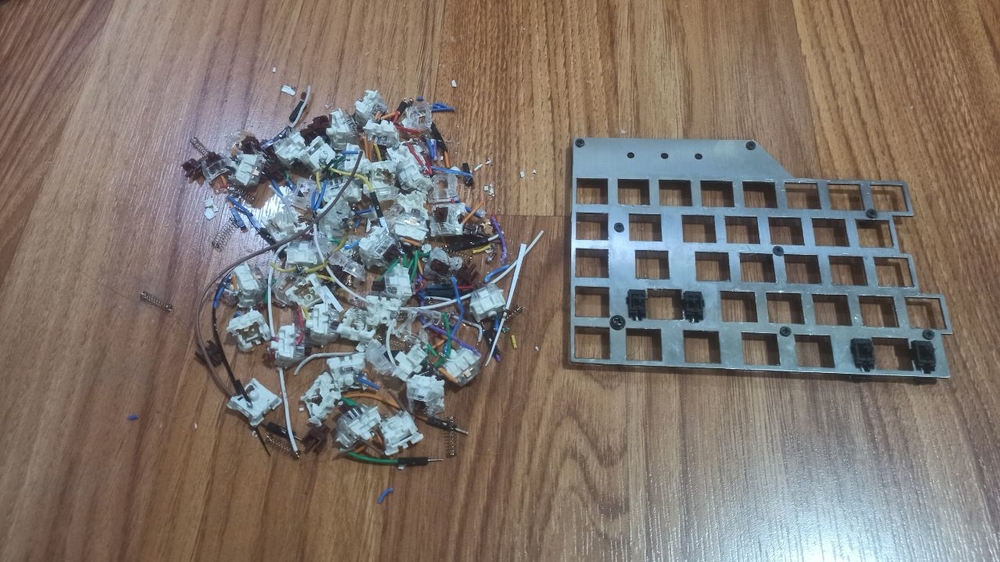
Because of my stupidity, I've to unplugged all the switches. I've to redo all the works that has been done on switches: matrix soldering and gluing. Plentiful of switches become the victims. Huft!
Use hot glue instead. Hot glue is quite strong to hold your switches but very easy to remove in case that you want to change some bad switches.
I'll use super glue only to things that need strong hold on the plate like USB-C port. reset tactile switch, TRRS jack.
I've seen some videos of making handwired keyboard and got some idea for better handwiring. I'll be using 0.35mm magnet coil wire single core copper wire.
Need to cut out the height of the switches and stabilizer so I can push the thickness limit. It'll be using 6mm spacer. The original uncut version is on the left. The middle is the common cut. The right one was forced to be cut like that to make more room for the neodyum magnet.
I reglued the switches back into the plate using hot glue. Quite easy but messy. Note that you have to clean the "spider web" things from the hot glue. If this thing makes it way into your switch housing or the stabilizer, it'll makes it feels terrible.
While waiting for the wire to be arrived, I made a pair of wrist rest from an unused one.
The TRRS cable was also being made.
Turned out that the TRRS jack is too thick for 6mm spacer. I need to set apart the jack port from the PCB.
Fully handwired.
Components placement. Glued with super glue (except for the Pro micros).
Bumpons added as rubber foot. Also another neodyum magnet to force the wrist rest stick with the board.
Multimeter tool is a must here. Need to check the entire wiring carefully.
I found an inverted diode and fixed it.
Forgot that the neodyum magnet's coating is conductive so I put the sticker on these too.
Entering programming phase. QMK is fun. I'm using deltasplit75 as the base.
Side views. You can see that the reset button is easy to reach with your nail.
Finished!


