This tool is designed to help customers migrate SQL Server Reporting Services reports (RDL) from their local server(s) to a Power BI workspace in their tenant. As part of the migration process, the tool will also:
• Convert any shared datasources and/or shared datasets in these report files to be embedded in the report and save the files locally to disk.
• Check for unsupported datasources or report components when uploading to Power BI
• Save the converted files that pass these checks to a specified Power BI Workspace.
• Provide a summary of the successful and unsuccessful assets migrated
Please note - None of the assets will be removed from the source as part of this process.
# RdlMigration <your Base url endpoint> <file Path> <WorkspaceName> <client-id>
This command will save all the converted files to local disk and display the status of each file in the command window, as well as a file called ConversionLog.txt
The examples below assume that you are running in a command prompt where the application RdlMigration.exe was copied to. You can get the application by cloning and building this repository, or by downloading the latest build from the 'Releases' tab. See details below on how to find your reportserver endpoint and how to create a Power BI client-id.
• Upload all reports from 'My reports' folder from a native mode installation of SQL Server Reporting Services or Power BI Report Server to 'My Worspace' in powerbi.com.
RdlMigration https://ssrsservername/reportserver "/My Reports" "My Workspace" <client-id>
• Upload all reports from '/Sales' folder from a native mode installation of SQL Server Reporting Services or Power BI Report Server to 'Sales' workspace in powerbi.com.
RdlMigration https://ssrsservername/reportserver "/Sales" "Sales" <client-id>
• Upload all reports from '/Shared Documents/Reports' folder from a sharepoint integrated mode installation of SQL Server Reporting Services to 'Reports' workspace in powerbi.com.
RdlMigration "https://sharepointservername/_vti_bin/reportserver" "https://sharepointservername/Shared Documents/Reports" "Reports" <client-id>
• Upload a single report called MonthlySales from '/Shared Documents/SalesReports' folder from a sharepoint integrated mode installation of SQL Server Reporting Services to 'Reports' workspace in powerbi.com.
RdlMigration "https://sharepointservername/_vti_bin/reportserver" "https://sharepointservername/Shared Documents/SalesReports/MonthlySales.rdl" "Reports" <client-id>
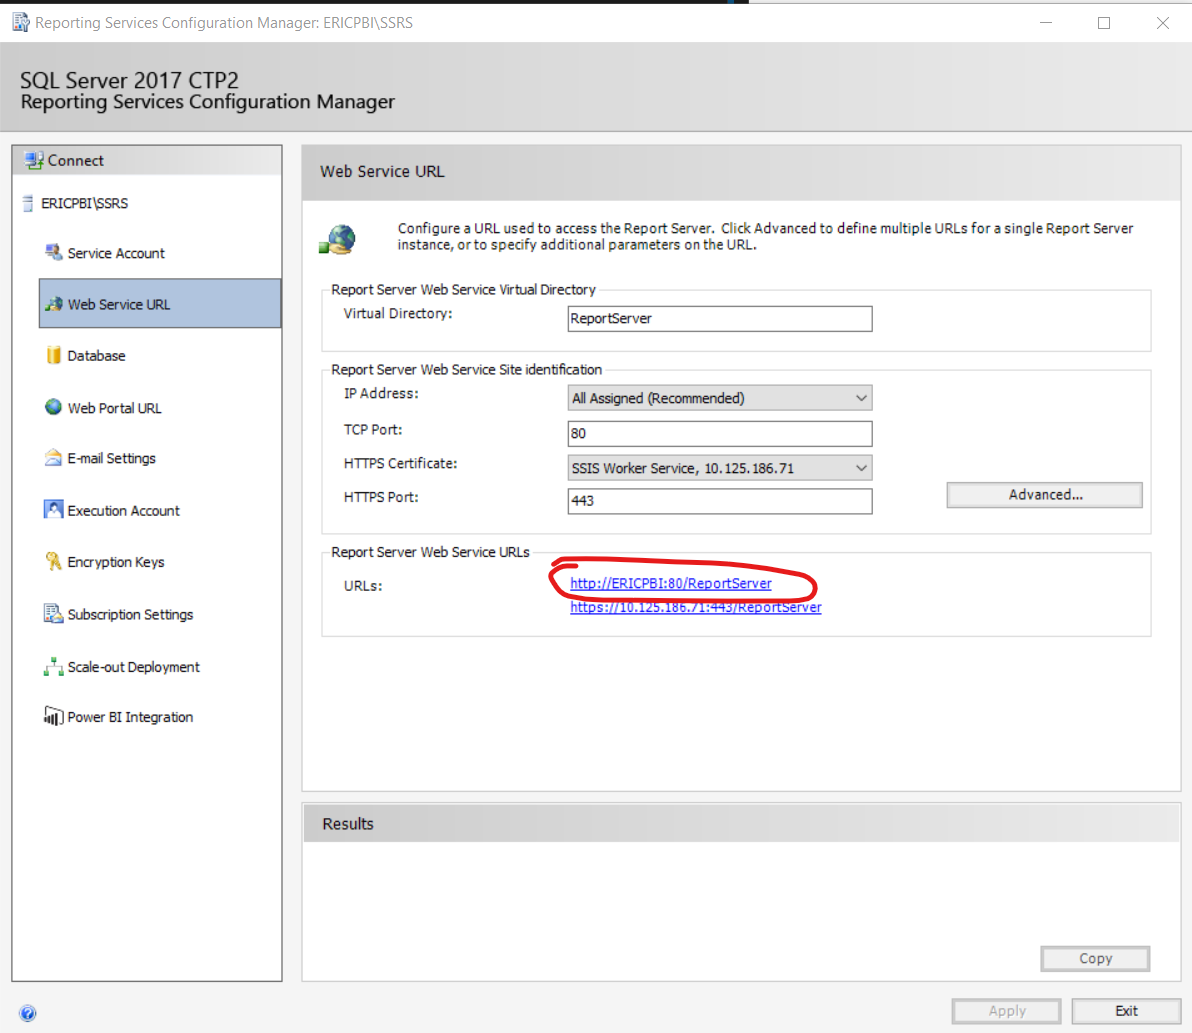
This is set in the Reporting Services Configuration Manager under Web Service URL-> Report Server Web Service URL
This refers to the relative path to your file or folder on the report server. If the path references a file, the tool will convert and push only that individual file. If the path references a folder, the tool will convert and try to push all the report files within that folder. This would include any reports contained in the folder and would convert dependencies that might be located in other folders or subfolders (such as Shared DataSources and Shared DataSets). Report in subfolders will not be published.
This is the name of the workspace you want to upload your files to. Surround the name with quotation marks if there’s a space in the name. For example:
"Paginated Workspace"
The Application Client ID that gives you permissions to read and write with the Power BI API:
To obtain this, do the following:
-
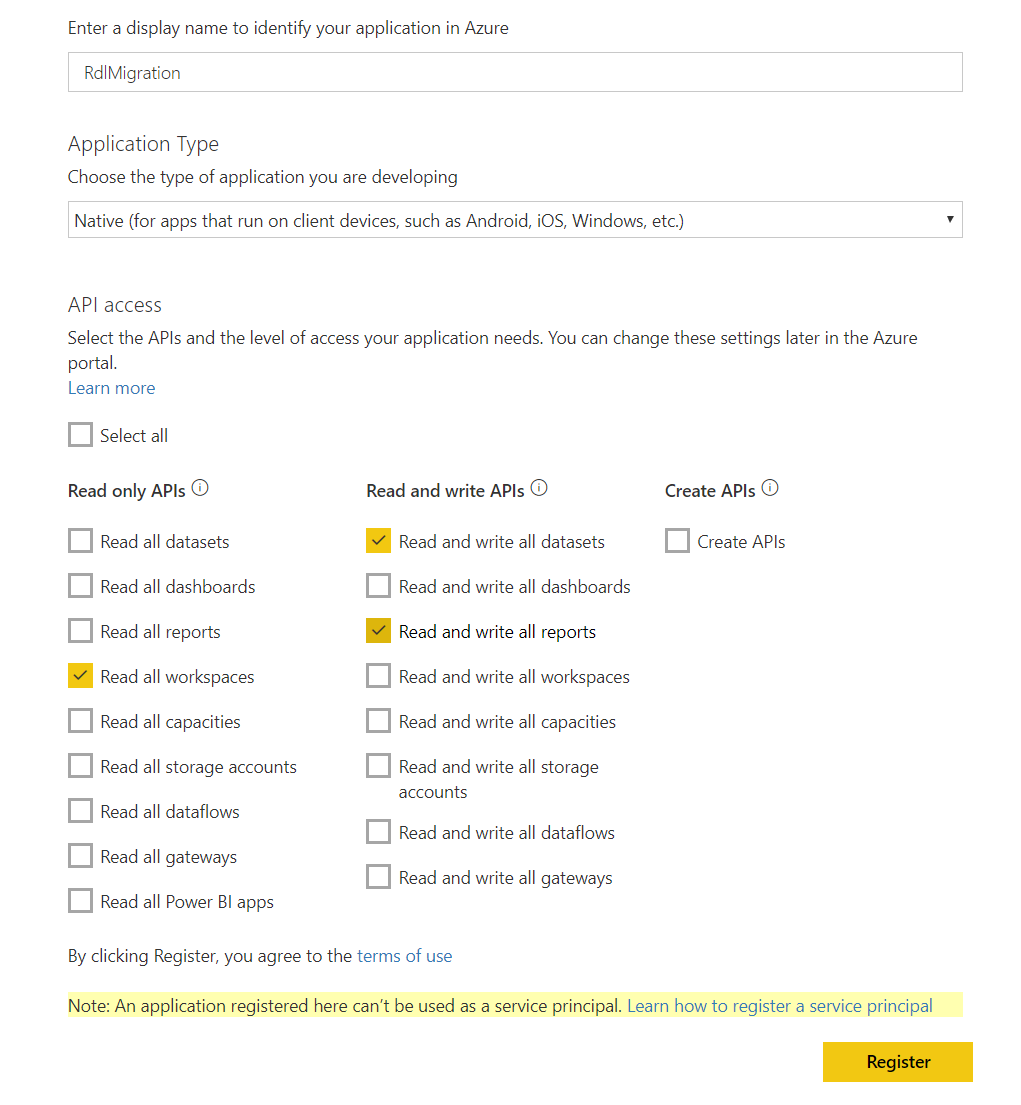
Go to https://dev.powerbi.com/apps .
-
Select Sign in with your existing account then select Next.
-
Provide an Application Name you want to call it.
-
Select Native for Application Type
-
Select the access permissions, for this application the minimum access are Read all Workspaces, Read and write all datasets, Read and write all reports
Click Register, and an application ID (Client-ID) will be provided to you.
Link : https://docs.microsoft.com/en-us/power-bi/developer/register-app
NOTE: In some cases, you may need an admin's approval for the app-id to work.

