-
Notifications
You must be signed in to change notification settings - Fork 0
Getting Started with AFNetworking
This is a guide to help developers get up to speed with AFNetworking. It is geared primarily towards anyone who is new to Mac or iOS development, or has not worked extensively with 3rd-party libraries before.
These step-by-step instructions are written for Xcode 4.2, using either the iOS 5 or Mac OS 10.7 SDK. If you are using a previous version of Xcode, you may want to update before starting.
First, we need to download the latest source code from the AFNetworking repository.
Click here to download AFNetworking in a zip archive
Once the download has finished, unarchive the zip file and open the resulting directory. The folder we'll be interested in later is named "AFNetworking", but hold off on doing anything with that for a moment.
Instead of adding the source files directly to your project, you may want to consider using CocoaPods to manage your dependencies. Follow the instructions on the CocoaPods site to install the gem, and specify AFNetworking as a dependency in your
Podfilewithpod 'AFNetworking', '~> 1.2'.
Once we have the latest version of AFNetworking, we're ready to add it to our project.
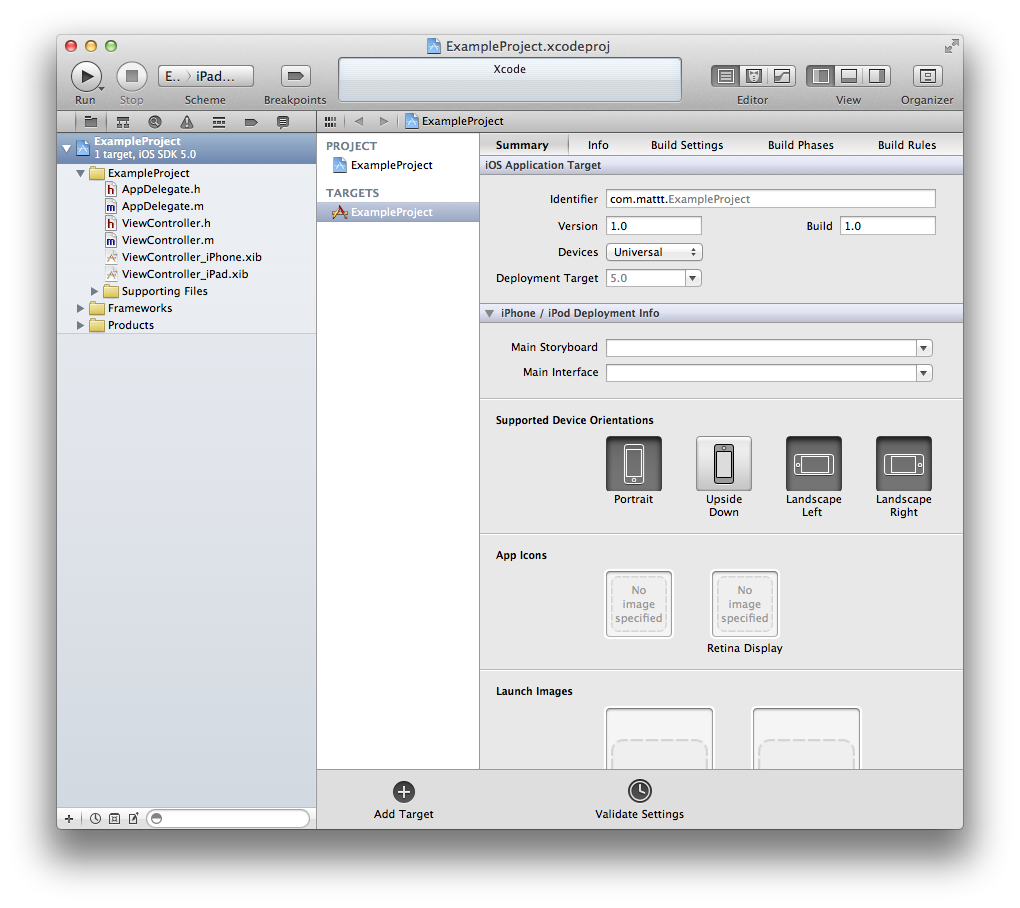
An Xcode project file organizes your source code files and manages the settings needed to build and distribute your app. When you open your project, you should see an Xcode workspace, with a toolbar across the top, a directory listing on the left, and an editor next to it on the right.
For now, we're interested in the directory listing on the left. If you don't see a list of files, go to "View > Navigators > Show Project Navigator", or use its keyboard shortcut, ⌘1.

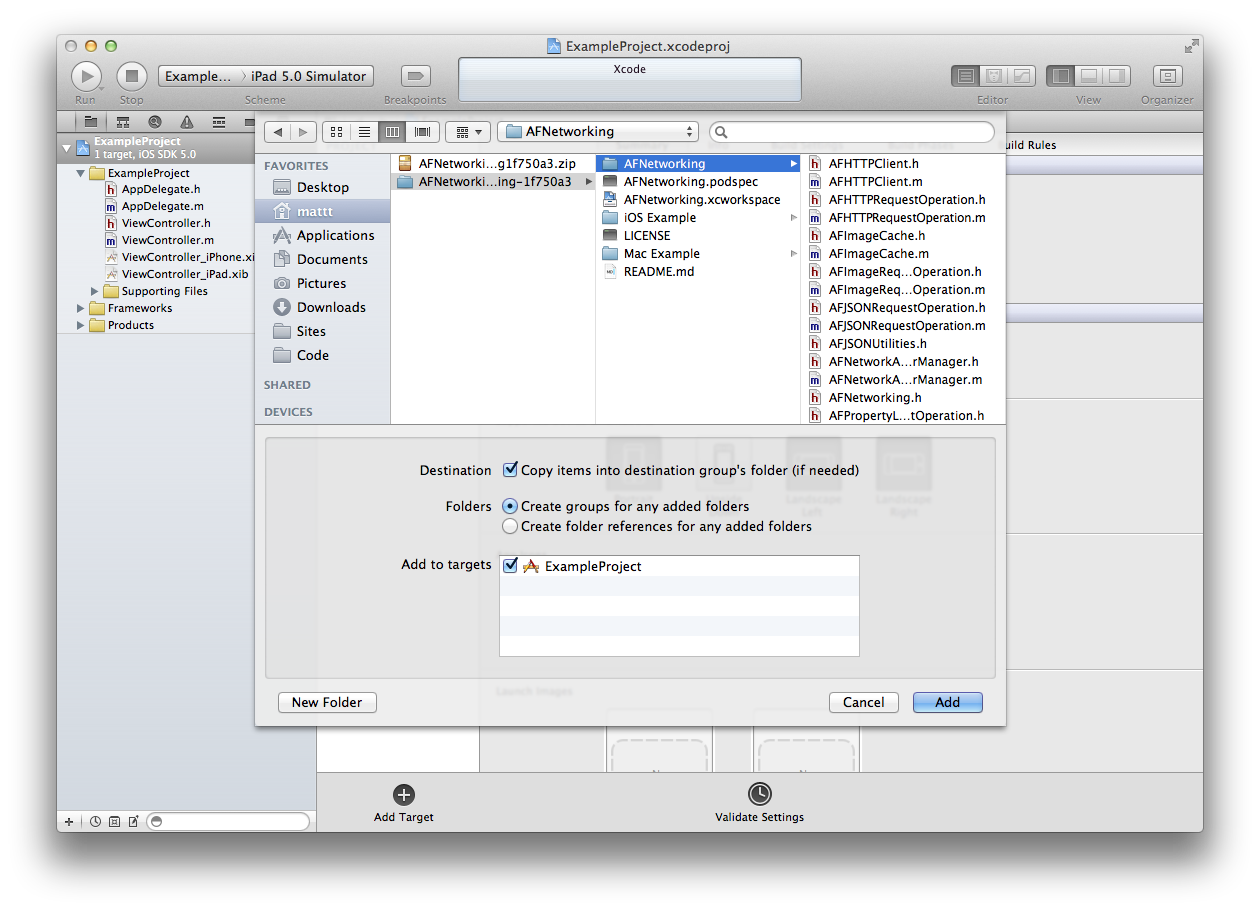
Now, go to "File > Add Files to '(Project Name)…'". You will be presented with a dialog sheet with a file browser and a few other controls. In the file browser, go to that unarchived folder from the code we downloaded a few minutes ago, and select that "AFNetworking" folder (be sure to select the folder itself, rather than any the files in the directory).

Check that the options below the file browser are as follows:
- Destination ☑ Copy items into destination group's folder (if needed) [Checked]
- Folders ◉ Create Groups for any added folders [Top Item Selected]
- Add to Targets ☑ (Project Name) [All Targets Selected]
Finally, click "Add". A new "AFNetworking" group will have been added to your project, which corresponds to the folder that is now in your project directory.
Now that our project is all set up with AFNetworking, let's try building the project. Select "Project > Build", or use its keyboard shortcut, ⌘B.
At this point, everything's in place for you to start using AFNetworking. Just #import the headers for the classes you need and get to it!
Don't know where to start, exactly? Well, that really depends on what your app does. Listed below are a few common tasks, with an explanation of how to use AFNetworking to accomplish them.
AFJSONRequestOperation is the perfect tool for this job. All you need to do is ask it for a particular URL, and it'll give you JSON when it's done:
NSURL *url = [NSURL URLWithString:@"http://httpbin.org/ip"];
NSURLRequest *request = [NSURLRequest requestWithURL:url];

AFJSONRequestOperation *operation = [AFJSONRequestOperation JSONRequestOperationWithRequest:request success:^(NSURLRequest *request, NSHTTPURLResponse *response, id JSON) {
    NSLog(@"IP Address: %@", [JSON valueForKeyPath:@"origin"]);
} failure:nil];

[operation start];
First, we construct an NSURL object and construct an NSURLRequest object from it. NSURLRequest encapsulates pretty much everything there is for an HTTP request, including url, method (GET, POST, PUT, DELETE, etc.), headers, and the body.
We then pass that url request object into AFJSONRequestOperation +JSONRequestOperationWithRequest:success:failure.
The success and failure parameters take block arguments. Blocks are a relatively new and complex feature in Objective-C, so if you're unfamiliar with them, think about reading up on them. Blocks are objects that contain a specified behavior--code that can be executed later.
In the case of our success and failure callback blocks, we're specifying what should happen after the request finishes. The request happens in the background, without locking up or slowing down the app. Depending on whether the response from the server indicates success (e.g. 200 status code and JSON Content-Type), or failure (e.g. 404 status code or unknown MIME type), the code in the corresponding block will be executed.
You'll notice that the argument for success is ^(NSURLRequest *request, NSHTTPURLResponse *response, id JSON). The caret (^) indicates that what follows is part of a block. The other arguments: request, response, and JSON are local variables that are passed into the block. In the block, we can use these values to do things like log the contents of the JSON (like in our example), or do more useful things, like populate an NSArray to update the data source of a UITableView.
After constructing the operation object, we have to start it somehow. In the example, we simply send -start, which kicks off the request and returns immediately.
Another option would be to take advantage of the fact that AFJSONRequestOperation, like all of the request operations in AFNetworking, is a subclass of NSOperation. In combination with NSOperationQueue, you can easily have several requests running concurrently (you have the ability to setting a maximum number of operations to run concurrently to keep your network from getting bogged down).
One last note: in addition to JSON, AFNetworking has a handful of request operations that download data and automatically convert it to things like XML, Images, and Property Lists (http://afnetworking.github.com/AFNetworking/Classes/AFPropertyListRequestOperation.html).
AFNetworking makes downloading and setting images as simple as getting an image from the project.
Start by adding #import "UIImageView+AFNetworking" to the top of a controller or a view implementation file. This category adds methods to UIImageView, like:
[imageView setImageWithURL:[NSURL URLWithString:@"…"]];
A longer form of this method also allow you to set a placeholder image while the image is downloading.
Use this anytime you need to load a remote image from the server.
Chances are pretty good that most if not all of the network requests you make are to a single API or web service, like a Rails or Sinatra backend.
If your app talks to a server backend (or a few different ones), then you'll love AFHTTPClient.
AFHTTPClient has everything you need for talking to a web API. It stores a base URL, which you can request relative paths to (e.g. base URL: http://example.com + relative path: /users = http://example.com/users). You can store a common set of header for things like authentication, content type, and language preferences, which will be added to any request you make with the client. Best of all, it will even automatically figure out how to parse your server response, so JSON requests give you JSON objects, XML requests give you parser objects, etc.
Here are some guidelines on how best to use AFHTTPClient:
- Create a subclass for each service endpoint you hit. For instance, if you're writing a social network aggregator, you might want a client for Twitter, one for Facebook, another for Instragram, and so on.
- In HTTP client subclasses, create a class method that returns a shared singleton instance. This way, you can configure and use a single client to use throughout the entire app.
- Want to upload a file? Check out
-multipartFormRequestWithMethod:path:parameters:constructingBodyWithBlock:. In the block, send the multipart form data builder-appendPartWithFileData:name:fileName:mimeType: - If you need to send request parameters as JSON, simply set the
parameterEncodingproperty toAFJSONParameterEncoding. - If you need to configure or hold a reference to a request operation before it's enqueued into the client's operation queue, use
-HTTPRequestOperationWithRequest:success:failure. Likewise with the URL request object, userequestWithMethod:path:parameters.
A good example of an AFHTTPClient subclass can be found in the example project: AFAppDotNetAPIClient. Use it as a starting point for your own client.
You can find even more articles like this one on the wiki. You'll also want to keep a link to the documentation handy while you're working on your app.