Blend_My_NFTs is an open source, free to use Blender add-on that enables you to easily generate thousands of 3D Models, Animations, and Images. This add on's primary purpose is to aid in the creation of large generative 3D NFT collections. It is the first and easiest 3D NFT generator.
For support, help, and questions, please join our wonderful Discord community!
Checkout the newest YouTube tutorial!
Blend_My_NFTs was initially developed to create Cozy Place, an NFT collection by This Cozy Studio Inc.
0001-0395.1.mov
The video above illustrates the first 10 Cozy Place NFTs generated with a very early prototype version of Blend_My_NFTs.
Website: https://thiscozystudio.com/
Discord: https://discord.gg/UpZt5Un57t
Youtube: https://www.youtube.com/c/ThisCozyStudio
Twitter: https://twitter.com/ThisCozyStudio
Instagram: https://www.instagram.com/this_cozy_studio/
Reddit: https://www.reddit.com/r/ThisCozyPlace/
Blend_My_NFTs works with Blender 3.2.2 on Windows 10 or macOS Big Sur 11.6. Linux is supported, however we haven't had the chance to test and guarantee this functionality. Windows 11 has not been tested as of yet. Any rendering engine works; Cycles, Eevee, and Octane have all been used by the community. This add-on only works in Blender, a Cinima 4D port is being investigated.
The YouTube tutorials use three different .blend example files. This repository has all three and includes a readme.md file that outlines which videos use which files and by what date: https://github.com/torrinworx/BMNFTs_Examples
- Blend_My_NFTs
- Setup and Installation
- Important Terminology
- Blender File Organization and Structure
- Steps to Generate NFTs
- Custom Metadata Fields
- Logic
- Notes on Rarity and Weighted Variants
- Notes on Meta Data and Standards
- Calculating Maximum Number of NFTs (Max Combinations)
- I have my NFTs, what next?
- Running Blend_My_NFTs Headlessly
Here are the steps you need to take to get the Blend_My_NFTs add-on installed in Blender:
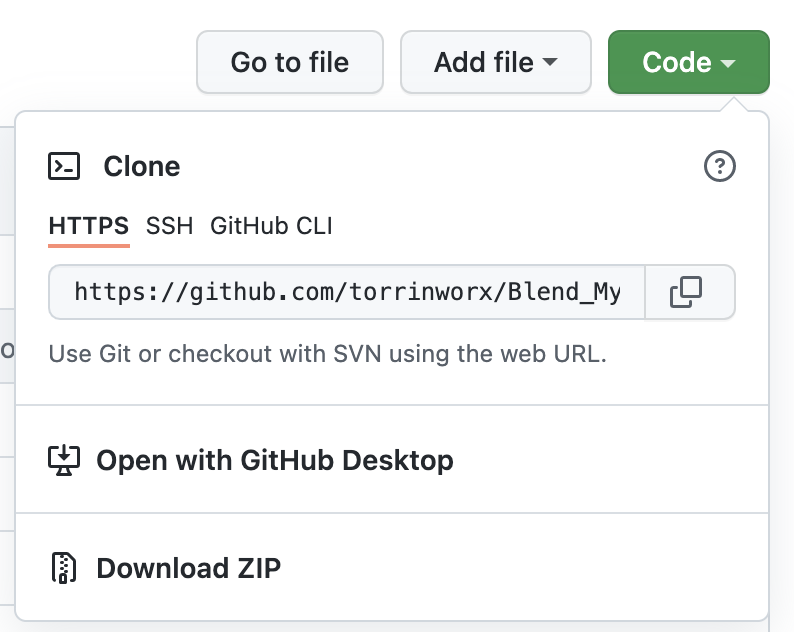
- Click the green
Codebutton at the top of this page.
- From the drop down click
Download ZIP. This will download Blend_My_NFTs-main.zip to your Downloads folder:
- Move the Blend_My_NFTs-main.zip file to your desktop:
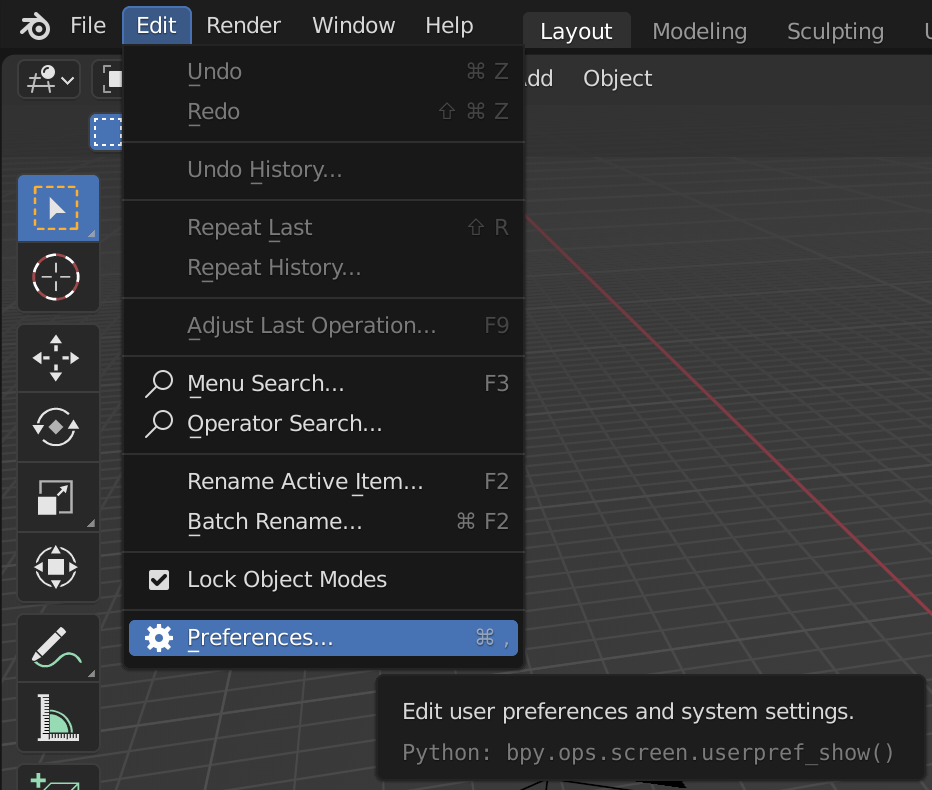
- Open Blender and navigate to
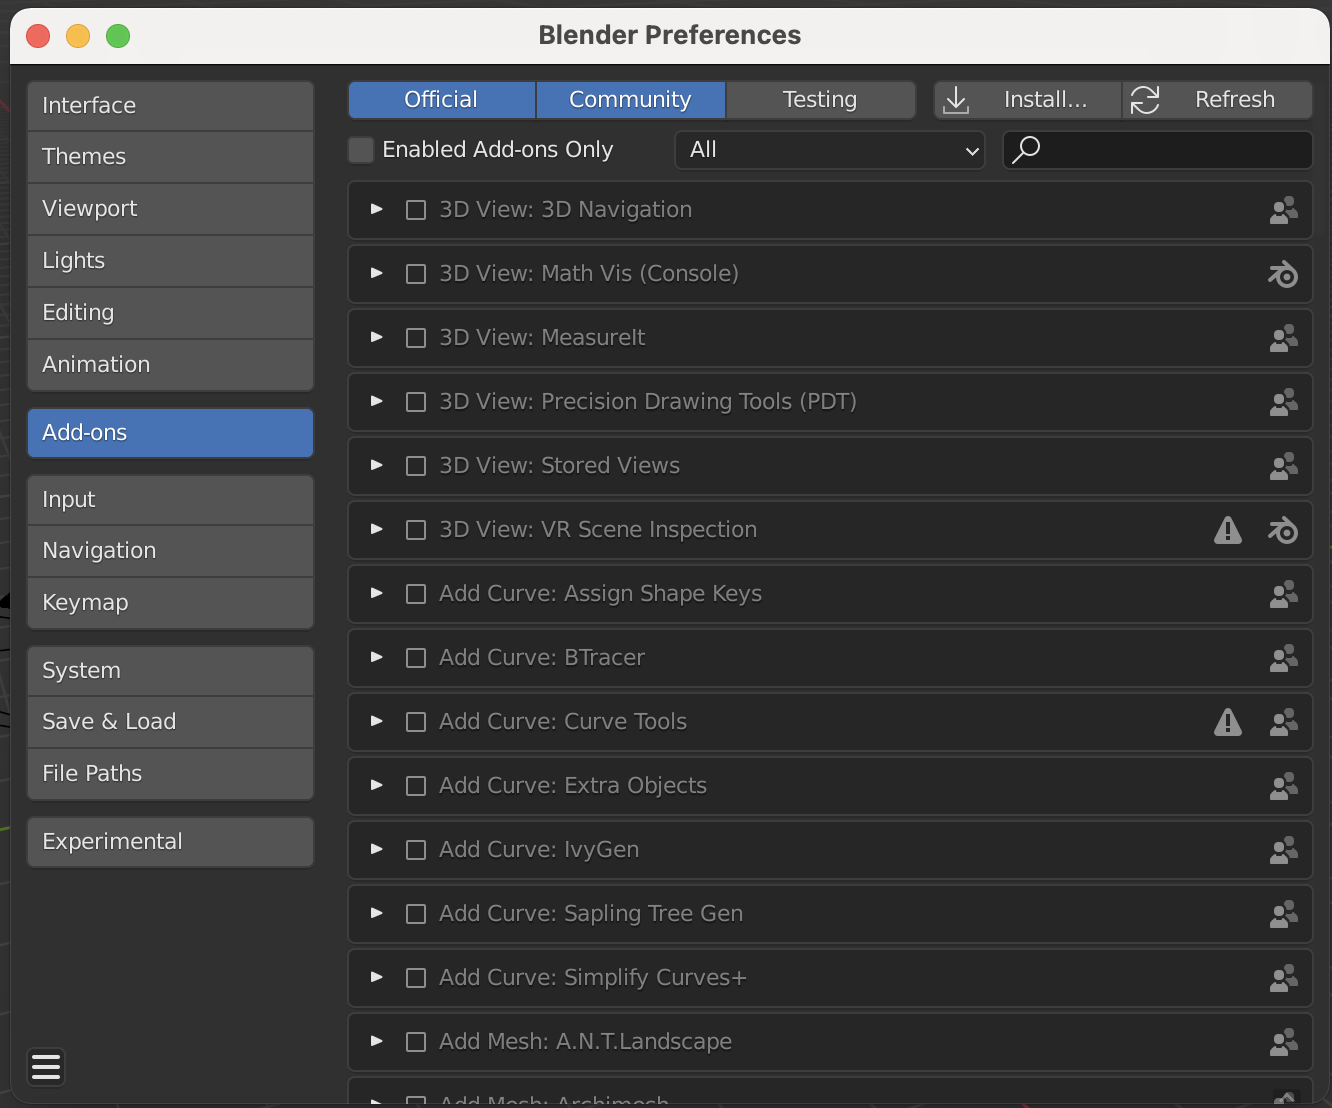
Edit->Preferences->Add-ons:
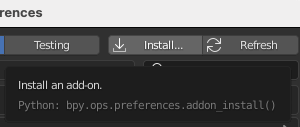
- Click the
Installbutton:
- In the
Blender File Viewwindow, navigate to the Blend_My_NFTs-main.zip file downloaded in step 1., select it, then clickInstall Add-on:
- Navigate back to the
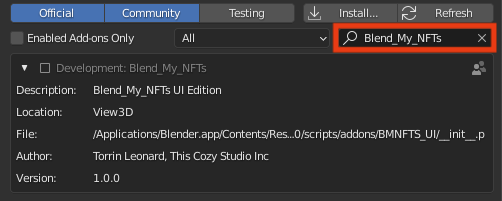
Add-onswindow in step 4., and search for Blend_My_NFTs:
- Click the
Checkboxto enable the Blend_My_NFTs add-on:
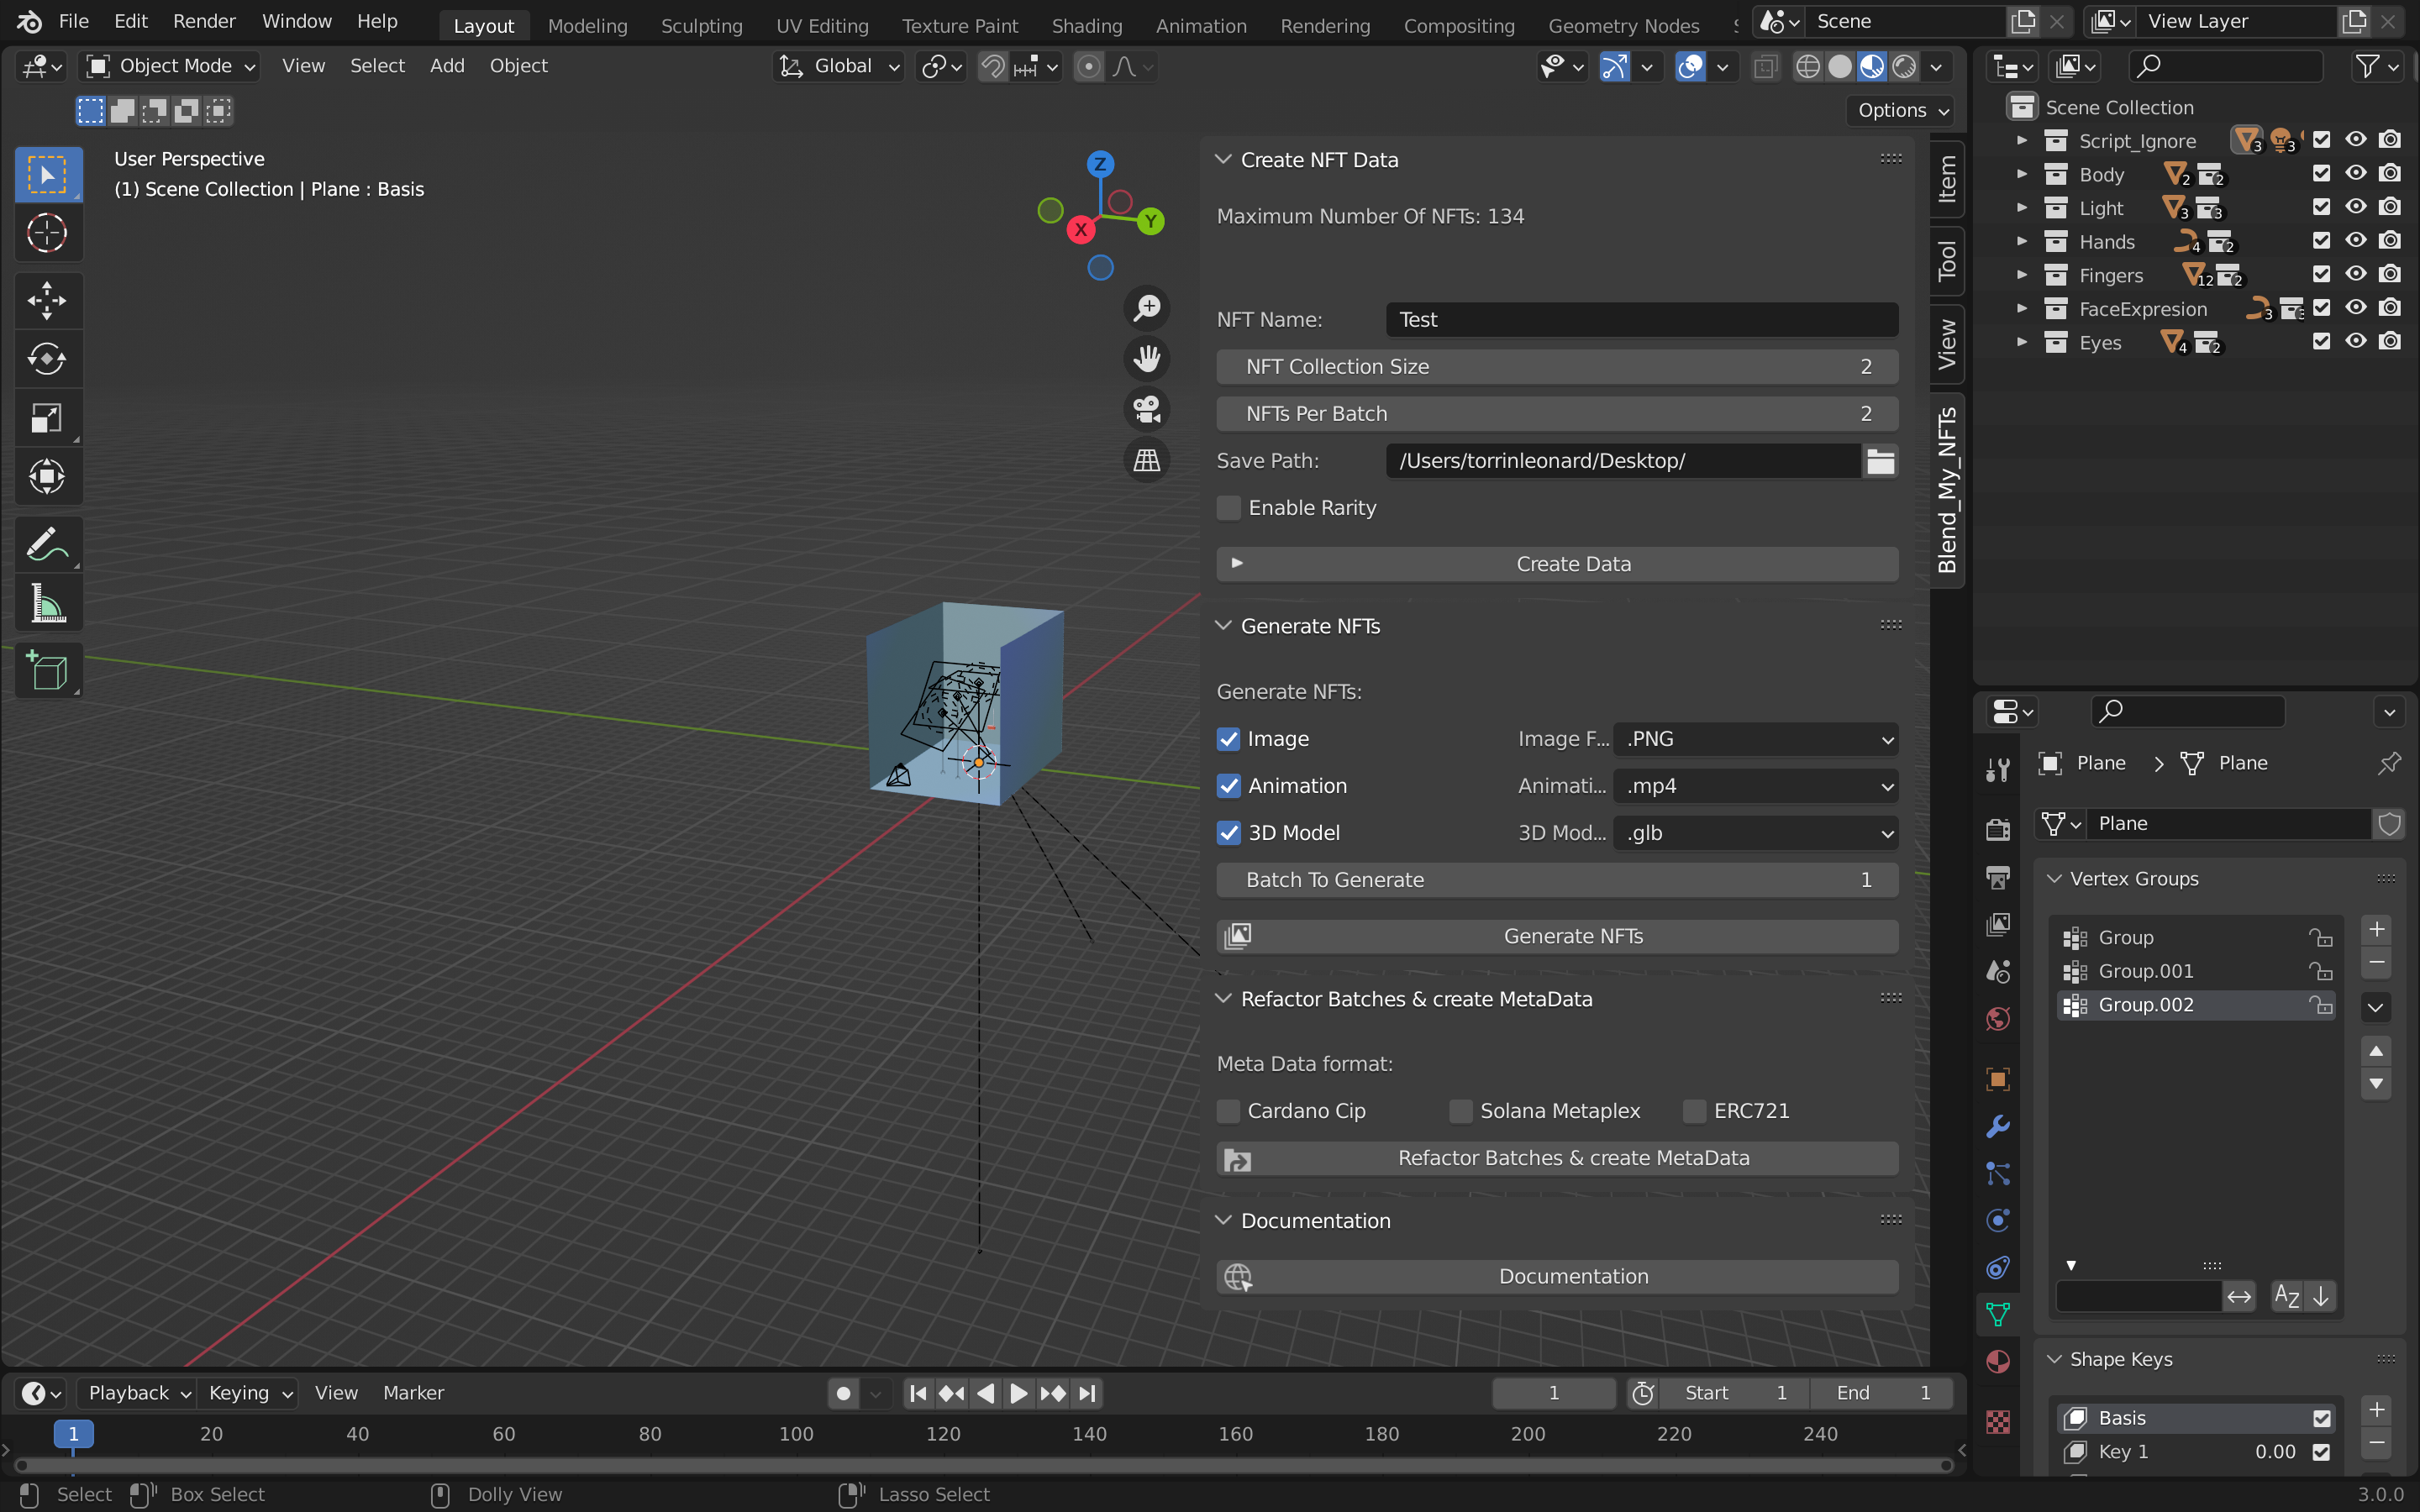
Now that Blend_My_NFTs is installed in your instance of Blender you can find the main panel in the 3D View tab in Layout, once you are there tap N on your keyboard to open the side panel:
Before you can continue further, there are terms used in this documenation to describe the process of this software. This makes it easier to understand how you need to organize your .blend file to generate NFTs. Refer to this section if you come accross an unfamiliar term.
Let's say you are creating an NFT collection, the artwork is a .png of a person wearing a hat:
-
Attribute- A part of the .png that can be changed. The idea of aHaton a man is an Attribute, there are many types of Hats, but theHatitself I will refer to it as an Attribute. -
Variants- These are the types of Hats; Red Hat, Blue Hat, Green Hat, Cat Hat, etc. These can be swapped into theHatAttribute to create unique .png NFTs. -
DNA- A sequence of numbers that determins whatVariantfrom everyAttributeto include in a single NFT .png. Blend_My_NFTs creates and stores a uniqe DNA sequence for each NFT you create. These numbers are stored in theNFTRecord. -
NFTRecord- The "Ledger" of allDNAfor your NFT collection. This will be generated after you create all the Attribtues and Variants that make up your NFT collection in Blender. -
Batch- A randomly selected subset ofDNA, taken from theNFTRecord. Blend_My_NFTs can split theNFTRecordinto multiple Batches; This allows you to render or create NFTs on multiple computers, or at seperate instances in time.
Important - Every object, model, texture, camera, light etc. must be in the same .blend file! If you have mulitiple .blend files, Blend_My_NFTs is unable to open and process them. It's recommended to keep your file's total size 5gb, so if you have multiple files created already, reduce the size and then merge them to a master file.
Organizing your NFTs Attributes and Varariants in Blender is essential to generate files with Blend_My_NFTs. Follow the organizational rules below when making your NFT .blend file:
- Your .blend file scene must contain a
Script_Ignorecollection. Make sure the name is exactlyScript_Ignore, include the underscore and capitalization.
- Any objects (Lights, Cameras, Background images, etc.) that stay constant throughout every NFT file are to be placed in this
Script_Ignorecollection.Script_Ignoremay contain sub collections and all naming conventions are not required withing this collection.
-
Every Attribute is represented by a collection placed directly in the Scene collection. The name of these attribute collections can not contain numbers or the underscore (
_) symbol. The name can contain spaces -
Every Variant of each Attribute is represented by a collection. These collections are to be placed in the corresponding Attribute colleciton. The naming convention of these Variant collections is as follows:
- <
Name of Variant>_<Order Number>_<Rarity Percentage>Name of Variant==> Any string/number/symbol combination, must not include the underscore (_) symbol. Can contain spaces.Order Number==> An incrementing number. Must increment for each Variant added to a given Attribute starting at1, numbers cannot repeat and must be unique for each Variant. Can only be in a single number format, do not use 001 or 0001 formats.Rarity Percentage==> A percentage that determins the chance that the given variant will be selected. Must be a number, can contain decimals, cannot contain the percentage (%) symbol. SeeNotes on Rarity and Weighted Variantssection for more details.
- Each Variant collection can contain everything that makes up an individual Variant; it can contain objects, lights, meshes, planes, and every other object type.
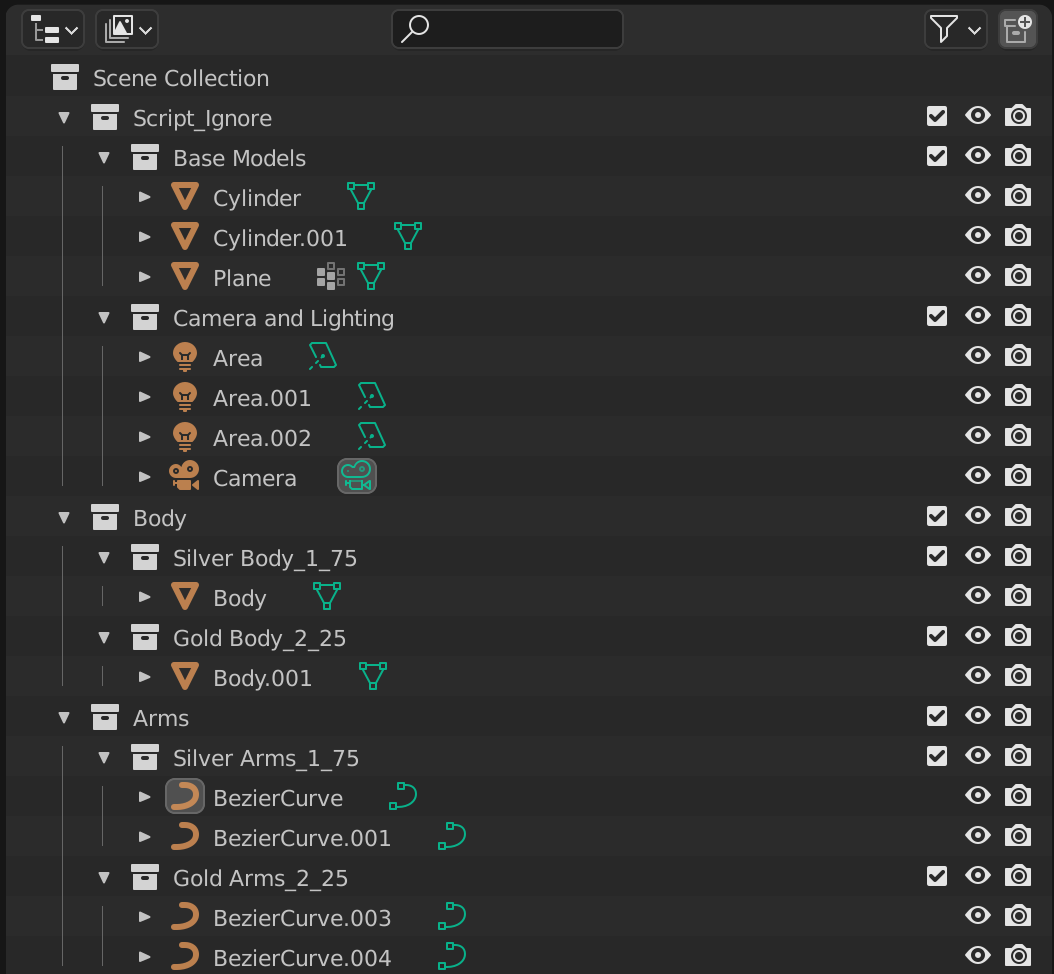
In this example, notice how the main components in Script_Ignore can be any type of object. The collections Body and Arms are both Attribute collections; Silver Body_1_75 and Gold Body_2_25 are Variants of the Body Attribute, and have a 75% and 25% generation chance. Silver Arms_1_75 and Gold Arms_2_25 are Variants of the Arm Attribute and have the same weighted distribution as the Body Variants. Notice how the Variant collections in the Arm Attribute can contain more than one object and object type, this principle can be applied to any Variant collections.
This repository contains three .blend example files that are compatable with Blend_My_NFTs: https://github.com/torrinworx/BMNFTs_Examples
After you have formatted and organized your NFT collection in Blender to the rules outlined above in Blender File Organization and Structure you can now go about generating your NFT collection. By the end of this process you will have a folder continaing the following:
- NFT media files; images, animations, or 3D models in any format that you specify.
- Json metadata files; one fore each NFT content filem, formatted to the blockchain standard that you set.
Before you get started, open the .blend of your NFT collection and open the side panel of the Layout tab so that Blend_My_NFTs is visible:
Each Step below is represented by one panel; everything you have to do for that one step, is in the corosponding panel in Blend_My_NFTs.
Blend_My_NFTs needs data to understand your .blend file, in this step you will create that data.
- Isolate or open the
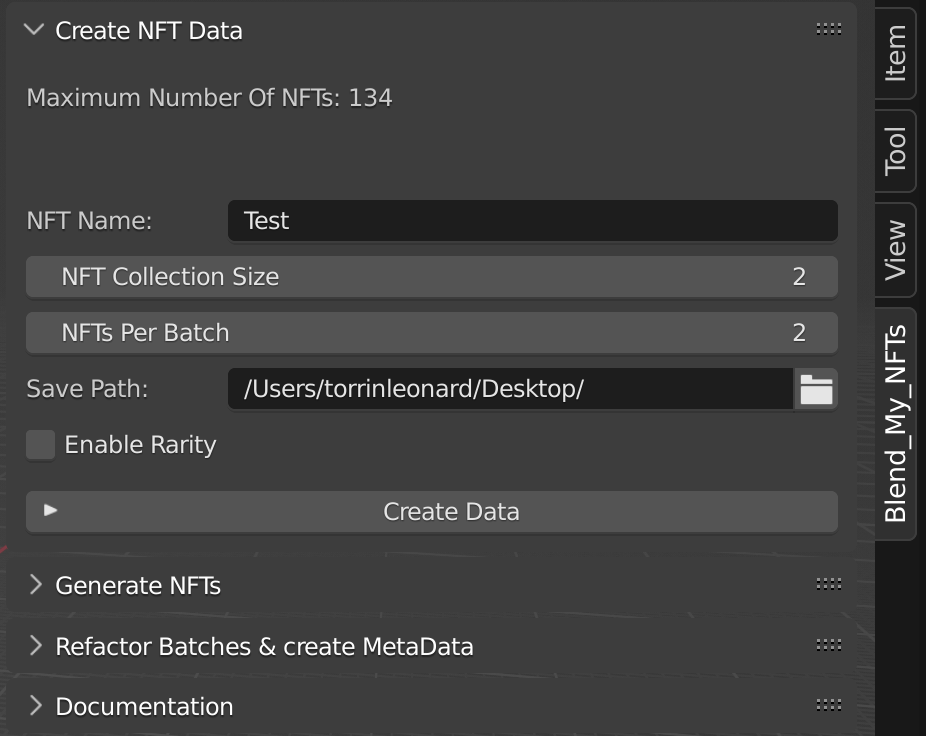
Create NFT Datapanel in Blend_My_NFTs:
- Set the name of your NFT collection in the
NFT Name:text field:
This name will be in the metadata and in the name of each NFT content file.
- Note -
Maximum Number Of NFTs: ###is the maximum number of NFTs your collection can contain with it's current number of Attirbutes and Variants.
- Note -
Recommended Limit: ##is the recommended number of NFTs Blend_My_NFTs is able to generate. Higher than this, e.i. closer toMaximum Number of NFTscan result it loss of NFT count and weighted Variants not appear as often as you expect them to. It is recommended that you keep yourNFT Collection Sizebelow this number.
- Set your NFT collection size with the
NFT Collection Sizefield:
Important: This number must be greater than 0 and less than Maximum Number Of NFTs shown at the top of the Create NFT Data panel.
- Set the NFTs per batch with the
NFTs Per Batchfield:
Important: This number must be greater than 0 and less than or equal to Maximum Number Of NFTs shown at the top of the Create NFT Data panel.
- Set the
Save Pathof yourBlend_My_NFTs Outputfolder by clicking on the file icon and navigating to a directory:
Then click the Accept button.
Desktop is recommended for easy access, but any directory will do.
- Enable or Disable Rarity and Weighted Variants with the checkbox
Enable Rarity. For more information on what affect this has on your NFT collection, see Blender File Organization and Structureand Notes on Rarity and Weighted Variants.
- Enable or Disable Logic with the checkbox
Enable Logic. For more information on what affect this has on your NFT collection, see Logic.
- If you enabled Logic, set the location of the Logic.json file you created in the
Logic Filefield. Click on the file icon and navigate to the location of the json file. To create a Logic.json file, see the Logic section.
- Lastly click the
Create Databutton:
After completeing the Create NFT Data step, you should have the following files and folders located at the Save Path set in step 6. above;
Blend_My_NFTs Outuputfolder. A directory that contains all output files from Blend_My_NFTs.NFT_Datafolder. This contains the followingNFTRecord.jsonandBatch#.jsonfiles.NFTRecord.jsonfile. A ledger that contains the NFT DNA of your collection.Batch_Datafolder. Contains allBatch#.json files.Batch#.jsonfiles. Smaller chuncks of theNFTRecord.jsonthat contain unique DNA.
Generated NFTsfolder. This directory will be empty, but is where your NFT content files will be exported to. once you've completed Step 2. Generate NFTs.
In this step, you will select the types of NFT content files you wish to generate, as well as the formats you want them in. You will then generate these files in batches, or all at once.
- Isolate or open the
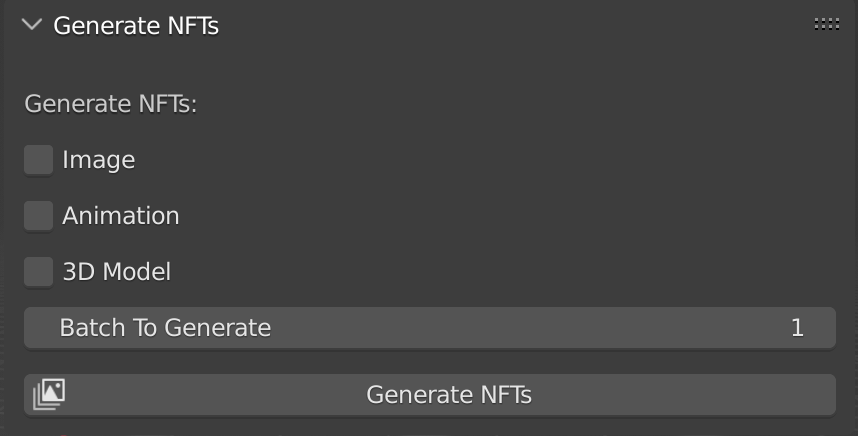
Generate NFTspanel in Blend_My_NFTs:
- Check the NFT content files you wish to generate (you can select more than one):
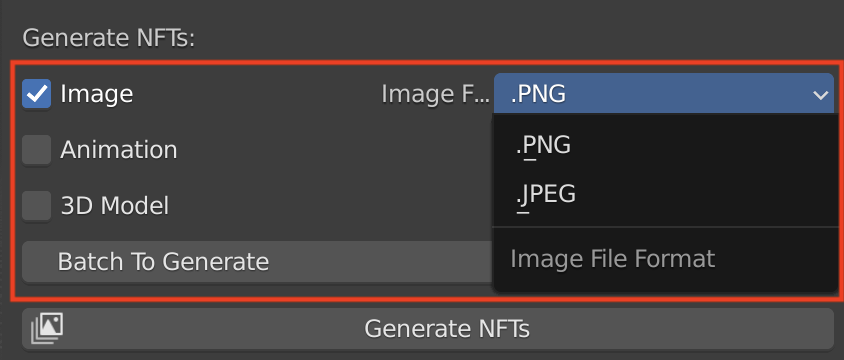
- If you check
Image, choose the file format you want the NFT content files to be exported as from theImage drop-down:
-
.png--> Exports image as .png -
.jpeg--> Exports image as .jpeg -
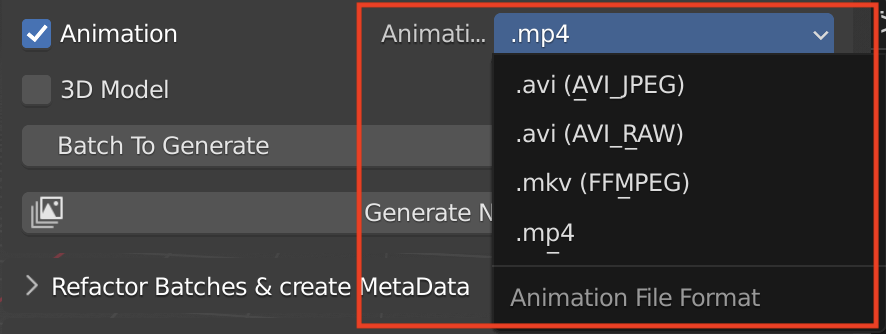
If you check
Animation, choose the file format you want the NFT content files to be exported as from theAnimation drop-down:
-
.avi (AVI_JPEG)--> Exports animations in AVI_JPEG encoding to .avi file format. See Blender API for more information. -
.avi (AVI_RAW)--> Exports animations in AVI_RAW encoding to .avi file format. See Blender API for more information. -
.mkv (FFMPEG)--> Exports animations in FFMPEG Blender default encoding and container to .mkv file format. See Blender API for more information. -
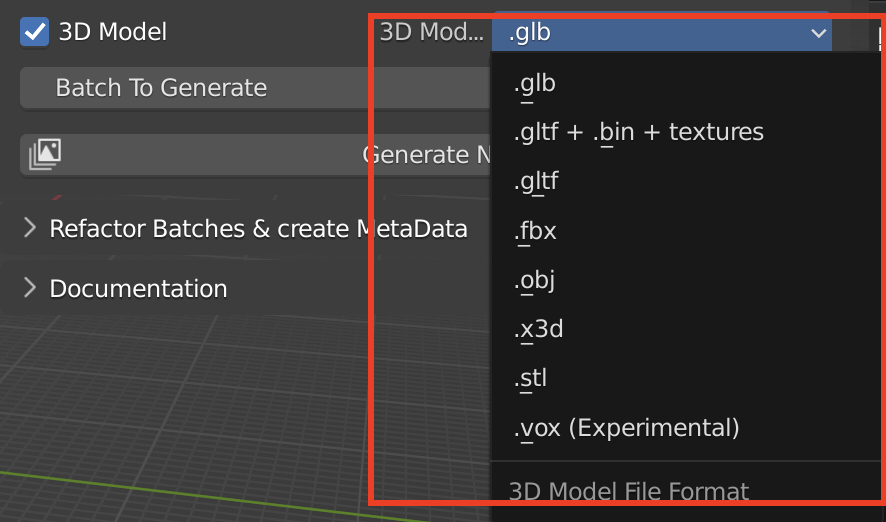
If you check
3D Model, choose the file format you want the NFT content files to be exported as from the3D Model drop-down:
.glb--> Exports .glb 3D models.gltf + .bin + textures--> Exports .gltf 3D models with seperated textures.gltf--> Exports .gltf 3D models with embeded textures.fbx--> Exports .fbx 3D models.obj--> Exports .obj 3D models.x3d--> Exports .x3d 3D models.stl--> Exports .stl 3D models.vox--> Exports .vox MagicVoxel 3D models. Experimental: This file format is still in development and might not work as intended. Important: You must install the voxwritter Blender add-on for this feature to work.
- Select number of the Batch you wish to generate in the
Batch to Generatefeild:
- Click the
Generate NFTsButton. This will generate the NFT content files from the Batch set in above step 3:
- To generate the rest of the Batches you have, repeat steps 3. to 4. and increment the
Batch To Generatenumber.
After completeing the Create NFT Data step, you should have the following files and folders located at the Save Path set in Step 1. Create NFT Data above;
Blend_My_NFTs Outuputfolder. A directory that contains all output files from Blend_My_NFTs.NFT_Datafolder. This contains the followingNFTRecord.jsonandBatch#.jsonfiles.NFTRecord.jsonfile. A ledger that contains the NFT DNA of your collection.Batch_Datafolder. Contains allBatch#.json files.Batch#.jsonfiles. Smaller chuncks of theNFTRecord.jsonthat contain unique DNA.
Generated NFTsfolder. This directory will be empty, but is where your NFT content files will be exported to. once you've completed Step 2. Generate NFTs.Batch#.jsonfolder. There should be one folder for each batch that you generated.Imagefolder. The folder where all the NFT Image content files are stored for a givenBatch#.json.Imagefiles. These images will contain have the name you specified in Step 1. Create Data, an incrementing number, and the file extension you specified above.
Animationfolder. The folder where all the NFT Animation content files are stored for a givenBtach#.json.Animationfiles. These animations will have the name you specified in Step 1. Create Data, an incrementing number, and the file extension you specified above.
3D Modelfolder. The folder where all the NFT 3D Model content files are stored.3D Modelfiles. These 3D models will have the name you specified in Step 1. Create Data, an incrementing number, and the file extension you specified above.
BMNFTs_metaDatafolder.Data_#.jsonfiles. These files are used by Blend_My_NFTs backend in Step 3. - Refactor Batches & Create MetaData. These can be ignored, unless you are customizing the metaData.py script.
In this step you will combine the batch files created in Step 2. - Generate NFTs into one cohesive folder that is ready to be uploaded to the blockchain of your choice. This step will also generate the metadata needed for smart contract minting sites.
This step is to be done after you have completely rendered and generated all of your NFT batches; once you complete this step, you cannot undo the changes.
- Isolate or open the
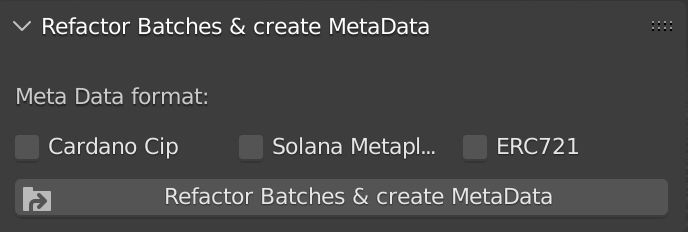
Refactor Batches & Create MetaDatapanel in Blend_My_NFTs:
- Check off the metadata templates you wish to generate (You can create more than one):
For more information on the metadata generated by Blend_My_NFTs and the standards that are followed see Notes on Meta Data and Standards.
- For each metadata template standard you can set a description, this will appear in the metadata json file of the given template.
-
If you want custom metadata fields, check the
Enable Custom Metadata Fieldscheckbox and setCustom Fields Fileto the Custom_Fields.json file you create in the Custom Metadata Fields section. -
Click the
Refactor Batches & Create MetaDatabutton:
- Confirm you wish to refactor your batches by clicking the
Refactor your Batches?button in the popup dialogue:
After completeing the Refactor Batches & Create MetaData step, you should have the following files and folders located at the Save Path set in Step 1. Create NFT Data above:
Blend_My_NFTs Outuputfolder. A directory that contains all output files from Blend_My_NFTs.-
NFT_Datafolder. This contains the followingNFTRecord.jsonandBatch#.jsonfiles.NFTRecord.jsonfile. A ledger that contains the NFT DNA of your collection.Batch_Datafolder. Contains allBatch#.json files.Batch#.jsonfiles. Smaller chuncks of theNFTRecord.jsonthat contain unique DNA.
-
Complete_Collectionfolder. A refactored version of theGenerated NFTsfolder, with all batches reordered and refactored and generated metadata templates.Imagefolder. The folder where all the NFT Image content files are stored.Imagefiles. These images will contain have the name you specified in Step 1. Create Data, an incrementing number, and the file extension you specified above.
Animationfolder. The folder where all the NFT Animation content files are stored.Animationfiles. These animations will have the name you specified in Step 1. Create Data, an incrementing number, and the file extension you specified above.
3D Modelfolder. The folder where all the NFT 3D Model content files are stored.3D Modelfiles. These 3D models will have the name you specified in Step 1. Create Data, an incrementing number, and the file extension you specified above.
BMNFTs_metaDatafolder.Data_#.jsonfiles. These files are used by Blend_My_NFTs backend in Step 3. - Refactor Batches & Create MetaData. These can be ignored, unless you are customizing the metaData.py script.
Cardano_metaDatafolder; will appear if specified in Step 2. above.Cardano_Data_#.jsonfiles. Will contain metadata template in Cardano CIP 25 format.
Solana_metaDatafolder; will appear if specified in step 2. above.Solana_Data_#.jsonfiles. Will contain metadata template in Solana Metaplex format.
ERC721_metaDatafolder; will appear if specified in Step 2. above.Erc721_Data_#.jsonfiles. Will contain metadata template in ERC721 format.
-
Congratulations!! You now have a complete 3D NFT collection that is ready to upload to the blockchain of your choice!
To enable the Material Randomizer check the Enable Materials check box in the Create NFT Data:
Materials are deterimened by a .json file that you manually create. For the purposes of this documentation, just think of JSON as a text file (.txt) that we can use to store information. You can name this file anything, but for this tutorial lets call it Logic.json.
If you need help creating a JSON file, checkout this tutorial: How to Create JSON File?
To learn more about JSON files and how to structure data read this article: Working with JSON
If you'd like, copy and paste this template into the JSON file you created above:
{
    "<Variant collection name>": {
        "Material List": {
            "<material name 1>": <material raraity percentage integer>,
            "<material naem 2>": <material raraity percentage integer>,
            "<material name 3>": <material raraity percentage integer>,
            "<material name 4>": <material raraity percentage integer>
        },
        "Variant Objects": [
            "<name of object within Variant collection 1>",
            "<name of object within Variant collection 2>",
            "<name of object within Variant collection 3>",
            "<name of object within Variant collection 4>"
        ]
    }
}
TODO: Add more detail to this section regarding the new material system, for now reference this commit: https://github.com/torrinworx/Blend_My_NFTs/commit/3cb2a69c81932e5b882b69c4c4bfbdd153a2dfee
Custom Metadata fields can be added to the ERC721, CIP 25 and Solana templates. In the Refactor Batches & Create Metadata panel check the Enable Custome Metadata Fields checkbox:
You can add and remove Custome Fields in this list using the two + and - buttons: ![]()
Each item in the list has two inputs; the Name and the Value. Each of these fields will be added to the Metadata Template you select when you refactor your batches.
Important: All Feild Names must be unique.
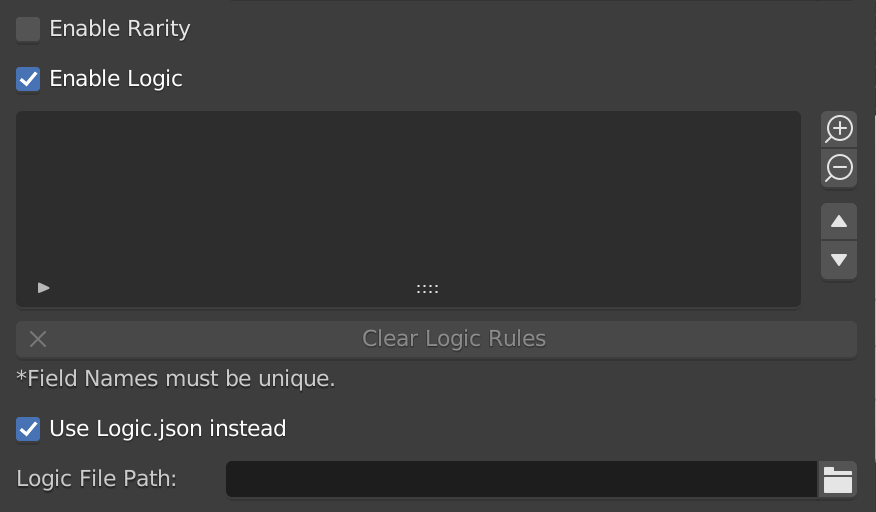
This section will go over the process of creating and using rules for your NFT collection, we will refer to this process as Logic. To enable Logic, check the Enable Logic checkbox in the Create NFT Data panel:
You can add and remove Rules in this list using the two + and - buttons: ![]()
Each item in the list will have two text fields labled Item List 1 and Item List 2 and a drop down menu where you can select the type of rule:
The best way to understand how Logic works is to think of it as a sentence, example: "Items List 1 Never goes With Items List 2" or "Items List 1 Only goes With Items List 2".
Both Item Lists can contain either multiple Variants or Attributes, however this is limited depending on the type of Rule that is selected (See Rule Types). All items in the Item Lists are seperated by a comma (,), NO SPACES!
It's reccomended if you have a large NFT collection to create a Logic.json file so that your Rules are stored safely. See Logic JSON Schema.
There are three rule types:
-
Never With--> If selected,Items List 1will never appear ifItems List 2are selected. For each NFT DNA that is generated, eitherItems List 1orItems List 2are randomly selected. That selectedItems Listis then acted upon depending on if the items in the list are Attributes or Variants:- If
Items Listcontains complete Attribute(s), those Attribute(s) will be set to Empty automatically. - If
Items Listcontains Variant(s), the other Variants in that Variants Attribute will be randomly or weightedly selected depending on if you haveEnable Rarityselected when you create NFT data.
- If
-
Only With--> If selected,Items List 1will only appear ifItems List 2are selected. IfItems List 1contains complete Attribute(s), those Attribute(s) will be set to Empty automatically. Meaning they will not appear if you export images, animations, or 3D models. -
Always With--> If selected,Items List 1will always appear ifItems List 2are selected.Items List 1CANNOT contain complete Attribute(s) and is limited to single Variants. The list can contain multiple Variants, however they must be from seperate Attributes.
Important: The more rules you add the higher the chance a rule conflict may arise, and you may see Attribute and Variant behaviour that you do not desire.
Logic can also be deterimened by a .json file that you manually create. For the purposes of this documentation, just think of JSON as a text file (.txt) that we can use to store information. You can name this file anything, but for this tutorial lets call it Logic.json.
If you need help creating a JSON file, checkout this tutorial: How to Create JSON File?
To learn more about JSON files and how to structure data read this article: Working with JSON If you'd like, copy and paste this template into the JSON file you created above:
{
    "Rule-1":{
        "IF": [
            "<Variant collection name>"
        ],
        "THEN":[
            "<Attribute or Variant collection name>", "<Attribute or Variant collection name 2>"
        ]
    }
    "Rule-2":{
            "IF": [
                "<Variant collection name>"
            ],
            "NOT":[
                "<Attribute or Variant collection name>", "<Attribute or Variant collection name 2>"
            ]
        }
}
Rule-#A dictionary representing the information of a single defined Rule of an NFT collection. There can be as many as you choose. Increment the#when you create a new rule.IFA single String in a list representing the Variant the rule is based off of.THENA list of Attributes or Variants that always appear IF theIFVariant is selected.NOTA list of Attributes or Variants that never appear IF theIFVariant is selected.
- Note:
NOTis not currently stable, it's recommended to only use a Single variant per NOT rule to see consistant results.
Say we have the following scene in a .blend file:
 Note that we have two Attributes,
 Cube and Sphere, and that they have 4 Variants. If you'd like to follow along with this example I'd recommend downloading the Logic_Example.blend.
- IF/THEN Rule setup
In this example, the Variant
Red Cube_1_25will always appear withRed Sphere_1_25:{ "Rule-1":{ "IF": [ "Red Cube_1_25" ], "THEN":[ "Red Sphere_1_25" ] } } - IF/NOT Rule setup
In this example, the Variant
Red Cube_1_25will never appear withRed Sphere_1_25:{ "Rule-1":{ "IF": [ "Red Cube_1_25" ], "NOT":[ "Red Sphere_1_25" ] } }
Now that you have a completed Logic.json file, you can now go back and complete Step 1. Create Data!
-
The most common issues people face are naming convention issues (See Blender File Organization and Structure). People often miss the naming convention on one or two collections and this typically throws up an error. The best way to resolve this is by reviewing the Blender File Organization and Structure standards and go through each collection in your Blender scene.
-
Remember that each Attribute and each Variant are represented by a
collectionif this is not the case yourMax Number of NFTswill be a negative number or 0. -
If you make ANY changes to your Blender scene, you need to re-Create NFT Data, otherwise Blend_My_NFTs wont be able to recognize the changes.
Rarity is a percentage value and accepts fractions like 0.001%, but they must be specified with decimals in the naming (fraction like 1/2 or 3/5 are not permitted in the naming structure). For ease of use the percentages should add up to 100%:
33% + 33% + 33% + 1% = 100%

Variant 1 = 33% chance
Variant 2 = 33% chance
Variant 3 = 33% chance
Variant 4 = 1% chance
If you have 20 variants with 50 set as the rarity percentage for each, Blend_My_NFTs will add up the percentages then treat the sum as 100%:
50% + 50% + 50% + 50% + 50%....
= 1,000%

Out of 100%:

(50/1,000)*100 = 5% chance of 1 variant
Rarity is dependent on both the number of NFTs you generate, as well as the maximum number of possible combinations of the Attributes and Variants in your .blend file.
This results in the following two scenarios, say, at a fixed number of 10,000 NFTs to generate;
-
Your .blend file has 1,000,000,000 possible combinations (trust me that's a small number, our collection for This Cozy Place has over 11 Trillion possible combinations). Generating 10,000 will be more representative of the rarity numbers you set as the script will simply have more combinations to choose from.
-
Your .blend file has 10,000 possible combinations. This means all possible combinations of your NFT will be generated, meaning that no rarity can be taken into account.
This happens for the following reasons:
-
The rarity is determined pseudo randomly, but is weighted based on each Variants rarity percentage.
-
The scripts generally prioritize the number of NFTs to generate (
maxNFTs) over rarity percentage
This behaviour is a fundamental mathematical result, not an issue with the code. I've researched various ways of creating and enforcing rarity, this is the only way I have found that works. If you have found a better method, feel free to make a pull request explaining it and I'd be happy to review and merge it to the main Github repo for BMNFTs.
- With Rarity percentage (50% 50% split)
  Hat <-- Attribute
  |-Green Hat_1_50
  |-Red Hat_2_50
- Since it's 50/50 it can also be expressed like this:
  Hat <-- Attribute
  |-Green Hat_1_0
  |-Red Hat_2_0
Leaving the rarity number as 0 will randomly select 1 of the variants you set in your .blend file. Note that this only works if every variant's rarity is set to 0. For an attribute its rarity or random, not both. You can have different attributes, where some are using rarity and others are randomly selected, but you cannot mix these with variants of one attribute.
  Hat <-- Attribute
  |-Green Hat_1_24.75
  |-Red Hat_2_24.75
  |-Blue Hat_2_24.75
  |-Orange Hat_2_24.57
  |-Purple Hat_2_0.5
  |-Yellow Hat_2_0.5
In the example above, Green, Red, Blue, and Orange hats all have an equal chance of getting selected. However Purple and Yellow hats will only appear on average 0.5% of the time. We recommend rounding to about 5 decimal places for simplicity, as numbers of more accuracy aren't really needed for NFT collections 10,000 or smaller.
The code that determines rarity can be found the Rarity_Sorter.py.
Mutliply the number of Variants in each Attribute by each other.
In the image above there are two Attributes; Body, and Arms. Each attribute has 2 Variants, so in order to find the Maximum Number of NFTs we do the following:
Number of Variants in Arm Attribute = 2
Number of Variants in Body Attribute = 2

(Number of Variants in Arm Attribute)*(Number of Variants in Body Attribute) = Maximum Number of NFTs

2*2 = 4

∴ The Maximum Number of NFTs is 4
The formula for this equation can be simplified to the following:
N 1 *N 2 *N 3 *... = Max NFTs
Blend_My_NFTs can export Cardano, Solana, and ERC721 formatted metadata templates. After running Refactor Batches & Create MetaData a template will be generated for each NFT you have created; These templates will include properly formated names for each Attribute and Variant that was selected to create that NFT.
Blend_My_NFTs can only provide this information in the templates, you will have to add Policy ID and URL when you upload and mint your NFT collection. For more information on how to do this see I have my NFTs, what next?
The list of meta data standard sources used to create the templates:
Cardano CIP25--> https://cips.cardano.org/cips/cip25/Solana Metaplex--> https://docs.metaplex.com/token-metadata/specificationERC721--> https://docs.opensea.io/docs/metadata-standards
The Blend_My_NFTs code implementation for the above standards can be found in main>metaData.py.
These meta data templates are based on the common standards for the given blockchain, you will have to modify and fill them in with a script of your own when you mint your NFT collection. These metadata templates are only provided for your convenience and are as accurate to the standards above that I could make them.
OpenSea and other NFT marketplaces and tools might require a specific naming convention for NFT media and metadata files. Blend_My_NFTs doesn't currently follow these file naming conventions, but this will be added in a future version. For now, the best no code workaround is to use a bulk file renamer suggested by itachimoonshot | Kaavan Labs in the This Cozy Studio Discord server:
Microsoft Power Toys - Power Rename
If you are working with Blender in an environment where you can't use the user interface to change settings within the addon, such as Google Colab, you can instead pass in a config file containing the settings from your local instance.
In order to generate this config file, you can use the Export BMNFT settings to a file button.
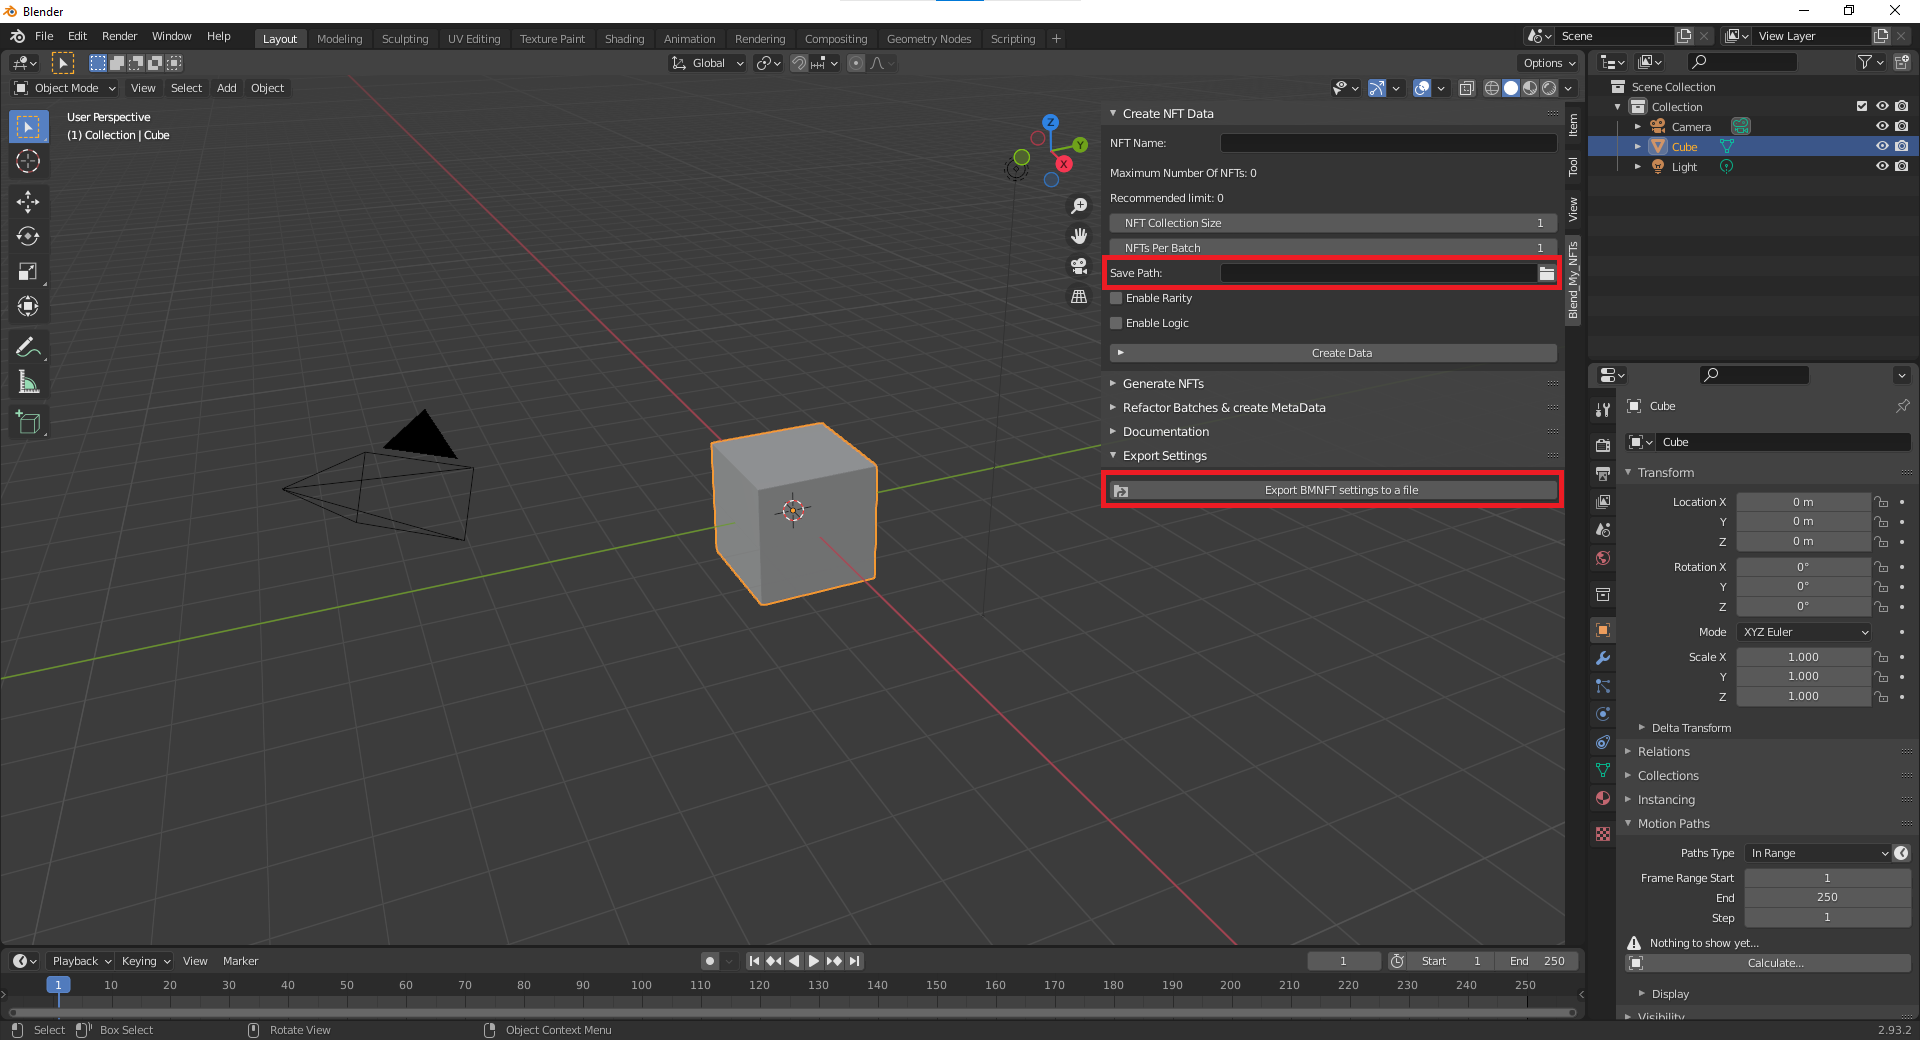 This file will be saved in the folder indicated by the
 Save Path field.
Once you have this config file, you can run this addon in Blender headlessly by running this command from the directory of your Blender installation:
On Windows
.\blender.exe --background <path to your .blend file> --python <path to Blend_My_NFTs __init__.py> -- --config-file <path to the generated config.cfg> --operation create-dna
On Linux
./blender --background <path to your .blend file> --python <Path to Blend_My_NFTs __init__.py> -- --config-file <path to the generated config.cfg> --operation create-dna
There are two mandatory arguments that you need to run this script from the terminal/command line:
-
Config file location
This argument tells Blend_My_NFTs where to find your
config.cfgfile in order to load your desired settings.--config-file -
Operation
This argument tells Blend_My_NFTs which operation you want to perform.
--operationwith one of the following three options afterwards:create-dna generate-nfts refactor-batches
There are also additional optional arguments that you can use:
-
Change Save Location
This argument takes priority over the save path indicated in
config.cfg.--save-path -
Change Batch Number
This argument takes priority over the batch number specified in
config.cfg.--batch-number -
Use Batch Data in a non standard location
Use batch data from a separate folder rather than the folder Blend My NFTs uses by default.
--batch-data
You can also view this information from your terminal/command line by running:
On Windows
.\blender.exe --background --python <path to Blend_My_NFTs __init__.py> -- --help
On Linux
./blender --background --python <Path to Blend_My_NFTs __init__.py> -- --help
It is important that you place the python arguments after the -- because of how blender parses arguments from the command line. More info about blender command line arguments can be found here.
More coming soon...


