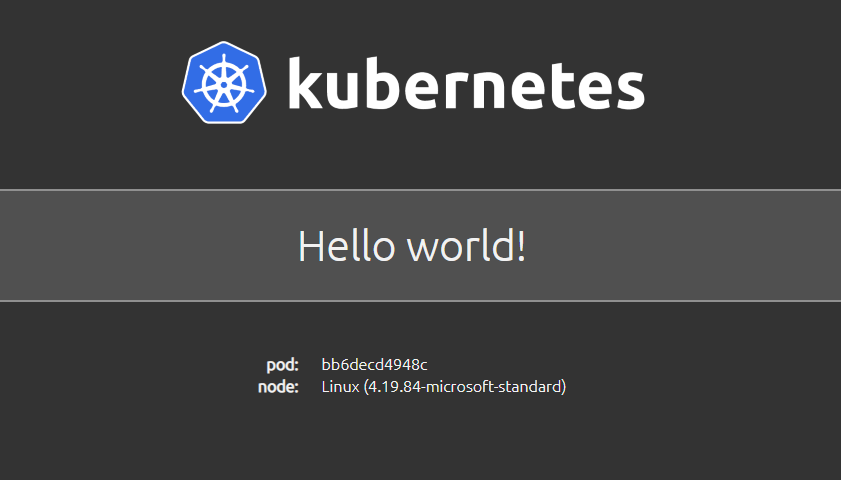
This container image can be deployed on a Kubernetes cluster. When accessed via a web browser on port 8080, it will display:
- a default Hello world! message
- the pod name
- node os information
The default "Hello world!" message displayed can be overridden using the MESSAGE environment variable. The default port of 8080 can be overriden using the PORT environment variable.
It is available on DockerHub as:
Deploy to your Kubernetes cluster using the hello-kubernetes.yaml, which contains definitions for the service and deployment objects:
# hello-kubernetes.yaml
apiVersion: v1
kind: Service
metadata:
  name: hello-kubernetes
spec:
  type: LoadBalancer
  ports:
  - port: 80
    targetPort: 8080
  selector:
    app: hello-kubernetes
---
apiVersion: apps/v1
kind: Deployment
metadata:
  name: hello-kubernetes
spec:
  replicas: 3
  selector:
    matchLabels:
      app: hello-kubernetes
  template:
    metadata:
      labels:
        app: hello-kubernetes
    spec:
      containers:
      - name: hello-kubernetes
        image: paulbouwer/hello-kubernetes:1.8
        ports:
        - containerPort: 8080
$ kubectl apply -f yaml/hello-kubernetes.yamlThis will display a Hello world! message when you hit the service endpoint in a browser. You can get the service endpoint ip address by executing the following command and grabbing the returned external ip address value:
$ kubectl get service hello-kubernetesYou can customise the message displayed by the hello-kubernetes container. Deploy using the hello-kubernetes.custom-message.yaml, which contains definitions for the service and deployment objects.
In the definition for the deployment, add an env variable with the name of MESSAGE. The value you provide will be displayed as the custom message.
# hello-kubernetes.custom-message.yaml
apiVersion: v1
kind: Service
metadata:
  name: hello-kubernetes-custom
spec:
  type: LoadBalancer
  ports:
  - port: 80
    targetPort: 8080
  selector:
    app: hello-kubernetes-custom
---
apiVersion: apps/v1
kind: Deployment
metadata:
  name: hello-kubernetes-custom
spec:
  replicas: 3
  selector:
    matchLabels:
      app: hello-kubernetes-custom
  template:
    metadata:
      labels:
        app: hello-kubernetes-custom
    spec:
      containers:
      - name: hello-kubernetes
        image: paulbouwer/hello-kubernetes:1.8
        ports:
        - containerPort: 8080
        env:
        - name: MESSAGE
          value: I just deployed this on Kubernetes!
$ kubectl apply -f yaml/hello-kubernetes.custom-message.yamlBy default, the hello-kubernetes app listens on port 8080. If you have a requirement for the app to listen on another port, you can specify the port via an env variable with the name of PORT. Remember to also update the containers.ports.containerPort value to match.
Here is an example:
apiVersion: apps/v1
kind: Deployment
metadata:
  name: hello-kubernetes-custom
spec:
  replicas: 3
  selector:
    matchLabels:
      app: hello-kubernetes-custom
  template:
    metadata:
      labels:
        app: hello-kubernetes-custom
    spec:
      containers:
      - name: hello-kubernetes
        image: paulbouwer/hello-kubernetes:1.8
        ports:
        - containerPort: 80
        env:
        - name: PORT
value: "80"If you'd like to build the image yourself, then you can do so as follows. The build-arg parameters provides metadata as defined in OCI image spec annotations.
Bash
$ docker build --no-cache --build-arg IMAGE_VERSION="1.8" --build-arg IMAGE_CREATE_DATE="`date -u +"%Y-%m-%dT%H:%M:%SZ"`" --build-arg IMAGE_SOURCE_REVISION="`git rev-parse HEAD`" -f Dockerfile -t "hello-kubernetes:1.8" appPowershell
PS> docker build --no-cache --build-arg IMAGE_VERSION="1.8" --build-arg IMAGE_CREATE_DATE="$(Get-Date((Get-Date).ToUniversalTime()) -UFormat '%Y-%m-%dT%H:%M:%SZ')" --build-arg IMAGE_SOURCE_REVISION="$(git rev-parse HEAD)" -f Dockerfile -t "hello-kubernetes:1.8" appIf you have VS Code and the Visual Studio Code Remote - Containers extension installed, the .devcontainer folder will be used to build a container based node.js 13 development environment.
Port 8080 has been configured to be forwarded to your host. If you run npm start in the app folder in the VS Code Remote Containers terminal, you will be able to access the website on http://localhost:8080. You can change the port in the .devcontainer\devcontainer.json file under the appPort key.
See here for more details on working with this setup.
