


This is an Introductory Tutorial to FIWARE Kurento - a media server generic enabler used for the analysis and enhancement of video streams via WebRTC. The tutorial discusses the architecture of stream orientated systems, and demonstrates the key concepts behind the use of video streams, by discussing code written in Node.js. Alternative code examples,written in Java and client-side JavaScript are also available.
The tutorial introduces a series of exercises which can be run directly from within a Docker container, no HTTP calls are required.
- このチュートリアルは日本語でもご覧いただけます。
Details
"Thank You Mario, But Our Princess is in Another Castle."
— Toad (Super Mario Bros.)
WebRTC is a set of protocols enabling direct peer-to-peer Real-Time Communications (RTC) between browsers or mobile applications.- this would allow a user to make a direct video call to a person in another remote location. However the type of applications which can be created using direct one-to-one communication are limited, and the scope of WebRTC can be enhanced by introducing an intelligent middleware application between the two clients.
The FIWARE Kurento generic enabler is a WebRTC Media Server. Each client makes a direct connection to the server, and the server intercepts the stream of data and passes the communication on to another client or clients. This model enables additional features such as group communication and broadcasting, but also means that is possible to process and interpret the media stream as it is received enabling object detection - and hence an ability to raise context events - as well as transcoding, recording or mixing.
The goal of this tutorial is to provide you with a simple getting started guide on how to install and use the Kurento Media Server. For this purpose a simple Node.js Express application will be discussed. The emphasis will be on how to integrate Kurento as a generic enabler within the FIWARE system and alter context.
The intention here is not to teach users how manipulate media streams using Node.js - an alternative such as Java could equally have been chosen. It is merely to show how a sample programming language could be used analyze and alter a media stream to potentially raise events and alter the context of a product "powered by FIWARE".
All the code for the demo can be found within the nodejs folder within the
kurento-examples directory.
Alternative client-side-javascript and java examples are also available. Obviously, your choice of programming
language will depend upon your own business needs - when reading the code below please keep this in mind and substitute
Node.js with your own programming language as appropriate.
Additional non-context related Kurento examples exist, which are beyond the scope of this tutorial. For more information, please refer to the official Kurento Tutorial Documentation. The Kurento Media Server is a stand-alone product and can also be used outside of the FIWARE ecosystem as a generic media server.
To keep things simple both components will be run using Docker. Docker is a container technology which allows to different components isolated into their respective environments.
- To install Docker on Windows follow the instructions here
- To install Docker on Mac follow the instructions here
- To install Docker on Linux follow the instructions here
Docker Compose is a tool for defining and running multi-container Docker applications. A YAML file is used configure the required services for the application. This means all container services can be brought up in a single command. Docker Compose is installed by default as part of Docker for Windows and Docker for Mac, however Linux users will need to follow the instructions found here
We will start up our services using a simple bash script. Windows users should download cygwin to provide a command-line functionality similar to a Linux distribution on Windows.
To start the installation, do the following:
git clone https://github.com/FIWARE/tutorials.Media-Streams.git
cd tutorials.Media-Streams
git checkout NGSI-v2
git submodule update --init --recursive

./services create
Note The initial creation of Docker images can take up to three minutes
Thereafter, all services can be initialized from the command-line by running the services Bash script provided within the repository:
./services <command>Where <command> will vary depending upon the exercise we wish to activate.
ℹ️ Note: If you want to clean up and start over again you can do so with the following command:
./services stop
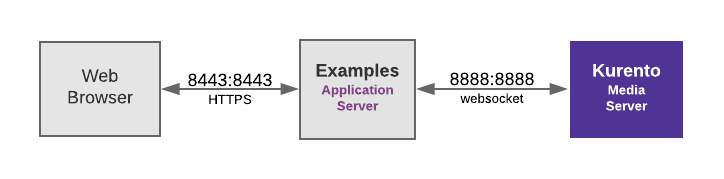
This application will only make use of one FIWARE component - the Kurento Media Server). Usage of the Media server alone is insufficient for an application to qualify as “Powered by FIWARE”.
The overall architecture will consist of the following elements:
-
One FIWARE Generic Enabler:
-
One Application Server (Examples) which:
- Displays a web-page, allowing a user to switch on their camera and interact.
- Sends a WebRTC media stream and displays results (either received processed video or detected events )
Since all interactions between the elements are initiated by HTTP requests, the entities can be containerized and run from exposed ports.
The specific architecture of each section of the tutorial is discussed below.
kurento:
    image: fiware/stream-oriented-kurento
    hostname: kurento
    container_name: fiware-kurento
    expose:
        - "8888"
    ports:
        - 8888:8888
    networks:
        - default
The kurento container is listening on a single port:
- Port
8888is exposed for Websocket communications - and also so that we can check the connection
kurento-examples:
    image: fiware/kurento-examples
    container_name: examples-kurento
    depends_on:
        - kurento
    build:
        context: ../kurento-examples
        dockerfile: Dockerfile
    ports:
        - 8443:8443
    networks:
        - default
    environment:
        - "MEDIA_SERVER_HOST=kurento"
        - "MEDIA_SERVER_PORT=8888"
        - "APP_SERVER_HOST=kurento-examples"
        - "APP_SERVER_PORT=8443"
        - "TUTORIAL_NAME=${TUTORIAL_NAME}"
The kurento-examples container is a web app server listening on a single port:
- Port
8443is exposed for HTTPS traffic so we can display the web page
The kurento-examples container is driven by environment variables as shown:
| Key | Value | Description |
|---|---|---|
| MEDIA_SERVER_HOST | kurento |
Hostname of the Media Server receives the media stream |
| MEDIA_SERVER_PORT | 8888 |
Port used by the Media Server used websocket traffic |
| APP_SERVER_HOST | kurento-examples |
Hostname of the App Server to display the web page (and receive event callbacks) |
| APP_SERVER_PORT | 8443 |
Port used by the App Server |
| TUTORIAL_NAME | none | The name of the example to run |
Before describing a proper context-related example, we will first examine a minimal set-up "Hello World" example to check that we are able to connect to the Kurento Media Server and send and receive a video stream. This is a very simple WebRTC application implementing a WebRTC loopback. A media stream is generated from a web-cam. It is displayed on the browser but also sent to the Kurento Media server where it is redirected un-altered back to the client application.

The net result is that two identical video elements are displayed on the same screen (with a minimal lag between them). This is not a useful application in itself, but will demonstrate that the media server can be accessed and is capable of streaming video.
To start the system with the simplest integration of Kurento, run the following command:
./services hello-worldYou can check if the Kurento Media Server is running by making an HTTP request to the exposed port 8888
curl -iX GET \
  http://localhost:8888
The expected response is :
HTTP/1.1 426 Upgrade Required
Server: WebSocket++/0.7.0
The response code 426 indicates that the Kurento Media Server is responding on the given port, but will not
respond successfully to HTTP requests. The Media Server will only respond successfully to WebSocket traffic.
What if I get a
Failed to connect to localhost port 8888: Connection refusedResponse?If you get a
Connection refusedresponse, the Media Server cannot be found where expected for this tutorial - you will need to substitute the URL and port in each cUrl command with the corrected IP address. All the cUrl commands tutorial assume that the Media Server is available onlocalhost:8888.Try the following remedies:
- To check that the docker containers are running try the following:
docker psYou should see two containers running. If the Media Server is not running, you can restart the containers as necessary. This command will also display open port information.
To run the example, open a WebRTC compatible browser at https://localhost:8443 and accept HTTPS traffic to open the
page. The application consists of a single HTML web page containing two HTML5 <video> tags: one showing the local
stream (as captured by the local webcam) and the other showing the remote stream sent by the media server back to the
client. Click on the start button and the same video will be displayed in both <video> elements.
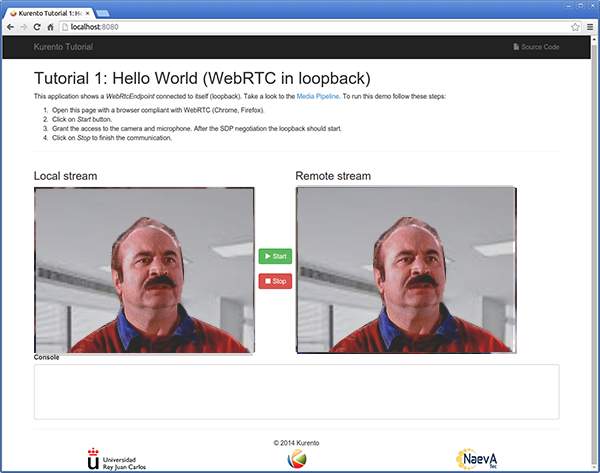
Click on the image above to watch a demo of the hello world example.
You can check that the remote stream has been re-directed by bringing down the Media Server:
docker stop fiware-kurentoThe image on the right will then freeze.
You can restart the Kurento Media Server by running:
docker start fiware-kurentoThe code under discussion can be found within the kurento-hello-world directory within the Git Repository The main
script of this demo is called server.js. For simplicity, all URLs have been hard-coded and error handling has been
removed from the code snippets under discussion to make them easier to read.
Dynamic communication between the frontend rendered web page and the backend application server occurs using WebSockets. The code handling the connection at the server can be seen below:
var ws = require("ws");

var wss = new ws.Server({
    server: server,
    path: "/helloworld",
});

wss.on("connection", function (ws) {
    var sessionId = null;
    var request = ws.upgradeReq;
    var response = {
        writeHead: {},
    };

    sessionHandler(request, response, function (err) {
        sessionId = request.session.id;
    });

    ws.on("error", (error) => {
        stop(sessionId);
    });

    ws.on("close", () => {
        stop(sessionId);
    });

    ws.on("message", (_message) => {
        var message = JSON.parse(_message);

        switch (message.id) {
            case "start":
                sessionId = request.session.id;
                start(sessionId, ws, message.sdpOffer, function (error, sdpAnswer) {
                    ws.send(
                        JSON.stringify({
                            id: "startResponse",
                            sdpAnswer: sdpAnswer,
                        })
                    );
                });
                break;

            case "stop":
                stop(sessionId);
                break;

            case "onIceCandidate":
                onIceCandidate(sessionId, message.candidate);
                break;
        }
    });
});
After the initial connection wss.on('connection', ...), there are several message types to handle, the main two
message types to handle are start which then makes a connection to the Kurento Media Server (see start()
function below) and onIceCandidate (see onIceCandidate() function below). Stopping, closing the connection and error
handling are handled in a standard manner and are not discussed here.
Kurento offers a well-defined WebSocket API - To
establish a WebSocket connection, the client needs to send a WebSocket handshake request to the /kurento endpoint, and
the media server will return a WebSocket handshake response.
Programmatically, we need create an instance of the KurentoClient in the application server. This is created using the
Environment Variables values specified. For example, if the Kurento is hosted at kurento-server and listening on port
8888.
const kurento = require("kurento-client");

function getKurentoClient(callback) {
    if (kurentoClient !== null) {
        return callback(null, kurentoClient);
    }

    kurento("ws://kurento-server:8888/kurento", (error, _kurentoClient) => {
        kurentoClient = _kurentoClient;
        callback(null, kurentoClient);
    });
}
The KurentoClient provides a simplified
interface for manipulating Media Elements
and Media Pipelines - a Node.js npm library and Java jar file are available.
To operate on the incoming video we will need to create a media pipeline - this is a processing widget where the source generated by one element is used at the input for another. Pipeline elements can be chained together and therefore represent a series of operations on the media stream.
In the Hello World example we will need a single WebRtcEndpoint that connects back to itself (i.e. in loopback)
These functions are called in the start() function, which is fired when the start message is received:
function start(sessionId, ws, sdpOffer, callback) {
    getKurentoClient((error, kurentoClient) => {
        // Create a Media Pipeline
        kurentoClient.create("MediaPipeline", (error, pipeline) => {
            createMediaElements(pipeline, ws, (error, webRtcEndpoint) => {
                if (candidatesQueue[sessionId]) {
                    while (candidatesQueue[sessionId].length) {
                        const candidate = candidatesQueue[sessionId].shift();
                        webRtcEndpoint.addIceCandidate(candidate);
                    }
                }
                // Connect it back on itself (i.e. in loopback)
                connectMediaElements(webRtcEndpoint, (error) => {
                    webRtcEndpoint.on("OnIceCandidate", function (event) {
                        const candidate = kurento.getComplexType("IceCandidate")(event.candidate);
                        ws.send(
                            JSON.stringify({
                                id: "iceCandidate",
                                candidate: candidate,
                            })
                        );
                    });

                    webRtcEndpoint.processOffer(sdpOffer, (error, sdpAnswer) => {
                        sessions[sessionId] = {
                            pipeline: pipeline,
                            webRtcEndpoint: webRtcEndpoint,
                        };
                        return callback(null, sdpAnswer);
                    });

                    webRtcEndpoint.gatherCandidates((error) => {
                        if (error) {
                            return callback(error);
                        }
                    });
                });
            });
        });
    });
}
Where createMediaElements() and connectMediaElements() are the following callback functions:
function createMediaElements(pipeline, ws, callback) {
    pipeline.create("WebRtcEndpoint", (error, webRtcEndpoint) => {
        if (error) {
            return callback(error);
        }
        return callback(null, webRtcEndpoint);
    });
}
function connectMediaElements(webRtcEndpoint, callback) {
webRtcEndpoint.connect(webRtcEndpoint, (error) => {
if (error) {
return callback(error);
}
return callback(null);
});
}The connection between media elements is negotiated by exchanging ICE candidates between the WebRTC peers - this can be achieved using the following boilerplate to use and store candidates:
let candidatesQueue = {};

[...]

function onIceCandidate(sessionId, _candidate) {
    let candidate = kurento.getComplexType('IceCandidate')(_candidate);

    if (sessions[sessionId]) {
        let webRtcEndpoint = sessions[sessionId].webRtcEndpoint;
        webRtcEndpoint.addIceCandidate(candidate);
    }
    else {
        if (!candidatesQueue[sessionId]) {
            candidatesQueue[sessionId] = [];
        }
        candidatesQueue[sessionId].push(candidate);
    }
}The connection and rendering of the video streams on the rendered web page is achieved using the JavaScript
WebSocket API helped along with a client-side
JavaScript library - kurento-utils.js used to simplify the WebRTC interaction with the application server. The
complete JavaScript can be found in static/js/index.js.
var ws = new WebSocket("wss://" + location.host + "/helloworld");
var videoInput = document.getElementById("videoInput");
var videoOutput = document.getElementById("videoOutput");
var webRtcPeer = null;
function start() {
var options = {
localVideo: videoInput,
remoteVideo: videoOutput,
onicecandidate: onIceCandidate,
};
webRtcPeer = kurentoUtils.WebRtcPeer.WebRtcPeerSendrecv(options, function (error) {
if (error) return onError(error);
this.generateOffer(onOffer);
});
}
function onIceCandidate(candidate) {
sendMessage({
id: "onIceCandidate",
candidate: candidate,
});
}
function onOffer(error, offerSdp) {
sendMessage({
id: "start",
sdpOffer: offerSdp,
});
}Whenever a WebSocket message is received, either starting communication, changing ICE candidates or an error condition, an appropriate action is taken.
ws.onmessage = function (message) {
    var parsedMessage = JSON.parse(message.data);

    switch (parsedMessage.id) {
        case "startResponse":
            webRtcPeer.processAnswer(message.sdpAnswer);
            break;
        case "iceCandidate":
            webRtcPeer.addIceCandidate(parsedMessage.candidate);
            break;
        case "error":
            // Error Handling
            break;
    }
};
A fuller description of the code can be found within the Kurento documentation.
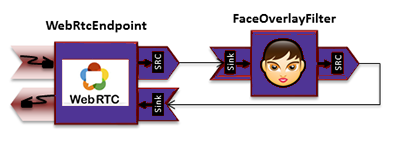
In order to alter context, we will need to be able to process the media stream. This second example builds on the previous WebRTC loopback video communication but also analyzes and alters the media stream by detecting faces and placing a hat over detected faces. This is an example of a Computer Vision and Augmented Reality filter.
To start the system with an example of Kurento altering a media stream, run the following command:
./services magic-mirrorTo run the example, open a WebRTC compatible browser at https://localhost:8443 and accept HTTPS traffic to open the
page. The application consists of a single HTML web page containing two HTML5 <video> tags: one showing the local
stream (as captured by the local webcam) and the other showing the remote stream sent by the media server back to the
client. Click on the start button and the modified video will be displayed in on the right.
[
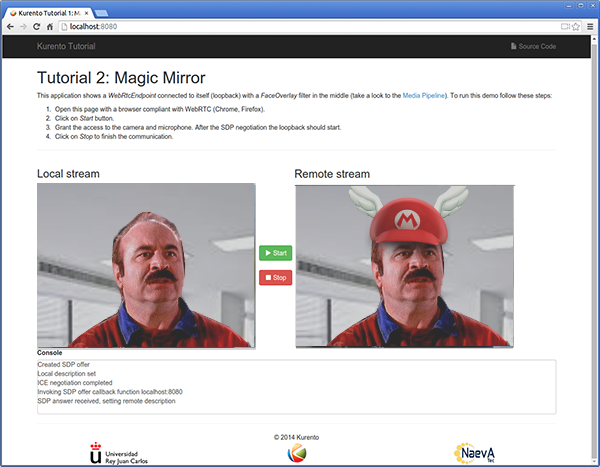
Click on the link to watch a demo of the magic mirror
The code under discussion can be found within the kurento-magic-mirror directory within the Git Repository. This
example builds on the previous hello world example, and much of the common boilerplate plumbing - making the WebSocket
connections between the web page and the Application Server, and the connections between the Application Server and the
Kurento Media Server remains the same. Please refer to the sections above to refresh your understanding:
- Backend - WebSocket Connection
- Backend - Connecting to Kurento
- Frontend - JavaScript on the rendered page
The main difference compared to the previous example, is that we are going to add a filter to alter the video output
prior to sending it to the web page. The kms-filters module is loaded by default as part of the Kurento Media
Server - it contains the following built-in
filters:
- The
ZBarFilterfilter detects QR and bar codes in a video stream. When a code is found, the filter raises aCodeFoundEvent - The
FaceOverlayFilterfilter detects faces in a video stream and overlaid it with a configurable image. - The
GStreamerFilteris a generic filter interface that enables the use of GStreamer filters in Kurento Media Pipelines.
The built-in filters (such as FaceOverlayFilter) can be created using the pipeline.create() function. We therefore
need to extend the createMediaElements() and connectMediaElements() functions as shown below:
function createMediaElements(pipeline, ws, callback) {
    pipeline.create("WebRtcEndpoint", (error, webRtcEndpoint) => {
        if (error) {
            return callback(error);
        }
        // Once the WebRtcEndpoint is created create a FaceOverlayFilter
        pipeline.create("FaceOverlayFilter", (error, faceOverlayFilter) => {
            if (error) {
                return callback(error);
            }
            // This adds the Mario hat
            faceOverlayFilter.setOverlayedImage(
                url.format(asUrl) + "img/mario-wings.png",
                -0.35,
                -1.2,
                1.6,
                1.6,
                function (error) {
                    if (error) {
                        return callback(error);
                    }
                    return callback(null, webRtcEndpoint, faceOverlayFilter);
                }
            );
        });
    });
}
function connectMediaElements(webRtcEndpoint, faceOverlayFilter, callback) {
webRtcEndpoint.connect(faceOverlayFilter, (error) => {
if (error) {
return callback(error);
}
faceOverlayFilter.connect(webRtcEndpoint, (error) => {
if (error) {
return callback(error);
}
return callback(null);
});
});
}The functions called in the start() function remain the same - the media streams are connected and now passed through
a pipeline before being retuned to the web page. The result is that the video stream is now intercepted and altered as
demonstrated.
A media stream can also be analyzed and used to raise context-related events. The final example of this tutorial adds a vehicle number plate detector filter element to the WebRTC video communication
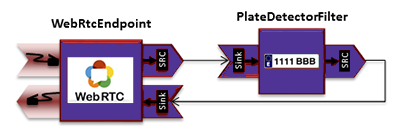
The events raised could be associated to context entities, and therefore be suitable for integration within the FIWARE
ecosystem. For example if Kurento was attached to a security camera, code you be added to send a PATCH request to
the Orion Context Broker to update the context of entity Camera X to show that a vehicle registration plate
XXX-xxx-XXX was detected at time yyy-yyy-yyy.
To start the system with an example of Kurento raising events, run the following command:
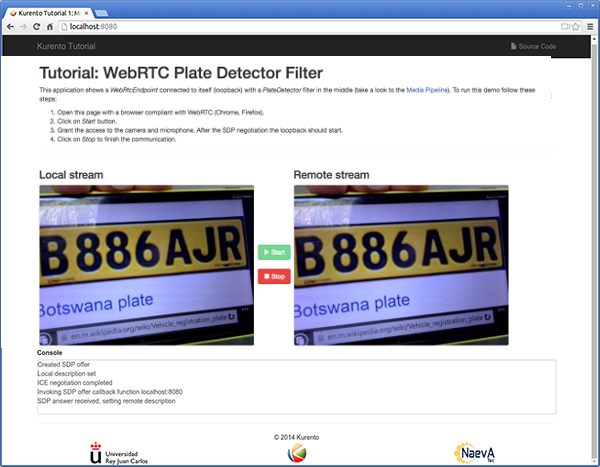
./services plate-detectionTo run the example, open a WebRTC compatible browser at https://localhost:8443 and accept HTTPS traffic to open the
page. The application consists of a single HTML web page containing two HTML5 <video> tags: one showing the local
stream (as captured by the local webcam) and the other showing the remote stream sent by the media server back to the
client. Click on the start button and the same video will be displayed in both <video> elements.
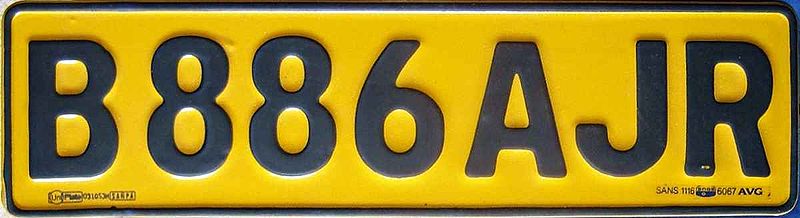
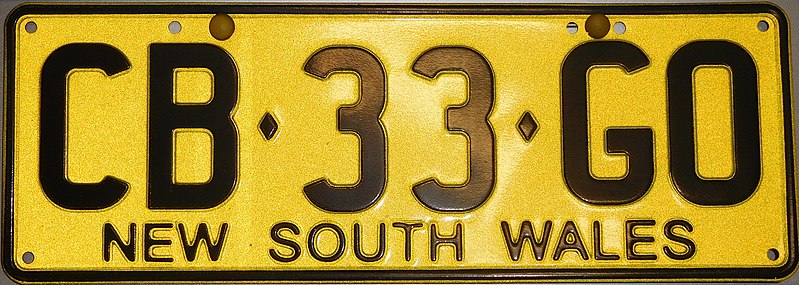
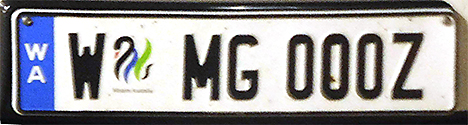
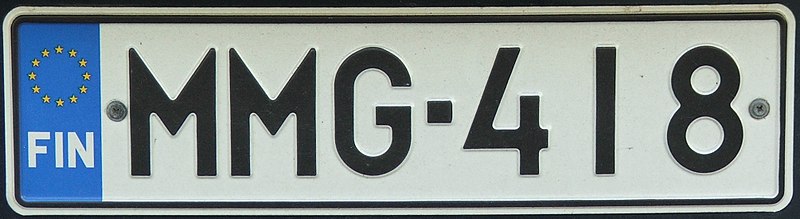
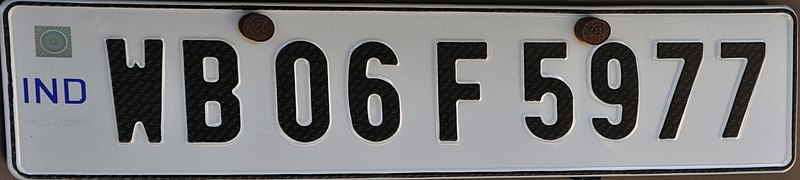
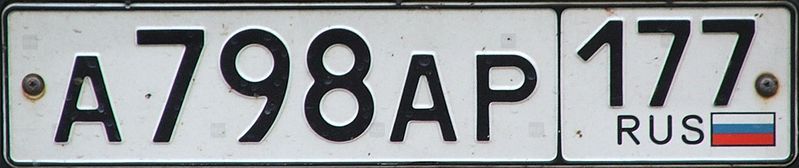
Select the image of a Vehicle registration plate from the list below and display it on your phone and see if the plate is detected
Further Vehicle Registration Plate images are available on Wikipedia
For example with the vehicle registration plate displayed in the screenshot above, the following output is obtained.
License plate detected --8886AJR
The reliability of detection will depend on the camera and filter used.
The code under discussion can be found within the kurento-platedetector directory within the Git Repository
Once again, the boilerplate plumbing very similar to the previous examples - the code making the WebSocket connections between the web page and the Application Server, and the connections between the Application Server and the Kurento Media Server are unaltered. Please refer to the sections above to refresh your understanding
- Backend - WebSocket Connection
- Backend - Connecting to Kurento
- Frontend - JavaScript on the rendered page
Beyond the basic kms-filters filters provided, you will need to
write you own custom code to process video
(and detect events). These custom filters are
modules which are typically installed when
setting up the media server.
Rather than writing our own custom module from scratch (which is beyond the scope of this tutorial), we will use on of the four freely-distributable, custom modules already created by the Kurento development team:
kms-pointerdetector: Filter that detects pointers in video streams, based on color tracking.kms-chroma: Filter that takes a color range in the top layer and makes it transparent, revealing another image behind.kms-crowddetector: Filter that detects people agglomeration in video streams.kms-platedetector: Prototype Filter that detects vehicle plates in video streams - Not for production use.
To install the modules, we must extend the default fiware/stream-oriented-kurento Docker image by using a custom
Dockerfile, which installs
the modules as shown:
apt-get -y install kms-pointerdetector-6.0 \
&& apt-get -y install kms-crowddetector-6.0 \
&& apt-get -y install kms-platedetector-6.0 \
&& apt-get -y install kms-chroma-6.0 \
For the example, we only need to register the kurento-module-platedetector module to make the filter available:
const kurento = require("kurento-client");
kurento.register("kurento-module-platedetector");
The platedetector.PlateDetectorFilter can be then be created using the pipeline.create() function. Extending the
createMediaElements() and connectMediaElements() functions as shown below to add the filter to the Media pipeline:
function createMediaElements(pipeline, ws, callback) {
    pipeline.create("WebRtcEndpoint", (error, webRtcEndpoint) => {
        if (error) {
            return callback(error);
        }

        pipeline.create("platedetector.PlateDetectorFilter", (error, filter) => {
            if (error) {
                return callback(error);
            }

            return callback(null, webRtcEndpoint, filter);
        });
    });
}
function connectMediaElements(webRtcEndpoint, filter, callback) {
webRtcEndpoint.connect(filter, (error) => {
if (error) {
return callback(error);
}
filter.connect(webRtcEndpoint, (error) => {
if (error) {
return callback(error);
}
return callback(null);
});
});
}In addition to the standard boilerplate from the previous examples, an extra clause is added to the WebSocket processing
to handle the plateDectected event which is raised by the platedetector.PlateDetectorFilter :
ws.onmessage = function(message) {
	var parsedMessage = JSON.parse(message.data);
	console.info('Received message: ' + message.data);

	switch (parsedMessage.id) {
...etc
	case 'plateDetected':
		plateDetected(parsedMessage);
		break;
	}
function plateDetected(message) {
console.log("License plate detected " + message.data.plate);
}The result is that the details of the vehicle registration plate is now displayed on screen.
Want to learn how to add more complexity to your FIWARE application by adding advanced features? You can find out by reading the other tutorials in this series
For more ideas about the capabilities of the Kurento Media Server, please read the official Kurento Tutorial Documentation.
MIT © 2018-2020 FIWARE Foundation e.V.
The Program includes additional submodules which were obtained under license:
- kurento-example/Node.js - © Kurento Apache 2.0 license
- kurento-example/java - © Kurento Apache 2.0 license
- kurento-example/client-side-javascript - © Kurento Apache 2.0 license
The vehicle registration plate images are public domain or have been obtained from Wikipedia Commons under license:
- Argentina © Quilmeño89 Creative Commons Attribution-Share Alike 4.0 International
- Australia © EurovisionNim Creative Commons Attribution-Share Alike 4.0 International
- Finland © Krokodyl Creative Commons Attribution 2.5 Generic
- India © Biswaruo Ganguly Creative Commons Attribution 3.0 Unported
- Russia © Krokodyl Creative Commons Attribution 2.5 Generic
- Sweden © Lalpino Creative Commons Attribution-Share Alike 4.0 International