This artifact lays out the source code and experiment setup for the ACM ASPLOS 2022 conference paper: "Serverless Computing on Heterogeneous Computers".
Disclaimer: It is not supposed to be used for production environment!
Updates (2021-12-13) :
- Add baseline test in 3-(3) which generates data for Fig-12 in the paper.
Updates (2021-12-12) :
- Refine functionBench test script to avoid error avg. latencies.
- Refine
delete_containers.shscript to eliminate unnecessary error msgs. - Refine descriptions of the results of test cases.
Updates (2021-12-11) :
- Generate baseline data for chained application tests 3-(1);
- Fix the image pull issues in 3-(7): Mapper-Reducer case;
- Add a How to parse the data paragraph under each test case in the Reproducability Section to directly relate the data to the results in the paper.
Molecule is a serverless sandbox runtime allowing functions running on heterogeneous devices.
Essential hardware requirements:
- CPU: recommending x86 CPU, but ARM is OK. CPU is sufficient for most of the experiements in the artifact.
- FPGA: You need a computer which is equpped with (at-least) one FPGA card for FPGA-based functions. AWS EC2 F1 instance (using AMI: ami-02155c6289e76719a) is perfectly for this case. To ease AE reviewers do the experiments, we have prepared an F1 instance that can be used during the AE period (see hotcrp for the way to access the instance).
Optional hardware requirements:
- DPU: You need a computer (with x86 CPU cores) which is equipped with Nvidia Bluefield (both Bluefield-1 and Bluefield-2 are OK). As DPU is a generic processor (using ARM CPU cores) and is abstracted by XPU-shim, the experiments for CPU-DPU settings are almost the same as for CPU-only setting. In the following cases, you will use CPU for the tests, but you can refer to Running experiments on CPU-DPU if you have DPU and want to do experiments on that.
Software requirements:
- Git: Molecule uses git for version control
- Docker: Molecule uses docker to create the build environment
- Linux: All the testing scripts are developed for Linux (Ubuntu-18.04/Ubuntu-20.04/CentOS Linux release 7.9.2009 are validated), which may be incompatible with mac or windows.
- Golang: go version go1.15.5 (or higher) linux/amd64
All the software requirements are well-prepared in the provided F1 testbed.
You can do all the tests on the F1 instance, or just do the FPGA-related tests on F1 and others on your local environment. In the following, we will explictly mark the tests that require an FPGA with 🏆 .
In this section, we will explain how to install Molecule and run a simple demo.
Molecule is an open-sourced project at: https://github.com/Molecule-Serverless. As the project contains many components, e.g., container runtime supporting fork (i.e., runc) and language runtimes like Python/Node.JS for functions, we use sub-modules to manage them all in the artifact.
To get the source code of Molecule:
git clone [email protected]:Molecule-Serverless/molecule-artifact.git
cd molecule-artifact
## Update all submodules:
git submodule update --init --recursive
Download the basic software dependencies.
For Ubuntu:
$ sudo apt-get install -y make git gcc build-essential pkgconf libtool \
  libsystemd-dev libprotobuf-c-dev libcap-dev libseccomp-dev libyajl-dev \
  go-md2man libtool autoconf python3 automake
For CentOS:
$ sudo yum --enablerepo='*' --disablerepo='media-*' --disablerepo=c7-media  install -y make automak \
  autoconf gettext libtool gcc libcap-devel systemd-devel \
  yajl-devel libseccomp-devel python36 libtool git glibc-static git-lfs
To build the Molecule's components (on x86 CPU):
./build_all.sh
If everything goes fine, you have everything needed to run Molecule's tests and reproduce the results.
If you have DPU, or you are using ARM server, using the following command to build:
./build_all_arm.sh
This section uses two cases to illustrate Molecule's functionalities.
We use the Alexa functions (from ServerlessBench) as a case.
Commands:
# enter to the molecule-benchmarks dir
cd ./molecule-benchmarks
# Build runtime and functions
./single-func/docker_build.sh
# Run the simple tests
./single-func/docker_run.sh
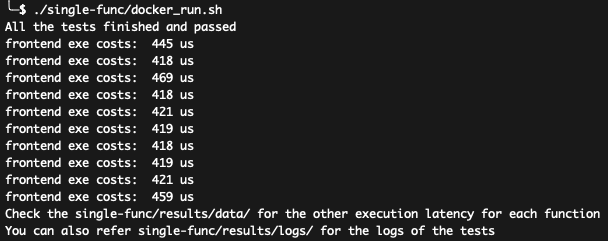
The script will run all alexa functions, and write data/log to single-func/results/. You shall see the results like:
You can see the exe costs of frontend function when everything is fine.
The following instructions assume you are using the provided AWS EC2 F1 instance. If you are using your own instance, please follow the Prepare FPGA environment to prepare your environment first. Otherwise, you are ready to do the experiments.
- Install the molecule
If you have installed, skip the step.
git clone [email protected]:Molecule-Serverless/molecule-artifact.git
cd molecule-artifact
## Update all submodules:
git submodule update --init --recursive
./build_all.sh
- Prepare AWS F1 FPGA environment
In the molecule-artifact dir:
source ./source_fpga_env.sh
- Run the demo
Now you are ready to run the demos (vector multiplex example):
cd molecule-benchmarks/fpga-apps
## Taking upto minutes
./run_demo.sh
You shall see the results like:
In the cold run, it is possible to use more time for FPGA; while in the warm run, the FPGA should achieve about 3x better latency compared with CPU.
In this part, we first explain instructions to run scripts that can reproduce the results of benchmarks and applications used in the paper, which shall give the reviewers/readers sufficient confiddence about the reproducability.
Besides, we also explain detail steps on evaluate each techniques (i.e., cfork and IPC-based DAG) in Molecule using microbenchmarks. These steps are optional but can help reviewers/readers to identify the major improvement of Molecule.
cd molecule-benchmarks/function-bench
./func_bench.sh
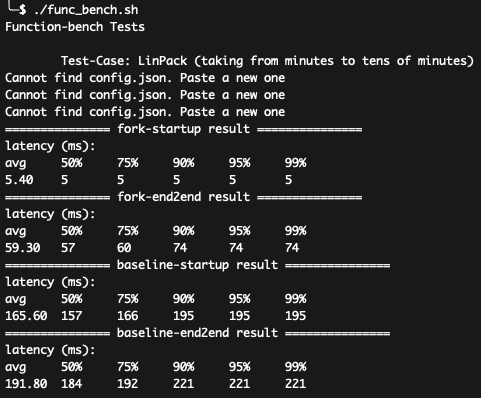
You shall see the results like:
The script will run all the test cases of FunctionBench used in the paper,
and shows the startup and end-to-end (cold boot).
The Image Resize is not included here.
How to parse the data: The above fig shows the results of Linpack.
- The avg end-to-end latencies of fork and baseline are related to data in Fig-14 in the paper, e.g., 59.30ms as Molecule's data and 191.80ms as Baseline's data;
- The shown results are different from the results shown in the paper because of different CPU configurations. In the paper, the concrete latencies for baseline (for LinPack) is 461ms and the improvement is about 2.5x. In the F1, the baseline for LinPack is 191ms and the improvement is about 3x. The speedup number variation (2.5x vs. 3x) is reasonable in this case, and the reason for the better result is because: the ratio of computation latencies decreased because of better hardware performance;
- In video-processing case, you may get a better result than presented in the paper (it's fine as you are getting better results not worse results). A possible reason is the different I/O settings.
- You can also use other data, e.g., P99 latencies, for your own usages.
The results basically match the data in the Figure-14. Molecule can achieve significant better performance compared with the baseline.
Note:
-
Please ensure you have built Molecule using ./build_all.sh.
-
To gain end-to-end (warm boot) latencies, please uncomment the Line #53 and #91 in the forkable-python-runtime/scripts/test_app.py
Commands:
# enter to the molecule-benchmarks dir
cd ./molecule-benchmarks
# Build runtime and functions
./chained-func/docker_build.sh
# This script will run Alexa chained applications
./chained-func/docker_run.sh
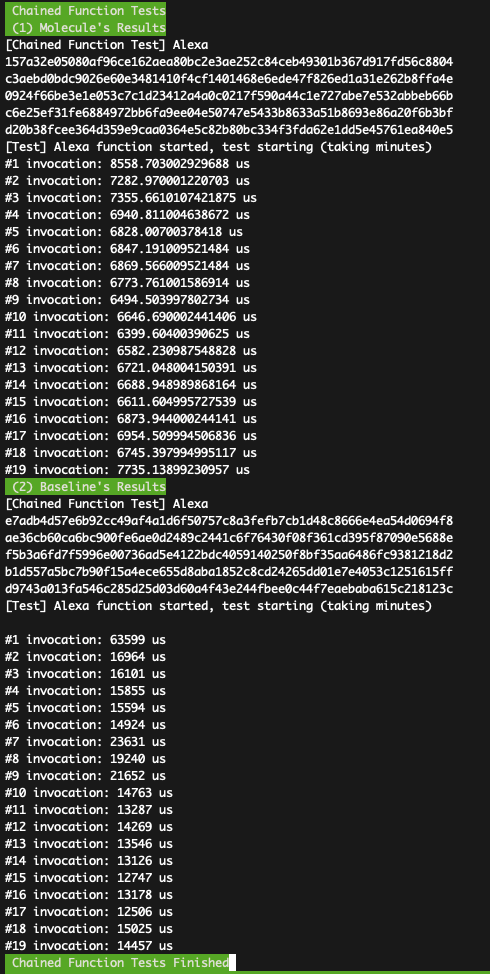
You shall see the results like:
How to parse the data: The above figure shows the end-to-end latencies of Alexa chained application under Molecule and the baseline systems. The figure shows latencies of 20 invocations under two systems. Overall, Molecule achieves 2--3x better latency compared with the baseline. In the paper, the improvement is 2x and the baseline is 38.6ms (the first two bars in the left of Fig-14-d). The shown result matches our improvement claims in the paper.
Ensure you have built Molecule using ./build_all.sh and source ./source_fpga_env.sh
cd molecule-benchmarks/fpga-apps
./run_bench.sh
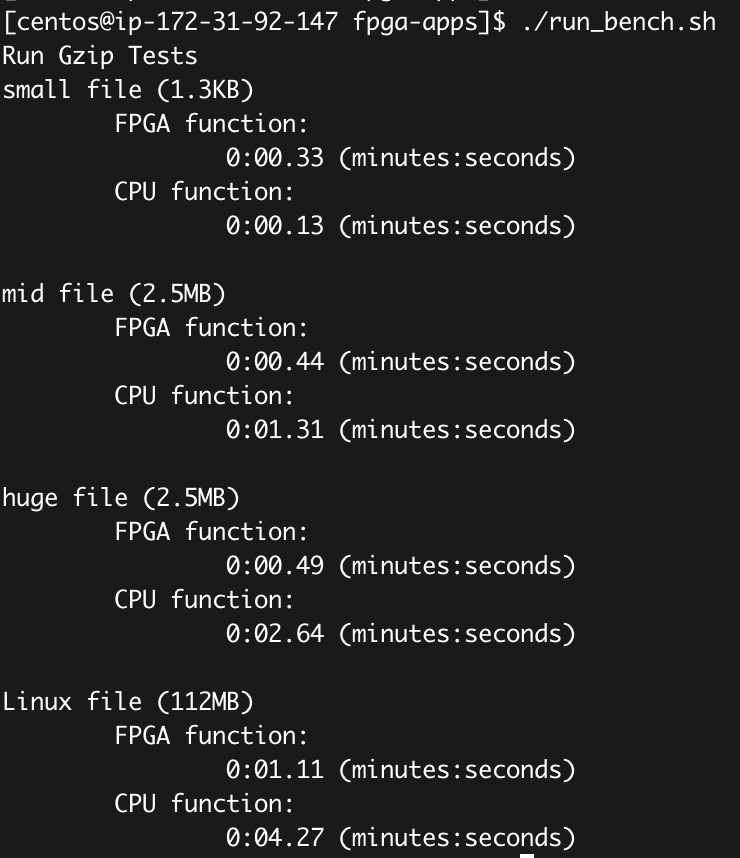
You shall see the results like:
How to parse the data: The above fig shows the results of GZIP latency for FPGA and CPU functions, which totally match the result of Fig-14 (e). As the test case is real-world applications, the results you have may be slightly different from the above figure.
If you have successfully run the above experiments and get the expected results, congradulation! you have done most of the work!
In the following, we will explain the detailed instructions to run each (optional) microbenchmarks. All test cases are self-contained, that means you can directly select and run the cases that you are interested in!
This section shows how to reproduce results in Figure-10 (a) and (b).
-
Ensure you have built Molecule using ./build_all.sh
-
Run tests
cd forkable-python-runtime/scripts
./kill_containers.sh # make sure that no old container exists

./base_build.sh # build baseline container's bundle

./template_build.sh # build template container's bundle
./endpoint_build.sh # build endpoint container's bundle

# test baseline works
./run_baseline.sh

# test cfork works
./run_fork.sh

# usage: python3 test_cfork.py [test]
# test can be baseline or fork
# if no test is specified, it runs all tests by default
# Caution: if the test is "fork", please make sure that you have run ./run_fork.sh successfully to warm up the environment
python3 test_cfork.py
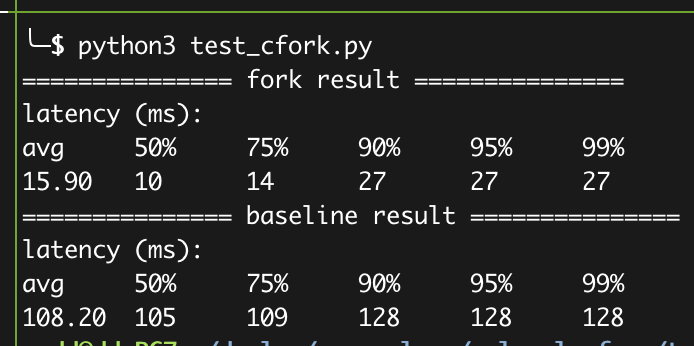
You shall see the results like:
How to parse the data: The data is related to the python bars in Figure-10 (a)/(b). The setting used in the AE (F1) is much better than the server used in the paper. Therefore, you shall see a better result in F1 (fork shall achieves 15-17ms, and the baseline can achieve 108-150ms).
We prepare scripts to run chained serverless functions and generate the communication latency, as the Figure-12 in the paper.
Commands:
# Enter molecule-benchmarks
cd molecule-benchmarks
./staged-func/docker_build.sh
# This script will run all the four cases (in Figure-12)
./staged-func/docker_run.sh
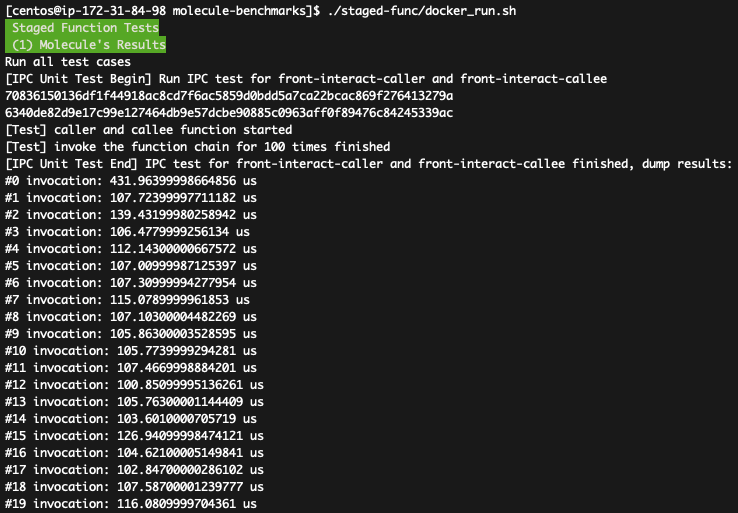
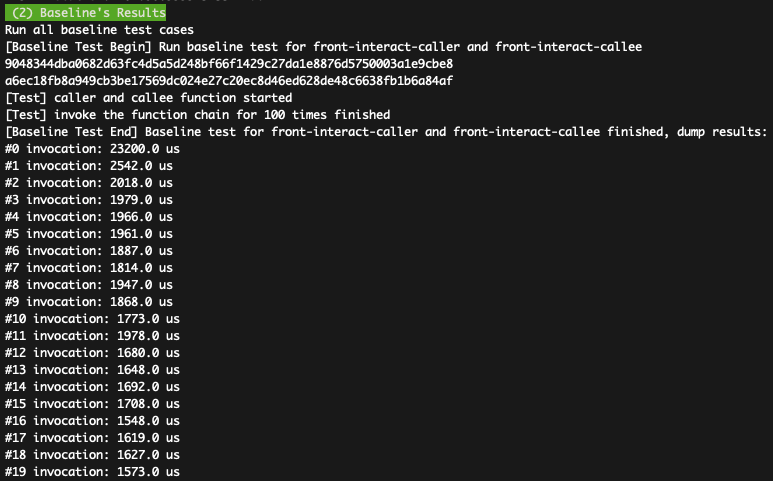
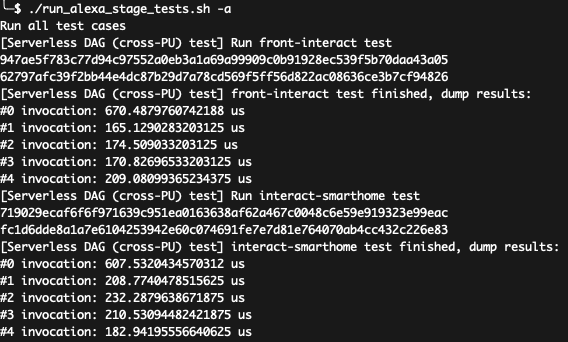
You shall see the results for both Molecule and Baseline like:
How to parse the data: The 1st figure shows the DAG latencies in Molecule, which can achieves <1 ms (about 100us in most cases). The 2nd figure shows the DAG latencies in Baseline (1500---2000us). As the Fig-9(b) in the paper presents the communication latencies of existing serverless platforms, e.g., both Lambda and OpenWhisk requires >10ms latencies, the evaluated data confirms the claims in the paper that IPC-based DAG communication can achieve significant lower latency (about 100us in most cases) compared with baseline. Besides, both Molecule and Baseline achieve better result (compared with Fig-12) because of better hardware settings.
The below instructions assume you do not have a DPU, so we will do the cFork on the node with a single CPU. However, unlike the above cases, we will start an XPU-shim, which provides the neighborIPC interfaces for the cFork to use. Similar cases can be transparently run on a CPU-DPU setting, in which you should start two XPU-shim and assign them different IDs.
In this case, we will rely on neighborIPC provided by XPU-shim to fork on an instance.
-
Ensure you have built Molecule using ./build_all.sh
-
Start the XPU-shim on local node
Commands:
cd xpu-shim/src/
sudo ./moleculeos -i 0
This command will start an XPU-shim node which will block the terminal.
Try to start another terminal for the following instructions.
- Start Molecule-worker on each PU:
Commands:
sudo ./runc/runc runtime
You will see the runtime is now connected to the XPU-shim.
- Run the tests
In another terminal (or another PU if you have other PUs like DPU):
cd forkable-python-runtime/scripts
./base_build.sh # build baseline container's bundle
cd ../../
cd moleculeruntimeclient
make
sudo ./molecule_rpc_client run -i 1 -c python-test -b ~/.base/container0
sudo ./molecule_rpc_client run -i 1 -c app-test -b ~/.base/spin0
Now you can fork the instances on remote PU:
sudo ./molecule_rpc_client cfork -i 1 -t python-test -p app-test
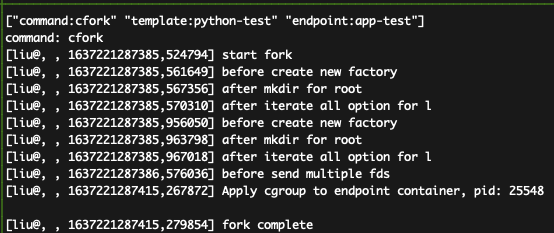
You shall see the results like:
How to parse the data:
The unit of the timestamp in the above figure is nano seconds.
That means, 1637221287415,279854 means 1637221287415.279854 ms (as a time stamp).
The latency is caculated by comparing the timestamp of fork complete and start fork;
therefore, the latncies is: 1637221287415.279854 ms - 1637221287385.524794 ms = 29.7548828125ms.
This confirms the claims in the paper (Figure-11-a) that the cFork can achieve about 30ms even in cross-PU settings.
Note: we do not apply the kernel optimization (CPUset opt), which is the biggest costs as shown in the breakdown in the above figure.
The below instructions assum you do not have a DPU, so we will do the DAG communication on the single CPU node. However, unlike the above case, we will start an XPU-shim, which provides the neighborIPC interfaces for the IPC-based DAG to use. The same case can be transparently run on a CPU-DPU setting, in which case you should start two XPU-shim and assigning them different IDs.
-
Ensure you have built Molecule using ./build_all.sh
-
Start the XPU-shim on local node
Commands:
cd xpu-shim/src
sudo ./moleculeos -i 0
- Run benchmarks:
In another terminal:
# Enter molecule-benchmarks
cd molecule-benchmarks
./staged-func-nIPC/docker_build.sh
./staged-func-nIPC/docker_run.sh
You shall see the results (in the 2nd terminal) like:
How to parse the data: The results have the same format as the local DAG results. As the Fig-9(b) in the paper presents the communication latencies of existing serverless platforms, e.g., both Lambda and OpenWhisk requires >10ms latencies, the shown result confirms the claims in the paper that XPU-shim's neighbor IPC can help functions on different PU to achieve low communication latency (about 150--600us in most cases).
This section shows how to reproduce results in Figure-10 (c).
-
Ensure you have built Molecule using
./build_all.shandsource ./source_fpga_env.sh -
Run the tests
Commands:
cd molecule-benchmarks/fpga-apps
## Taking upto minutes
./run_breakdown.sh
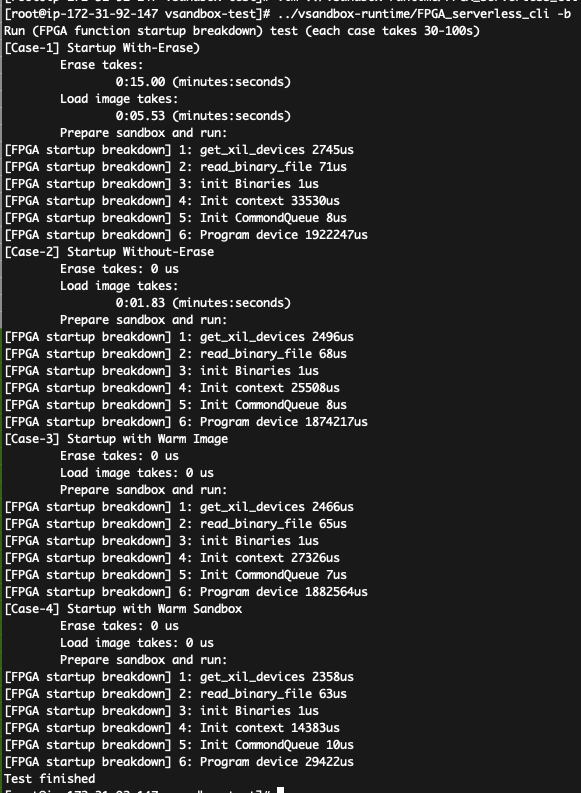
After that, you shall see the results like (including startup latency of four cases):
How to parse the data:
- in the first case, the total latency is 15+5.53+2 = 22.52s in the figure, which matches the 1st bar in Figure-10(c);
- in the second case, the total latency is 1.83+1.9=3.73s, which matches the 2nd bar in Figure-10(c);
- in the third case, the total latency is 1.9s, which matches the 3rd bar in Figure-10(c);
- in the fourth case, the total latency is 46ms, which matches the 4th bar in Figure-10(c).
Follow the instructions in pychain/README.md.
We thank all of our reviewer, AE reviewers for their insightful comments!
We are open and welcome developers and researchers to help us to improve the project.

