Sales/Customer analysis and trend prediction.
This project is using for demo to FA about how to initialize a project and draft data pipeline.
Building the data pipeline

- Design data pipeline here
- Ingest data from flat file
- Extract, captured new and changed data
- Load new and changed data onto Snowflake
- Normalize and Denormalize data
- Build data model
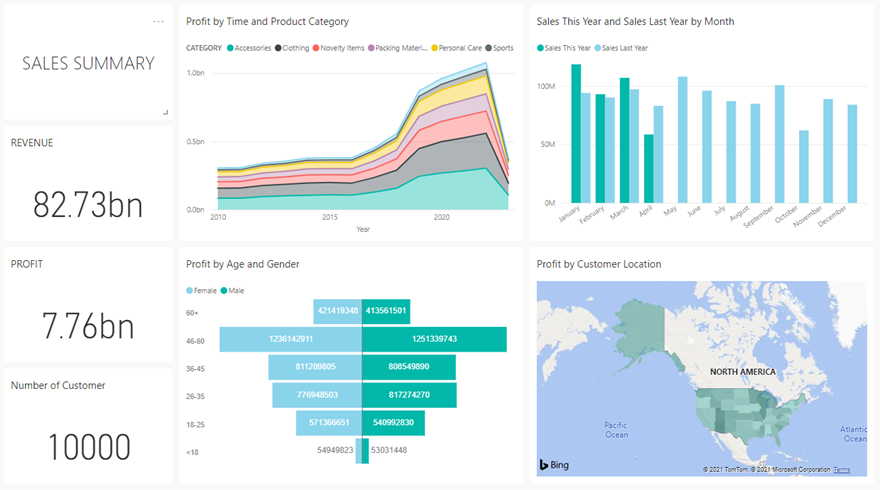
- Visualize your data
- Download and install snowsql CLI.
- Go to %USERPROFILE%\.snowsql\ to change login config for better automation, using this document.
- Generate data: python Data_generator.py, copy into resources/raw-folder.
- Login into MSSQL, create a new Credentials (Server > Security > Credentials > New Credentials...), fill following field:
i. Credential name: runcmd.
ii. Identity: click ... > Advanced...> Find now and choice your current window's account.
iii. Enter your window's account password in Password and Confirm password.
iv. Click OK to create Credentials. - Run init_mssql.sql to set up local database, job and schedule, you can change schedule time and frequency as needed.
- Run /src/SSIS/Project1.sln, change "ProjectPath" variable to your project path and "ErrorEmail" variable to your email. If you get errors on connection, edit Project1 Connection in Connection Managers.
- Deploy Project1.sln on SQL Server:
i. Open Project1.ispac under Project1\bin\Development.
ii. Under "Select Source" follow the default Project Deployment, with the path pointing to the "Project1.ispac" package.
iii. Under "Select Destination" enter the name of the server that hosts the SSIS catalog.
iv. Select a path under the SSIS catalog, create a new folder "Project1".
v. Finalize the wizard by clicking Deploy. - Authen SnowSQL using proper user and run init_snowflake.sql.
- Open PowerBI, click Get Data, search for Snowflake.
- Connect to Snowflake server using your snowflake account.
- Create PowerBI dashboard.

- User:
longbv1Password:abc123 - User:
mainq2Password:abc123