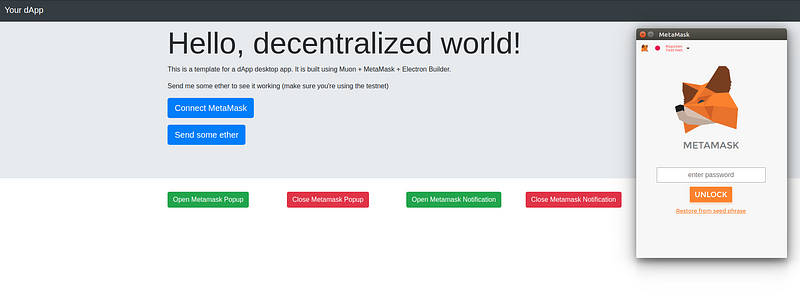
Easily create a desktop version of your dApp using Electron (Muon) + MetaMask.
When it comes to decentralized apps, the more the users don’t have to rely on third parties in order to use the application, the more trust they can put in.
Serving your frontend through cloud servers is great because anyone using a browser with MetaMask can access it, but you’re still depending on third-parties to host the code. This means that if the servers are down, *e.g.*maintenance or a DDoS attack, the users won’t be able to use the application.
On the other hand, if you created an offline version of your dApp using Electron, you wouldn't be able to use MetaMask to manage the wallets... until now.
Using this boilerplate, you'll be able to wrap your dApp code within a Muon application that includes MetaMask directly from Chrome Store!
This boilerplate is built on top of Muon, which is a security-focused fork from Electron with support for Chrome extensions. The boilerplate sets up a Muon application and injects the MetaMask extension.
- The npm scripts download the MetaMask code from the Chrome Store to the local folder.
- The Muon application renders your local HTML and injects the MetaMask content scripts.
- Your frontend code should use
chrome.ipcRenderer.send('message')to communicate with Muon's main process and trigger the MetaMask popups. - MetaMask handles all the wallet management side of the application. So you don't have to deal directly with user's private keys.
- Electron Builder packs and generates installers for Linux, Windows and MacOS.
Fork the repo and clone it to your local machine
git clone https://github.com/YourAccount/electron-metamask-boilerplate.git
Include your dApp frontend repository as a submodule
git submodule add https://github.com/your-awesome-company/dapp.git app
It's recommended to add the submodule with https instead of ssh. This way you can easily clone and install both the parent and the children repos (check this link).
Now the folder structure should be something like:
electron-metamask-boilerplate
  -> node_modules/

  -> extensions/

    --> metamask/

  -> main.js

  -> package.json

  ->  [ ... ]

  -> app - (your git repository)
    --> node_modules/

    --> src/

    --> dist/

    --> package.json

    --> [ ... ]
Usually the frontend code that is rendered in the browser resides within a dist folder, so we recommend that you build your project to a dist folder so you can use our configuration without having to alter too many things.
Now, edit main.js to properly read index.html from your app's folder.
In development mode Muon will read the extensions file from the parent folder at /extensions/metamask, but when bundling to production, Electron Builder will expect the same folder at app/dist/extensions/metamask. This can be changed in extensions.js.
Once you're ready run npm start for a development server.
Unfortunately, the built-in communication between the MetaMask scripts to trigger the UI doesn't work on Muon. In order to make the popups work, you'll need to intercept the web3 calls and manually send a message to Muon.
Check out this function.
Electron Builder depends on both package.jsons to generate the installers. For more info, check the docs.
swapy-exchange-electron-wrapper
Swapy's article on how we did the Electron + MetaMask integration
