OS X and iOS application and framework to play with the Apple Push Notification service (APNs)
Install the Mac app using Homebrew cask:
brew cask install pusherOr download the latest Pusher.app binary:
Alternatively, you can include NWPusher as a framework, using CocoaPods:
pod 'NWPusher', '~> 0.7.0'or Carthage (iOS 8+ is required to use Cocoa Touch Frameworks)
github "noodlewerk/NWPusher"
Or simply include the source files you need. NWPusher has a modular architecture and does not have any external dependencies, so use what you like.
Testing push notifications for your iOS or Mac app can be a pain. You might consider setting up your own server or use one of the many push webservices online. Either way it's a lot of work to get all these systems connected properly. When it is all working properly, push notifications come in fast (< 1 sec) and reliably. However when nothing comes in, it can be very hard to find out why.
That's why I made Pusher. It is a Mac and iPhone app for sending push notifications directly to the Apple Push Notification Service. No need to set up a server or create an account online. You only need the SSL certificate and a device token to start pushing directly from your Mac, or even from an iPhone! Pusher has detailed error reporting and logs, which are very helpful with verifying your setup.
Pusher comes with a small framework for both OS X and iOS. It provides various tools for sending notifications programmatically. On OS X it can use the keychain to retrieve push certificates and keys. Pusher can also be used without keychain, using a PKCS #12 file. If you want to get a better understanding of how push notifications work, then this framework is a good place to start and play around.
Mac OS X application for sending push notifications through the APN service:
- Takes certificates and keys directly from the keychain
- Fully customizable payload with syntax checking
- Allows setting expiration and priority
- Stores device tokens so you don't have to copy-paste them every time
- Handles PKCS #12 files (.p12)
- Automatic configuration for sandbox
- Reports detailed error messages returned by APNs
- Reads from feedback service
OS X and iOS framework for sending pushes from your own application:
- Modular, no dependencies, use what you like
- Fully documented source code
- Detailed error handling
- iOS compatible, so you can also push directly from your iPhone :o
- Demo applications for both platforms
Before you can start sending push notification payloads, there are a few hurdles to take. First you'll need to obtain the Apple Push Services SSL Certificate of the app you want to send notifications to. This certificate is used by Pusher to set up the SSL connection through which the payloads will be sent to Apple.
Second you'll need the device token of the device you want to send your payload to. Every device has its own unique token that can only be obtained from within the app. It's a bit complicated, but in the end it all comes down to just a few clicks on Apple's Dev Center website, some gray hairs, and a bit of patience.
Let's start with the SSL certificate. The goal is to get both the certificate and the private key into your OS X keychain. If someone else already generated this certificate, you'll need to ask for exporting these into a PKCS12 file. If there is no certificate generated yet, you can generate the certificate and the private key in the following steps:
- Log in to Apple's Dev Center
- Go to the Provisioning Portal or Certificates, Identifiers & Profiles
- Go to Certificates and create a Apple Push Notification service SSL
- From here on you will be guided through the certificate generation process.
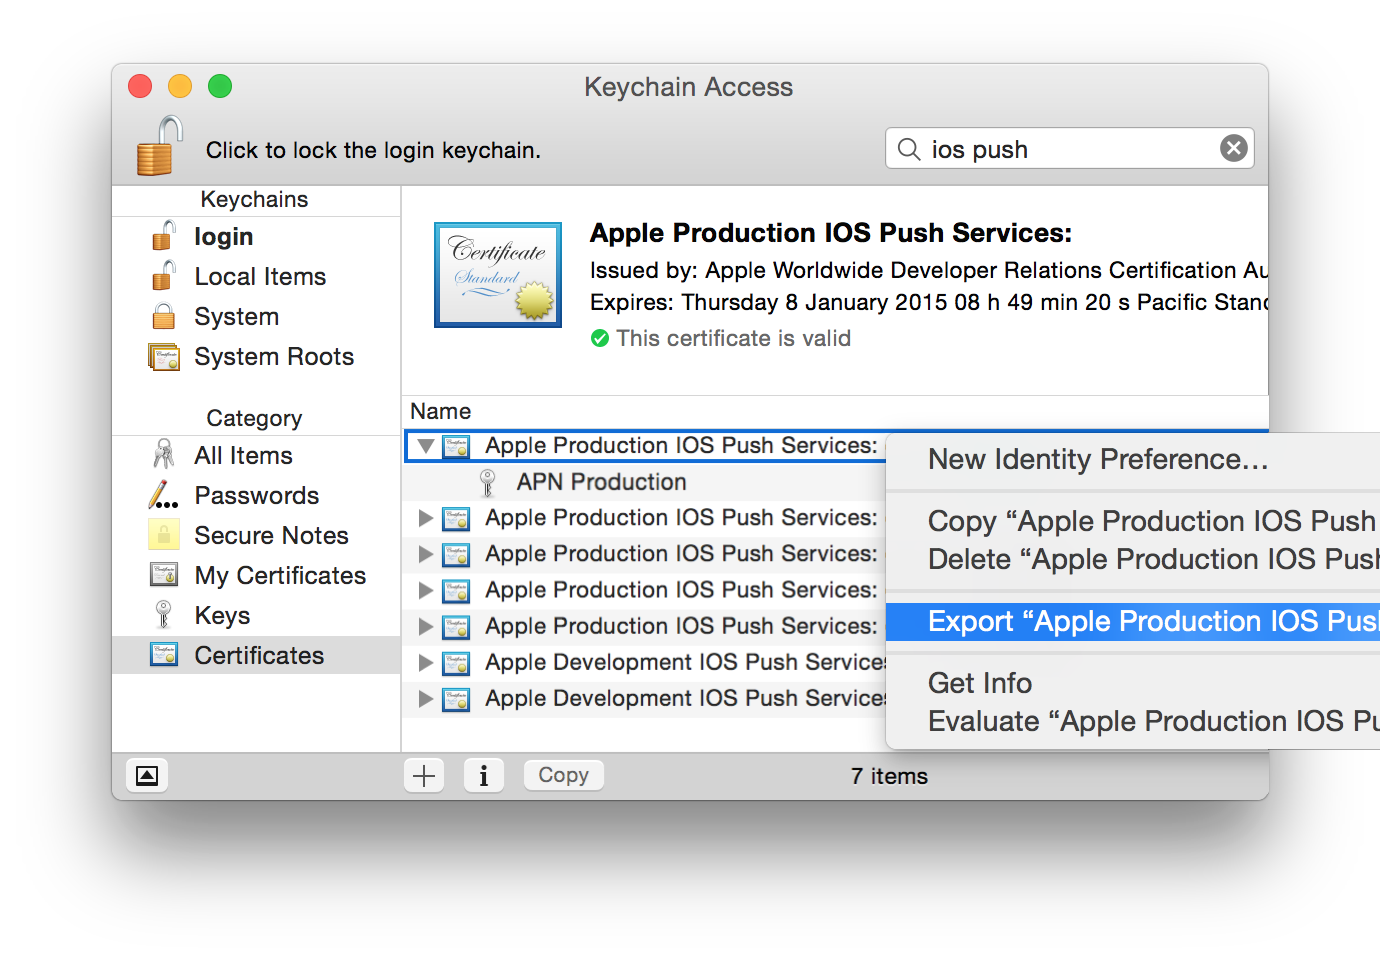
Keep in mind that you will eventually be downloading a certificate, which you will need to install in your keychain together with the private key. This should look something like this:
NB: There is Development and Production certificates, which should (generally) correspond to respectively DEBUG and RELEASE versions of your app. Make sure you get the right one, check Development (sandbox) or Production, iOS or Mac, and the bundle identifier.
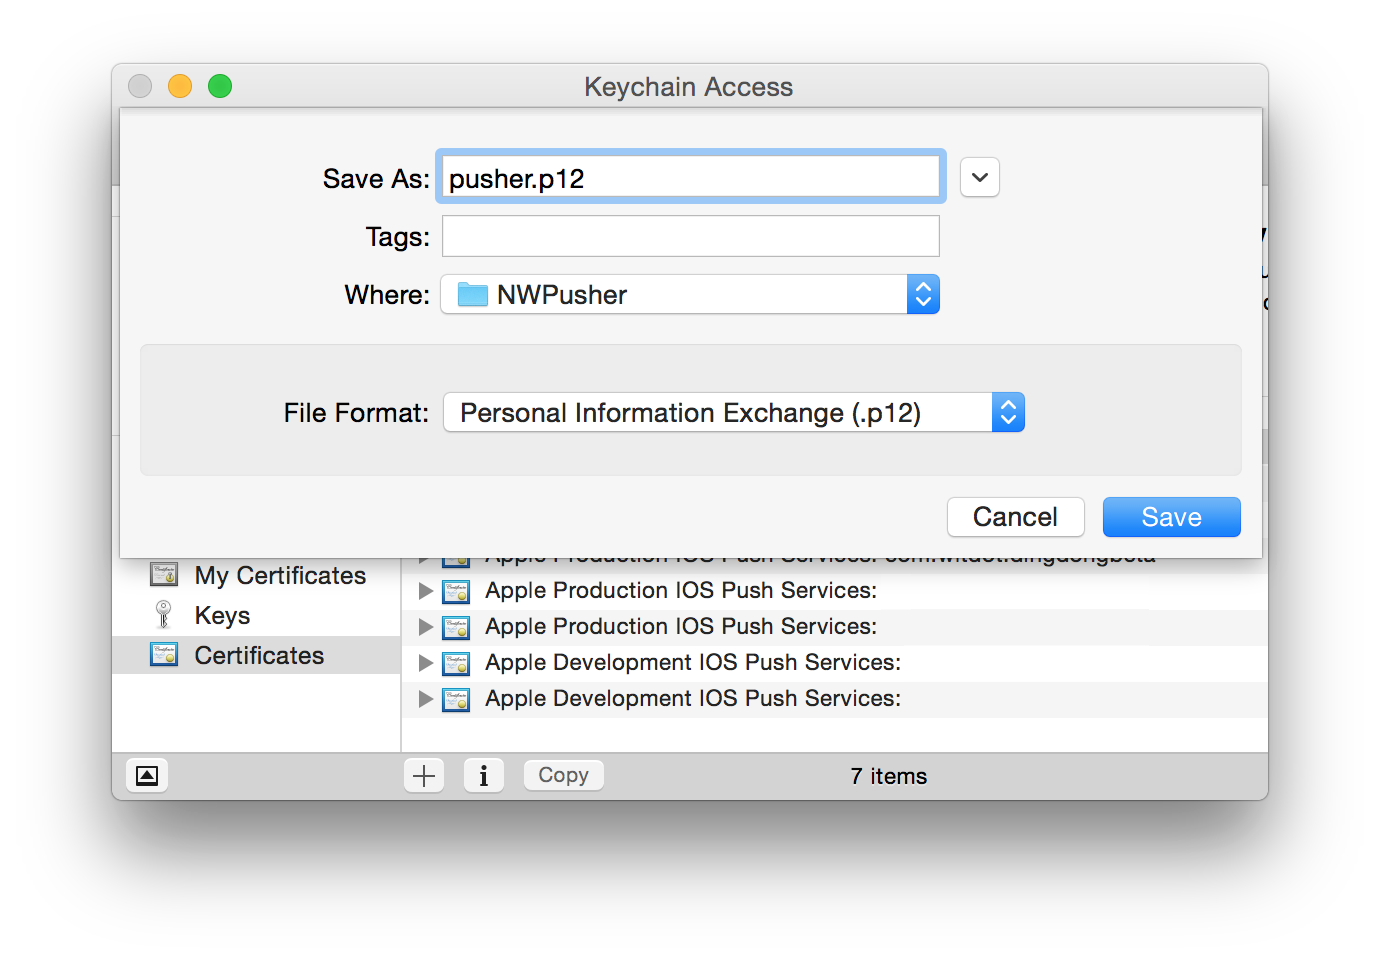
The push certificate should be exported to a PKCS12 file, which allows you to share these with fellow developers:
Now you need to obtain a device token, which is a 64 character hex string (256 bits). This should be done from within the iOS app you're going to push to. Add the following lines to the application delegate (Xcode 6 required):
- (BOOL)application:(UIApplication *)application
    didFinishLaunchingWithOptions:(NSDictionary *)launchOptions
{
    if ([application respondsToSelector:@selector(registerUserNotificationSettings:)]) {
        NSLog(@"Requesting permission for push notifications..."); // iOS 8
        UIUserNotificationSettings *settings = [UIUserNotificationSettings settingsForTypes:
            UIUserNotificationTypeAlert | UIUserNotificationTypeBadge |
            UIUserNotificationTypeSound categories:nil];
        [UIApplication.sharedApplication registerUserNotificationSettings:settings];
    } else {
        NSLog(@"Registering device for push notifications..."); // iOS 7 and earlier
        [UIApplication.sharedApplication registerForRemoteNotificationTypes:
            UIRemoteNotificationTypeAlert | UIRemoteNotificationTypeBadge |
            UIRemoteNotificationTypeSound];
    }
    return YES;
}

- (void)application:(UIApplication *)application
    didRegisterUserNotificationSettings:(UIUserNotificationSettings *)settings
{
    NSLog(@"Registering device for push notifications..."); // iOS 8
    [application registerForRemoteNotifications];
}

- (void)application:(UIApplication *)application
    didRegisterForRemoteNotificationsWithDeviceToken:(NSData *)token
{
    NSLog(@"Registration successful, bundle identifier: %@, mode: %@, device token: %@",
        [NSBundle.mainBundle bundleIdentifier], [self modeString], token);
}

- (void)application:(UIApplication *)application
    didFailToRegisterForRemoteNotificationsWithError:(NSError *)error
{
    NSLog(@"Failed to register: %@", error);
}

- (void)application:(UIApplication *)application handleActionWithIdentifier:(NSString *)identifier
    forRemoteNotification:(NSDictionary *)notification completionHandler:(void(^)())completionHandler
{
    NSLog(@"Received push notification: %@, identifier: %@", notification, identifier); // iOS 8
    completionHandler();
}

- (void)application:(UIApplication *)application
    didReceiveRemoteNotification:(NSDictionary *)notification
{
    NSLog(@"Received push notification: %@", notification); // iOS 7 and earlier
}

- (NSString *)modeString
{
#if DEBUG
    return @"Development (sandbox)";
#else
    return @"Production";
#endif
}
Now, when you run the application, the 64 character push string will be logged to the console.
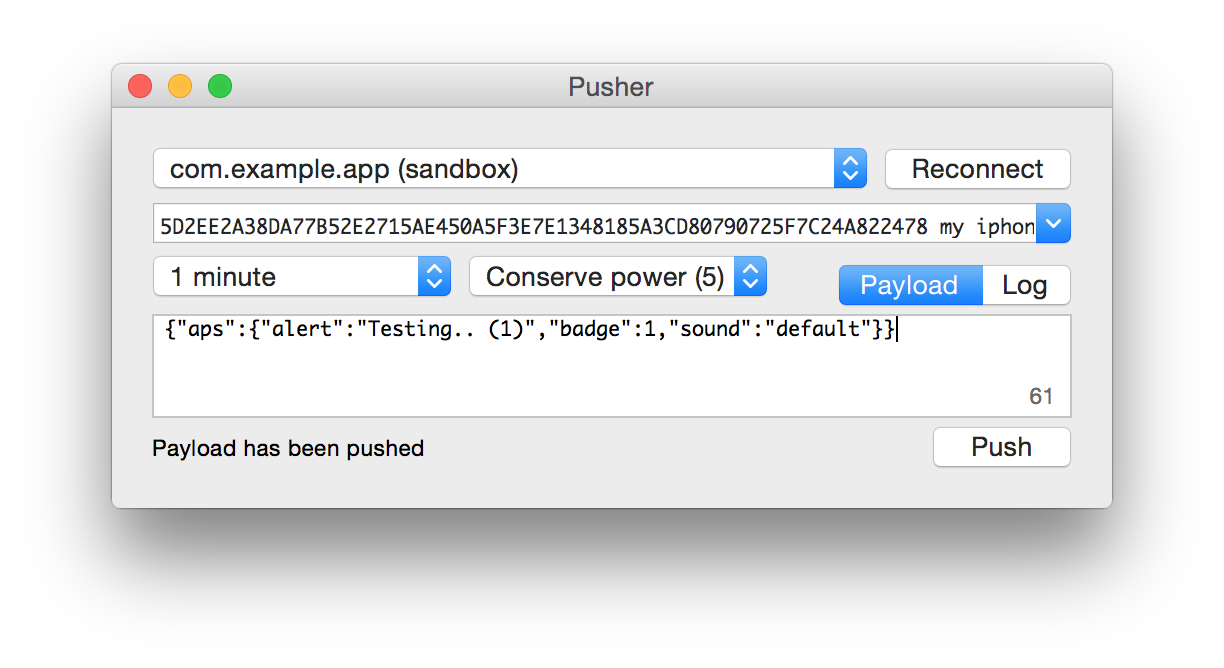
With the SSL certificate and private key in the keychain and the device token on the pasteboard, you're ready to send some push notifications. Let's start by sending a notification using the Pusher app for Mac OS X. Open the Pusher Xcode project and run the PusherMac target:
The combo box at the top lists the available SSL certificates in the keychain. Select the certificate you want to use and paste the device token of the device you're pushing to. The text field below shows the JSON formatted payload text that you're sending. Read more about this format in the Apple documentation under Apple Push Notification Service.
Now before you press Push, make sure the application you're sending to is in the background, e.g. by pressing the home button. This way you're sure the app is not going to interfere with the message, yet. Press push, wait a few seconds, and see the notification coming in.
If things are not working as expected, then take a look at the Troubleshooting section below.
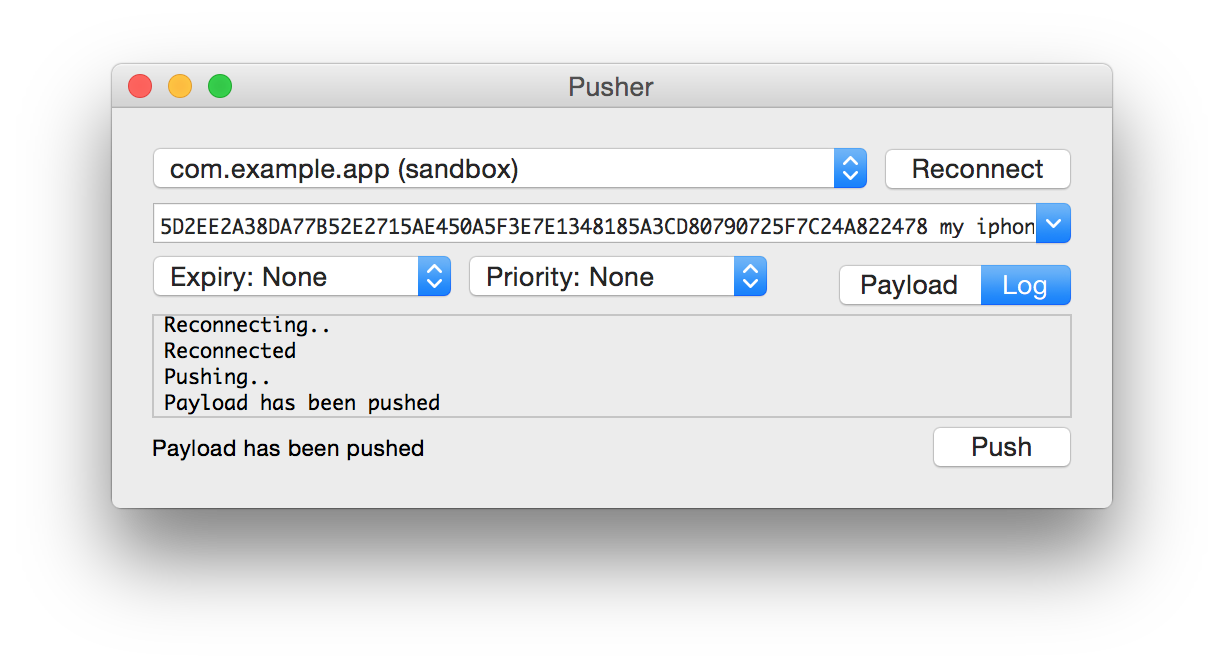
The ultimate experience is of course pushing from an iPhone to an iPhone, directly. This can be done with the Pusher iOS app. Before you run the PusherTouch target, make sure to include the certificate, private key, and device token inside the app. Take the PKCS12 file that you exported earlier and include it in the PusherTouch bundle. Then go to NWAppDelegate.m in the Touch folder and configure pkcs12FileName, pkcs12Password, and deviceToken. Now run the PusherTouch target:
If everything is set up correctly, you only need to Connect and Push. Then you should receive the Testing.. push message on the device.
Again, if things are not working as expected, take a look at the Troubleshooting section below or post an issue on GitHub.
Consult Apple's documentation for more info on the APNs architecture: Apple Push Notification Service
Pusher can also be used as a framework to send notifications programmatically. The included Xcode project provides examples for both OS X and iOS. The easiest way to include NWPusher is through CocoaPods:
pod 'NWPusher', '~> 0.7.0'CocoaPods also compiles documentation, which can be accessed through CocoaDocs. Alternatively you can include just the files you need from the Classes folder. Make sure you link with Foundation.framework and Security.framework.
Before any notification can be sent, you first need to create a connection. When this connection is established, any number of payloads can be sent.
Note that Apple doesn't like it when you create a connection for every push. Therefore be careful to reuse a connection as much as possible in order to prevent Apple from blocking.
To create a connection directly from a PKCS12 (.p12) file:
    NSURL *url = [NSBundle.mainBundle URLForResource:@"pusher.p12" withExtension:nil];
    NSData *pkcs12 = [NSData dataWithContentsOfURL:url];
    NSError *error = nil;
    NWPusher *pusher = [NWPusher connectWithPKCS12Data:pkcs12 password:@"pa$$word" error:&error];
    if (pusher) {
        NSLog(@"Connected to APNs");
    } else {
        NSLog(@"Unable to connect: %@", error);
    }
When pusher is successfully connected, send a payload to your device:
    NSString *payload = @"{\"aps\":{\"alert\":\"Testing..\"}}";
    NSString *token = @"0123456789ABCDEF0123456789ABCDEF0123456789ABCDEF0123456789ABCDEF";
    NSError *error = nil;
    BOOL pushed = [pusher pushPayload:payload token:token identifier:rand() error:&error];
    if (pushed) {
        NSLog(@"Pushed to APNs");
    } else {
        NSLog(@"Unable to push: %@", error);
    }
After a second or so, we can take a look to see if the notification was accepted by Apple:
    NSUInteger identifier = 0;
    NSError *apnError = nil;
    NSError *error = nil;
    BOOL read = [pusher readFailedIdentifier:&identifier apnError:&apnError error:&error];
    if (read && apnError) {
        NSLog(@"Notification with identifier %i rejected: %@", (int)identifier, apnError);
    } else if (read) {
        NSLog(@"Read and none failed");
    } else {
        NSLog(@"Unable to read: %@", error);
    }
Alternatively on OS X you can also use the keychain to obtain the SSL certificate. In that case first collect all certificates:
    NSError *error = nil;
    NSArray *certificates = [NWSecTools keychainCertificatesWithError:&error];
    if (certificates) {
        NSLog(@"Loaded %i certificates", (int)certificates.count);
    } else {
        NSLog(@"Unable to access keychain: %@", error);
    }
After selecting the right certificate, obtain the identity from the keychain:
    NSError *error = nil;
    NWIdentityRef identity = [NWSecTools keychainIdentityWithCertificate:certificate error:&error];
    if (identity) {
        NSLog(@"Loaded identity: %@", [NWSecTools inspectIdentity:identity]);
    } else {
        NSLog(@"Unable to create identity: %@", error);
    }
Take a look at the example project for variations on this approach.
Consult Apple's documentation for more info on the client-server communication: Provider Communication
The feedback service is part of the Apple Push Notification service. The feedback service is basically a list containing device tokens that became invalid. Apple recommends that you read from the feedback service once every 24 hours, and no longer send notifications to listed devices. Note that this can be used to find out who removed your app from their device.
Communication with the feedback service can be done with the NWPushFeedback class. First connect using one of the connect methods:
    NSURL *url = [NSBundle.mainBundle URLForResource:@"pusher.p12" withExtension:nil];
    NSData *pkcs12 = [NSData dataWithContentsOfURL:url];
    NSError *error = nil;
    NWPushFeedback *feedback = [NWPushFeedback connectWithPKCS12Data:pkcs12 password:@"pa$$word" error:&error];
    if (feedback) {
        NSLog(@"Connected to feedback service");
    } else {
        NSLog(@"Unable to connect to feedback service: %@", error);
    }
When connected read the device token and date of invalidation:
    NSError *error = nil;
    NSArray *pairs = [feedback readTokenDatePairsWithMax:100 error:&error];
    if (pairs) {
        NSLog(@"Read token-date pairs: %@", pairs);
    } else {
        NSLog(@"Unable to read feedback: %@", error);
    }
Apple closes the connection after the last device token is read.
On macOS, you obtain a device token for your app by calling the registerForRemoteNotificationTypes: method of the NSApplication object. It is recommended that you call this method at launch time as part of your normal startup sequence. The first time your app calls this method, the app object requests the token from APNs. After the initial call, the app object contacts APNs only when the device token changes; otherwise, it returns the existing token quickly.
The app object notifies its delegate asynchronously upon the successful or unsuccessful retrieval of the device token. You use these delegate callbacks to process the device token or to handle any errors that arose. You must implement the following delegate methods to track whether registration was successful:
- Use the
application:didRegisterForRemoteNotificationsWithDeviceToken:to receive the device token and forward it to your server. - Use the
application:didFailToRegisterForRemoteNotificationsWithError:to respond to errors.
Note: If the device token changes while your app is running, the app object calls the appropriate delegate method again to notify you of the change.
The app delegate calls the registerForRemoteNotificationTypes: method as part of its regular launch-time setup, passing along the types of interactions that you intend to use. Upon receiving the device token, the application:didRegisterForRemoteNotificationsWithDeviceToken: method forwards it to the app’s associated server using a custom method. If an error occurs during registration, the app temporarily disables any features related to remote notifications. Those features are re-enabled when a valid device token is received.
    - (void)applicationDidFinishLaunching:(NSNotification *)notification {
        // Configure the user interactions first.
        [self configureUserInteractions];

        [NSApp registerForRemoteNotificationTypes:(NSRemoteNotificationTypeAlert | NSRemoteNotificationTypeSound)];
    }
- (void)application:(NSApplication *)application
didRegisterForRemoteNotificationsWithDeviceToken:(NSData *)deviceToken {
// Forward the token to your server.
[self forwardTokenToServer:deviceToken];
} - (void)application:(NSApplication *)application
didFailToRegisterForRemoteNotificationsWithError:(NSError *)error {
NSLog(@"Remote notification support is unavailable due to error: %@", error);
[self disableRemoteNotificationFeatures];
}Pusher reads certificate and key data from PKCS12 files. This is a binary format that bundles both X.509 certificates and a private key in one file. Conversion from other file formats to and from PKCS12 is provided by the OpenSSL CLI.
Inspect PKCS12:
openssl pkcs12 -in pusher.p12
where the output should be something like:
...
friendlyName: Apple Development/Production IOS/Mac Push Services: <your-bundle-identifier>
localKeyID: <key-id>
...
-----BEGIN CERTIFICATE-----
...
friendlyName: <private-key-used-for-generating-above-certificate>
localKeyID: <same-key-id>
...
-----BEGIN PRIVATE KEY-----
...
Make sure your build matches the Development/Production, iOS/Mac, and bundle identifier.
Inspect PKCS12 structure:
openssl pkcs12 -in pusher.p12 -info -noout
Inspect PEM:
openssl rsa -in pusher.pem -noout -check
openssl rsa -in pusher.pem -pubout
openssl x509 -in pusher.pem -noout -pubkey
PKCS12 to PEM:
openssl pkcs12 -in pusher.p12 -out pusher.pem -clcerts -aes256
Alternatively you can use the command below, which does not encrypt the private key (not recommended):
openssl pkcs12 -in pusher.p12 -out pusher.pem -nodes -clcerts
PEM to PKCS12:
openssl pkcs12 -export -in pusher.pem -out pusher.p12
Consult the OpenSSL documentation for more details: OpenSSL Documents - pkcs12
Apple's Push Notification Service is not very forgiving in nature. If things are done in the wrong order or data is formatted incorrectly the service will refuse to deliver any notification, but generally provides few clues about went wrong and how to fix it. In the worst case, it simply disconnects without even notifying the client.
Some tips on what to look out for:
-
A device token is unique to both the device, the developer's certificate, and to whether the app was built with a production or development (sandbox) certificate. Therefore make sure that the push certificate matches the app's provisioning profile exactly. This doesn't mean the tokens are always different; device tokens can be the same for different bundle identifiers.
-
There are two channels through which Apple responds to pushed notifications: the notification connection and the feedback connection. Both operate asynchronously, so for example after the second push has been sent, we might get a response to the first push, saying it has an invalid payload. Use a new identifier for every notification so these responses can be linked to the right notification.
If it fails to connect then check:
-
Are the certificates and keys in order? Use the OpenSSL commands listed above to inspect the certificate. See if there is one push certificate and key present. Also make sure you're online, try
ping www.apple.com. -
Is the certificate properly loaded? Try initializing an identity using
[NWSecTools identityWithPKCS12Data:data password:password error:&error]or[NWSecTools keychainIdentityWithCertificate:certificate error:&error]. -
Are you using the right identity? Use
[NWSecTools inspectIdentity:identity]to inspect the identity instance. In generalNWSecToolscan be helpful for inspecting certificates, identities and the keychain. -
Can you connect with the push servers? Try
[NWPusher connectWithIdentity:identity error:&error]or[NWPusher connectWithPKCS12Data:pkcs12 password:password error:&error]. -
Pusher connects on port
2195with hostsgateway.push.apple.comandgateway.sandbox.push.apple.com, and on port2196with hostsfeedback.push.apple.comandfeedback.sandbox.push.apple.com. Make sure your firewall is configured to allow these connections.
If nothing is delivered to the device then check:
-
Is the device online? Is it able to receive push notifications from other services? Try to get pushes from other apps, for example a messenger. Many wireless connections work visibly fine, but do not deliver push notifications. Try to switch to another wifi or cellular network.
-
Are you pushing to the right device token? This token should be returned by the OS of the receiving device, in the callback
-application: didRegisterForRemoteNotificationsWithDeviceToken:. The push certificate should match the provisioning profile of the app, check Development or Production, iOS or Mac, and the bundle identifier. Make sure the receiving app is closed, so it cannot interfere with the delivery. -
Does the push call succeed? Isn't there any negative response from the push server or feedback server? Both
[pusher pushPayload:payload token:token identifier:rand() error:&error]and[pusher readFailedIdentifier:&identifier apnError:&apnError error:&error]should returnYES, but wait a second between pushing and reading. Also try to connect to the feedback service to read feedback.
Consult Apple's documentation for more troubleshooting tips: Troubleshooting Push Notifications
The source comes with an Xcode project file that should take care of building the OS X and iOS demo applications. Alternatively you can also build Pusher.app from the commandline with xcodebuild:
xcodebuild -project NWPusher.xcodeproj -target PusherMac -configuration Release clean install
After a successful build, Pusher.app can be found in the build folder of the project.
Documentation generated and installed using appledoc by running from the project root:
appledoc .
See the appledoc documentation for more info.
Pusher is licensed under the terms of the BSD 2-Clause License, see the included LICENSE file.


