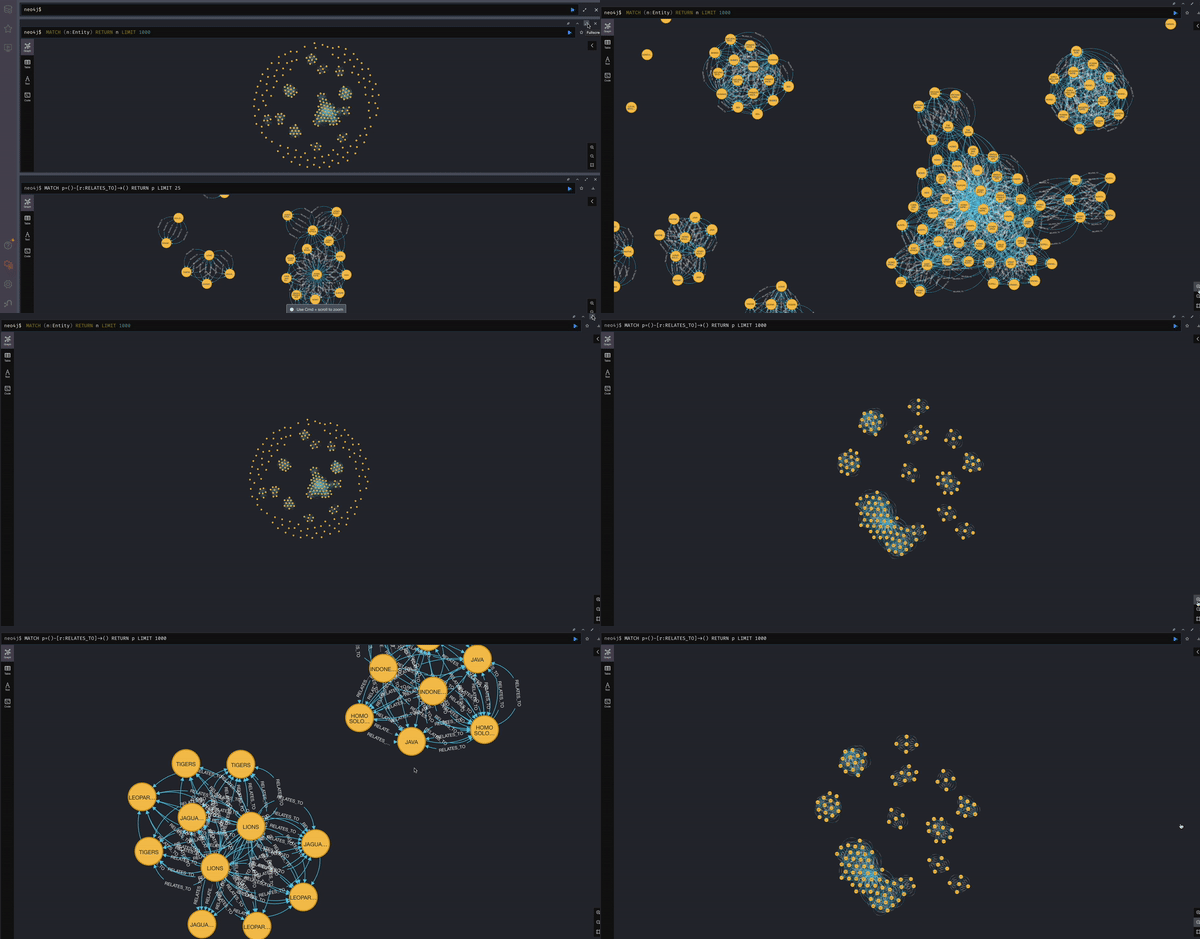
This guide introduces GraphRAG, a powerful tool released by Microsoft for graph representation and visualization using Neo4j. We'll explore how to leverage GraphRAG's capabilities to extract high-quality responses, integrate with Groq for enhanced language model performance, and visualize data relationships using Neo4j. By the end of this guide, you'll understand the theory behind GraphRAG, its prompts, and the practical steps to set it up and use it effectively.
GraphRAG enhances the quality of responses by extracting additional entities and information from provided data, going beyond basic semantic search capabilities. The process involves:
- Entity Extraction Prompt: Identifying entities within a text document, including their names, types, descriptions, and relationships.
- Community Report Prompt: Writing comprehensive reports for communities of entities, providing a high-level overview of the data set and key insights.
-
Install LM Studio
- Download and install LM Studio for your operating system from this link.
-
Download the Desired Model
- In LM Studio, download the model:
nomic-ai/nomic-embed-text-v1.5-GGUF/nomic-embed-text-v1.5.Q4_K_M.gguf.
- In LM Studio, download the model:
-
Start the Server
- Start the LM Studio server.
-
Create an Account
- Sign up for an account on the GROQQ playground.
-
Generate an API Key
- Generate an API Key in your GROQQ account and take note of it.
-
Install and Initialize GraphRAG
- Run the following commands in your desired directory:
pip install graphrag
python -m graphrag.index --init --root .
- Run the following commands in your desired directory:
-
Configure Settings
- Open the
settings.yamlfile and update it with the following configuration:embeddings: async_mode: threaded llm: api_key: ${GRAPHRAG_API_KEY} type: openai_embedding model: nomic-ai/nomic-embed-text-v1.5-GGUF/nomic-embed-text-v1.5.Q4_K_M.gguf api_base: http://localhost:1234/v1 llm: api_key: ${GROQQ_API_KEY} type: openai_chat model: mixtral-8x7b-32768 model_supports_json: true api_base: https://api.groq.com/openai/v1 tokens_per_minute: 3000 requests_per_minute: 30 max_retries: 2
- Open the
-
Set Environment Variables
- Open the
.envfile and update it with the following contents:GROQQ_API_KEY="enter-your-key-from-groqq" GRAPHRAG_API_KEY="12345"
- Open the
-
Prepare Input Files
- Create an
inputdirectory and place your.txtinput files in it.
- Create an
-
Run Indexing Code
- Run the following command in the terminal (takes approximately 20 minutes for 500 lines):
python -m graphrag.index --init --root .
- Run the following command in the terminal (takes approximately 20 minutes for 500 lines):
-
Run Global Queries
- Use the appropriate code to perform global queries.
-
Install and Run Neo4j
- Run the following commands:
curl -O https://dist.neo4j.org/neo4j-community-5.21.2-unix.tar.gz
tar -xzf neo4j-community-5.21.2-unix.tar.gz
cd neo4j-community-5.21.2
./bin/neo4j run
- Run the following commands:
-
Convert Parquet Output to CSV
- Use the
converttocsv.pyscript to convert the Parquet output of GRAPHRAG to CSV. Adjust the input and output directories as needed.
- Use the
-
Import Data into Neo4j
- Run the following DDL and DML queries to import your data into Neo4j and start exploring your graph:
// Import Documents
LOAD CSV WITH HEADERS FROM 'file:///create_final_documents.csv' AS row
CREATE (d:Document {
    id: row.id,
    title: row.title,
    raw_content: row.raw_content,
    text_unit_ids: row.text_unit_ids
});

// Import Text Units
LOAD CSV WITH HEADERS FROM 'file:///create_final_text_units.csv' AS row
CREATE (t:TextUnit {
    id: row.id,
    text: row.text,
    n_tokens: toFloat(row.n_tokens),
    document_ids: row.document_ids,
    entity_ids: row.entity_ids,
    relationship_ids: row.relationship_ids
});

// Import Entities
LOAD CSV WITH HEADERS FROM 'file:///create_final_entities.csv' AS row
CREATE (e:Entity {
    id: row.id,
    name: row.name,
    type: row.type,
    description: row.description,
    human_readable_id: toInteger(row.human_readable_id),
    text_unit_ids: row.text_unit_ids
});

// Import Relationships
LOAD CSV WITH HEADERS FROM 'file:///create_final_relationships.csv' AS row
CREATE (r:Relationship {
    source: row.source,
    target: row.target,
    weight: toFloat(row.weight),
    description: row.description,
    id: row.id,
    human_readable_id: row.human_readable_id,
    source_degree: toInteger(row.source_degree),
    target_degree: toInteger(row.target_degree),
    rank: toInteger(row.rank),
    text_unit_ids: row.text_unit_ids
});

// Import Nodes
LOAD CSV WITH HEADERS FROM 'file:///create_final_nodes.csv' AS row
CREATE (n:Node {
    id: row.id,
    level: toInteger(row.level),
    title: row.title,
    type: row.type,
    description: row.description,
    source_id: row.source_id,
    community: row.community,
    degree: toInteger(row.degree),
    human_readable_id: toInteger(row.human_readable_id),
    size: toInteger(row.size),
    entity_type: row.entity_type,
    top_level_node_id: row.top_level_node_id,
    x: toInteger(row.x),
    y: toInteger(row.y)
});

// Import Communities
LOAD CSV WITH HEADERS FROM 'file:///create_final_communities.csv' AS row
CREATE (c:Community {
    id: row.id,
    title: row.title,
    level: toInteger(row.level),
    raw_community: row.raw_community,
    relationship_ids: row.relationship_ids,
    text_unit_ids: row.text_unit_ids
});

// Import Community Reports
LOAD CSV WITH HEADERS FROM 'file:///create_final_community_reports.csv' AS row
CREATE (cr:CommunityReport {
    id: row.id,
    community: row.community,
    full_content: row.full_content,
    level: toInteger(row.level),
    rank: toFloat(row.rank),
    title: row.title,
    rank_explanation: row.rank_explanation,
    summary: row.summary,
    findings: row.findings,
    full_content_json: row.full_content_json
});

// Create indexes for better performance
CREATE INDEX FOR (d:Document) ON (d.id);
CREATE INDEX FOR (t:TextUnit) ON (t.id);
CREATE INDEX FOR (e:Entity) ON (e.id);
CREATE INDEX FOR (r:Relationship) ON (r.id);
CREATE INDEX FOR (n:Node) ON (n.id);
CREATE INDEX FOR (c:Community) ON (c.id);
CREATE INDEX FOR (cr:CommunityReport) ON (cr.id);

// Create relationships after all nodes are imported
MATCH (d:Document)
UNWIND split(d.text_unit_ids, ',') AS textUnitId
MATCH (t:TextUnit {id: trim(textUnitId)})
CREATE (d)-[:HAS_TEXT_UNIT]->(t);

MATCH (t:TextUnit)
UNWIND split(t.document_ids, ',') AS docId
MATCH (d:Document {id: trim(docId)})
CREATE (t)-[:BELONGS_TO]->(d);

MATCH (t:TextUnit)
UNWIND split(t.entity_ids, ',') AS entityId
MATCH (e:Entity {id: trim(entityId)})
CREATE (t)-[:HAS_ENTITY]->(e);

MATCH (t:TextUnit)
UNWIND split(t.relationship_ids, ',') AS relId
MATCH (r:Relationship {id: trim(relId)})
CREATE (t)-[:HAS_RELATIONSHIP]->(r);

MATCH (e:Entity)
UNWIND split(e.text_unit_ids, ',') AS textUnitId
MATCH (t:TextUnit {id: trim(textUnitId)})
CREATE (e)-[:MENTIONED_IN]->(t);

MATCH (r:Relationship)
MATCH (source:Entity {name: r.source})
MATCH (target:Entity {name: r.target})
CREATE (source)-[:RELATES_TO]->(target);

MATCH (r:Relationship)
UNWIND split(r.text_unit_ids, ',') AS textUnitId
MATCH (t:TextUnit {id: trim(textUnitId)})
CREATE (r)-[:MENTIONED_IN]->(t);

MATCH (c:Community)
UNWIND split(c.relationship_ids, ',') AS relId
MATCH (r:Relationship {id: trim(relId)})
CREATE (c)-[:HAS_RELATIONSHIP]->(r);

MATCH (c:Community)
UNWIND split(c.text_unit_ids, ',') AS textUnitId
MATCH (t:TextUnit {id: trim(textUnitId)})
CREATE (c)-[:HAS_TEXT_UNIT]->(t);

MATCH (cr:CommunityReport)
MATCH (c:Community {id: cr.community})
CREATE (cr)-[:REPORTS_ON]->(c);
- Run the following DDL and DML queries to import your data into Neo4j and start exploring your graph:
- Visualize Document to TextUnit Relationships
MATCH (d:Document)-[r:HAS_TEXT_UNIT]->(t:TextUnit)
RETURN d, r, t
LIMIT 50;
By following this guide, you can set up and utilize GraphRAG to its full potential, creating and exploring complex graph data locally. This powerful tool combined with Neo4j offers a robust platform for data visualization and analysis
