This projet contains a collection of Templates to monitor Unifi and other UBNT devices with Zabbix: APs, Switches, Routers (USG and UDMP), AirMax devices, and NVRs
I am currently running those on the current versions of the base software as of Oct 2022: Zabbix 6.2.x, a mix of Unifi 4.x, 5.x and 6.x APs and switches, AirMax 8.7.1, UDMP 1.12.x, controller 7.2.x
I am now testing and exporting from zabbix server 6.2. I am not sure how far backwards compatible those templates are with older versions of Zabbix.
It may be problematic to import those templates in anything less than 6.2. A couple of people have asked to have a version based on 6.0. For now, look at the workaround in patricegautier#64
You need to install jq on your system: https://stedolan.github.io/jq/
On Raspbian, this can be done with:
sudo apt-get install jq
You also need to install expect, again on raspbian that can be done with
sudo apt-get install expect
You need to install mca-dump-short.sh and ssh-run in Zabbix's external script directory
Please confirm where that directory is from the variable ExternalScripts in your zabbix server conf at /etc/zabbix/zabbix_server.conf. On my system this is set to:
ExternalScripts=/usr/lib/zabbix/externalscripts
After cp-ing the scripta to that directory, make sure you have the permissions necessary for zabbix to execute this script:
chown zabbix:zabbix /usr/lib/zabbix/externalscripts /usr/lib/zabbix/externalscripts/mca-dump-short.sh
chmod a+x /usr/lib/zabbix/externalscripts /usr/lib/zabbix/externalscripts/mca-dump-short.sh
and the same for ssh-run
Import zbx_export_templates.yaml into Zabbix, from Configuration > Templates > Import
You should now have the following templates available, and it should be pretty self explanatory what type of device you need to link them to in Zabbix.
Unifi AP
Unifi Switch
Unifi USG
Unifi UDMP
UBNT AirMax
Unifi WiFi Site
Unifi Protect Cloud Key
Unifi Protect NVR4
SunMax SolarPoint
Unifi SSH Host
• You will need to assign the templates with the matching type to hosts you have to create in Zabbix for your unifi devices. Use the 'Agent' interface in Zabbix with the proper IP or DNS entry.
A couple of things on top of that:
• Unifi SSH Host: You have to assign that one to all your devices, on top of the template for that specific type.
For example a Switch should have 2 templates assigned to it: Unifi SSH Host and Unifi Switch
UPDATE: It is no longer necessary to assign SSH Host to APs, Switches, UDMPs or USGs; The corresponding templates are now pulling those values directly. The number of SSH operations and general load on devices is basically halved with this change, since AP and Switches are the most common devices. You should still assign this template to NVRs and Cloud Keys. A future version will remove that requirement as well.
• Unifi SSH High Priority Host is a variant of the first template with higher alert levels that can be used instead; don't assign both to the same device
• Unifi Wifi Site is meant to aggregate WiFi traffic across your wifi networks for a Unifi site. Just assign it to one of the APs that can see all the networks in question and assign the {$AP_GROUP} macro for that host to the name of a zabbix host group that contains all the APs for that site.
These templates use public key SSH to access APs, Switches, Routers, AirMax stations and retrieve data directly, using the mca-dump or mca-status command line utility. Your zabbix server (or your proxies if you use those) will need public key SSH access to all the unifi devices they are monitoring:
1/ You should generate a new key pair for this.
The templates are set up to work with a public-private key pair. For a primer on that you can check out for ex https://www.redhat.com/sysadmin/passwordless-ssh. Since you need zabbix to be able to use those without you in front of the keyboard, you need an empty passphrase.
Zabbix is finicky and this is the specific way I needed to run the generation get a workable keypair (no passphrase, pem format). From your Zabbix server, run:
sudo mkdir ~/.ssh/zabbix && sudo chown zabbix ~/.ssh/zabbix && cd ~/.ssh/zabbix
sudo -u zabbix ssh-keygen -P "" -t rsa  -m pem -f zb_id_rsa
This is what I end up with:
pi@pi:~/.ssh/zabbix $ ls -l
total 20
-rw------- 1 zabbix zabbix 1675 Jul 23 18:57 zb_id_rsa
-rw-r--r-- 1 zabbix zabbix 391 Jul 23 18:57 zb_id_rsa.pub
drwxr-xr-x 2 zabbix zabbix 4096 Sep 13  2020 .
drwxr-xr-x 3 pi     pi     4096 Mar  1 13:54 ..
2/ You will need to specifically enable SSH access on the unifi devices.
For most devices, there is one setting in the Unifi controller UI in Settings > Site and one for the UDMP in the UDMP advanced settings which is separate. This is where you specify the username and password that you will use to log in via SSH
3/ You then need to send your public key to all the devices you want to monitor
For managed devices (APs, Switches), the Unifi controller has handy UI to install your public key on all the devices. This is by far the easiest way to do this.
for UDMPs and AirMax devices, you will need to do it by hand. ssh-copy-id helps there, esp. on the UDMP since those will embarrasingly wipe all your keys at every firmware update and reboot (seriously UBNT):
sudo -u zabbix ssh-copy-id -i <path_to_your_privateKey> yourUserName@oneOfYourUnifiDevicesIP
I have a more sophisticated script I use to do this at https://github.com/patricegautier/certRenewalScripts/blob/master/updatePublicKey.sh
IMPORTANT NOTE: on some Unifi devices (APs and Switches in particular) the authorized keys are stored not in the usual ~/.ssh/authorized_keys, but in ./var/etc/dropbear/authorized_keys. If you provision those keys from the controller UI or using the updatePublicKey script above it will hit the right spot, but ssh-copy-id will not
3/ So now check that your zabbix server can actually get in with SSH with:
sudo -u zabbix ssh -i <fullPathToYourPrivateKey> yourUserName@oneOfYourUnifiDevicesIP
If you are set up correctly that should get you in without asking for a password
You can also check that the script used to retrieve data is working correctly for a given device with:
sudo -u zabbix /usr/lib/zabbix/externalscripts/mca-dump-short.sh -d <theDeviceIP> -u <yourUnifiUserName> -i <fullPathToYourPrivateKey> -t <UDMP|AP|SWITCH|CK>
You should get a JSON document in return.
If you use a Zabbix proxy, it will initiate the connection to the hosts it monitors, so you need to run those tests there.
4/ You then need to point Zabbix to those keys.
In your Zabbix conf file (/etc/zabbix/zabbix_server.conf typically) add:
SSHKeyLocation=/the/path/to/your/keys
in my case I have:
SSHKeyLocation=/home/pi/.ssh/zabbix
if you run your Zabbix server in a Docker container (as I do), you have to keep in mind that all these SSH accesses take place from within that container.
A few things then:
1/ You need to make sure your private keys are going to resist the container coming and going, and set them up in a persistent docker volume:
from my Zabbix Server docker-compose.yml:
volumes:
  - ${HOME}/Deployment/zabbixServer/sshKeys:/var/lib/zabbix/ssh_keys:ro
  - ${HOME}/Deployment/zabbixServer/externalScripts:/usr/lib/zabbix/externalscripts:ro
  		...
note that /var/lib/zabbix/ssh_keys is the default location for zabbix keys, and so the running container will find them there.
Also note that I have /usr/lib/zabbix/externalscripts also mapped to a persistent volume; you can just pust mca_dump_short.sh and others in that volume
2/ You can then either run all the ssh commands to setup/manage keys from within the Zabbix server container or from the outside targetting the persistent volume. From inside you might run something like:
docker exec zabbix-server ssh-keygen -P "" -t rsa -m pem -f /var/lib/zabbix/ssh_keys/zb_id_rsa
to create the public/private key pair. Similarly to explicitly check the container can get to a particular device:
docker exec zabbix-server /usr/lib/zabbix/externalscripts/mca-dump-short.sh -d <ip> -u <userName> -i /var/lib/zabbix/ssh_keys/zb_id_rsa -t <UDMP|AP|SWITCH|CK>
In Zabbix, in Administration > General > Macros, you will need to set a value for all the following macros:
The username that will let the zabbix server (or proxy) log in to your unifi devices via SSH
The full path where to find the public private key pair to be able to SSH into your Unifi devices. The private key should be in the SSHKeyLocation directory from your zabbix conf file. For my system for ex, this is set to /home/pi/.ssh/zabbix/zb_id_rsa
Set this macro on each host, in case you are using a non standard port for SSH (!=22)
The file name for your private key in SSHKeyLocation. For me this is set to zb_id_rsa
The file name for your public key in SSHKeyLocation. For me this is set to zb_id_rsa.pub
If you are having trouble geting ssh going with public/private key pair authentication, you can optionally supply the path of a file that contains the SSH password to your Unifi devices. If supplied, the template will use sshpass to provide the password to ssh. There are more security implications to doing this than using the keypair method..
How often to poll Unifi devices for new data. I have this set to '1m'
How long to wait for devices to return data. I have this set to '5' (not 5s), as some switch regularly take 2-3s to respond. Note that you should have the overall Zabbix TIMEOUT, or ZBX_TIMEOUT if you are using the container version set to at a value greater than this
How often to discover features of devices, mostly switch port names; I have this set to 15mns
The temperature in Celsius above which to alert. I have set this to '90'.
The period after which to alert for most checks. I have this set to '10m'. The triggers on this period are level 'Warning'
Set this to your cameras' password. There's UI in the protect controller to set this on all cameras at once.
You will also need to enable SSH for cameras, the instructions are at:
https://help.ui.com/hc/en-us/articles/360015877853-UniFi-Protect-Enabling-Camera-SSH-Access
The threshold of camera outoing bandwidth below which to alert. I have this set to 500000 i.e 500kbps.
I have defined some moving average items with the suffix _smooth to help make graphs easier to read. This is set to '10m' for me.
The load average value above which to issue a info. The consensus is 1 for this. Note that for switches and APs this value has less meaning since they process packets with specialized HW and this macro is overridden in the template to avoid too many warnings
The load average value above which to issue a warning. I have this set to 2. Note that for switches and APs this value has less meaning since they process packets with specialized HW and this macro is overridden in the template to avoid too many warnings
The percentages above which to issue and info/average event for channel interferences. I have this set to 30 and 50 respectively You can customize this for 2G/5G with {$UNIFI_CHANNEL_INTERFERENCE_INFO_THRESHOLD:"ng"} or {$UNIFI_CHANNEL_INTERFERENCE_AVERAGE_THRESHOLD:"na"} values
The percentages above which to issue and info/average event for Channel usage. I have this set to 30 and 50 respectively You can customize this for 2G/5G with {$UNIFI_CHANNEL_USAGE_INFO_THRESHOLD:"ng"} or {$UNIFI_USAGE_INTERFERENCE_INFO_THRESHOLD:"na"} values
The percentages above which to issue and info/average event for switch Port usage. I have this set to 40, 60 and 50 respectively
Note: those macros do not come with the import, you have to create them by hand; they will survive subsequent imports..
If you got this far, congratulations the install is complete! Now for the funner part:
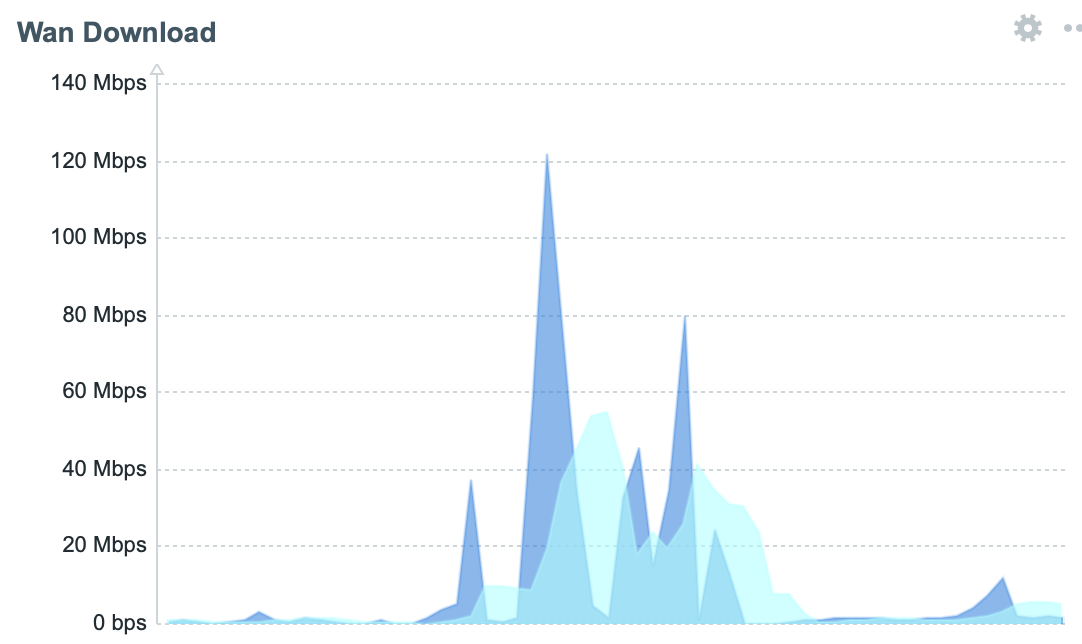
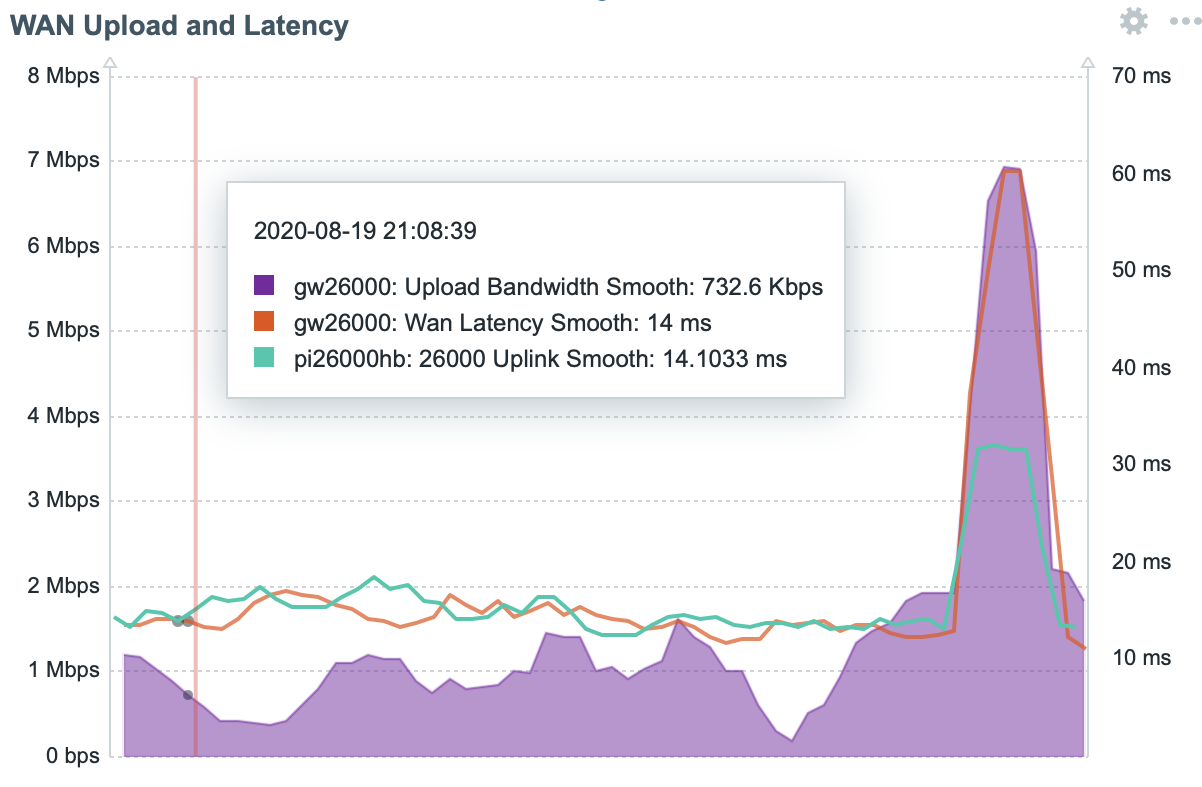
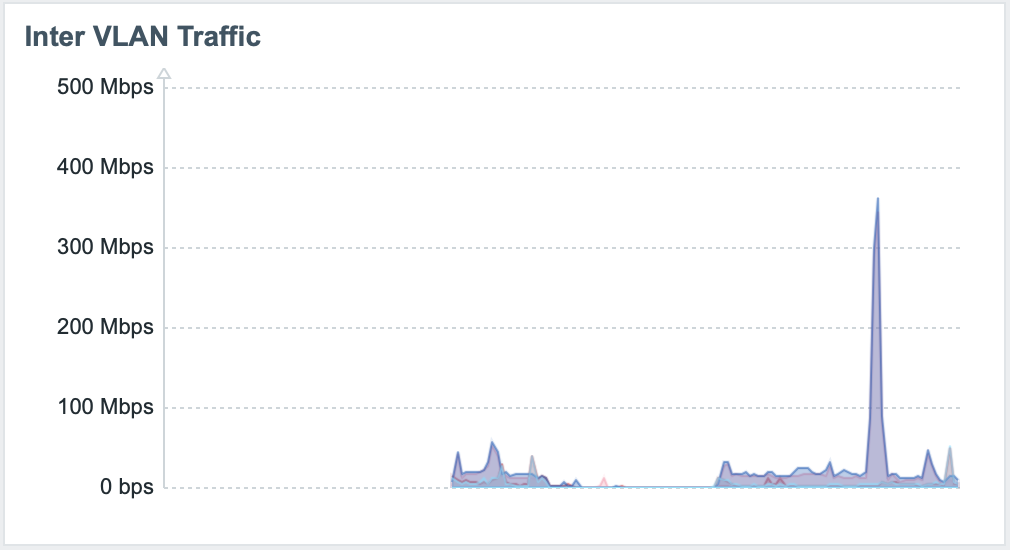
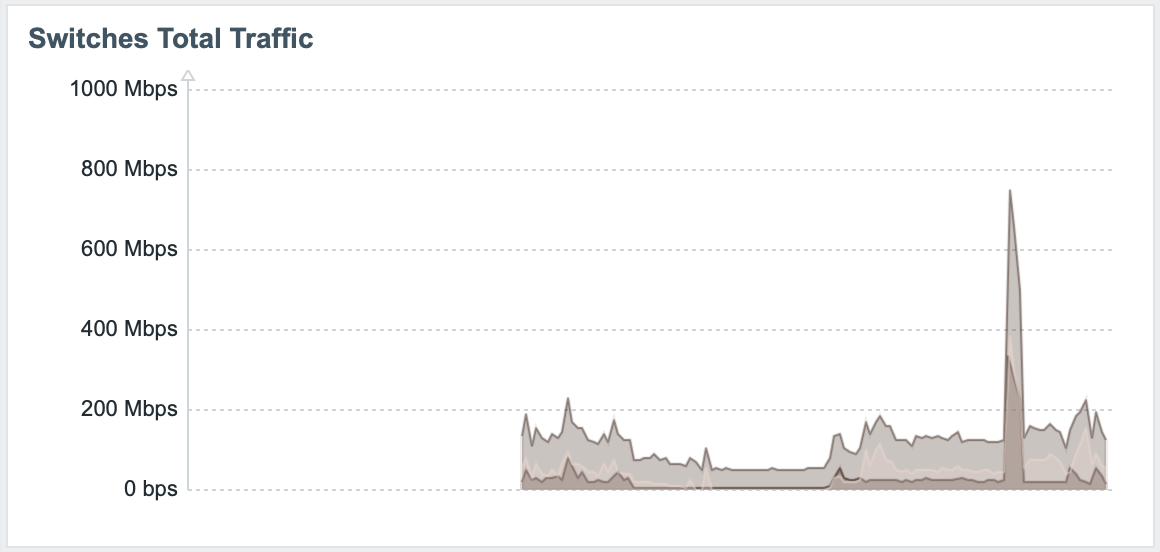
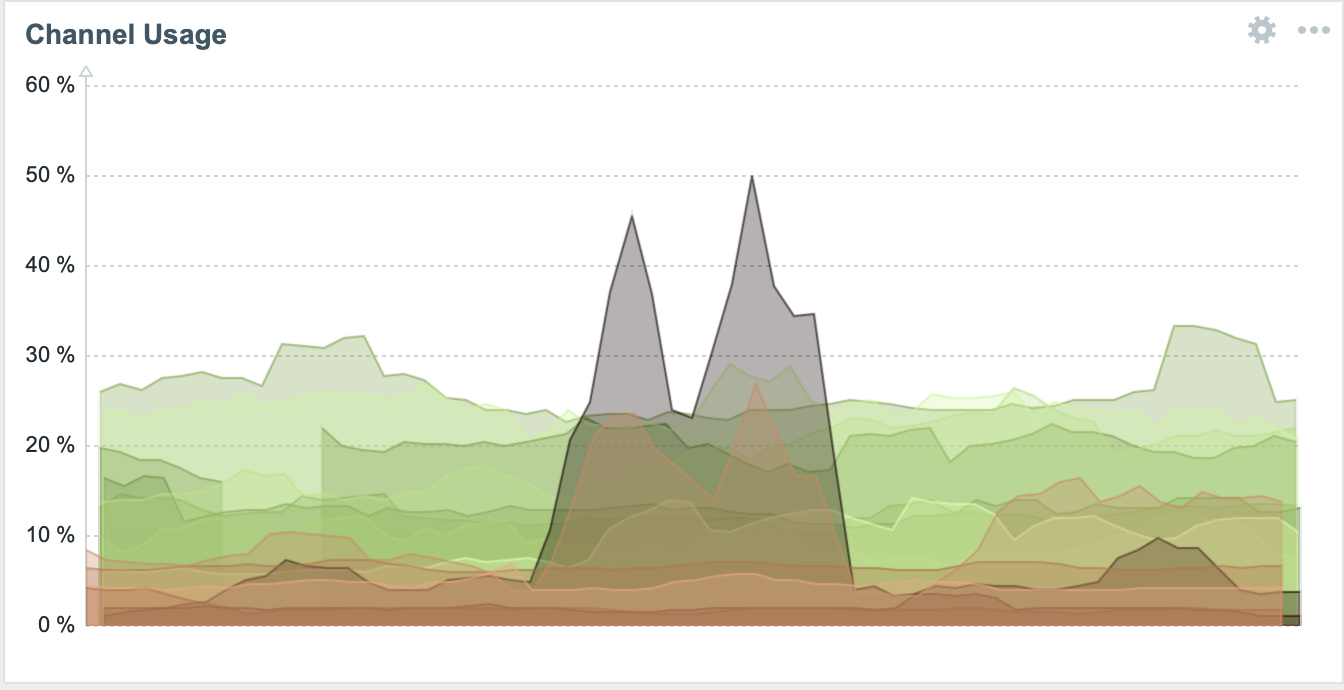
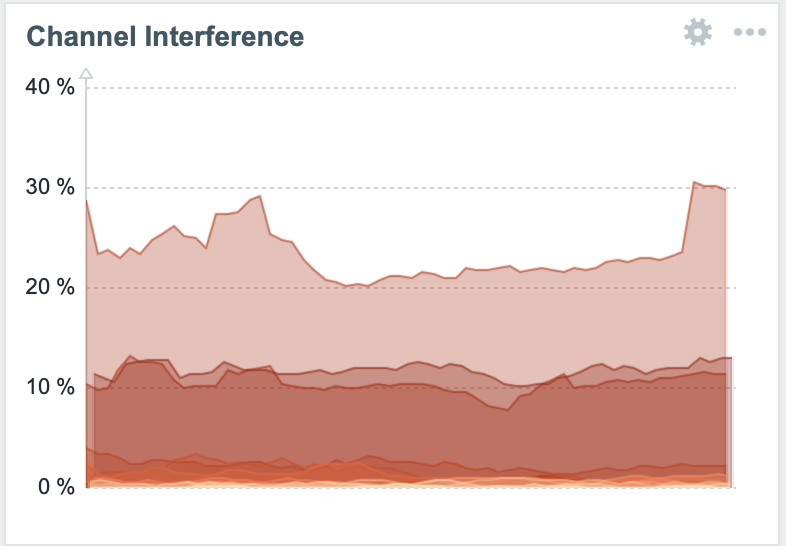
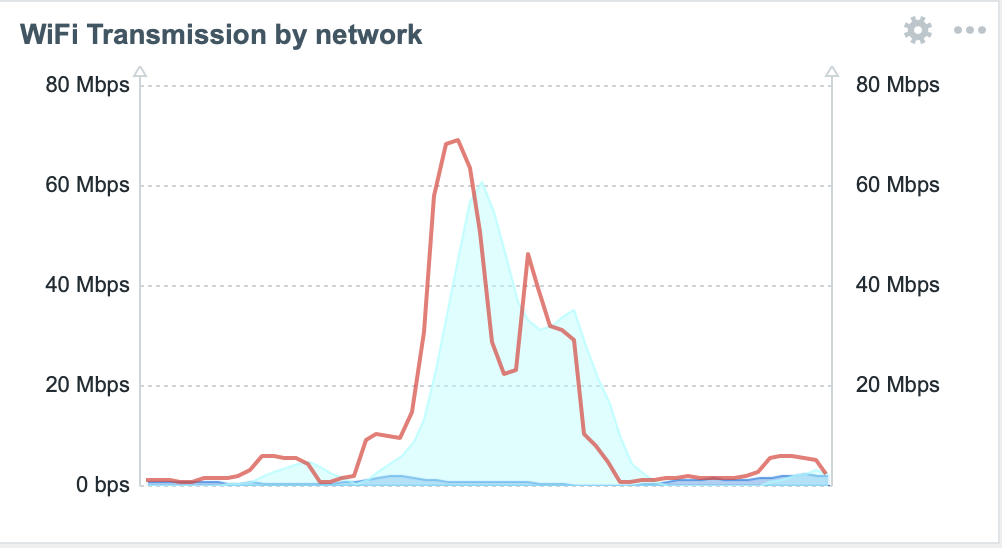
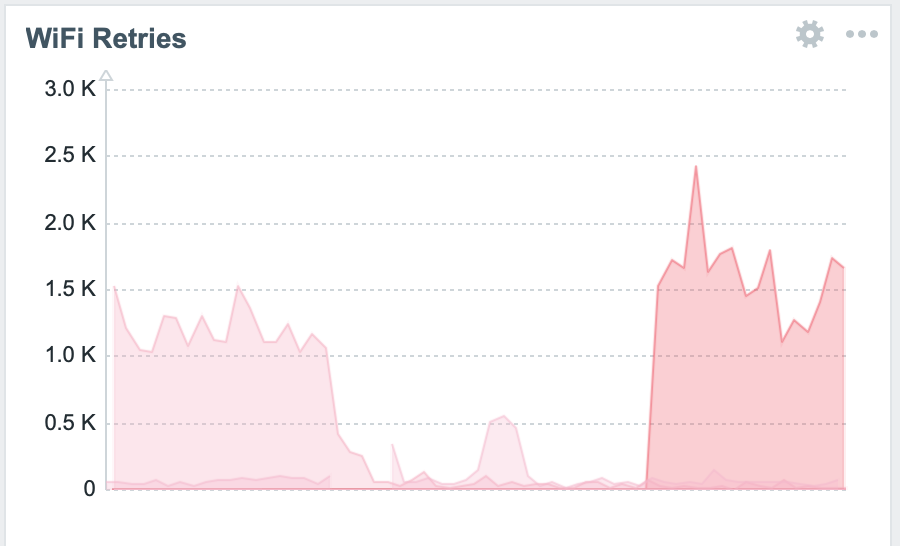
If everything is working you should be able to see data flowing in the Monitoring > Latest Data section of Zabbix. Time to set up some graphs.. I have some basic graphs setup in the templates themselves, unfortunately Zabbix doesn't to have a good way to share the fancier graphs as it does for templates, so here is a quick rundown of what I have setup..:
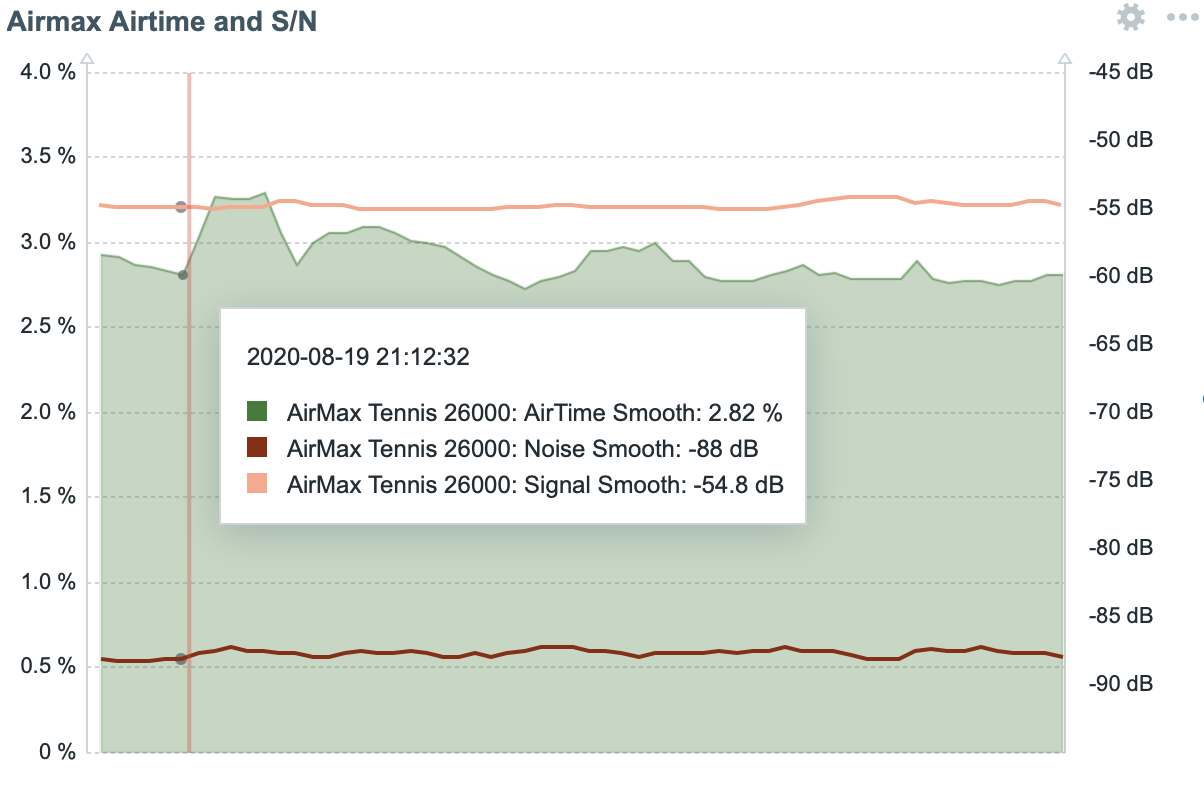
Observe the tight correlation between upload bandwidth and latency.. Cable technology at its finest!
I have found this one to be useful to get router usage down
Useful to point to potential bottlenecks
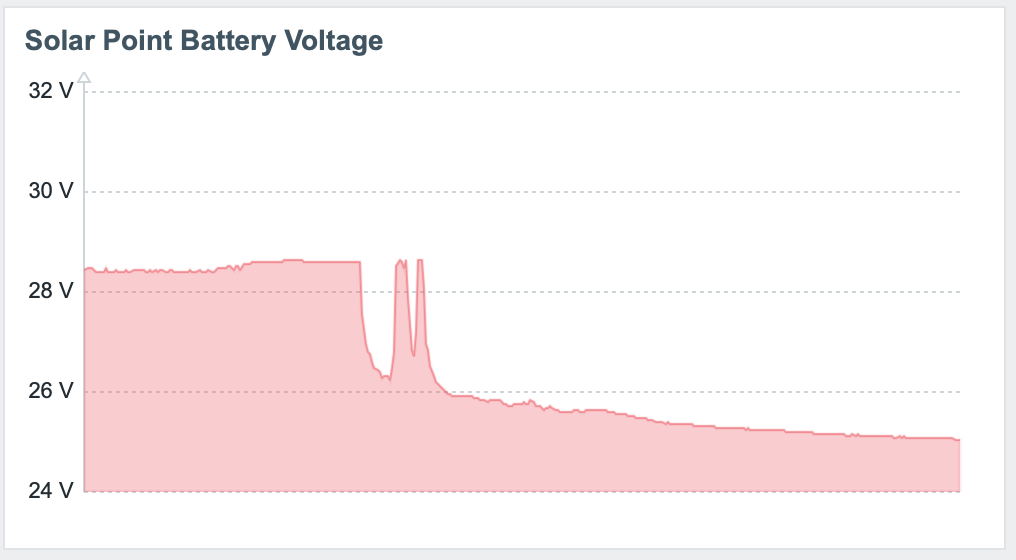
Following the same steps as mca-dump-short.sh above, install solarpointBattery.sh as a Zabbix external script
The SunMax SolarPoints do not support SSH, so you'll have to set up the following macros seperately, either in Administration > General > Macros or on the host directly depending on your case:
The username that will let the zabbix server (or proxy) log in to the SolarPoint device
The password that will let the zabbix server (or proxy) log in to the SolarPoint device
That will give you access to power production and consumption, as well as set a trigger on PoE ports being suspended
• You should simply have to import the updates zbx_export_templates.yaml into zabbix and those will replace the current template. • Also check if there are any updates to any of the scripts (mcaDumpShort.sh in particular) and if so please copy those files in the right spot on your zabbix server/proxies • Macros that you have defined in Administration > General > Macros will survive importing a new template version, so no action needed there • Macros that you have defined directly on one of your devices that uses one of the templates in this project also survive • If you did define some macros on the templates themselves, those will get blown out during the import.. You can either move those macros to one of the aforementioned spts or if that's not practicaly you can also define your own template that links to one of the templates in this projects, put the macros on that new template and have your devices use that. It's also a good way to customize the templates to your case, though I would of course hope you would contribute your enhancements back!
• Your zabbix server log file (/var/log/zabbix/zabbix_server.log usually) can be a good source of debugging info, esp if you set DebugLevel=4 in /etc/zabbix/zabbix_server.conf. Restart the Zabbix server with
sudo service zabbix-server restart
• mcaDumpShort.sh is also logging all errors to /tmp/mcaDumpShort.err on the zabbixServer (or proxy if you are using one). It's a good source of info to debug issues too.
• If you see timeouts, there are 2 values to experiment with:
in your zabbix server conf, usually /etc/zabbix/zabbix_server.conf add adjust the zabbix timeout (default is 3s):
TimeOut=30
and then in the Zabbix UI, change the macro value for UNIFI_CHECK_TIMEOUT in Administration > General Macros so sth a little smaller than the first value, maybe 25 in this case.
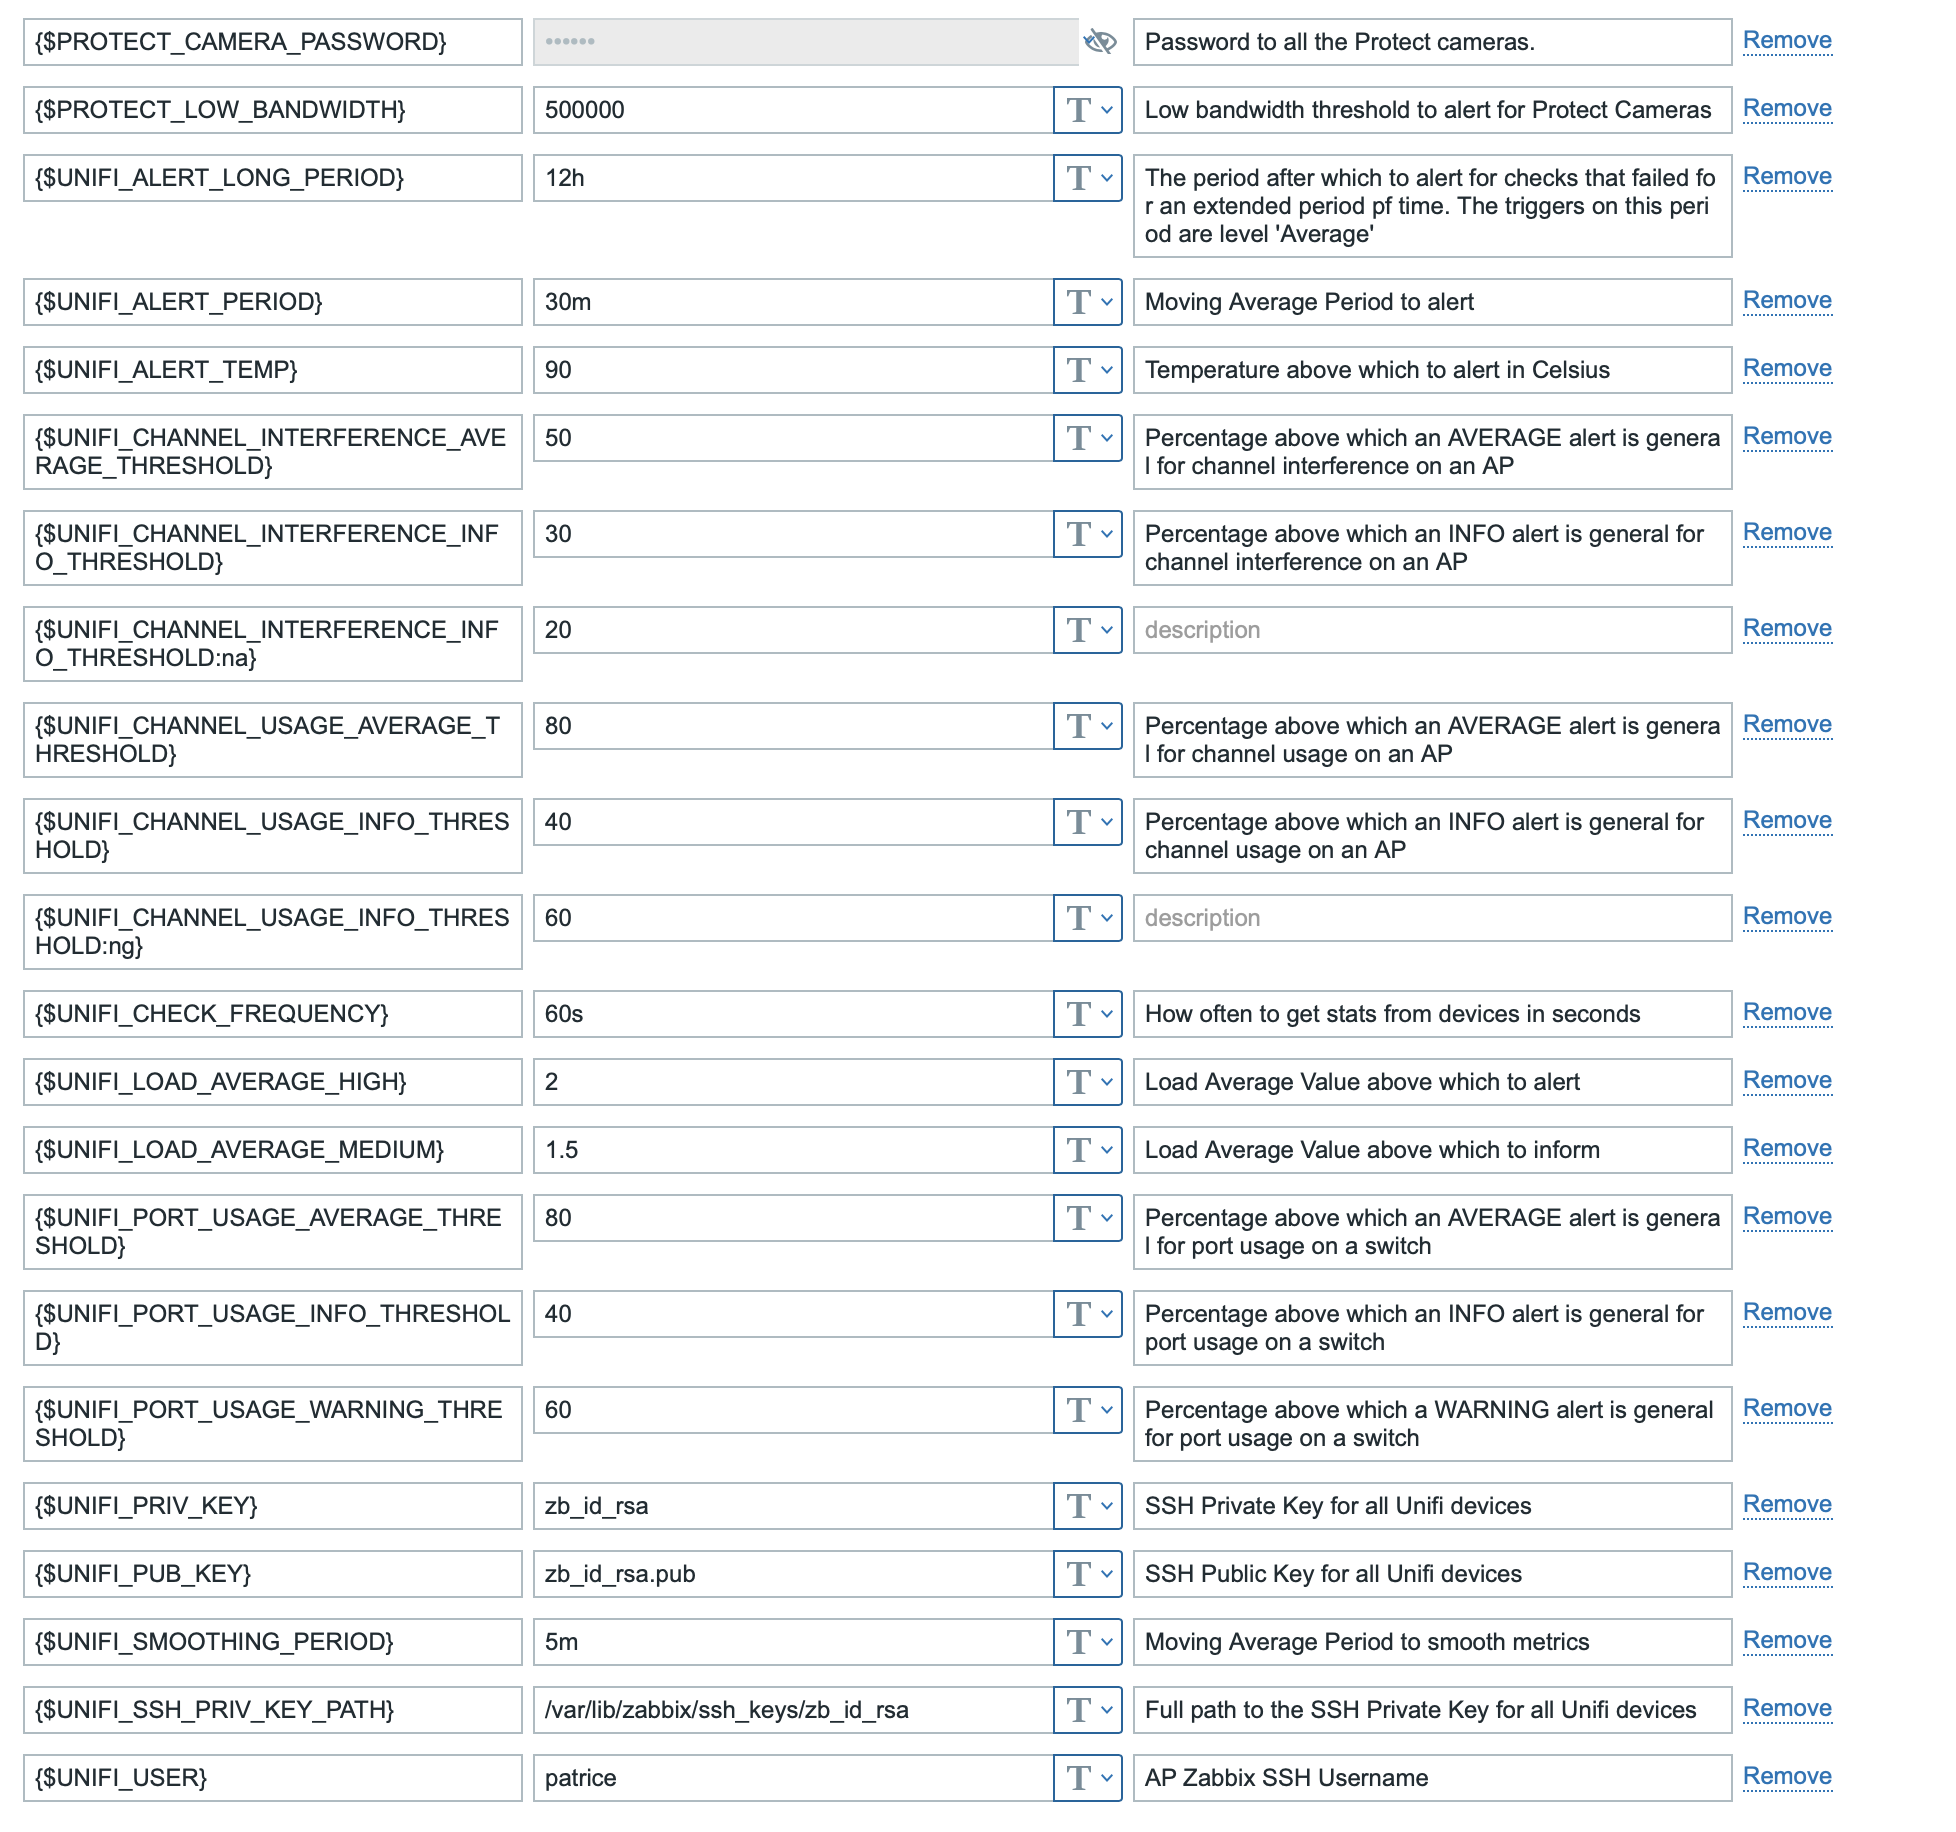
• Macros Cheat Sheet
This is my set of values
• libSSH can be a source of problems:
- if some of your items randomly fail with 'Cannot read data from SSH server' (in the UI or in /var/log/zabbix/zabbix_server.log), the likely culprit is an outdated version of libssh, which sometimes returns an error code even on success. You have to compile the last version from sources from libssh.org and recompile I'm afraid.. This was a problem on Raspbian buster for libssh 0.8.x and is confirmed fixed with libssh 0.9.5 at least.
On Raspbian Bullseye you can find libssl at https://packages.debian.org/bullseye/amd64/libssh-4/download
I am just downloading sources from https://www.libssh.org and recompiling.
Incidentally, this is still a problem with Zabbix 6.0.0 containers, which are still packaged with libssh 0.9.3
- In Ubuntu 20.04 the "ssh.run" key does not work with the standard libssh. Just install the latest version from https://launchpad.net/~kedazo/+archive/ubuntu/libssh-0.7.x and everything is OK.
• if an import fails with 'Invalid parameter "/interfaceid": cannot be empty.', it might be caused by the presence of an older version of the templates. Remove them before re-importing..
• SSH to Unifi devices is invoked with the SSH option "-o StrictHostKeyChecking=accept-new" which means it will automatically accept their SSH host key on first connection to that IP or Host Name. The default SSH setting is to ask for the user's confirmation on first connection but I deemed the extra convenience of not having to do this to be worth it in the context of a Home/Small Business Unifi setup
• The reason for the existence of the mca-dump-short external script instead of using SSH items directly if you are wondering is that there is a 64k limit to ssh.run items in zabbix, which we run into running mca-dump on large switches for ex. To raise that limit in Zabbix you have to recompile from sources and I didn't want to have that dependency. The only reliable way I found around this is to run an external script to retrieve the mca-dump data from device, and then post-process it with jq to make the data < 64k on the way into Zabbix
i.e automatically create all the proper hosts connected to the proper templates via a single connection to the Unifi controller
Most of the pain in setting those templates up is debugging the SSH connections.. Add pre-processing to check for valid json on mca-dump-short to all templates
There is a mountain of information to be retrieved from devices. I added what made most sense to me, but let me know if you would like to see added. Also there is potential for quite a few more triggers..
