In this exercise, we're going to be practicing with the git rebase --interactive command (abbreviated to git rebase -i).
Before beginning, clone this repo locally and create a new branch with git checkout -b <your branch name>
Right now, you have no git history for this repo! In part one, we'll add the commits you need in order to rebase in part two.
-
In favorites directory, you'll find several json files that already have examples.
-
In
animals.json, please add your name and favorite animal as shown in the example. Don't worry too much about syntax being perfect. -
Before continuing, stage and commit your changes with a message. Don't push up to Github just yet.
git add <your file>
git commit -m <your commit message>
-
Repeat steps 2 and 3 for the remaining json files.
-
At this point, you should have 7 individual commits on your branch. You can verify this by running
git logto see the commits, andgit statusto see how far your local branch is ahead of Github. -
Push your changes upstream to Github with
git push -u origin <your branch name>.-uis short for--set-upstream-towhich sets the remote branch.
Now you have commits to work with! Yay!
- It's time to start rebasing. You can enter interactive rebase by running one of the following:
git rebase main --interactive
git rebase main -i
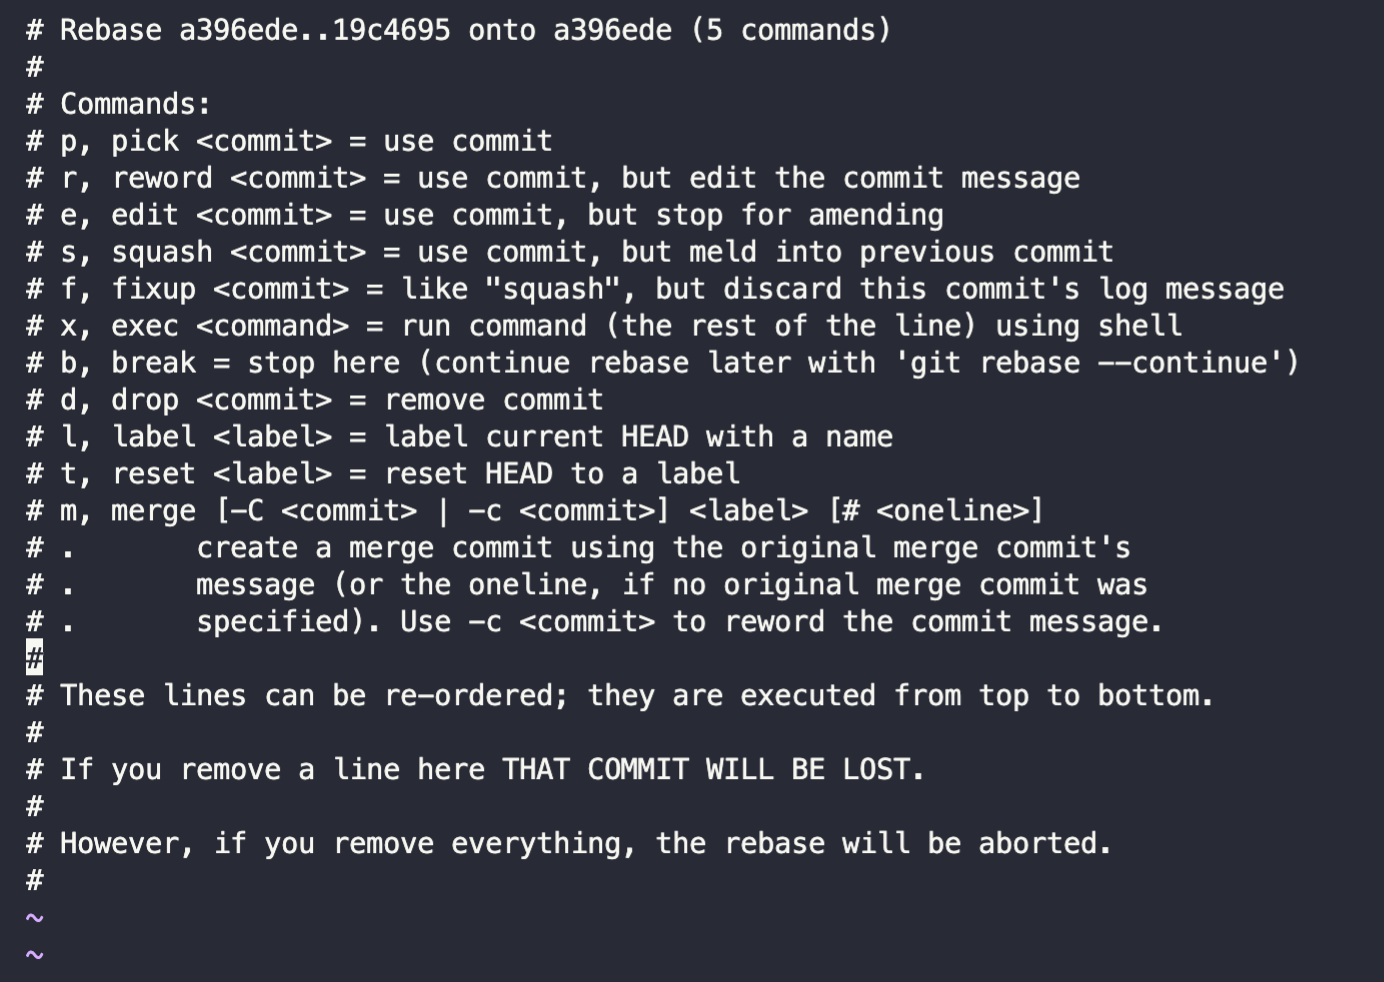
This should take you to a screen that looks something like this:
Most of these commands are pretty specific. For the most part, you won't need to use most of them very often. Today, we're going to try out pick, reword, edit, squash, and drop.
In order to edit in zsh, you'll need to do SHIFT + i or SHIFT + r to get into edit mode. From there, you should be able to make the edits below. To quit edit mode and leave this screen, do ESC, then :wq! as noted below.
-
Using the arrow keys, navigate to the line that contains your first commit, the animals.json one. We'll be keeping your
animalscommit, so you don't have to change anything there. -
Key down to the line containing your
colorscommit and replace the wordpickwithreword. -
Key down to the line containing your
gamescommit and replace the wordpickwithedit. -
Next we'll be skipping the ice cream commit. We still want to keep it, so leave
pickthere. Key down to the line containing yourmusiccommit and replace the wordpickwithsquash. -
Key down to the line containing your
seasonscommit and replace the wordpickwithdrop. -
Pick your
snackscommit, i.e. no changes needed to that line. -
Save and exit your rebase by keying out of the commit lines and typing
:wq!andenter.:wq!writes your changes and quits the rebase UI. -
Watch as your rebase executes. It will stop in two places: at the
colorscommit, where you can edit the commit message, and thegamescommit, where you can edit the actual commit changes. -
Once it's complete, run
git logand inspect the changes. -
Congrats! You just finished an interactive rebase. What next? You'll see errors if you trying running
git pushon the branch you just rebased. This is because the rebase re-assigned the commit hash of every commit on your branch. Although the changes/diff may be the same, git acknowledges your new branch as a set of completely different commits. For that reason, it's necessary to force push to see your freshly rebased branch up on Github.
git push --force origin <your branch name>
git push -f origin <your branch name>
Be sure to double check the branch you're (git status) and the commits on your branch (git log) before force pushing. Force pushing can be a destructive action! See slide in presentation for more considerations around rebasing.
Don't want to make alterations to your branch, but still want to rebase? 🤔 Simply run git rebase <base branch name>. You'll still need to force push if pushing up to a remote branch.
