| title | description | author | manager | ms.author | ms.date | ms.topic | ms.service | services | ms.reviewer | ms.suite | tags |
|---|---|---|---|---|---|---|---|---|---|---|---|
Connect to IBM Informix database - Azure Logic Apps | Microsoft Docs |
Manage resources with IBM Informix REST APIs and Azure Logic Apps |
gplarsen |
jeconnoc |
plarsen |
09/26/2016 |
article |
logic-apps |
logic-apps |
klam, LADocs |
integration |
connectors |
Microsoft connector for Informix connects Logic Apps to resources stored in an IBM Informix database. The Informix connector includes a Microsoft client to communicate to remote Informix server computers across a TCP/IP network. This includes cloud databases, such as IBM Informix for Windows running in Azure virtualization, and on-premises databases using the on-premises data gateway. See the supported list of IBM Informix platforms and versions (in this topic).
The connector supports the following database operations:
- List database tables
- Read one row using SELECT
- Read all rows using SELECT
- Add one row using INSERT
- Alter one row using UPDATE
- Remove one row using DELETE
This topic shows you how to use the connector in a logic app to process database operations.
To learn more about Logic Apps, see create a logic app.
This connector supports the following logic app actions:
- Getables
- GetRow
- GetRows
- InsertRow
- UpdateRow
- DeleteRow
Creating a logic app for any operation is comprised of many steps performed through the Microsoft Azure portal.
Within the logic app, you can add an action to list tables in a Informix database. This action instructs the connector to process a Informix schema statement, such as CALL SYSIBM.SQLTABLES.
- In the Azure start board, select + (plus sign), Web + Mobile, and then Logic App.
- Enter the Name, such as
InformixgetTables, Subscription, Resource group, Location, and App Service Plan. Select Pin to dashboard, and then select Create.
-
In the Logic Apps Designer, select Blank LogicApp in the Templates list.
-
In the triggers list, select Recurrence.
-
In the Recurrence trigger, select Edit, select Frequency drop-down to select Day, and then select Interval to type 7.
-
Select the + New step box, and then select Add an action.
-
In the actions list, type informix in the Search for more actions edit box, and then select Informix - Get tables (Preview).

-
In the Informix - Get tables configuration pane, select checkbox to enable Connect via on-premises data gateway. Notice that the settings change from cloud to on-premises.
- Type value for Server, in the form of address or alias colon port number. For example, type
ibmserver01:9089. - Type value for Database. For example, type
nwind. - Select value for Authentication. For example, select Basic.
- Type value for Username. For example, type
informix. - Type value for Password. For example, type
Password1. - Select value for Gateway. For example, select datagateway01.
- Type value for Server, in the form of address or alias colon port number. For example, type
-
Select Create, and then select Save.

-
In the InformixgetTables blade, within the All runs list under Summary, select the first-listed item (most recent run).
-
In the Logic app run blade, select Run Details. Within the Action list, select Get_tables. See the value for Status, which should be Succeeded. Select the Inputs link to view the inputs. Select the Outputs link, and view the outputs; which should include a list of tables.


This connector supports connections to database on-premises and in the cloud using the following connection properties.
| Property | Description |
|---|---|
| server | Required. Accepts a string value representing a TCP/IP address or alias, in either IPv4 or IPv6 format, followed (colon-delimited) by a TCP/IP port number. |
| database | Required. Accepts a string value representing a DRDA Relational Database Name (RDBNAM). Informix accepts a 128-byte string (database is known as an IBM Informix database name (dbname)). |
| authentication | Optional. Accepts a list item value, either Basic or Windows (kerberos). |
| username | Required. Accepts a string value. |
| password | Required. Accepts a string value. |
| gateway | Required. Accepts a list item value, representing the on-premises data gateway defined to Logic Apps within the storage group. |
This connector can access an on-premises Informix database using the on-premises data gateway. See gateway topics for more information.
-
In the Gateways configuration pane, select checkbox to enable Connect via gateway. See the settings change from cloud to on-premises.
-
Type value for Server, in the form of address or alias colon port number. For example, type
ibmserver01:9089. -
Type value for Database. For example, type
nwind. -
Select value for Authentication. For example, select Basic.
-
Type value for Username. For example, type
informix. -
Type value for Password. For example, type
Password1. -
Select value for Gateway. For example, select datagateway01.
-
Select Create to continue.
This connector can access a cloud Informix database.
-
In the Gateways configuration pane, leave the checkbox disabled (unclicked) Connect via gateway.
-
Type value for Connection name. For example, type
hisdemo2. -
Type value for Informix server name, in the form of address or alias colon port number. For example, type
hisdemo2.cloudapp.net:9089. -
Type value for Informix database name. For example, type
nwind. -
Type value for Username. For example, type
informix. -
Type value for Password. For example, type
Password1. -
Select Create to continue.


You can create a logic app action to fetch all rows in the Informix table. This action instructs the connector to process an Informix SELECT statement, such as SELECT * FROM AREA.
- In the Azure start board, select + (plus sign), Web + Mobile, and then Logic App.
- Enter the Name (e.g. "InformixgetRows"), Subscription, Resource group, Location, and App Service Plan. Select Pin to dashboard, and then select Create.
-
In the Logic Apps Designer, select Blank LogicApp in the Templates list.
-
In the triggers list, select Recurrence.
-
In the Recurrence trigger, select Edit, select Frequency drop-down to select Day, and then select Interval to type 7.
-
Select the + New step box, and then select Add an action.
-
In the actions list, type informix in the Search for more actions edit box, and then select Informix - Get rows (Preview).
-
In the Get rows (Preview) action, select Change connection.
-
In the Connections configuration pane, select Create new.

-
In the Gateways configuration pane, leave the checkbox disabled (unclicked) Connect via gateway.
- Type value for Connection name. For example, type
HISDEMO2. - Type value for Informix server name, in the form of address or alias colon port number. For example, type
HISDEMO2.cloudapp.net:9089. - Type value for Informix database name. For example, type
NWIND. - Type value for Username. For example, type
informix. - Type value for Password. For example, type
Password1.
- Type value for Connection name. For example, type
-
Select Create to continue.
-
In the Table name list, select the down arrow, and then select AREA.
-
Optionally, select Show advanced options to specify query options.
-
Select Save.

-
In the InformixgetRows blade, within the All runs list under Summary, select the first-listed item (most recent run).
-
In the Logic app run blade, select Run Details. Within the Action list, select Get_rows. See the value for Status, which should be Succeeded. Select the Inputs link to view the inputs. Select the Outputs link, and view the outputs; which should include a list of rows.


You can create a logic app action to add one row in a Informix table. This action instructs the connector to process a Informix INSERT statement, such as INSERT INTO AREA (AREAID, AREADESC, REGIONID) VALUES ('99999', 'Area 99999', 102).
- In the Azure start board, select + (plus sign), Web + Mobile, and then Logic App.
- Enter the Name, such as
InformixinsertRow, Subscription, Resource group, Location, and App Service Plan. Select Pin to dashboard, and then select Create.
-
In the Logic Apps Designer, select Blank LogicApp in the Templates list.
-
In the triggers list, select Recurrence.
-
In the Recurrence trigger, select Edit, select Frequency drop-down to select Day, and then select Interval to type 7.
-
Select the + New step box, and then select Add an action.
-
In the actions list, type informix in the Search for more actions edit box, and then select Informix - Insert row (Preview).
-
In the Get rows (Preview) action, select Change connection.
-
In the Connections configuration pane, select to select an connection. For example, select hisdemo2.

-
In the Table name list, select the down arrow, and then select AREA.
-
Enter values for all required columns (see red asterisk). For example, type
99999for AREAID, typeArea 99999, and type102for REGIONID. -
Select Save.

-
In the InformixinsertRow blade, within the All runs list under Summary, select the first-listed item (most recent run).
-
In the Logic app run blade, select Run Details. Within the Action list, select Get_rows. See the value for Status, which should be Succeeded. Select the Inputs link to view the inputs. Select the Outputs link, and view the outputs; which should include the new row.


You can create a logic app action to fetch one row in a Informix table. This action instructs the connector to process a Informix SELECT WHERE statement, such as SELECT FROM AREA WHERE AREAID = '99999'.
- In the Azure start board, select + (plus sign), Web + Mobile, and then Logic App.
- Enter the Name, such as
InformixgetRow, Subscription, Resource group, Location, and App Service Plan. Select Pin to dashboard, and then select Create.
-
In the Logic Apps Designer, select Blank LogicApp in the Templates list.
-
In the triggers list, select Recurrence.
-
In the Recurrence trigger, select Edit, select Frequency drop-down to select Day, and then select Interval to type 7.
-
Select the + New step box, and then select Add an action.
-
In the actions list, type informix in the Search for more actions edit box, and then select Informix - Get rows (Preview).
-
In the Get rows (Preview) action, select Change connection.
-
In the Connections configurations pane, select to select an existing connection. For example, select hisdemo2.
-
In the Table name list, select the down arrow, and then select AREA.
-
Enter values for all required columns (see red asterisk). For example, type
99999for AREAID. -
Optionally, select Show advanced options to specify query options.
-
Select Save.

-
In the InformixgetRow blade, within the All runs list under Summary, select the first-listed item (most recent run).
-
In the Logic app run blade, select Run Details. Within the Action list, select Get_rows. See the value for Status, which should be Succeeded. Select the Inputs link to view the inputs. Select the Outputs link, and view the outputs; which should include row.


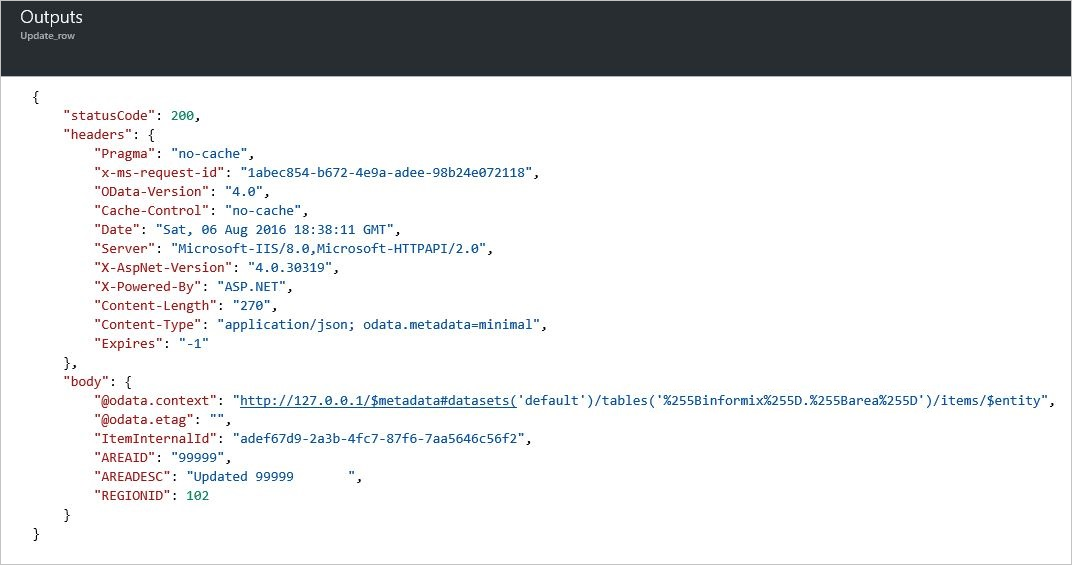
You can create a logic app action to change one row in a Informix table. This action instructs the connector to process a Informix UPDATE statement, such as UPDATE AREA SET AREAID = '99999', AREADESC = 'Area 99999', REGIONID = 102).
- In the Azure start board, select + (plus sign), Web + Mobile, and then Logic App.
- Enter the Name, such as
InformixupdateRow, Subscription, Resource group, Location, and App Service Plan. Select Pin to dashboard, and then select Create.
-
In the Logic Apps Designer, select Blank LogicApp in the Templates list.
-
In the triggers list, select Recurrence.
-
In the Recurrence trigger, select Edit, select Frequency drop-down to select Day, and then select Interval to type 7.
-
Select the + New step box, and then select Add an action.
-
In the actions list, type informix in the Search for more actions edit box, and then select Informix - Update row (Preview).
-
In the Get rows (Preview) action, select Change connection.
-
In the Connections configurations pane, select to select an existing connection. For example, select hisdemo2.
-
In the Table name list, select the down arrow, and then select AREA.
-
Enter values for all required columns (see red asterisk). For example, type
99999for AREAID, typeUpdated 99999, and type102for REGIONID. -
Select Save.

-
In the InformixupdateRow blade, within the All runs list under Summary, select the first-listed item (most recent run).
-
In the Logic app run blade, select Run Details. Within the Action list, select Get_rows. See the value for Status, which should be Succeeded. Select the Inputs link to view the inputs. Select the Outputs link, and view the outputs; which should include the new row.


You can create a logic app action to remove one row in a Informix table. This action instructs the connector to process a Informix DELETE statement, such as DELETE FROM AREA WHERE AREAID = '99999'.
- In the Azure start board, select + (plus sign), Web + Mobile, and then Logic App.
- Enter the Name, such as
InformixdeleteRow, Subscription, Resource group, Location, and App Service Plan. Select Pin to dashboard, and then select Create.
-
In the Logic Apps Designer, select Blank LogicApp in the Templates list.
-
In the triggers list, select Recurrence.
-
In the Recurrence trigger, select Edit, select Frequency drop-down to select Day, and then select Interval to type 7.
-
Select the + New step box, and then select Add an action.
-
In the actions list, type informix in the Search for more actions edit box, and then select Informix - Delete row (Preview).
-
In the Get rows (Preview) action, select Change connection.
-
In the Connections configurations pane, select an existing connection. For example, select hisdemo2.
-
In the Table name list, select the down arrow, and then select AREA.
-
Enter values for all required columns (see red asterisk). For example, type
99999for AREAID. -
Select Save.

-
In the InformixdeleteRow blade, within the All runs list under Summary, select the first-listed item (most recent run).
-
In the Logic app run blade, select Run Details. Within the Action list, select Get_rows. See the value for Status, which should be Succeeded. Select the Inputs link to view the inputs. Select the Outputs link, and view the outputs; which should include the deleted row.


This connector supports the following IBM Informix versions, when configured to support Distributed Relational Database Architecture (DRDA) client connections.
- IBM Informix 12.1
- IBM Informix 11.7
View any triggers and actions defined in the swagger, and also see any limits in the connector details.
Create a logic app. Explore the other available connectors in Logic Apps at our APIs list.