| title | description | services | documentationcenter | author | manager | ms.assetid | ms.service | ms.workload | ms.tgt_pltfrm | ms.devlang | ms.topic | ms.date | ms.author | robots |
|---|---|---|---|---|---|---|---|---|---|---|---|---|---|---|
Tutorial: Create a pipeline using Copy Wizard | Microsoft Docs |
In this tutorial, you create an Azure Data Factory pipeline with a Copy Activity by using the Copy Wizard supported by Data Factory |
data-factory |
linda33wj |
craigg |
b87afb8e-53b7-4e1b-905b-0343dd096198 |
data-factory |
data-services |
na |
na |
tutorial |
01/22/2018 |
jingwang |
noindex |
[!div class="op_single_selector"]
Note
This article applies to version 1 of Data Factory. If you are using the current version of the Data Factory service, see copy activity tutorial.
This tutorial shows you how to use the Copy Wizard to copy data from an Azure blob storage to an Azure SQL database.
The Azure Data Factory Copy Wizard allows you to quickly create a data pipeline that copies data from a supported source data store to a supported destination data store. Therefore, we recommend that you use the wizard as a first step to create a sample pipeline for your data movement scenario. For a list of data stores supported as sources and as destinations, see supported data stores.
This tutorial shows you how to create an Azure data factory, launch the Copy Wizard, go through a series of steps to provide details about your data ingestion/movement scenario. When you finish steps in the wizard, the wizard automatically creates a pipeline with a Copy Activity to copy data from an Azure blob storage to an Azure SQL database. For more information about Copy Activity, see data movement activities.
Complete prerequisites listed in the Tutorial Overview article before performing this tutorial.
In this step, you use the Azure portal to create an Azure data factory named ADFTutorialDataFactory.
-
Log in to Azure portal.
-
Click Create a resource from the top-left corner, click Data + analytics, and click Data Factory.

-
In the New data factory blade:
-
Enter ADFTutorialDataFactory for the name. The name of the Azure data factory must be globally unique. If you receive the error:
Data factory name “ADFTutorialDataFactory” is not available, change the name of the data factory (for example, yournameADFTutorialDataFactoryYYYYMMDD) and try creating again. See Data Factory - Naming Rules topic for naming rules for Data Factory artifacts.
-
Select your Azure subscription.
-
For Resource Group, do one of the following steps:
-
Select Use existing to select an existing resource group.
-
Select Create new to enter a name for a resource group.
Some of the steps in this tutorial assume that you use the name: ADFTutorialResourceGroup for the resource group. To learn about resource groups, see Using resource groups to manage your Azure resources.
-
-
Select a location for the data factory.
-
Select Pin to dashboard check box at the bottom of the blade.
-
Click Create.

-
-
After the creation is complete, you see the Data Factory blade as shown in the following image:


-
On the Data Factory blade, click Copy data to launch the Copy Wizard.
[!NOTE] If you see that the web browser is stuck at "Authorizing...", disable/uncheck Block third-party cookies and site data setting in the browser settings (or) keep it enabled and create an exception for login.microsoftonline.com and then try launching the wizard again.
-
In the Properties page:
-
Enter CopyFromBlobToAzureSql for Task name
-
Enter description (optional).
-
Change the Start date time and the End date time so that the end date is set to today and start date to five days earlier.
-
Click Next.

-
-
On the Source data store page, click Azure Blob Storage tile. You use this page to specify the source data store for the copy task.

-
On the Specify the Azure Blob storage account page:
-
Enter AzureStorageLinkedService for Linked service name.
-
Confirm that From Azure subscriptions option is selected for Account selection method.
-
Select your Azure subscription.
-
Select an Azure storage account from the list of Azure storage accounts available in the selected subscription. You can also choose to enter storage account settings manually by selecting Enter manually option for the Account selection method, and then click Next.

-
-
On Choose the input file or folder page:
-
Double-click adftutorial (folder).
-
Select emp.txt, and click Choose

-
-
On the Choose the input file or folder page, click Next. Do not select Binary copy.

-
On the File format settings page, you see the delimiters and the schema that is auto-detected by the wizard by parsing the file. You can also enter the delimiters manually for the copy wizard to stop auto-detecting or to override. Click Next after you review the delimiters and preview data.

-
On the Destination data store page, select Azure SQL Database, and click Next.

-
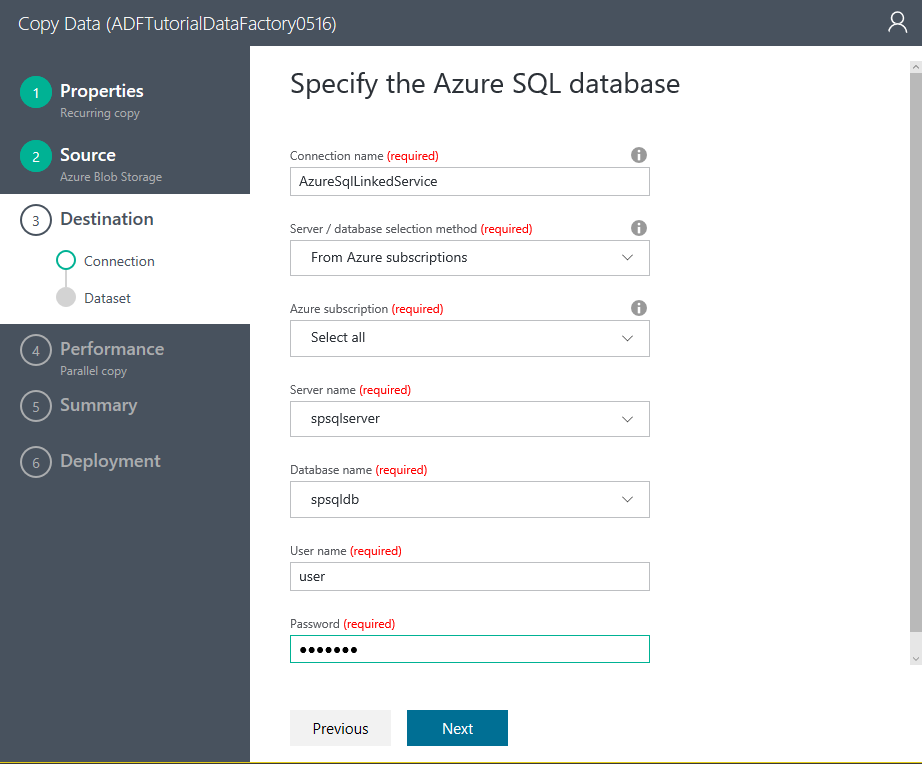
On Specify the Azure SQL database page:
-
Enter AzureSqlLinkedService for the Connection name field.
-
Confirm that From Azure subscriptions option is selected for Server / database selection method.
-
Select your Azure subscription.
-
Select Server name and Database.
-
Enter User name and Password.
-
Click Next.
-
-
On the Table mapping page, select emp for the Destination field from the drop-down list, click down arrow (optional) to see the schema and to preview the data.

-
On the Schema mapping page, click Next.

-
On the Performance settings page, click Next.

-
Review information in the Summary page, and click Finish. The wizard creates two linked services, two datasets (input and output), and one pipeline in the data factory (from where you launched the Copy Wizard).


-
On the Deployment page, click the link:
Click here to monitor copy pipeline.
-
The monitoring application is launched in a separate tab in your web browser.

-
To see the latest status of hourly slices, click Refresh button in the ACTIVITY WINDOWS list at the bottom. You see five activity windows for five days between start and end times for the pipeline. The list is not automatically refreshed, so you may need to click Refresh a couple of times before you see all the activity windows in the Ready state.
-
Select an activity window in the list. See the details about it in the Activity Window Explorer on the right.

Notice that the dates 11, 12, 13, 14, and 15 are in green color, which means that the daily output slices for these dates have already been produced. You also see this color coding on the pipeline and the output dataset in the diagram view. In the previous step, notice that two slices have already been produced, one slice is currently being processed, and the other two are waiting to be processed (based on the color coding).
For more information on using this application, see Monitor and manage pipeline using Monitoring App article.


In this tutorial, you used Azure blob storage as a source data store and an Azure SQL database as a destination data store in a copy operation. The following table provides a list of data stores supported as sources and destinations by the copy activity:
[!INCLUDE data-factory-supported-data-stores]
For details about fields/properties that you see in the copy wizard for a data store, click the link for the data store in the table.