A tool for writing programs systematically using check-expects (unit tests) in the Beginning Student Language.
Two sentences describing the features.
With the Table Tool, you can write check-expects, test out different formulas, and export a combined program. The tool fully supports structure and constant definitions, pseudo-recursion, and check-expect imports.
"I want to use this now!" : http://cedar.sice.indiana.edu:35888/Beginning-Student-Tables/
"Let me run on this on my own machine first..." :
- Clone this repository
- Install npm (if you think you already have it run
npm -vin your terminal):Or whichever way you install packages on your OS.sudo apt install npm - Go to your project directory
cd path/to/repo/main/ - Install the dependencies:
npm install - Start a local server:
npm start - In your preferred browser, open the link generated in your terminal.
Already familiar with the Beginning Student Language? Great! That means you're probably also already familiar with check-expects. This tool allows you to write and test different formulas with your check-expects easily! ...
Never seen this language before? No worries! Beginning Student Language check-expects are just like unit tests. The BSL Table tool allows you to design functions and run unit tests on them. To get started with BSL's paranthesized syntax, refer to the Parenthesized Syntax section below! ...
This section will guide you through using the Table Tool. The steps to use it follow the "design recipe". The design recipe is a sequence of steps to take to systematically write and orgnaize a program. You can learn more about it in Section 6.1 of Part I in "How to Design Programs".
This section tells the user about the layout of the table tool: what the name field is, signature field, purpose, inputs, params, want, formula and etc...
Below is a breakdown of the layout of the table tool, and how to use them.
- Definitions Area this is where you can define constants, functions, or structures
- Check-Expect Area write your check-expects here, then add them to your tables using the 'import button'
Table Header
- 'Table Name' cell where you will write the name of the function you're writing
- 'Signature' cell where you will write the signature (same as contract) of the function: the input types and output type
- 'Purpose' cell as the name implies, this is where you will write the purpose of the function
Table Body
-
Paramter cell this is where you name the inputs to your function, add more by typing into the green 'dummy cell' next to it
-
Formula cell here you can write arithmetic which the table will evaluate using your inputs, to start making a new formula, start writing in the green 'dummy cell'.
-
Input cell the inputs to your function, add more by typing into the green 'dummy cell' next to it
-
Want cell this is where you will type the expected value for the given input in that row
-
Output cell this is where the output of your formulas will appear, if output is not evaluated it will be gray, if there is an error it will appear pink
-
Language dropdown you can select to either use BSL or BSL with list abbreviations
-
Show Combined Program click the checkbox to generate the BSL code for your tables
An image over here highlighting the different components of the table tool
It's important to remember the colors used by the table:
- Yellow cells indicates new cells, which are ready to be typed into
- Green cells indicates dummy cells, which when typed into will turn into Yellow cells
- Pink cells indiciate that there is an error, this is usually accomponied by an error message somewhere
- Gray cells are unsued by the Table Tool and can be ignored by the user
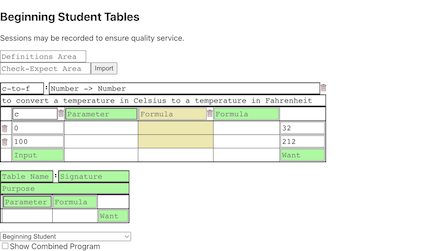
Here are some example cases on how you can use the Beginning Student Tables tool to write functions and solve problems. First let's look at a simple case, where we try to convert a temptertature in celsius to fahrenheit.
- Simple Use
-
The problem: write a function to convert celsius to fahrenheit
-
Ways to start developing a function for this problem:
- Write inputs and wants. Type in the formula you think will work. Adjust the formula to pass all the written examples!
- Write check-expects in the 'check-expect area'. Write a formula. Adjust the formula to pass all the written examples!
-
Let's test it out!
-
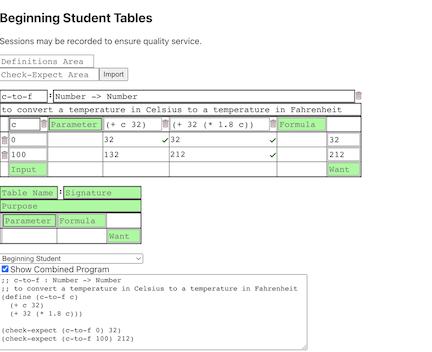
We can generate this BSL code using the 'Show Combined Program' check-box below the last table.
-
This generated code includes our intermediate tries for formulas, so let's make sure to get rid of that before using it elsewhere.
-
The final Table should look something like this:
That was really easy, how about we look at a slightly more complicated example that requires recursion.
- Recursive Use
-
The problem: write a function that sums a list of numbers
-
Ways to start developing the function for this problem:
- Write a single input and want, and write your formula. Use the 'add example' button to fill in the rest of the inputs. Write desired wants for these inputs
- Write check-expects in the 'check-expects area'.
-
Let's test it out!
- To begin, let's fill in the function name, signature and write some examples
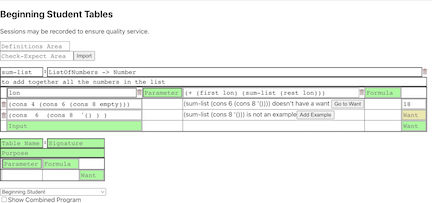
- Since we will be adding all the numbers in the list together, lets try to add the first number of the list with the sum of the rest of the list:
(+ (first lon) (sum (rest lon))) - It looks like we're missing a couple examples for recursion. We can add it by using the 'add example' button in the output cell.
- We get an error saying 'expected a cons, but given empty list'. So let's add a conditional to check wether the given input is a non-empty list or an empty list:
- In the second formula cell:
(cons? lon), and in the formula cell next to that:(empty? lon) - As you can see, we get new formula cells below these:
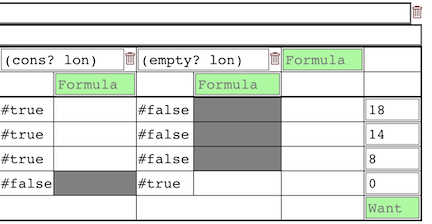
- We can use the formula from the previous steps for the
(cons? lon)case - Since the sum of an empty list is zero, we can just write 0 under the
(empty? lon)case - It works!
-
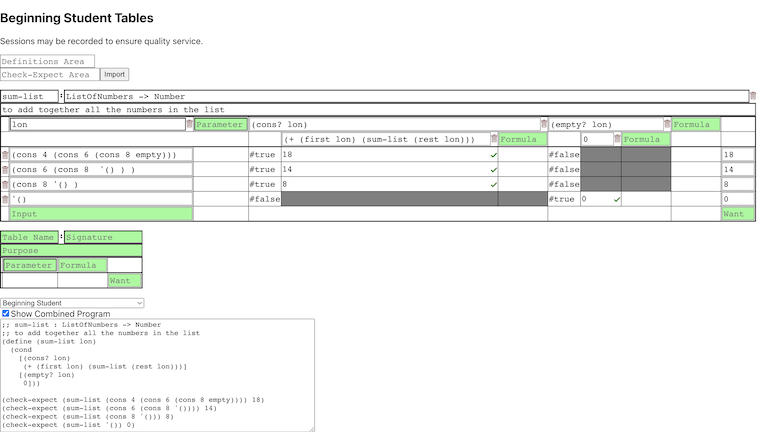
Like before, we can generate the BSL code for this table using the 'Show Combined Proram' check-box below the table. Again, make sure to delete the intermidate steps before using it elsewhere.
-
The final Table should look similar to this:
Some of the things we learned:
- You can import check-expects or manually write inputs/wants
- Adjust formulas in new formula cells
- Generate BSL code using the 'show combined program' checkbox
As described by "How to Design Programs", the Beginning Student Language is:
Quote describing the language here
Here are a few quick things to know about BSL to get you started:
- BSL uses parenthsized prefix notation syntax:
- Operators come before the operands:
(operator operand-one operand-two)- So, adding five and two:
(+ 5 2) - Strings are specified with double quotes:
- Variables are assigned using the
definefunction:- Assigning the value 5 to x :
(define x 5) - Lists can be defined in two ways:
- using
consto define a list of elements, one and two (more on this below) :
(cons 1 (cons 2 empty))- using the abbreviated
listsyntax to define a list of elemnts, one and two:
(list 1 2)- note that spaces are used instead of commas
- Only the first and the 'rest' of the elements can be accessed in a list:
(first (cons 1 (cons 2 (cons empty))))will return1(rest (cons 1 (cons 2 (cons empty))))will return(cons 2 (cons empty))
- using
- Unit tests can be written using the
check-expectfunction (more on this below):- calls the specified function and compares it with specified output:
(check-expect (+ 5 2) 7)- the above
check-expectwill be#truesince 5 plus 2 is 7 - specifically, the inputs to
+are 5 and 2, and the 'want' for it is 7
Let's take a closer look at the important features of BSL.
-
Functions more on using/defining functions
-
Constants and Variables more on variables
-
Lists more on lists here
-
Unit Tests/Check-expects more on unit tests here
-
Structures more on structures here
-
Primitives
- These are the built-in operations that BSL supports
- Some of these are the basic arithmetic operators such as
+,-,*,/and even operations to convert a string to number, likestring->number - The full list of the primitives supported by the Table tool can be found here: SupportedPrimitives.txt
- If you would like to expand on this list, please see the For Developers section
If you want to learn more about BSL, visit the official documentation: https://docs.racket-lang.org/htdp-langs/beginner.html
Two line description on development.
In this section we will cover the project structure, and then how to add some features.
This application is written in TypeScript using React.
The project consisits of three importnat parts. The main App component, the table components, and the interpereter. The App component is at the top of the program hierarchy and either directly or inderectly interacts with almost all other sections of the program.
< breakdown of what App.tsx does and how >
< breakdown of the funcionality of several of the components that make up the table >
< breakdown of the how the interpreter is written >
- input-definitions.ts - this file contains the data definitions for the Table. There are two sections of this file: the actual Types and the type-guards.
You can find more extensive documentation inside the files.
Testing is done with the Jest javascript library and utilizing Enzyme.
Here are a couple examples of adding features to the Table Tool to get you started on development!
- Adding a Function
- We'll add a function that returns the first character of a given string, let's call it
first-char - Functions are part of the interpreter, so open `/path/to/prototypes/two/src/interpreter.js' in your IDE
- To begin, let's define a new function, which will handle the logic for
first-char:function firstChar(args) { // logic here... }
- You can note two important detials here,
firstChartakes 'args' as a paramter, and that it returns an object with a value and a type. We'll cover the latter a bit later. - when this function will be called the operands are passed as paramters, that is,
argswill be the operands to our new functionfirst-char. So in our case,argsshould be a string. - First, let's check that we only get one operand, this means that the length of
argsshould be 1. Otherwise, we should throw an Error. - It's also a good iea to check that operand is a string. We can do this by using a type-check. This is what the logic inside
firstCharshould currently look like:// check argument length if (args.length != 1) { throw new Error('arity mismatch'); } // check function operand types typeCheck(args[0], [RSTRING_T]);
RSTRING_Tis the corresponding type to a string in our interpreter < this should be covered in the above sections ... >- Now its time to actually perform what we want
first-charto do! - To get the first character of a string, we can simply call substring on the given string, making sure to check that it has one character at least:
let str = args[0];
let value;
if (str.length > 0) {
   value = str.substring(0, 1);
} else {
   value = "";
}

// same as: value = str.length > 0 ? str.substring(0, 1) : "";
- Keep in mind that this is function will be evaluted by our interpreter, so let's return it in accordingly:
return {value: value , type: RSTRING_T};
- This is what the body of
firstCharshould look like:// check argument length if (args.length != 1) { throw new Error('arity mismatch'); } // check function operand types typeCheck(args[0], [RSTRING_T]); // calculate return value let str = args[0]; let value; if (str.length > 0) { value = str.substring(0, 1); } else { value = ""; } return {value: value , type: RSTRING_T};
- The last thing we need to do is add it to protoEnv :
protoEnv = [
   ...
   { name: 'first-char', binding: { type: RFUNC_T, value: firstChar } }
];
- Functions inside the
protoEnvwill be "built-in" so the user need not define them in the Table tool - Congrats! You have successfully added a new function to the BSL Table Tool!
- We'll add a function that returns the first character of a given string, let's call it
